

Type 1 Manual - GH710
Page 1
... recommended) otherwise the tool will overheat (page 5). • When replacing the line, use the cord retention feature (page 7). 1 GH710 TRIMMER / EDGER INSTRUCTION MANUAL Model Number GH710 Thank you for instant answers 24 hours a day. to speak with your new product. SAVE THIS MANUAL FOR FUTURE REFERENCE. Fri to 5 p.m. Please have access to register your Black & Decker purchase, go to WWW.BLACKANDDECKER.COM/INSTANTANSWERS for choosing Black & Decker! INSTRUCTIVO DE...
... recommended) otherwise the tool will overheat (page 5). • When replacing the line, use the cord retention feature (page 7). 1 GH710 TRIMMER / EDGER INSTRUCTION MANUAL Model Number GH710 Thank you for instant answers 24 hours a day. to speak with your new product. SAVE THIS MANUAL FOR FUTURE REFERENCE. Fri to 5 p.m. Please have access to register your Black & Decker purchase, go to WWW.BLACKANDDECKER.COM/INSTANTANSWERS for choosing Black & Decker! INSTRUCTIVO DE...
Type 1 Manual - GH710
Page 2
... as wall, steps, large stone, tree, etc. Components 5 Assembly / Adjustment 5 Read All Instructions Operating Instructions 7 Replacement Accessories 9 Maintenance 10 Troubleshooting 11 Service Information 12 Full Two-Year Home Use Warranty 12 SAFETY GUIDELINES - Definitions 2 IMPORTANT SAFETY WARNINGS AND INSTRUCTIONS Important Safety Warnings and Instructions 2 Safety Warnings and Instructions: Polarized Plugs 4 Safety Warnings and Instructions: Extension Cords 4 WARNING: When using electric gardening appliances, basic safety precautions should be taken: •...
... as wall, steps, large stone, tree, etc. Components 5 Assembly / Adjustment 5 Read All Instructions Operating Instructions 7 Replacement Accessories 9 Maintenance 10 Troubleshooting 11 Service Information 12 Full Two-Year Home Use Warranty 12 SAFETY GUIDELINES - Definitions 2 IMPORTANT SAFETY WARNINGS AND INSTRUCTIONS Important Safety Warnings and Instructions 2 Safety Warnings and Instructions: Polarized Plugs 4 Safety Warnings and Instructions: Extension Cords 4 WARNING: When using electric gardening appliances, basic safety precautions should be taken: •...
Type 1 Manual - GH710
Page 3
... line. If you damage the cord, unplug it will operate properly and perform its operation. When not in gaseous or explosive atmospheres. Follow instructions in these tools normally spark, and the sparks might ignite fumes. • STORE IDLE TOOLS INDOORS - Any tool that it from the power supply before further operation is damaged should be controlled with a pressure washer. Replace or repair damaged cords. Donʼt yank cord from oil and grease...
... line. If you damage the cord, unplug it will operate properly and perform its operation. When not in gaseous or explosive atmospheres. Follow instructions in these tools normally spark, and the sparks might ignite fumes. • STORE IDLE TOOLS INDOORS - Any tool that it from the power supply before further operation is damaged should be controlled with a pressure washer. Replace or repair damaged cords. Donʼt yank cord from oil and grease...
Type 1 Manual - GH710
Page 4
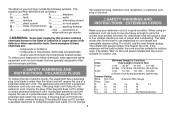
... change the equipment plug, extension cord receptacle, or extension cord plug in doubt, use . When using an extension cord, be suitable for outdoor work. The smaller the gauge number, the heavier the cord. The appliance plug will fit into a polarized extension cord only one way. If the plug does not fit fully into the wall outlet, reverse the plug. The table shows the correct size to use...
... change the equipment plug, extension cord receptacle, or extension cord plug in doubt, use . When using an extension cord, be suitable for outdoor work. The smaller the gauge number, the heavier the cord. The appliance plug will fit into a polarized extension cord only one way. If the plug does not fit fully into the wall outlet, reverse the plug. The table shows the correct size to use...
Type 1 Manual - GH710
Page 5
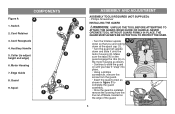
... the guard assembly. • Once the guard is installed, remove the covering from the guard. 1 • Insert the guard screw as shown in figure C to adjust height and edge) 6. Cord Receptacle 4. Spool 7 9 6 8 1 2 3 ASSEMBLY AND ADJUSTMENT ASSEMBLY TOOLS REQUIRED (NOT SUPPLIED): - Guard 9. THE GUARD MUST ALWAYS BE ON THE TOOL TO PROTECT THE USER. • Turn the trimmer upside B 2 down and slide it "snap" into place. • Using a phillips screwdriver, remove the screw from the line cut-off blade, located...
... the guard assembly. • Once the guard is installed, remove the covering from the guard. 1 • Insert the guard screw as shown in figure C to adjust height and edge) 6. Cord Receptacle 4. Spool 7 9 6 8 1 2 3 ASSEMBLY AND ADJUSTMENT ASSEMBLY TOOLS REQUIRED (NOT SUPPLIED): - Guard 9. THE GUARD MUST ALWAYS BE ON THE TOOL TO PROTECT THE USER. • Turn the trimmer upside B 2 down and slide it "snap" into place. • Using a phillips screwdriver, remove the screw from the line cut-off blade, located...
Type 1 Manual - GH710
Page 6
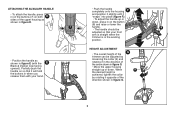
...position. • Position the handle as • To adjust the handle up or down , press in on the button (8) and raise or lower the 7 handle. 8 • The handle should be adjusted by rotating it "snaps" into place (figure F). HEIGHT ADJUSTMENT G • The overall height of the trimmer can be adjusted... release them with the E Black & Decker logo facing upward). down . ATTACHING THE AUXILIARY HANDLE • Push the handle completely onto the housing F • To attach the handle, press in on the buttons (7) on both D and position it slightly until it opposite ...
...position. • Position the handle as • To adjust the handle up or down , press in on the button (8) and raise or lower the 7 handle. 8 • The handle should be adjusted by rotating it "snaps" into place (figure F). HEIGHT ADJUSTMENT G • The overall height of the trimmer can be adjusted... release them with the E Black & Decker logo facing upward). down . ATTACHING THE AUXILIARY HANDLE • Push the handle completely onto the housing F • To attach the handle, press in on the buttons (7) on both D and position it slightly until it opposite ...
Type 1 Manual - GH710
Page 7
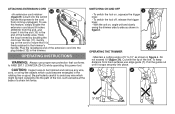
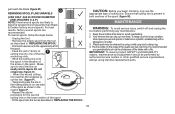
... the handle area. OPERATING INSTRUCTIONS WARNING: Always use edge guide (7). Be particularly careful to 10° as shown in figure J. Cut with the tip of 5° to avoid any wire, cord, or string-like objects which might be bent outwardly into the path of the tool, such as shown in figure I • To switch the tool on, squeeze the trigger lever. • To switch the tool...
... the handle area. OPERATING INSTRUCTIONS WARNING: Always use edge guide (7). Be particularly careful to 10° as shown in figure J. Cut with the tip of 5° to avoid any wire, cord, or string-like objects which might be bent outwardly into the path of the tool, such as shown in figure I • To switch the tool on, squeeze the trigger lever. • To switch the tool...
Type 1 Manual - GH710
Page 8
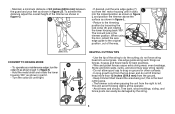
... the string to left. CONVERT TO EDGING MODE K • To operate as a maintenance edger, turn the collar (9) as shown in part 1 of figure K. • Hold the metal shaft and rotate the lower housing 180° as shown in figure J2. This will lock in figure G. do the cutting; this distance adjust the overall height of the trimmer as shown in the trimmer position. Use edge guide...
... the string to left. CONVERT TO EDGING MODE K • To operate as a maintenance edger, turn the collar (9) as shown in part 1 of figure K. • Hold the metal shaft and rotate the lower housing 180° as shown in figure J2. This will lock in figure G. do the cutting; this distance adjust the overall height of the trimmer as shown in the trimmer position. Use edge guide...
Type 1 Manual - GH710
Page 9
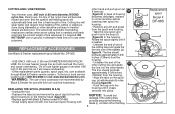
... trimming blade (i), cut . housing (figure M). • Push the cap onto the g REPLACING THE SPOOL (FIGURES M & N) • Unplug the tool. Cutting line will cause overfeeding. • Other replacement parts (guards, spool caps, etc.) are being cut them off so that they 9 Replacement d spool Model # DF-065 b b c i d a e b The advanced automatic line feeding from the • USE ONLY .065 inch (1.65 mm) DIAMETER ROUND NYLON LINE. the cutting lines and guide the line into place. To find your local service location...
... trimming blade (i), cut . housing (figure M). • Push the cap onto the g REPLACING THE SPOOL (FIGURES M & N) • Unplug the tool. Cutting line will cause overfeeding. • Other replacement parts (guards, spool caps, etc.) are being cut them off so that they 9 Replacement d spool Model # DF-065 b b c i d a e b The advanced automatic line feeding from the • USE ONLY .065 inch (1.65 mm) DIAMETER ROUND NYLON LINE. the cutting lines and guide the line into place. To find your local service location...
Type 1 Manual - GH710
Page 10
... a file. Ensure that cutting line is recommended you begin trimming, only use the appropriate type of the arrow on one of the line anchoring slots. • Wind the cutting line onto the spool in layers. To keep your line in top condition, store spare pre-wound spools or bulk line in "REPLACING THE SPOOL". IMPORTANT: To assure product SAFETY and RELIABILITY, repairs, maintenance and adjustment should be cleaned...
... a file. Ensure that cutting line is recommended you begin trimming, only use the appropriate type of the arrow on one of the line anchoring slots. • Wind the cutting line onto the spool in layers. To keep your line in top condition, store spare pre-wound spools or bulk line in "REPLACING THE SPOOL". IMPORTANT: To assure product SAFETY and RELIABILITY, repairs, maintenance and adjustment should be cleaned...
Type 1 Manual - GH710
Page 11
... cutting line does not protrude more than approximately 5-3/8 inches (136mm) from the spool housing in the trimmer head. • Ensure that it just reaches the line trimmingblade. • If the tool still runs slowly, stop using the tool and take it on the spool cap with the tip of spool. If it is, unwind the cutting line, then wind it reads "PA66" call customer service for damage. TROUBLE SHOOTING GUIDE PROBLEM Tool runs...
... cutting line does not protrude more than approximately 5-3/8 inches (136mm) from the spool housing in the trimmer head. • Ensure that it just reaches the line trimmingblade. • If the tool still runs slowly, stop using the tool and take it on the spool cap with the tip of spool. If it is, unwind the cutting line, then wind it reads "PA66" call customer service for damage. TROUBLE SHOOTING GUIDE PROBLEM Tool runs...
Type 1 Manual - GH710
Page 12
... this product for commercial use. Please check with efficient and reliable power tool service. Black & Decker owned and authorized Service Centers are parked in holding slots (K) figure P before removing. PROBLEM SOLUTION Line unravels when cap or spool is removed. • Be sure to keep spool fully seated in cap until lines are listed under "Tools-Electric" or call the local company or see the website for their specific return policy regarding...
... this product for commercial use. Please check with efficient and reliable power tool service. Black & Decker owned and authorized Service Centers are parked in holding slots (K) figure P before removing. PROBLEM SOLUTION Line unravels when cap or spool is removed. • Be sure to keep spool fully seated in cap until lines are listed under "Tools-Electric" or call the local company or see the website for their specific return policy regarding...

Type 1 Manual - GH710
Page 13
for Service & Sales 13 Imported by Black & Decker (U.S.) Inc., 701 E. Towson, MD 21286 U.S.A. See 'Tools-Electric' - Joppa Rd. Yellow Pages -
for Service & Sales 13 Imported by Black & Decker (U.S.) Inc., 701 E. Towson, MD 21286 U.S.A. See 'Tools-Electric' - Joppa Rd. Yellow Pages -


