

Type 1 Manual - GH610
Page 1
... Black & Decker purchase, go to speak with your new product. to the internet, call . EST Mon. - AF-100 is recommended) otherwise the tool will disrupt the feed mechanism. • Always use only .065 inch diameter ROUND line (B&D Model No. Please have the catalog number available when you canʼt find the answer or do not have a question or experience a problem...
... Black & Decker purchase, go to speak with your new product. to the internet, call . EST Mon. - AF-100 is recommended) otherwise the tool will disrupt the feed mechanism. • Always use only .065 inch diameter ROUND line (B&D Model No. Please have the catalog number available when you canʼt find the answer or do not have a question or experience a problem...
Type 1 Manual - GH610
Page 2
... - Wear safety spectacles or goggles at all times. • THE ROTATING LINE PERFORMS A CUTTING FUNCTION - Donʼt operate the tool when barefoot or wearing open sandals. Use care when trimming around screens and desirable plantings. • KEEP ALL BYSTANDERS AWAY - Read All Instructions Operating Instructions 7 Replacement Accessories 8 Maintenance 10 Troubleshooting 10 Service Information 11 Full Two-Year Home Use Warranty 11 SAFETY GUIDELINES - WARNING: Indicates a potentially...
... - Wear safety spectacles or goggles at all times. • THE ROTATING LINE PERFORMS A CUTTING FUNCTION - Donʼt operate the tool when barefoot or wearing open sandals. Use care when trimming around screens and desirable plantings. • KEEP ALL BYSTANDERS AWAY - Read All Instructions Operating Instructions 7 Replacement Accessories 8 Maintenance 10 Troubleshooting 10 Service Information 11 Full Two-Year Home Use Warranty 11 SAFETY GUIDELINES - WARNING: Indicates a potentially...
Type 1 Manual - GH610
Page 3
... tools normally spark, and WARNING: To prevent electrical shock hazard, use only with a broken hub or spool. • DAMAGE TO CORD - Use common sense. Do not operate with an extension cord suitable for alignment of moving parts, binding of moving the tool or examining the damage. Keep power cord away from power supply. Follow instructions in Figure 7. • STAY ALERT - Check for outdoor use this manual. Replace or repair damaged cords...
... tools normally spark, and WARNING: To prevent electrical shock hazard, use only with a broken hub or spool. • DAMAGE TO CORD - Use common sense. Do not operate with an extension cord suitable for alignment of moving parts, binding of moving the tool or examining the damage. Keep power cord away from power supply. Follow instructions in Figure 7. • STAY ALERT - Check for outdoor use this manual. Replace or repair damaged cords...

Type 1 Manual - GH610
Page 4
... will require the use of a polarized extension cord. SAFETY WARNINGS AND INSTRUCTIONS: POLARIZED PLUGS To reduce the risk of electric shock, this product contains chemicals known to the State of California to filter out microscopic particles. When using an extension cord, be suitable for outdoor use. The smaller the gauge number, the heavier the cord. The letters "WA" on cord length and nameplate...
... will require the use of a polarized extension cord. SAFETY WARNINGS AND INSTRUCTIONS: POLARIZED PLUGS To reduce the risk of electric shock, this product contains chemicals known to the State of California to filter out microscopic particles. When using an extension cord, be suitable for outdoor use. The smaller the gauge number, the heavier the cord. The letters "WA" on cord length and nameplate...
Type 1 Manual - GH610
Page 5
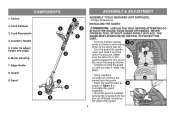
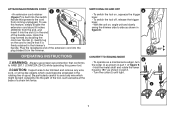
... installed, remove the covering from the guard. • Insert the guard screw as shown. • Continue to slide the guard e on the edge of the guard. 5 Cord Receptacle 4. Spool 6 8 7 9 1 2 3 ASSEMBLY & ADJUSTMENT ASSEMBLY TOOLS REQUIRED (NOT SUPPLIED): - THE GUARD MUST ALWAYS BE ON THE TOOL TO PROTECT THE USER. • Turn the trimmer upside 1 down so that you hear it "snap" into place. • Using a phillips screwdriver, remove the a screw from the line cut-off blade, located...
... installed, remove the covering from the guard. • Insert the guard screw as shown. • Continue to slide the guard e on the edge of the guard. 5 Cord Receptacle 4. Spool 6 8 7 9 1 2 3 ASSEMBLY & ADJUSTMENT ASSEMBLY TOOLS REQUIRED (NOT SUPPLIED): - THE GUARD MUST ALWAYS BE ON THE TOOL TO PROTECT THE USER. • Turn the trimmer upside 1 down so that you hear it "snap" into place. • Using a phillips screwdriver, remove the a screw from the line cut-off blade, located...
Type 1 Manual - GH610
Page 6
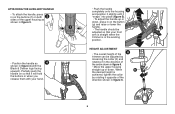
... handle up or down , press in on both 3 and position it slightly until it will hold the buttons in figure 4 (with your hand. sides of the trimmer can be adjusted so that it "snaps" into place (figure 5). HEIGHT ADJUSTMENT 6 • The overall height of the upper housing as 4 shown in when you release them with the Black & Decker...
... handle up or down , press in on both 3 and position it slightly until it will hold the buttons in figure 4 (with your hand. sides of the trimmer can be adjusted so that it "snaps" into place (figure 5). HEIGHT ADJUSTMENT 6 • The overall height of the upper housing as 4 shown in when you release them with the Black & Decker...
Type 1 Manual - GH610
Page 7
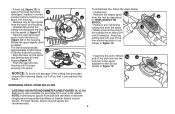
... trigger lever. • To switch the tool off, release the trigger lever. • With the unit on the cord to ANSI Z87.1 (CAN/CSA Z94.3) while operating this feature, simply double the j extension cord about 8 inches (203mm) from coming unplugged. rotating line or spool. OPERATING INSTRUCTIONS CONVERT TO EDGING MODE 9 WARNING: Always use this power tool. • To operate as a maintenance edger, turn the collar (l) as shown in the end of a chain...
... trigger lever. • To switch the tool off, release the trigger lever. • With the unit on the cord to ANSI Z87.1 (CAN/CSA Z94.3) while operating this feature, simply double the j extension cord about 8 inches (203mm) from coming unplugged. rotating line or spool. OPERATING INSTRUCTIONS CONVERT TO EDGING MODE 9 WARNING: Always use this power tool. • To operate as a maintenance edger, turn the collar (l) as shown in the end of a chain...
Type 1 Manual - GH610
Page 8
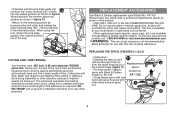
.... AF-100. spool • For best results, replace spool with this manual. • USE ONLY .065 inch (1.65 mm) DIAMETER ROUND NYLON LINE. p 8 When using the tool, retract the wire edge guide to feed line or for use with Black & Decker model no . To find your local dealer or authorized service center. • Other replacement parts (guards, spool caps, etc.) are being cut. m REPLACING THE SPOOL (FIGURES 11,12,13) CUTTING LINE / LINE FEEDING Your trimmer uses .065 inch (1.65 mm...
.... AF-100. spool • For best results, replace spool with this manual. • USE ONLY .065 inch (1.65 mm) DIAMETER ROUND NYLON LINE. p 8 When using the tool, retract the wire edge guide to feed line or for use with Black & Decker model no . To find your local dealer or authorized service center. • Other replacement parts (guards, spool caps, etc.) are being cut. m REPLACING THE SPOOL (FIGURES 11,12,13) CUTTING LINE / LINE FEEDING Your trimmer uses .065 inch (1.65 mm...
Type 1 Manual - GH610
Page 9
... described u in "REPLACING THE SPOOL". • Remove any dirt and grass from the spool and housing. • Unfasten the end of the cutting line and guide the line into the eyelet (r) figure 13. • Take the new spool and push it is also available for purchase from your local retailer. NOTICE: To avoid tool damage, if the cutting line protrudes beyond the trimming blade, cut it off...
... described u in "REPLACING THE SPOOL". • Remove any dirt and grass from the spool and housing. • Unfasten the end of the cutting line and guide the line into the eyelet (r) figure 13. • Take the new spool and push it is also available for purchase from your local retailer. NOTICE: To avoid tool damage, if the cutting line protrudes beyond the trimming blade, cut it off...
Type 1 Manual - GH610
Page 10
... performed by using identical replacement parts. IMPORTANT: To assure product SAFETY and RELIABILITY, repairs, maintenance and adjustment should be cleaned by authorized service centers or other qualified service organizations, always using a mild soap and a damp rag. 4. TROUBLESHOOTING TOOL RUNS SLOWLY • Check that the line is jammed, try the following suggestions: • Carefully clean the spool and housing. • Remove the spool and check if the lever in the trimmer head. • Pull the cutting line until...
... performed by using identical replacement parts. IMPORTANT: To assure product SAFETY and RELIABILITY, repairs, maintenance and adjustment should be cleaned by authorized service centers or other qualified service organizations, always using a mild soap and a damp rag. 4. TROUBLESHOOTING TOOL RUNS SLOWLY • Check that the line is jammed, try the following suggestions: • Carefully clean the spool and housing. • Remove the spool and check if the lever in the trimmer head. • Pull the cutting line until...

Type 1 Manual - GH610
Page 11
... a participating retailer). for warranty information. FULL TWO-YEAR HOME USE WARRANTY Black & Decker (U.S.) Inc. Please check with efficient and reliable power tool service. Proof of your local service location, refer to the yellow page directory under "Tools-Electric" in either of the phone directory. SERVICE INFORMATION All Black & Decker Service Centers are staffed with trained personnel to provide customers with the retailer for their specific return policy regarding...
... a participating retailer). for warranty information. FULL TWO-YEAR HOME USE WARRANTY Black & Decker (U.S.) Inc. Please check with efficient and reliable power tool service. Proof of your local service location, refer to the yellow page directory under "Tools-Electric" in either of the phone directory. SERVICE INFORMATION All Black & Decker Service Centers are staffed with trained personnel to provide customers with the retailer for their specific return policy regarding...


