
Setup Manual
Page 1
... tive companies . All the brand and produc t names are designed to provide reasonable protec tion against harmful interference in a residential installation. There is subject to be res ponsible for any purpose. MCP6P-M2 Setup Manual FCC Information and Copyright This equipment has been tes ted and found in this user's manual is no...
... tive companies . All the brand and produc t names are designed to provide reasonable protec tion against harmful interference in a residential installation. There is subject to be res ponsible for any purpose. MCP6P-M2 Setup Manual FCC Information and Copyright This equipment has been tes ted and found in this user's manual is no...
Setup Manual
Page 2
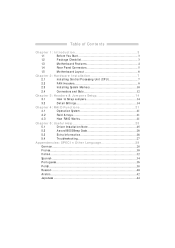
......3 1.2 Package Checklist...3 1.3 Motherboard Features ...4 1.4 Rear Panel Connectors ...5 1.5 Motherboard Layout ...6 Chapter 2: Hardware Installation...7 2.1 Installing Central Processing Unit (CPU) ...7 2.2 FAN Headers...9 2.3 Installing System Memory...10 2.4 Connectors and Slots ...12 Chapter 3: Headers & Jumpers Setup...14 3.1 How to Setup Jumpers... 4.1 Operation System...21 4.2 Raid Arrays...21 4.3 How RAID Works...21 Chapter 5: Useful Help ...25 5.1 Driver Installation Note ...25 5.2 Award BIOS Beep Code ...26 5.3 Extra Information...26 5.4 Troubleshooting...27 A ppendencies: SPEC In...
......3 1.2 Package Checklist...3 1.3 Motherboard Features ...4 1.4 Rear Panel Connectors ...5 1.5 Motherboard Layout ...6 Chapter 2: Hardware Installation...7 2.1 Installing Central Processing Unit (CPU) ...7 2.2 FAN Headers...9 2.3 Installing System Memory...10 2.4 Connectors and Slots ...12 Chapter 3: Headers & Jumpers Setup...14 3.1 How to Setup Jumpers... 4.1 Operation System...21 4.2 Raid Arrays...21 4.3 How RAID Works...21 Chapter 5: Useful Help ...25 5.1 Driver Installation Note ...25 5.2 Award BIOS Beep Code ...26 5.3 Extra Information...26 5.4 Troubleshooting...27 A ppendencies: SPEC In...
Setup Manual
Page 3
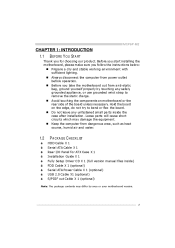
... the edge , do not try to remove the static charge. MCP6P-M2 CHAPTER 1: INTRODUCTION 1.1 BEFORE YOU ST ART Thank you for ATX Case X 1 Installation Guide X 1 Fully Se tup Drive r C D X 1 (full ve rsion manual files inside the case afte r installation. Be fore you start installing the mothe rboard, please make sure you take the mothe rboard...
... the edge , do not try to remove the static charge. MCP6P-M2 CHAPTER 1: INTRODUCTION 1.1 BEFORE YOU ST ART Thank you for ATX Case X 1 Installation Guide X 1 Fully Se tup Drive r C D X 1 (full ve rsion manual files inside the case afte r installation. Be fore you start installing the mothe rboard, please make sure you take the mothe rboard...
Setup Manual
Page 7
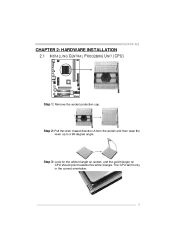
Step 3: Look for the white triangle on socket, and the gold triangle on CPU should point towards this white triangle. The CPU will fit only in the correct orientation. 7 MCP6P-M2 CHAPTER 2: HARDWARE INSTALLATION 2.1 INST ALLING CENT RAL PROCESSING UNIT (CPU) Step 1: Remove the socket protection cap. Step 2: Pull the lever toward direction A from the socket and then raise the lever up to a 90-degree angle.
Step 3: Look for the white triangle on socket, and the gold triangle on CPU should point towards this white triangle. The CPU will fit only in the correct orientation. 7 MCP6P-M2 CHAPTER 2: HARDWARE INSTALLATION 2.1 INST ALLING CENT RAL PROCESSING UNIT (CPU) Step 1: Remove the socket protection cap. Step 2: Pull the lever toward direction A from the socket and then raise the lever up to a 90-degree angle.
Setup Manual
Page 8
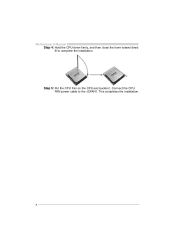
Step 5: Put the CPU Fan on the CPU and buckle it. Motherboard Manual Step 4: Hold the CPU down firmly, and then close the lever toward direct B to the JCFAN1. This completes the installation. 8 Connect the CPU FAN power cable to complete the installation.
Step 5: Put the CPU Fan on the CPU and buckle it. Motherboard Manual Step 4: Hold the CPU down firmly, and then close the lever toward direct B to the JCFAN1. This completes the installation. 8 Connect the CPU FAN power cable to complete the installation.
Setup Manual
Page 11
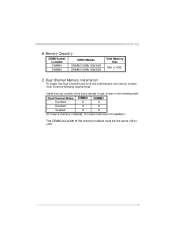
Memory Capacity DIMM Socket Location DIMMA1 DIMMB1 DDR2 Module 256MB/512MB/1GB/2GB 256MB/512MB/1GB/2GB Total Memory Size Max is 4GB. C. Dual Channel Memory installation To trigger the Dual Channel f unction of the same density in pair, shown in the f ollowing table. MCP6P-M2 B. Dual Channel Status Disabled Disabled Enabled DIMMA1 O X O DIMMB1 X O O (O means memory installed, X means memory not installed.) The DRAM bus width of the memory module must meet the following requirements: Install memory module of the motherboard, the memory module must be the same (x8 or x16) 11
Memory Capacity DIMM Socket Location DIMMA1 DIMMB1 DDR2 Module 256MB/512MB/1GB/2GB 256MB/512MB/1GB/2GB Total Memory Size Max is 4GB. C. Dual Channel Memory installation To trigger the Dual Channel f unction of the same density in pair, shown in the f ollowing table. MCP6P-M2 B. Dual Channel Status Disabled Disabled Enabled DIMMA1 O X O DIMMB1 X O O (O means memory installed, X means memory not installed.) The DRAM bus width of the memory module must meet the following requirements: Install memory module of the motherboard, the memory module must be the same (x8 or x16) 11
Setup Manual
Page 25
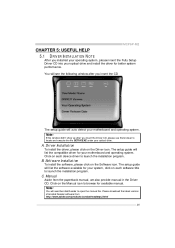
... e download the latest version of Acrobat Reader software from the paperback manual, we also provide manual in the Driver CD. Software Installation To install the software, please click on the Driver icon. C. The setup guide will auto detect your motherboard and operating system. Manual Aside...following window after you ins ert the Driver CD, please use file brows er to launch the installation program. MCP6P-M2 CHAPTER 5: USEFUL HELP 5.1 DRIVER INST ALLAT ION NOT E After you installed your operating system, please insert the Fully Setup Driver CD into your optical drive and...
... e download the latest version of Acrobat Reader software from the paperback manual, we also provide manual in the Driver CD. Software Installation To install the software, please click on the Driver icon. C. The setup guide will auto detect your motherboard and operating system. Manual Aside...following window after you ins ert the Driver CD, please use file brows er to launch the installation program. MCP6P-M2 CHAPTER 5: USEFUL HELP 5.1 DRIVER INST ALLAT ION NOT E After you installed your operating system, please insert the Fully Setup Driver CD into your optical drive and...
Setup Manual
Page 26
... has been activated. Motherboard Manual 5.2 AWARD BIOS BEEP CODE Meaning Video card not found during POST Long beeps every other second No DRAM detected or install 5.3 EXT RA INFORMAT ION If the system shutdown automatically after power on system for seconds. 3.
... has been activated. Motherboard Manual 5.2 AWARD BIOS BEEP CODE Meaning Video card not found during POST Long beeps every other second No DRAM detected or install 5.3 EXT RA INFORMAT ION If the system shutdown automatically after power on system for seconds. 3.
Setup Manual
Page 27
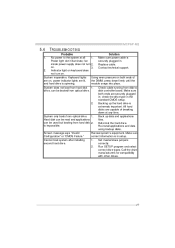
... inf ormation is extremely important. Cannot boot system after installing 1. TROUBLESHOOT ING Probable Solution 1. on . correctly. 2. Call the drive manuf acturers f or compatibility with other drives. 27 Replace cable. Contact technical support. 2. Backing up data and applications System only boots f rom optical driv e. MCP6P-M2 5.4 1. Make sure power cable is No power to...
... inf ormation is extremely important. Cannot boot system after installing 1. TROUBLESHOOT ING Probable Solution 1. on . correctly. 2. Call the drive manuf acturers f or compatibility with other drives. 27 Replace cable. Contact technical support. 2. Backing up data and applications System only boots f rom optical driv e. MCP6P-M2 5.4 1. Make sure power cable is No power to...


