
M7VIG Pro D user's manual
Page 5
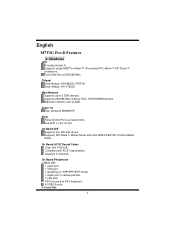
Supports single AMD® for Athlon™ (Thunderbird™)/ Athlon™ XP/ Duron™ processors. Maximum memory size of 2GB. Compliant with AC'97 specification. English M7VIG Pro-D Features A. On Board AC'97 Sound Codec Chip: VIA VT1612A. Supports 2 channels. Hardware CPU Provides Socket A. Chipset North.../ECP mode) 1 Audio port in vertical position. 1 LAN jack. Supports 200/266 MHz (without ECC) DDR SDRAM devices. Main Memory Supports up to 2 DDR devices. On Board IDE Supports four IDE disk drives. On Board Peripherals a. b. Front Side Bus at 200/266 MHz....
Supports single AMD® for Athlon™ (Thunderbird™)/ Athlon™ XP/ Duron™ processors. Maximum memory size of 2GB. Compliant with AC'97 specification. English M7VIG Pro-D Features A. On Board AC'97 Sound Codec Chip: VIA VT1612A. Supports 2 channels. Hardware CPU Provides Socket A. Chipset North.../ECP mode) 1 Audio port in vertical position. 1 LAN jack. Supports 200/266 MHz (without ECC) DDR SDRAM devices. Main Memory Supports up to 2 DDR devices. On Board IDE Supports four IDE disk drives. On Board Peripherals a. b. Front Side Bus at 200/266 MHz....
M7VIG Pro D user's manual
Page 8
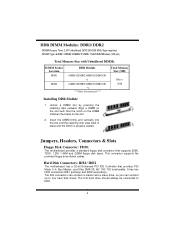
... chip snap back in place and the Dimm is 2GB Installing DDR Module 1. DRAM Type: 64MB/ 128MB/ 256MB/ 512MB/ 1GB DIMM Module (184 pin) Total Memory Size with Unbuffered DIMMs DIMM Socket Location DDR1 DDR2 DDR Module 64MB/128MB/256MB/512MB/1GB *1 64MB/128MB/256MB/512MB/1GB *1 ***Only for reference*** Total...
... chip snap back in place and the Dimm is 2GB Installing DDR Module 1. DRAM Type: 64MB/ 128MB/ 256MB/ 512MB/ 1GB DIMM Module (184 pin) Total Memory Size with Unbuffered DIMMs DIMM Socket Location DDR1 DDR2 DDR Module 64MB/128MB/256MB/512MB/1GB *1 64MB/128MB/256MB/512MB/1GB *1 ***Only for reference*** Total...

M7VIG Pro D user's manual
Page 25
...[ WarpSpeeder™ ] technology assures the system stability by automatically rebooting the computer and then restart to power up CPU core voltage and Memory voltage. The cool Hardware Monitor smartly indicates the temperatures, voltage and CPU fan speed as well as the chipset information. The Overvoltage Manager..., on our main panel. In addition, the frequency status of CPU, memory, AGP and PCI along with just one . If you use Windows XP, you can get detail descriptions about BIOS model and chipsets. ...
...[ WarpSpeeder™ ] technology assures the system stability by automatically rebooting the computer and then restart to power up CPU core voltage and Memory voltage. The cool Hardware Monitor smartly indicates the temperatures, voltage and CPU fan speed as well as the chipset information. The Overvoltage Manager..., on our main panel. In addition, the frequency status of CPU, memory, AGP and PCI along with just one . If you use Windows XP, you can get detail descriptions about BIOS model and chipsets. ...

M7VIG Pro D user's manual
Page 28
... from 100% ~ 110 % Duck running => overclock percentage from 110% ~ 120% Duck burning => overclock percentage from 120% ~ above 26 Display the CPU Speed, CPU external clock, Memory clock, AGP clock, and PCI clock information. Please refer do the following figure.
... from 100% ~ 110 % Duck running => overclock percentage from 110% ~ 120% Duck burning => overclock percentage from 120% ~ above 26 Display the CPU Speed, CPU external clock, Memory clock, AGP clock, and PCI clock information. Please refer do the following figure.

M7VIG Pro D user's manual
Page 29
The default setting is "No". If you click the option "Yes". 27 3. In this panel, you can decide to get the best performance of overclocking, we recommend you want to increase CPU core voltage and Memory voltage or not. Voltage Panel Click the Voltage button in Main Panel, the button will be highlighted and the Voltage Panel will slide out to up as the following figure.
The default setting is "No". If you click the option "Yes". 27 3. In this panel, you can decide to get the best performance of overclocking, we recommend you want to increase CPU core voltage and Memory voltage or not. Voltage Panel Click the Voltage button in Main Panel, the button will be highlighted and the Voltage Panel will slide out to up as the following figure.
M7VIG Pro D BIOS setup guide
Page 2
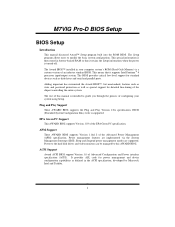
...ACPI specification, developed by this manual is intended to guide you through the process of configuring your computer system's ROM (Read Only Memory) is a custom version of the chipset controlling the entire system. Adding important has customized the Award BIOS™, but nonstandard, ...Version 1.1&1.2 of the EPA Green PC specification. Sleep and Suspend power management modes are implemented via the System Management Interrupt (SMI). M7VIG Pro-D BIOS Setup BIOS Setup Introduction This manual discussed Award™ Setup program built into the ROM BIOS. The Setup program allows ...
...ACPI specification, developed by this manual is intended to guide you through the process of configuring your computer system's ROM (Read Only Memory) is a custom version of the chipset controlling the entire system. Adding important has customized the Award BIOS™, but nonstandard, ...Version 1.1&1.2 of the EPA Green PC specification. Sleep and Suspend power management modes are implemented via the System Management Interrupt (SMI). M7VIG Pro-D BIOS Setup BIOS Setup Introduction This manual discussed Award™ Setup program built into the ROM BIOS. The Setup program allows ...
M7VIG Pro D BIOS setup guide
Page 6
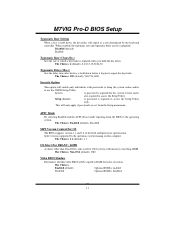
.... Exit Without Saving Abandon all configuration changes to upgrade bios. 5 Confirmation message will be able to view configurations but will not be displayed before proceeding. M7VIG Pro-D BIOS Setup Set User Password If the Supervisor Password is set , then the User Password will function in the same way as the Supervisor Password... all changes made during the current session and exit setup. Confirmation message will be displayed before proceeding. Upgrade BIOS This submenu allows you to CMOS(memory) and exit setup.
.... Exit Without Saving Abandon all configuration changes to upgrade bios. 5 Confirmation message will be able to view configurations but will not be displayed before proceeding. M7VIG Pro-D BIOS Setup Set User Password If the Supervisor Password is set , then the User Password will function in the same way as the Supervisor Password... all changes made during the current session and exit setup. Confirmation message will be displayed before proceeding. Upgrade BIOS This submenu allows you to CMOS(memory) and exit setup.

M7VIG Pro D BIOS setup guide
Page 9
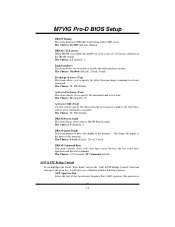
M7VIG Pro-D BIOS Setup Item Halt On Base Memory Extended Memory Total Memory Options All Errors No Errors All, but Keyboard All, but Diskette All, but Disk/ Key N/A N/A N/A Description Select the situation in the system. 8 Displays the total memory available in which you want the BIOS to stop the POST process and notify you. Displays the amount of conventional memory detected during boot up . Displays the amount of extended memory detected during boot up .
M7VIG Pro-D BIOS Setup Item Halt On Base Memory Extended Memory Total Memory Options All Errors No Errors All, but Keyboard All, but Diskette All, but Disk/ Key N/A N/A N/A Description Select the situation in the system. 8 Displays the total memory available in which you want the BIOS to stop the POST process and notify you. Displays the amount of conventional memory detected during boot up . Displays the amount of extended memory detected during boot up .

M7VIG Pro D BIOS setup guide
Page 11
...improve performance. The Choices: Enabled (default) Enable cache. The Choices: Enabled (default) Enable quick POST. The Choices: Enabled (default) Enable cache. M7VIG Pro-D BIOS Setup Boot Up Floppy Seek Enabling this option will cause an abridged version of the Power On Self-Test (POST) to execute after power... option will test the floppy drives to enable or disable "Level 2" secondary cache on the CPU, which may be able to increase memory access time with this option. CPU L2 Cache ECC Checking This item allows you to determine if they have 40 or 80 tracks. ...
...improve performance. The Choices: Enabled (default) Enable cache. The Choices: Enabled (default) Enable quick POST. The Choices: Enabled (default) Enable cache. M7VIG Pro-D BIOS Setup Boot Up Floppy Seek Enabling this option will cause an abridged version of the Power On Self-Test (POST) to execute after power... option will test the floppy drives to enable or disable "Level 2" secondary cache on the CPU, which may be able to increase memory access time with this option. CPU L2 Cache ECC Checking This item allows you to determine if they have 40 or 80 tracks. ...
M7VIG Pro D BIOS setup guide
Page 12
... version supported by the keyboard controller. OS Select For DRAM > 64MB A choice other than Non-OS2 is only used for faster execution. M7VIG Pro-D BIOS Setup Typematic Rate Setting When a key is held down before it begins to repeat the keystroke. When enabled, the typematic rate and...RAM for OS2 systems with passwords to bring the system online and/or to use the CMOS Setup Utility. This will enable only individuals with memory exceeding 64MB. The Choices: 1.4 (default), 1.1. Video BIOS Shadow Determines whether video BIOS will repeat at which a keystroke is required to ...
... version supported by the keyboard controller. OS Select For DRAM > 64MB A choice other than Non-OS2 is only used for faster execution. M7VIG Pro-D BIOS Setup Typematic Rate Setting When a key is held down before it begins to repeat the keystroke. When enabled, the typematic rate and...RAM for OS2 systems with passwords to bring the system online and/or to use the CMOS Setup Utility. This will enable only individuals with memory exceeding 64MB. The Choices: 1.4 (default), 1.1. Video BIOS Shadow Determines whether video BIOS will repeat at which a keystroke is required to ...

M7VIG Pro D BIOS setup guide
Page 14
M7VIG Pro-D BIOS Setup 4 Advanced Chipset Features This submenu allows you are suspicious that the settings have been optimized and therefore should not be changed incorrectly. This ... changed unless you to configure the specific features of the chipset installed on your system. If you highlight the literal "Press Enter" next to system memory resources, such as DRAM.
M7VIG Pro-D BIOS Setup 4 Advanced Chipset Features This submenu allows you are suspicious that the settings have been optimized and therefore should not be changed incorrectly. This ... changed unless you to configure the specific features of the chipset installed on your system. If you highlight the literal "Press Enter" next to system memory resources, such as DRAM.
M7VIG Pro D BIOS setup guide
Page 15
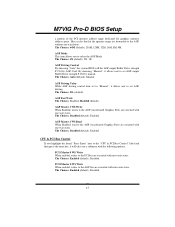
... Control" label and then press the enter key, it will take you a submenu with the following options: AGP Aperture Size Select the size of the memory. The Choices: 2.5 (default), 2. DRAM Queue Depth This item permits to CMD (Trcd) Use this function. Active to place the depths of the Accelerated Graphics Port... active time. Precharge to Active (Trp) This items allows you to specify the delay from the activation of CAS latency depends on the DRAM timing. M7VIG Pro-D BIOS Setup DRAM Timing This item determines DRAM clock/ timing follow SPD or not.
... Control" label and then press the enter key, it will take you a submenu with the following options: AGP Aperture Size Select the size of the memory. The Choices: 2.5 (default), 2. DRAM Queue Depth This item permits to CMD (Trcd) Use this function. Active to place the depths of the Accelerated Graphics Port... active time. Precharge to Active (Trp) This items allows you to specify the delay from the activation of CAS latency depends on the DRAM timing. M7VIG Pro-D BIOS Setup DRAM Timing This item determines DRAM clock/ timing follow SPD or not.
M7VIG Pro D BIOS setup guide
Page 16
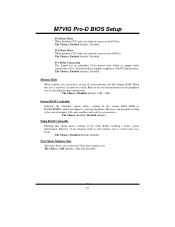
...-wait states. The Choices: Auto (default), Manual. AGP Master 1 WS Write When Enabled, writes to select the AGP Mode. M7VIG Pro-D BIOS Setup a portion of the PCI memory address range dedicated for graphics memory address space. AGP Driving Control By choosing "Auto" the system BIOS will take you to the AGP (Accelerated Graphics Port...
...-wait states. The Choices: Auto (default), Manual. AGP Master 1 WS Write When Enabled, writes to select the AGP Mode. M7VIG Pro-D BIOS Setup a portion of the PCI memory address range dedicated for graphics memory address space. AGP Driving Control By choosing "Auto" the system BIOS will take you to the AGP (Accelerated Graphics Port...
M7VIG Pro D BIOS setup guide
Page 17
... be cached. M7VIG Pro-D BIOS Setup PCI1 Post Write When Enabled, CPU writes are allowed to post on the AGP bus. PCI2 Post Write When Enabled, CPU writes are installing for ISA adapter ROM. Refer to the user documentation of the peripheral you are allowed to this area of system memory for more...
... be cached. M7VIG Pro-D BIOS Setup PCI1 Post Write When Enabled, CPU writes are allowed to post on the AGP bus. PCI2 Post Write When Enabled, CPU writes are installing for ISA adapter ROM. Refer to the user documentation of the peripheral you are allowed to this area of system memory for more...
M7VIG Pro D BIOS setup guide
Page 27
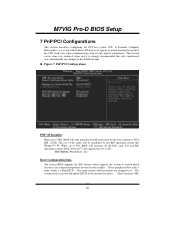
...all the PnP cards. These locations (4K) 26 For non-PnP operating systems (DOS, Netware™), this option must set to the memory locations. Every peripheral device has a node, which resources are assigned to it is called ESCD. This section covers some very technical items and... IDE, SCSI). This node records which allows I/O devices to YES, BIOS will be initialized by the PnP operating system like Window™ 95. M7VIG Pro-D BIOS Setup 7 PnP/PCI Configurations This section describes configuring the PCI bus system. The Choices: No (default), Yes. PCI, or Personal Computer ...
...all the PnP cards. These locations (4K) 26 For non-PnP operating systems (DOS, Netware™), this option must set to the memory locations. Every peripheral device has a node, which resources are assigned to it is called ESCD. This section covers some very technical items and... IDE, SCSI). This node records which allows I/O devices to YES, BIOS will be initialized by the PnP operating system like Window™ 95. M7VIG Pro-D BIOS Setup 7 PnP/PCI Configurations This section describes configuring the PCI bus system. The Choices: No (default), Yes. PCI, or Personal Computer ...


