Update Manual
Page 1
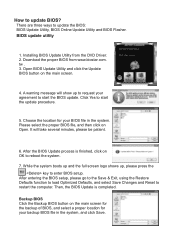
Installing BIOS Update Utility from www.biostar.com. Download the proper BIOS from the DVD Driver. 2. tw . 3. Click Yes to start the BIOS update. After entering the BIOS setup, please go to the Save & Exit, using the Restore Defaults function to load Optimized Defaults, and select Save Changes and Reset to update BIOS? Please select the proper BIOS file, and then...
Installing BIOS Update Utility from www.biostar.com. Download the proper BIOS from the DVD Driver. 2. tw . 3. Click Yes to start the BIOS update. After entering the BIOS setup, please go to the Save & Exit, using the Restore Defaults function to load Optimized Defaults, and select Save Changes and Reset to update BIOS? Please select the proper BIOS file, and then...
Update Manual
Page 2
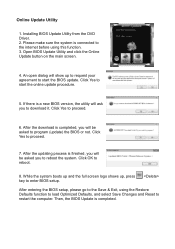
... is finished, you will be asked to start the online update procedure. 5. After the updating process is completed, you to start the BIOS update. Installing BIOS Update Utility from the DVD Driver. 2. Open BIOS Update Utility and click the Online Update button on the main screen. 4. Click Yes to enter BIOS setup. While the system boots up and the full...
... is finished, you will be asked to start the online update procedure. 5. After the updating process is completed, you to start the BIOS update. Installing BIOS Update Utility from the DVD Driver. 2. Open BIOS Update Utility and click the Online Update button on the main screen. 4. Click Yes to enter BIOS setup. While the system boots up and the full...
Update Manual
Page 3
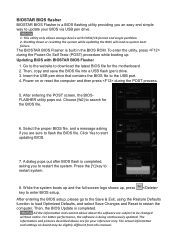
...the BIOS file to search for your BIOS via USB pen drive. 1. BIOSTAR BIOS flasher BIOSTAR BIOS Flasher is built in the BIOS ROM. After entering the POST screen, the BIOSFLASHER utility pops out. The BIOSTAR BIOS Flasher is a BIOS flashing ...utility providing you are subject to flash the BIOS file. Choose [fs0] to the USB port. 4. The actual information and settings on or reset the computer and then press during the Power-On Self Tests (POST) procedure while booting up , press key to restart system. 8. Then, the BIOS Update...
...the BIOS file to search for your BIOS via USB pen drive. 1. BIOSTAR BIOS flasher BIOSTAR BIOS Flasher is built in the BIOS ROM. After entering the POST screen, the BIOSFLASHER utility pops out. The BIOSTAR BIOS Flasher is a BIOS flashing ...utility providing you are subject to flash the BIOS file. Choose [fs0] to the USB port. 4. The actual information and settings on or reset the computer and then press during the Power-On Self Tests (POST) procedure while booting up , press key to restart system. 8. Then, the BIOS Update...
Setup Manual
Page 26
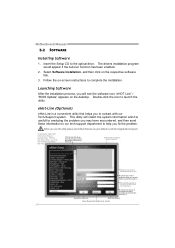
... installation. The drivers installation program would be able to you must provide. Follow the on that helps you will see the software icon "eHOT Line" / "BIOS Update" appears on the respective software title. 3. This utility will show the i nformation which is a convenient utility that you . Wi thout this utility,please set Outlook...
... installation. The drivers installation program would be able to you must provide. Follow the on that helps you will see the software icon "eHOT Line" / "BIOS Update" appears on the respective software title. 3. This utility will show the i nformation which is a convenient utility that you . Wi thout this utility,please set Outlook...
Setup Manual
Page 28
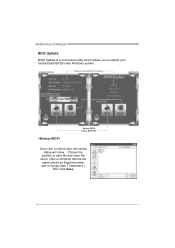
Motherboard Manual BIOS Update BIOS Update is a convenient utility which allows you to a .bin file Update BIOS with a BIOS file Once click on this button, the saving dialog will show. AWARD BIOS Show current BIOS information AMI BIOS Clear CMOS function (Only for AWARD BIOS) Save current BIOS to update your motherboard BIOS under Windows system. Choose the position to save file and enter file name. (We recommend that the file name should be English/number and no longer than 7 characters.) Then click Save. 26
Motherboard Manual BIOS Update BIOS Update is a convenient utility which allows you to a .bin file Update BIOS with a BIOS file Once click on this button, the saving dialog will show. AWARD BIOS Show current BIOS information AMI BIOS Clear CMOS function (Only for AWARD BIOS) Save current BIOS to update your motherboard BIOS under Windows system. Choose the position to save file and enter file name. (We recommend that the file name should be English/number and no longer than 7 characters.) Then click Save. 26
Setup Manual
Page 29
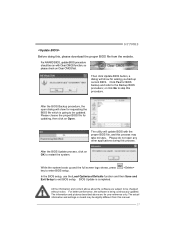
... After the BIOS Update process, click on Open. Please do not open dialog will show for your reference only. Click Yes for updating, then click on OK to the Backup BIOS procedure; All the information and content above are subject to be run with the proper BIOS file, and this process may be updated. H77MU3 Before doing...
... After the BIOS Update process, click on Open. Please do not open dialog will show for your reference only. Click Yes for updating, then click on OK to the Backup BIOS procedure; All the information and content above are subject to be run with the proper BIOS file, and this process may be updated. H77MU3 Before doing...
Bios Manual
Page 3
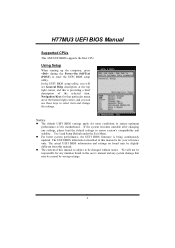
... corner, and you will not be slightly different from this manual is being continuously updated. z The content of the motherboard. Notice z The default UEFI BIOS settings apply for your reference only. The actual UEFI BIOS information and settings on board may be changed without notice. Use Load Setup Default... under the Exit Menu. H77MU3 UEFI BIOS Manual Supported CPUs This AMI UEFI BIOS supports the Intel CPU. Using Setup When starting up the computer, press during the Power-On Self-Test (POST) to ensure ...
... corner, and you will not be slightly different from this manual is being continuously updated. z The content of the motherboard. Notice z The default UEFI BIOS settings apply for your reference only. The actual UEFI BIOS information and settings on board may be changed without notice. Use Load Setup Default... under the Exit Menu. H77MU3 UEFI BIOS Manual Supported CPUs This AMI UEFI BIOS supports the Intel CPU. Using Setup When starting up the computer, press during the Power-On Self-Test (POST) to ensure ...

Bios Manual
Page 11
...Default) / Enabled Hardware Prefetcher The processor has a hardware prefetcher that automatically analyzes its capabilities. Options: Enabled (Default) / Disabled 10 H77MU3 UEFI BIOS Manual Active Processor Cores This item sets number of malicious buffer overflow attacks when combined with memory reads. This determines the kind of basic... the latency associated with a supporting OS (Windows Server 2003 SP1, Windows XP SP2, SuSE Linux 9.2, RedHat Enterprise 3 Update 3.). Options: Enabled (Default) / Disabled Intel Virtualization Tech Virtualization Technology can do so, it as well.
...Default) / Enabled Hardware Prefetcher The processor has a hardware prefetcher that automatically analyzes its capabilities. Options: Enabled (Default) / Disabled 10 H77MU3 UEFI BIOS Manual Active Processor Cores This item sets number of malicious buffer overflow attacks when combined with memory reads. This determines the kind of basic... the latency associated with a supporting OS (Windows Server 2003 SP1, Windows XP SP2, SuSE Linux 9.2, RedHat Enterprise 3 Update 3.). Options: Enabled (Default) / Disabled Intel Virtualization Tech Virtualization Technology can do so, it as well.
Bios Manual
Page 16
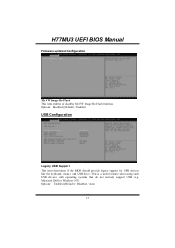
H77MU3 UEFI BIOS Manual Firmware updated Configuration Me FW Image Re-Flash This item enables or disables Me FW image Re-Flash function. Options: Disabled (Default) / Enabled USB Configuration Legacy USB Support This item determines if the BIOS should provide legacy support for USB devices like the keyboard, mouse, and USB drive. Options: Enabled (Default) / Disabled / Auto 15 Microsoft DOS or Windows NT). This is a useful feature when using such USB devices with operating systems that do not natively support USB (e.g.
H77MU3 UEFI BIOS Manual Firmware updated Configuration Me FW Image Re-Flash This item enables or disables Me FW image Re-Flash function. Options: Disabled (Default) / Enabled USB Configuration Legacy USB Support This item determines if the BIOS should provide legacy support for USB devices like the keyboard, mouse, and USB drive. Options: Enabled (Default) / Disabled / Auto 15 Microsoft DOS or Windows NT). This is a useful feature when using such USB devices with operating systems that do not natively support USB (e.g.


