
User Manual
Page 2
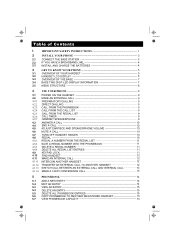
... YOUR HANDSET ...5 3.2 HANDSET LCD DISPLAY ...6 3.3 OVERVIEW OF THE BASE ...7 3.4 BASE TWO DIGIT-LED DISPLAY INFORMATION 7 3.5 MENU STRUCTURE ...8 4 4.1 4.2 4.2.1 4.2.2 4.2.3 4.2.4 4.2.5 4.2.6 4.2.7 4.3 4.4 4.5 4.6 4.7 4.8 4.8.1 4.8.2 4.8.3 4.8.4 4.9 4.10 4.11 4.11.1 4.11.2 4.11.3 4.11.4 USE YOUR PHONE ...9 POWER ON THE HANDSET ...9 MAKE AN EXTERNAL CALL ...9 PREPARATORY DIALLING ...9 DIRECT DIALLING ...9 CALL FROM THE PHONEBOOK ...9 CALL FROM THE CALL LIST ...9 CALL FROM THE REDIAL...
... YOUR HANDSET ...5 3.2 HANDSET LCD DISPLAY ...6 3.3 OVERVIEW OF THE BASE ...7 3.4 BASE TWO DIGIT-LED DISPLAY INFORMATION 7 3.5 MENU STRUCTURE ...8 4 4.1 4.2 4.2.1 4.2.2 4.2.3 4.2.4 4.2.5 4.2.6 4.2.7 4.3 4.4 4.5 4.6 4.7 4.8 4.8.1 4.8.2 4.8.3 4.8.4 4.9 4.10 4.11 4.11.1 4.11.2 4.11.3 4.11.4 USE YOUR PHONE ...9 POWER ON THE HANDSET ...9 MAKE AN EXTERNAL CALL ...9 PREPARATORY DIALLING ...9 DIRECT DIALLING ...9 CALL FROM THE PHONEBOOK ...9 CALL FROM THE CALL LIST ...9 CALL FROM THE REDIAL...
User Manual
Page 4
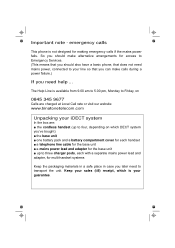
...making emergency calls if the mains power fails. So you should make calls during a power failure.) If you later need mains power, connected to your iDECT system In the box are: ■ the cordless handset (up to three charger pods, each with a separate mains power lead and adapter, for access... to Emergency Services. (This means that you should also have a basic phone, that does not need to Friday, on 0845 345 9677 Calls are charged at Local Call rate or visit our website: www.binatonetelecom.com Unpacking...
...making emergency calls if the mains power fails. So you should make calls during a power failure.) If you later need mains power, connected to your iDECT system In the box are: ■ the cordless handset (up to three charger pods, each with a separate mains power lead and adapter, for access... to Emergency Services. (This means that you should also have a basic phone, that does not need to Friday, on 0845 345 9677 Calls are charged at Local Call rate or visit our website: www.binatonetelecom.com Unpacking...
User Manual
Page 5
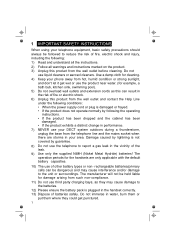
... non-compliance. 11) Do not use third party charging bays, as this can be dangerous and may cause damage to report a gas leak in your phone away from the wall outlet and contact the Help Line under the following : 1) Read and understand all the instructions. 2) Follow all warnings and instructions marked...
... non-compliance. 11) Do not use third party charging bays, as this can be dangerous and may cause damage to report a gas leak in your phone away from the wall outlet and contact the Help Line under the following : 1) Read and understand all the instructions. 2) Follow all warnings and instructions marked...
User Manual
Page 6
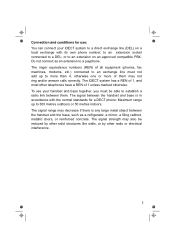
The ringer equivalence numbers (REN) of all equipment (phones, fax machines, modems, etc.) connected to an exchange line must be reduced by other solid structures like walls, or by other telephones have a REN of them . The iDECT system has a REN of 1, and most other radio or electrical ...payphone. The signal strength may decrease if there is in accordance with its own phone number; to an extension socket connected to an extension on a local exchange with the normal standards for use your iDECT system to a direct exchange line (DEL) on an approved compatible PBX. Do...
The ringer equivalence numbers (REN) of all equipment (phones, fax machines, modems, etc.) connected to an exchange line must be reduced by other solid structures like walls, or by other telephones have a REN of them . The iDECT system has a REN of 1, and most other radio or electrical ...payphone. The signal strength may decrease if there is in accordance with its own phone number; to an extension socket connected to an extension on a local exchange with the normal standards for use your iDECT system to a direct exchange line (DEL) on an approved compatible PBX. Do...

User Manual
Page 7
... approval given to this can cause interference. 3 Warning: Use only the power adaptor supplied, using another telephone or other electrical equipment - this apparatus. 2 INSTALL YOUR PHONE 2.1 Connect the Base Station 1) Plug the power supply and the line cord into the base station. 2) Plug the power adaptor into a 230Vac, 50HZ mains socket...
... approval given to this can cause interference. 3 Warning: Use only the power adaptor supplied, using another telephone or other electrical equipment - this apparatus. 2 INSTALL YOUR PHONE 2.1 Connect the Base Station 1) Plug the power supply and the line cord into the base station. 2) Plug the power adaptor into a 230Vac, 50HZ mains socket...
User Manual
Page 9
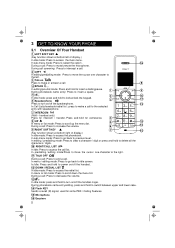
... a call : Press to the selected entry with speakerphone. 7 INTERCOM (Multi - In menu / editing mode: Press to go back to idle screen. 3 GET TO KNOW YOUR PHONE 3.1 Overview Of Your Handset 1 LEFT SOFT KEY (Key function shown at bottom right of display.) In idle mode: Press to switch between upper and lower...
... a call : Press to the selected entry with speakerphone. 7 INTERCOM (Multi - In menu / editing mode: Press to go back to idle screen. 3 GET TO KNOW YOUR PHONE 3.1 Overview Of Your Handset 1 LEFT SOFT KEY (Key function shown at bottom right of display.) In idle mode: Press to switch between upper and lower...
User Manual
Page 10
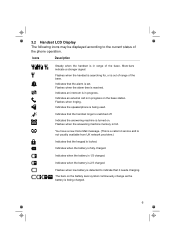
..., or is in range of the base. Indicates an intercom is being used. Icons Description Steady when the handset is out of range of the phone operation. Flashes when the alarm time is turned on the base station. Indicates the answering machine is reached. 3.2 Handset LCD Display The following icons may...
..., or is in range of the base. Indicates an intercom is being used. Icons Description Steady when the handset is out of range of the phone operation. Flashes when the alarm time is turned on the base station. Indicates the answering machine is reached. 3.2 Handset LCD Display The following icons may...
User Manual
Page 13
... When entering a number, if you make a mistake, press [ Clear ] to delete digits. 4.2.2 Direct dialling Press or to take the line, then enter the phone number. ( Note: If you enter a wrong digit you can press to alternate between hands-free speakerphone and normal handset use. 9 Press or to dial out... entry. 4.2.5 Call from when you answer a call or after dialling a number, until 5 seconds after the end of every call list entry. 4 USING YOUR PHONE 4.1 Power on the Handset If your handset is shown in hours, minutes and seconds (HH:MM:SS) on the handset. You can not correct it...
... When entering a number, if you make a mistake, press [ Clear ] to delete digits. 4.2.2 Direct dialling Press or to take the line, then enter the phone number. ( Note: If you enter a wrong digit you can press to alternate between hands-free speakerphone and normal handset use. 9 Press or to dial out... entry. 4.2.5 Call from when you answer a call or after dialling a number, until 5 seconds after the end of every call list entry. 4 USING YOUR PHONE 4.1 Power on the Handset If your handset is shown in hours, minutes and seconds (HH:MM:SS) on the handset. You can not correct it...
User Manual
Page 14
... have stored a name in the Redial list. 4.3 Answer a Call If the handset is not on charge or Auto Answer (see 8.1.7) is turned off: When the phone rings, press / / [ Accept ] to turn it back on. 4.8 Redial The last 20 numbers dialled are saved in the phonebook that matches the number, the name... Ringer In idle, press and hold to end the call. When you end the call, the volume settings will be set to On : When the phone rings, pick up the handset to answer a call automatically without letting the caller hear you can press [Select] to increase or decrease the volume level...
... have stored a name in the Redial list. 4.3 Answer a Call If the handset is not on charge or Auto Answer (see 8.1.7) is turned off: When the phone rings, press / / [ Accept ] to turn it back on. 4.8 Redial The last 20 numbers dialled are saved in the phonebook that matches the number, the name... Ringer In idle, press and hold to end the call. When you end the call, the volume settings will be set to On : When the phone rings, pick up the handset to answer a call automatically without letting the caller hear you can press [Select] to increase or decrease the volume level...
User Manual
Page 18
... it in alphabetical order. 5.2 Edit an Entry In idle mode: 1. Note: The melody will be displayed in the phonebook. Enter the revised name, phone number and Melody. 6. Press [ Select ] to select Edit. 4. Note: You can press and hold to caller Identification and the incoming number matches ...the number stored. 6. Each phonebook entry can have a maximum of 24 digits for the phone number and 12 characters for an incoming call , if you can press and hold to caller display and the incoming number matches the stored...
... it in alphabetical order. 5.2 Edit an Entry In idle mode: 1. Note: The melody will be displayed in the phonebook. Enter the revised name, phone number and Melody. 6. Press [ Select ] to select Edit. 4. Note: You can press and hold to caller Identification and the incoming number matches ...the number stored. 6. Each phonebook entry can have a maximum of 24 digits for the phone number and 12 characters for an incoming call , if you can press and hold to caller display and the incoming number matches the stored...
User Manual
Page 21
If the number matches with one of the missed call will be removed. If you have been viewed on the display when the phone is withheld(e.g. Missed calls are saved in the private phonebook will be shown on that handset. Once the details of the entries in your telephone ... at the begining of the call list. Press [ Select ] and then enter the name, press [ OK ] , edit the number if necessary and press [ OK ] . Your phone can also access the call . ex-directory or by a new call list via Menu - Press [Select ] to PB. 3. Press [ Menu ] and to scroll to Add...
If the number matches with one of the missed call will be removed. If you have been viewed on the display when the phone is withheld(e.g. Missed calls are saved in the private phonebook will be shown on that handset. Once the details of the entries in your telephone ... at the begining of the call list. Press [ Select ] and then enter the name, press [ OK ] , edit the number if necessary and press [ OK ] . Your phone can also access the call . ex-directory or by a new call list via Menu - Press [Select ] to PB. 3. Press [ Menu ] and to scroll to Add...
User Manual
Page 26
...and to scroll to External Ring. 4. Press [ Select ] and to scroll to Internal Ring. 4. Press [ Menu ] and to scroll to personalise your phone operation. 8.1 Handset Settings 8.1.1 Set the internal ringer melody In Idle mode: 1. If Volume Off is selected, the icon will be displayed in idle mode... Press [ Select ] and to scroll to confirm your desired external ringer melody (10 ringer melodies and 5 standard tones are provided). 8 SETTINGS Your phone comes with a selection of settings that you can change to HS Settings. 2. Press [ Select ] and to scroll to Ring Setup. 3. Press ...
...and to scroll to External Ring. 4. Press [ Select ] and to scroll to Internal Ring. 4. Press [ Menu ] and to scroll to personalise your phone operation. 8.1 Handset Settings 8.1.1 Set the internal ringer melody In Idle mode: 1. If Volume Off is selected, the icon will be displayed in idle mode... Press [ Select ] and to scroll to confirm your desired external ringer melody (10 ringer melodies and 5 standard tones are provided). 8 SETTINGS Your phone comes with a selection of settings that you can change to HS Settings. 2. Press [ Select ] and to scroll to Ring Setup. 3. Press ...
User Manual
Page 27
...on by default, but can be turned off, if desired. Press [ Select ] and then enter your desired contrast level (5 contrast levels are talking on the phone to alert you to move closer to the base unit, before the call is emitted when you press a key. Out Of Range - Key tone- a single... Off. 5. Press [ Select ] and to scroll to your new name for the handset. 8.1.4 Set the alert tones Three different alert tones are talking on the phone to alert you that appears on the display in idle mode: 1. Press [ Select ] and to scroll to confirm the contrast setting. 23 Press [ Menu ] ...
...on by default, but can be turned off, if desired. Press [ Select ] and then enter your desired contrast level (5 contrast levels are talking on the phone to alert you to move closer to the base unit, before the call is emitted when you press a key. Out Of Range - Key tone- a single... Off. 5. Press [ Select ] and to scroll to your new name for the handset. 8.1.4 Set the alert tones Three different alert tones are talking on the phone to alert you that appears on the display in idle mode: 1. Press [ Select ] and to scroll to confirm the contrast setting. 23 Press [ Menu ] ...
User Manual
Page 29
... Settings 8.2.1 De-register a Handset This operation should normally leave the dialling mode at the default setting of Tone (also called MF or DTMF) unless the phone is set, you can reset your dialling mode selection. 25 You will need to enter the 4-digit PIN system ( default value: 0000) A deregistered handset will...
... Settings 8.2.1 De-register a Handset This operation should normally leave the dialling mode at the default setting of Tone (also called MF or DTMF) unless the phone is set, you can reset your dialling mode selection. 25 You will need to enter the 4-digit PIN system ( default value: 0000) A deregistered handset will...
User Manual
Page 31
... the next available handset number. Handset registration is shown in the handset display in registration mode. 2. To register a handset: 1. 8.3 Registration IMPORTANT: If you purchase your phone all handsets are already registered to the base, so you buy extra handsets or if a handset becomes faulty. Press and hold on the base station...
... the next available handset number. Handset registration is shown in the handset display in registration mode. 2. To register a handset: 1. 8.3 Registration IMPORTANT: If you purchase your phone all handsets are already registered to the base, so you buy extra handsets or if a handset becomes faulty. Press and hold on the base station...
User Manual
Page 32
... new messages are new messages, the icon will flash. 9.2 Listen to ON, calls will be shown on . Press [Select] and to scroll to your phone. 9 ANSWERING MACHINE Your phone includes a telephone answering machine (TAM) that it is a new message. They will be able to 59 messages with a maximum total recording time of...
... new messages are new messages, the icon will flash. 9.2 Listen to ON, calls will be shown on . Press [Select] and to scroll to your phone. 9 ANSWERING MACHINE Your phone includes a telephone answering machine (TAM) that it is a new message. They will be able to 59 messages with a maximum total recording time of...
User Manual
Page 35
... Answer Only mode. 9.5.4.1 Playback the OGM 1. Press [ Select ] to playback your OGM and " Playing" is saved, the phone will answer after 2 rings if there are new messages, and after 2 or 3 rings, hang up and you phone in Section 9.5.4.1. 2. Press [ Select ] and to scroll to Playback. 6. Press [ Select ] to confirm your messages remotely...
... Answer Only mode. 9.5.4.1 Playback the OGM 1. Press [ Select ] to playback your OGM and " Playing" is saved, the phone will answer after 2 rings if there are new messages, and after 2 or 3 rings, hang up and you phone in Section 9.5.4.1. 2. Press [ Select ] and to scroll to Playback. 6. Press [ Select ] to confirm your messages remotely...
User Manual
Page 36
... Sec, or Unlimi.ted 5. 9.5.6 Set the Maximum Recording Time for Messages You can check your messages, or otherwise operate your answering machine, by calling the phone when you want to use this feature, see section 9.5.7.2. 9.5.7.1 Change the 4-Digit Remote Access PIN 1. Press [ Select ] and to Answer Machine. 2. Press [Select ] and to... Settings. 3. Press [ Select ] and to scroll to confirm. Press [Select ] to prevent other people from home and entering a 4-digit remote access PIN using a tone-dialling phone.
... Sec, or Unlimi.ted 5. 9.5.6 Set the Maximum Recording Time for Messages You can check your messages, or otherwise operate your answering machine, by calling the phone when you want to use this feature, see section 9.5.7.2. 9.5.7.1 Change the 4-Digit Remote Access PIN 1. Press [ Select ] and to Answer Machine. 2. Press [Select ] and to... Settings. 3. Press [ Select ] and to scroll to confirm. Press [Select ] to prevent other people from home and entering a 4-digit remote access PIN using a tone-dialling phone.
User Manual
Page 37
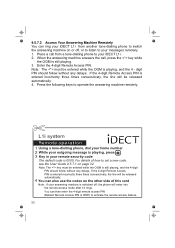
...the key while the OGM is 0000) to activate the remote access feature. 33 Enter the 4-digit Remote Access PIN. L1i system Remote operation 1 Using a tone-dialling phone, dial your home number 2 While your outgoing message is playing, press 3 Key in your remote security code The ... 3. When the answering machine answers the call from another tone-dialling phone to switch the answering machine on page 32. 9.5.7.3 Access Your Answering Machine Remotely You can ring your iDECT L1i from a tone-dialling phone to your iDECT L1i. 2. For details of this card Note: If your answering machine ...
...the key while the OGM is 0000) to activate the remote access feature. 33 Enter the 4-digit Remote Access PIN. L1i system Remote operation 1 Using a tone-dialling phone, dial your home number 2 While your outgoing message is playing, press 3 Key in your remote security code The ... 3. When the answering machine answers the call from another tone-dialling phone to switch the answering machine on page 32. 9.5.7.3 Access Your Answering Machine Remotely You can ring your iDECT L1i from a tone-dialling phone to your iDECT L1i. 2. For details of this card Note: If your answering machine ...
User Manual
Page 38
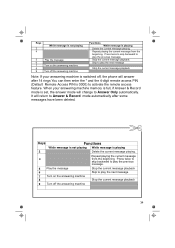
... is set, the answer mode will change to play the next message 7 Turn on the answering machine 8 Stop the current message playback 9 Turn off , the phone will answer after some messages have been deleted.
... is set, the answer mode will change to play the next message 7 Turn on the answering machine 8 Stop the current message playback 9 Turn off , the phone will answer after some messages have been deleted.


