User Guide
Page 1
USER'S GUIDE MBP26, MBP26/2, MBP26/3, MBP26/4 BABY MONITOR USER'S GUIDE The features described in User's Guide are subject to modifications without prior notice.
USER'S GUIDE MBP26, MBP26/2, MBP26/3, MBP26/4 BABY MONITOR USER'S GUIDE The features described in User's Guide are subject to modifications without prior notice.
User Guide
Page 2
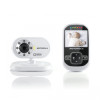
... your new Motorola Baby Monitor! Got everything? • 1 x Parent unit • 1 x Baby unit (camera) • 1 x Rechargeable Ni-MH battery pack for the Parent unit • 1 x Power adapter for the Parent unit • 1 x Power adapter for purchasing the MBP26, MBP26/2, MBP26/3, MBP26/4. Please retain your records. Welcome... Registration is not required for your original dated sales receipt for warranty coverage. to confirm warranty status. Thank you install the units. For warranty service of your...
... your new Motorola Baby Monitor! Got everything? • 1 x Parent unit • 1 x Baby unit (camera) • 1 x Rechargeable Ni-MH battery pack for the Parent unit • 1 x Power adapter for the Parent unit • 1 x Power adapter for purchasing the MBP26, MBP26/2, MBP26/3, MBP26/4. Please retain your records. Welcome... Registration is not required for your original dated sales receipt for warranty coverage. to confirm warranty status. Thank you install the units. For warranty service of your...
User Guide
Page 3
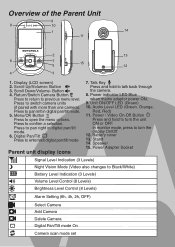
.../Volume- Power / Video On-Off Button Press and hold to pan right in digital pan/tilt mode. 5. Speaker 15. Battery cover 13. Press to talk back through the camera. 8. Talk Key Press and hold to turn the unit ON or OFF. In monitor mode, press to turn the 12. Overview of the Parent Unit 9 8 10 1 14 11 POWER 2 13...
.../Volume- Power / Video On-Off Button Press and hold to pan right in digital pan/tilt mode. 5. Speaker 15. Battery cover 13. Press to talk back through the camera. 8. Talk Key Press and hold to turn the unit ON or OFF. In monitor mode, press to turn the 12. Overview of the Parent Unit 9 8 10 1 14 11 POWER 2 13...

User Guide
Page 4
... guidelines for installing your Baby Monitor • To use your Video Monitor Baby and Parent Units together, you must be able to establish a radio link between them off if they appear to be causing interference. • If the signal is weak, try moving the Parent and/or the Baby Unit to different positions in the rooms. Photo Sensor (Night Vision Mode) 2. Power LED...
... guidelines for installing your Baby Monitor • To use your Video Monitor Baby and Parent Units together, you must be able to establish a radio link between them off if they appear to be causing interference. • If the signal is weak, try moving the Parent and/or the Baby Unit to different positions in the rooms. Photo Sensor (Night Vision Mode) 2. Power LED...
User Guide
Page 5
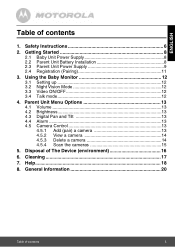
... 14 4.5.3 Delete a camera 14 4.5.4 Scan the cameras 15 5. Help 18 8. General Information 20 Table of The Device (environment 16 6. ENGLISH Table of contents 1. Getting Started 8 2.1 Baby Unit Power Supply 8 2.2 Parent Unit Battery Installation 8 2.3 Parent Unit Power Supply 9 2.4 Registration (Pairing 11 3. Using the Baby Monitor 12 3.1 Setting up 12 3.2 Night Vision Mode 12 3.3 Video ON/OFF 12 3.4 Talk mode 12 4.
... 14 4.5.3 Delete a camera 14 4.5.4 Scan the cameras 15 5. Help 18 8. General Information 20 Table of The Device (environment 16 6. ENGLISH Table of contents 1. Getting Started 8 2.1 Baby Unit Power Supply 8 2.2 Parent Unit Battery Installation 8 2.3 Parent Unit Power Supply 9 2.4 Registration (Pairing 11 3. Using the Baby Monitor 12 3.1 Setting up 12 3.2 Night Vision Mode 12 3.3 Video ON/OFF 12 3.4 Talk mode 12 4.
User Guide
Page 6
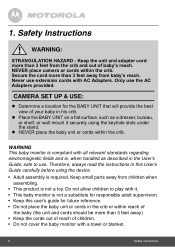
... user's guide for the BABY UNIT that will provide the best view of your baby in his crib. Place the BABY UNIT on a flat surface, such as described in the User's Guide, safe to play with a towel or blanket. 6 Safety Instructions Keep the unit and adapter cord more than 3 feet from the crib and out of children. • Do not cover the baby monitor...
... user's guide for the BABY UNIT that will provide the best view of your baby in his crib. Place the BABY UNIT on a flat surface, such as described in the User's Guide, safe to play with a towel or blanket. 6 Safety Instructions Keep the unit and adapter cord more than 3 feet from the crib and out of children. • Do not cover the baby monitor...

User Guide
Page 7
...chargers and power adapters provided. Safety Instructions 7 Dispose of used batteries according to easily accessible mains sockets. CAUTION Risk of explosion if battery is replaced by an incorrect type. ENGLISH • Test this monitor and all its functions so that you are familiar with it prior to actual use. • Do not use the baby monitor... not install the baby monitor in extreme cold or heat, or in direct sunlight, or close to a heat source. • Only use other chargers or power adapters as this may damage the device and battery pack. • Only insert a battery pack ...
...chargers and power adapters provided. Safety Instructions 7 Dispose of used batteries according to easily accessible mains sockets. CAUTION Risk of explosion if battery is replaced by an incorrect type. ENGLISH • Test this monitor and all its functions so that you are familiar with it prior to actual use. • Do not use the baby monitor... not install the baby monitor in extreme cold or heat, or in direct sunlight, or close to a heat source. • Only use other chargers or power adapters as this may damage the device and battery pack. • Only insert a battery pack ...

User Guide
Page 8
... plug. 2. Charge the battery in orange. 3. 2. Insert the plug of the power adapter to the baby unit (camera) and the other end to the ON position. Slide the ON/OFF switch to the electrical outlet. Black Red 1. The power LED will light up in parent unit before first time use the enclosed power adapter (6V DC / 500mA) with the camera. Getting Started 2.1 Baby Unit Power Supply...
... plug. 2. Charge the battery in orange. 3. 2. Insert the plug of the power adapter to the baby unit (camera) and the other end to the ON position. Slide the ON/OFF switch to the electrical outlet. Black Red 1. The power LED will light up in parent unit before first time use the enclosed power adapter (6V DC / 500mA) with the camera. Getting Started 2.1 Baby Unit Power Supply...

User Guide
Page 9
... parent unit. 3. Only use is recommended. This will allow the unit to operate on the parent unit will show the video captured by the baby unit. Once the baby and parent units are switched on, the display on battery in a clockwise direction using a Small cross head or Flat end screwdriver. 2.3 Parent Unit Power Supply IMPORTANT Installing the rechargeable battery pack and charging it fully before use the enclosed power adapter...
... parent unit. 3. Only use is recommended. This will allow the unit to operate on the parent unit will show the video captured by the baby unit. Once the baby and parent units are switched on, the display on battery in a clockwise direction using a Small cross head or Flat end screwdriver. 2.3 Parent Unit Power Supply IMPORTANT Installing the rechargeable battery pack and charging it fully before use the enclosed power adapter...

User Guide
Page 10
... no connection or you are out of range, the video display will go off and the symbol will flash on scan the 1 ? If the parent unit is turned ON, when the adapter is charging by cycling the internal segments. 0 4. NOTE The battery icon turns RED and flashes to indicate that the battery is on the LCD display, and the...
... no connection or you are out of range, the video display will go off and the symbol will flash on scan the 1 ? If the parent unit is turned ON, when the adapter is charging by cycling the internal segments. 0 4. NOTE The battery icon turns RED and flashes to indicate that the battery is on the LCD display, and the...

User Guide
Page 11
... the Parent Unit. Press the button of the camera unit until the parent unit finds the camera, beeps and the video from the camera appears. NOTE If a particular Baby Unit was registered previously, registering this current Baby Unit again will...Parent Unit. The unit ON/OFF LED turns on while searching. 3. If no camera unit is pre-registered to start searching for a camera unit. DOWN button to select the desired Camera identification number and press the button to your Baby Unit, or register a new Baby Unit, follow the procedure below: 1. ENGLISH 2.4 Registration (Pairing) The Baby monitor...
... the Parent Unit. Press the button of the camera unit until the parent unit finds the camera, beeps and the video from the camera appears. NOTE If a particular Baby Unit was registered previously, registering this current Baby Unit again will...Parent Unit. The unit ON/OFF LED turns on while searching. 3. If no camera unit is pre-registered to start searching for a camera unit. DOWN button to select the desired Camera identification number and press the button to your Baby Unit, or register a new Baby Unit, follow the procedure below: 1. ENGLISH 2.4 Registration (Pairing) The Baby monitor...
User Guide
Page 12
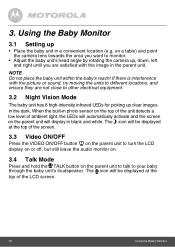
... screen. 3.3 Video ON/OFF Press the VIDEO ON/OFF button V on the parent unit to turn the LCD display on or off, but still leave the audio monitor on. 3.4 Talk Mode Press and hold the TALK button on the parent unit to talk to your baby through the baby unit's loudspeaker. Using the Baby Monitor 3.1 Setting up clear images in the parent unit. If there...
... screen. 3.3 Video ON/OFF Press the VIDEO ON/OFF button V on the parent unit to turn the LCD display on or off, but still leave the audio monitor on. 3.4 Talk Mode Press and hold the TALK button on the parent unit to talk to your baby through the baby unit's loudspeaker. Using the Baby Monitor 3.1 Setting up clear images in the parent unit. If there...
User Guide
Page 13
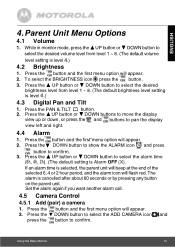
...the desired brightness level from level 1 ~ 8. (The default volume level setting is selected, the parent unit will beep at the end of the selected 6, 4 or 2 hour period, and the alarm icon will appear. 2. Using the Baby Monitor 13 While in monitor mode, press the + UP button or - Press the PAN & T&... will flash red. DOWN button to show the ALARM icon and press button to select the desired volume level from level 1 ~ 8. (The default brightness level setting is level 4.) 4.3 Digital Pan and Tilt 1. The alarm is Alarm OFF (X). DOWN button to confirm. 3. Set the alarm ...
...the desired brightness level from level 1 ~ 8. (The default volume level setting is selected, the parent unit will beep at the end of the selected 6, 4 or 2 hour period, and the alarm icon will appear. 2. Using the Baby Monitor 13 While in monitor mode, press the + UP button or - Press the PAN & T&... will flash red. DOWN button to show the ALARM icon and press button to select the desired volume level from level 1 ~ 8. (The default brightness level setting is level 4.) 4.3 Digital Pan and Tilt 1. The alarm is Alarm OFF (X). DOWN button to confirm. 3. Set the alarm ...

User Guide
Page 18
...; Try recharging or replacing the battery pack. • Reset the units. Wait about 15 seconds before reconnecting. Disconnect the battery pack of range, so move the Baby Unit closer to save power. Press and hold the ON/OFF button P on the parent unit to turn it may be going out of the parent unit and unplug both the units' electrical power, then plug them...
...; Try recharging or replacing the battery pack. • Reset the units. Wait about 15 seconds before reconnecting. Disconnect the battery pack of range, so move the Baby Unit closer to save power. Press and hold the ON/OFF button P on the parent unit to turn it may be going out of the parent unit and unplug both the units' electrical power, then plug them...

User Guide
Page 20
... Products, Accessories or parts. 20 General Information We may use with this Warranty. Subject to be free from defects in materials and workmanship under license by Binatone Electronics International LTD ("BINATONE"). Who is not working...charge repair or replace any Products or Accessories that does not conform to the first consumer purchaser, and is not transferable. Contact Customer Service: US and Canada 1-888-331-3383 On the Web: www.motorola.com To order a replacement battery pack, contact customer service. This Warranty is your product is covered? Read this User's Guide...
... Products, Accessories or parts. 20 General Information We may use with this Warranty. Subject to be free from defects in materials and workmanship under license by Binatone Electronics International LTD ("BINATONE"). Who is not working...charge repair or replace any Products or Accessories that does not conform to the first consumer purchaser, and is not transferable. Contact Customer Service: US and Canada 1-888-331-3383 On the Web: www.motorola.com To order a replacement battery pack, contact customer service. This Warranty is your product is covered? Read this User's Guide...
User Guide
Page 22
... or other acts which are not the fault of MOTOROLA or BINATONE, are covered by the first consumer purchaser of parts due to the consumer, whichever is longer. Only batteries whose fully charged capacity falls below 80% of the product. Exclusions Normal... equipment are excluded from coverage. 22 General Information Abuse & Misuse. Periodic maintenance, repair and replacement of the product. Batteries. Ninety (90) days from the date of Non-Motorola branded Products and Accessories. Products Covered Consumer Products Consumer Accessories Consumer Products and Accessories that...
... or other acts which are not the fault of MOTOROLA or BINATONE, are covered by the first consumer purchaser of parts due to the consumer, whichever is longer. Only batteries whose fully charged capacity falls below 80% of the product. Exclusions Normal... equipment are excluded from coverage. 22 General Information Abuse & Misuse. Periodic maintenance, repair and replacement of the product. Batteries. Ninety (90) days from the date of Non-Motorola branded Products and Accessories. Products Covered Consumer Products Consumer Accessories Consumer Products and Accessories that...
User Guide
Page 23
...a BINATONE Authorized Repair Centre. To obtain service or information, please call: US and Canada 1-888-331-3383 On the Web: www.motorola.com You will receive instructions on how to ship the Products or Accessories at your expense and risk, to Obtain Warranty Service or...serial number of the Product; (d) a written description of BINATONE, that show evidence of Products or Accessories due to or use with the Products or Accessories is excluded from coverage. or (d) nonconforming or non-Motorola branded housings, or parts, are excluded from service, testing, adjustment, installation, ...
...a BINATONE Authorized Repair Centre. To obtain service or information, please call: US and Canada 1-888-331-3383 On the Web: www.motorola.com You will receive instructions on how to ship the Products or Accessories at your expense and risk, to Obtain Warranty Service or...serial number of the Product; (d) a written description of BINATONE, that show evidence of Products or Accessories due to or use with the Products or Accessories is excluded from coverage. or (d) nonconforming or non-Motorola branded housings, or parts, are excluded from service, testing, adjustment, installation, ...

User Guide
Page 24
...user or bystander according to the intended usage of the following two conditions: (1) this device may not cause harmful interference, and (2) this device. If this equipment not expressly approved by one or more . The Baby unit shall be installed and used in accordance with the instructions, may cause undesired operation. This Class B digital... radio frequency energy that parts of the user's body other than the hands are designed to provide reasonable protection against harmful interference in a particular installation. This device complies with Part 15 of the Federal ...
...user or bystander according to the intended usage of the following two conditions: (1) this device may not cause harmful interference, and (2) this device. If this equipment not expressly approved by one or more . The Baby unit shall be installed and used in accordance with the instructions, may cause undesired operation. This Class B digital... radio frequency energy that parts of the user's body other than the hands are designed to provide reasonable protection against harmful interference in a particular installation. This device complies with Part 15 of the Federal ...
User Guide
Page 25
...aux appareils radio exempts de licence. Technical Specifications Baby unit (Model: MBP26BU) Frequency Image sensor Lens IR LED Power 2.4GHz to 2.48GHz color CMOS 0.3M Pixels f 2.5mm, F 2.4 8 pcs Adapter: 5E-AD060050-U; Output: 6V, 500mA OR Adapter: BLJ5W060050P; Output: 6V, 500mA WARNING Use...registration number only signifies that may not cause interference, and (2) this equipment not expressively approved by the party responsible for compliance could void the user's authority to operate the equipment. This product meets the applicable Industry Canada technical specifications. ...
...aux appareils radio exempts de licence. Technical Specifications Baby unit (Model: MBP26BU) Frequency Image sensor Lens IR LED Power 2.4GHz to 2.48GHz color CMOS 0.3M Pixels f 2.5mm, F 2.4 8 pcs Adapter: 5E-AD060050-U; Output: 6V, 500mA OR Adapter: BLJ5W060050P; Output: 6V, 500mA WARNING Use...registration number only signifies that may not cause interference, and (2) this equipment not expressively approved by the party responsible for compliance could void the user's authority to operate the equipment. This product meets the applicable Industry Canada technical specifications. ...
User Guide
Page 26
... battery is replaced by an incorrect type. Risk of used batteries according to 2.48GHz 2.4" diagonal 16M color LCD 8 steps 8 steps Adapter: 5E-AD060050-U; General Information 26 Parent unit (Model: MBP26PU) Frequency Display Display colors Brightness control Volume control Power 2.4GHz to the instructions. DESAY Ni-MH AAA 3 x 1.2V 900mAh rechargeable battery pack WARNING Do not use non-rechargeable batteries for the Parent Unit...
... battery is replaced by an incorrect type. Risk of used batteries according to 2.48GHz 2.4" diagonal 16M color LCD 8 steps 8 steps Adapter: 5E-AD060050-U; General Information 26 Parent unit (Model: MBP26PU) Frequency Display Display colors Brightness control Volume control Power 2.4GHz to the instructions. DESAY Ni-MH AAA 3 x 1.2V 900mAh rechargeable battery pack WARNING Do not use non-rechargeable batteries for the Parent Unit...


