
User Guide
Page 4
... Motorola Monitors App on Android™ device 10 3.2.4 Add FOCUS66 Camera to your account 11 3.3 User Account and Camera Setup: Working with PC/Notebook 38 5. Table of contents Connecting Devices 8 3.1 Setup...8 3.2 User Account and Camera Setup on Android™ Devices 9 3.2.1 Power on and connect the FOCUS66 camera 9 3.2.2 Download the Hubble for Motorola Monitors application ........ 9 3.2.3 Run...
... Motorola Monitors App on Android™ device 10 3.2.4 Add FOCUS66 Camera to your account 11 3.3 User Account and Camera Setup: Working with PC/Notebook 38 5. Table of contents Connecting Devices 8 3.1 Setup...8 3.2 User Account and Camera Setup on Android™ Devices 9 3.2.1 Power on and connect the FOCUS66 camera 9 3.2.2 Download the Hubble for Motorola Monitors application ........ 9 3.2.3 Run...

User Guide
Page 8
... to access the Camera, our secure server authenticates the user's identity and permits access to the Camera. 3.1 Setup Connect the Camera to connect it work? Pair / Setup state: LED is in -app setup process. Unconnected state: LED is blue and always on - Getting started - Ready for entering during the in... Make sure the password of the router is available for connection state: LED is blue and slow flashing Note: You can only setup via a compatible smartphone or tablet and not via a PC. 8 Getting started - Connected state: LED is red and slowly flashing - 3.
... to access the Camera, our secure server authenticates the user's identity and permits access to the Camera. 3.1 Setup Connect the Camera to connect it work? Pair / Setup state: LED is in -app setup process. Unconnected state: LED is blue and always on - Getting started - Ready for entering during the in... Make sure the password of the router is available for connection state: LED is blue and slow flashing Note: You can only setup via a compatible smartphone or tablet and not via a PC. 8 Getting started - Connected state: LED is red and slowly flashing - 3.
User Guide
Page 9
...User Account and Camera Setup on and connect the FOCUS66 camera • Connect the FOCUS66 adapter to search "Hubble for Motorola Monitors" application. • Download Hubble for Motorola Monitors application from Google Play™ Store and install it into micro USB socket at back of FOCUS66 camera. • ...Make sure that ON/OFF button is ready for setup. 3.2.2 Download the Hubble for Motorola Monitors application • Go to the Google Play™ Store...
...User Account and Camera Setup on and connect the FOCUS66 camera • Connect the FOCUS66 adapter to search "Hubble for Motorola Monitors" application. • Download Hubble for Motorola Monitors application from Google Play™ Store and install it into micro USB socket at back of FOCUS66 camera. • ...Make sure that ON/OFF button is ready for setup. 3.2.2 Download the Hubble for Motorola Monitors application • Go to the Google Play™ Store...
User Guide
Page 11
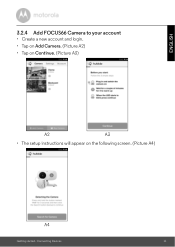
Connecting Devices 11 ENGLISH 3.2.4 Add FOCUS66 Camera to your account • Create a new account and login. • Tap on Add Camera. (Picture A2) • Tap on Continue. (Picture A3) A2 A3 • The setup instructions will appear on the following screen. (Picture A4) A4 Getting started -
Connecting Devices 11 ENGLISH 3.2.4 Add FOCUS66 Camera to your account • Create a new account and login. • Tap on Add Camera. (Picture A2) • Tap on Continue. (Picture A3) A2 A3 • The setup instructions will appear on the following screen. (Picture A4) A4 Getting started -
User Guide
Page 13
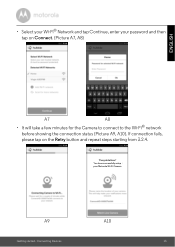
ENGLISH • Select your Wi-Fi® Network and tap Continue, enter your Motorola Wi-Fi Camera A9 A10 Getting started - If connection fails, please tap on Connect. (Picture A7, A8) A7 A8 • It will take a few minutes for the Camera to connect to the Wi-Fi® network before showing the connection status (Picture A9, A10). Congratulations! You have successfully setup your password and then tap on the Retry button and repeat steps starting from 3.2.4. Connecting Devices 13
ENGLISH • Select your Wi-Fi® Network and tap Continue, enter your Motorola Wi-Fi Camera A9 A10 Getting started - If connection fails, please tap on Connect. (Picture A7, A8) A7 A8 • It will take a few minutes for the Camera to connect to the Wi-Fi® network before showing the connection status (Picture A9, A10). Congratulations! You have successfully setup your password and then tap on the Retry button and repeat steps starting from 3.2.4. Connecting Devices 13
User Guide
Page 15
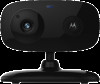
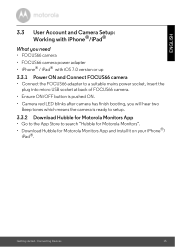
...- ENGLISH 3.3 User Account and Camera Setup: Working with iPhone®/iPad® What you need • FOCUS66 camera • FOCUS66 camera power adapter • iPhone® / iPad® with iOS 7.0 version or up 3.3.1 Power ON and Connect FOCUS66 camera • Connect the FOCUS66 adapter to a suitable mains power socket...into micro USB socket at back of FOCUS66 camera. • Ensure ON/OFF button is pushed ON. • Camera red LED blinks after camera has finish booting, you will hear two Beep tones which means the camera is ready to setup. 3.3.2 Download Hubble for Motorola Monitors...
...- ENGLISH 3.3 User Account and Camera Setup: Working with iPhone®/iPad® What you need • FOCUS66 camera • FOCUS66 camera power adapter • iPhone® / iPad® with iOS 7.0 version or up 3.3.1 Power ON and Connect FOCUS66 camera • Connect the FOCUS66 adapter to a suitable mains power socket...into micro USB socket at back of FOCUS66 camera. • Ensure ON/OFF button is pushed ON. • Camera red LED blinks after camera has finish booting, you will hear two Beep tones which means the camera is ready to setup. 3.3.2 Download Hubble for Motorola Monitors...

User Guide
Page 21
... to go back to Add Camera page. (Picture A13) • Tap on Add Camera to add one more camera follow steps of Android™ device setup 3.2.4. (Picture A14) Camera 21
... to go back to Add Camera page. (Picture A13) • Tap on Add Camera to add one more camera follow steps of Android™ device setup 3.2.4. (Picture A14) Camera 21
User Guide
Page 30
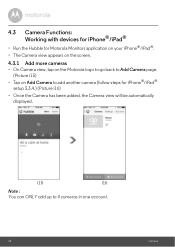
... 4 cameras in one account. 30 Camera 4.3 Camera Functions: Working with devices for iPhone®/iPad® • Run the Hubble for iPhone®/iPad® setup 3.3.4.) (Picture i16) • Once the Camera has been added, the Camera view will be automatically displayed.
... 4 cameras in one account. 30 Camera 4.3 Camera Functions: Working with devices for iPhone®/iPad® • Run the Hubble for iPhone®/iPad® setup 3.3.4.) (Picture i16) • Once the Camera has been added, the Camera view will be automatically displayed.

User Guide
Page 39
... from one router (e.g. Please reset the Camera with the following the steps 3.2.4 for Android device or 3.3.4 of the Camera for 5 seconds, until you have Camera setup issues, then the Camera has to start pairing". 3. Procedure for resetting the Camera Note: If your camera again by following procedure: 1. office) or you hear...
... from one router (e.g. Please reset the Camera with the following the steps 3.2.4 for Android device or 3.3.4 of the Camera for 5 seconds, until you have Camera setup issues, then the Camera has to start pairing". 3. Procedure for resetting the Camera Note: If your camera again by following procedure: 1. office) or you hear...
User Guide
Page 43
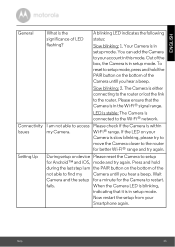
... you hear a beep. Slow blinking: 2. Press and hold the PAIR button on the bottom of the box, the Camera is in setup mode. Now restart the setup from your account in setup mode. Wait Camera and the setup for a minute for better Wi-Fi® range and try to move the Camera closer to..., press and hold during the last step I am the PAIR button on the bottom of LED flashing? Help 43 Your Camera is in setup mode. fails. ENGLISH General What is the significance of the Camera untill you hear a beep. You can add the Camera to your Smartphone again. Please ...
... you hear a beep. Slow blinking: 2. Press and hold the PAIR button on the bottom of the box, the Camera is in setup mode. Now restart the setup from your account in setup mode. Wait Camera and the setup for a minute for better Wi-Fi® range and try to move the Camera closer to..., press and hold during the last step I am the PAIR button on the bottom of LED flashing? Help 43 Your Camera is in setup mode. fails. ENGLISH General What is the significance of the Camera untill you hear a beep. You can add the Camera to your Smartphone again. Please ...