User Guide
Page 1
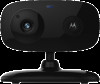
USER'S GUIDE Wi-Fi® Home Video Camera Models: FOCUS66-B, FOCUS66-B2, FOCUS66-S, FOCUS66-S2, FOCUS66-W, FOCUS66-W2 The features described in this user's guide are subject to modifications without prior notice.
USER'S GUIDE Wi-Fi® Home Video Camera Models: FOCUS66-B, FOCUS66-B2, FOCUS66-S, FOCUS66-S2, FOCUS66-W, FOCUS66-W2 The features described in this user's guide are subject to modifications without prior notice.
User Guide
Page 2
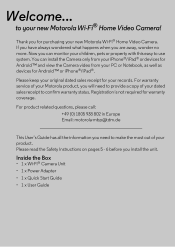
... Camera video from your PC or Notebook, as well as devices for warranty coverage. Now you are away, wonder no more. Inside the Box • 1 x Wi-Fi® Camera Unit • 1 x Power Adapter • 1 x Quick Start Guide • 1 x User Guide Registration is not required for Android™ or... Welcome... For warranty service of your Motorola product, you need to provide a copy of your new Motorola Wi-Fi® Home Video Camera! to make the most out of your new Motorola Wi-Fi® Home Video Camera. For product related questions, please call: +49 (0) 1805 938 802 in...
... Camera video from your PC or Notebook, as well as devices for warranty coverage. Now you are away, wonder no more. Inside the Box • 1 x Wi-Fi® Camera Unit • 1 x Power Adapter • 1 x Quick Start Guide • 1 x User Guide Registration is not required for Android™ or... Welcome... For warranty service of your Motorola product, you need to provide a copy of your new Motorola Wi-Fi® Home Video Camera! to make the most out of your new Motorola Wi-Fi® Home Video Camera. For product related questions, please call: +49 (0) 1805 938 802 in...
User Guide
Page 3
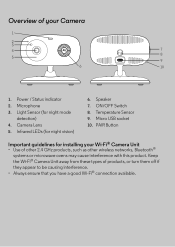
... night mode detection) 4. PAIR Button Important guidelines for installing your Camera 1 2 3 4 7 8 5 9 6 10 1. Micro USB socket 10. Keep the Wi-Fi® Camera Unit away from these types of other 2.4 GHz products, such as other wireless networks, Bluetooth® systems or microwave ovens may cause... interference with this product. Microphone 3. Camera Lens 5. Overview of your Wi-Fi® Camera Unit • Use of products, or turn them off if they appear to be causing interference. • Always...
... night mode detection) 4. PAIR Button Important guidelines for installing your Camera 1 2 3 4 7 8 5 9 6 10 1. Micro USB socket 10. Keep the Wi-Fi® Camera Unit away from these types of other 2.4 GHz products, such as other wireless networks, Bluetooth® systems or microwave ovens may cause... interference with this product. Microphone 3. Camera Lens 5. Overview of your Wi-Fi® Camera Unit • Use of products, or turn them off if they appear to be causing interference. • Always...
User Guide
Page 5
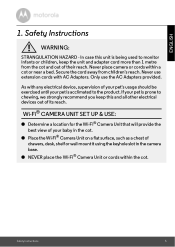
... from the cot and out of drawers, desk, shelf or wall-mount it using the keyhole slot in the camera base. ● NEVER place the Wi-Fi® Camera Unit or cords within a cot or near a bed. Only use extension cords with any electrical device, supervision of your pet's usage should... be exercised until your baby in the cot. ● Place the Wi-Fi® Camera Unit on a flat surface, such as a chest of their reach. Safety Instructions 5 Never place camera or cords within the cot. As with...
... from the cot and out of drawers, desk, shelf or wall-mount it using the keyhole slot in the camera base. ● NEVER place the Wi-Fi® Camera Unit or cords within a cot or near a bed. Only use extension cords with any electrical device, supervision of your pet's usage should... be exercised until your baby in the cot. ● Place the Wi-Fi® Camera Unit on a flat surface, such as a chest of their reach. Safety Instructions 5 Never place camera or cords within the cot. As with...
User Guide
Page 6
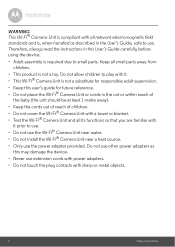
... the power adapter provided. Do not allow children to play with it prior to use. • Do not use the Wi-Fi® Camera Unit near water. • Do not install the Wi-Fi® Camera Unit near a heat source. • Only use extension cords with power adapters. • Do not touch...; Adult assembly is , when handled as this user's guide for future reference. • Do not place the Wi-Fi® Camera Unit or cords in the User's Guide, safe to use. WARNING This Wi-Fi® Camera Unit is compliant with all relevant electromagnetic field standards and is required due to small...
... the power adapter provided. Do not allow children to play with it prior to use. • Do not use the Wi-Fi® Camera Unit near water. • Do not install the Wi-Fi® Camera Unit near a heat source. • Only use extension cords with power adapters. • Do not touch...; Adult assembly is , when handled as this user's guide for future reference. • Do not place the Wi-Fi® Camera Unit or cords in the User's Guide, safe to use. WARNING This Wi-Fi® Camera Unit is compliant with all relevant electromagnetic field standards and is required due to small...

User Guide
Page 8
... secure server authenticates the user's identity and permits access to the Camera. 3.1 Setup Connect the Camera to connect it work? Getting started - Status of the Wi-Fi® router with which you want to the power adapter, then plug into an suitable mains power socket and make sure the power switch...
... secure server authenticates the user's identity and permits access to the Camera. 3.1 Setup Connect the Camera to connect it work? Getting started - Status of the Wi-Fi® router with which you want to the power adapter, then plug into an suitable mains power socket and make sure the power switch...

User Guide
Page 10
to go to the Terms of Use" before you have Hubble for Motorola Monitors account, please select Already have a Account? Connecting Devices A1 10 Getting started - 3.2.3 Run Hubble for Motorola Monitors App on Create. (Picture A1) Note: If you tap on Android™ device • Ensure your Android™ device is connected to your Wi-Fi® router. • Run Hubble for Motorola Monitors application and key in your Hubble for Motorola Monitors account information, read through the Terms of Service then select "I agree to the next step.
to go to the Terms of Use" before you have Hubble for Motorola Monitors account, please select Already have a Account? Connecting Devices A1 10 Getting started - 3.2.3 Run Hubble for Motorola Monitors App on Create. (Picture A1) Note: If you tap on Android™ device • Ensure your Android™ device is connected to your Wi-Fi® router. • Run Hubble for Motorola Monitors application and key in your Hubble for Motorola Monitors account information, read through the Terms of Service then select "I agree to the next step.
User Guide
Page 13
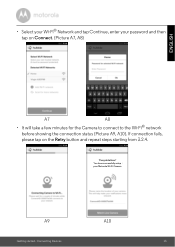
Congratulations! You have successfully setup your password and then tap on the Retry button and repeat steps starting from 3.2.4. Connecting Devices 13 If connection fails, please tap on Connect. (Picture A7, A8) A7 A8 • It will take a few minutes for the Camera to connect to the Wi-Fi® network before showing the connection status (Picture A9, A10). ENGLISH • Select your Wi-Fi® Network and tap Continue, enter your Motorola Wi-Fi Camera A9 A10 Getting started -
Congratulations! You have successfully setup your password and then tap on the Retry button and repeat steps starting from 3.2.4. Connecting Devices 13 If connection fails, please tap on Connect. (Picture A7, A8) A7 A8 • It will take a few minutes for the Camera to connect to the Wi-Fi® network before showing the connection status (Picture A9, A10). ENGLISH • Select your Wi-Fi® Network and tap Continue, enter your Motorola Wi-Fi Camera A9 A10 Getting started -

User Guide
Page 16
Connecting Devices to go to the Terms of Service then select "I agree to the next step. i1 16 Getting started - 3.3.3 Run Hubble for Motorola Monitors on your iPhone®/iPad® • Ensure your iPhone®/iPad® is connected to your Wi-Fi® Router. • Run Hubble for Motorola Monitors application and key in your Hubble for Motorola Monitors account information, read through the Terms of Service" before you tap on Create. (Picture i1) Note: If you have a Hubble for Motorola Monitors account, please select Already have a Account?
Connecting Devices to go to the Terms of Service then select "I agree to the next step. i1 16 Getting started - 3.3.3 Run Hubble for Motorola Monitors on your iPhone®/iPad® • Ensure your iPhone®/iPad® is connected to your Wi-Fi® Router. • Run Hubble for Motorola Monitors application and key in your Hubble for Motorola Monitors account information, read through the Terms of Service" before you tap on Create. (Picture i1) Note: If you have a Hubble for Motorola Monitors account, please select Already have a Account?
User Guide
Page 19
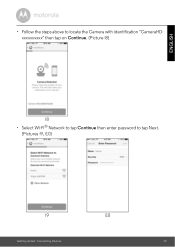
Connecting Devices 19 ENGLISH • Follow the steps above to locate the Camera with identification "CameraHDxxxxxxxxxx" then tap on Continue. (Picture i8) i8 • Select Wi-Fi® Network to tap Continue then enter password to tap Next. (Pictures i9, i10) i9 i10 Getting started -
Connecting Devices 19 ENGLISH • Follow the steps above to locate the Camera with identification "CameraHDxxxxxxxxxx" then tap on Continue. (Picture i8) i8 • Select Wi-Fi® Network to tap Continue then enter password to tap Next. (Pictures i9, i10) i9 i10 Getting started -
User Guide
Page 20
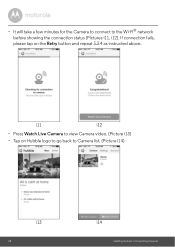
• It will take a few minutes for the Camera to connect to Camera list. (Picture i14) i13 20 i14 Getting started - i11 i12 • Press Watch Live Camera to view Camera video. (Picture i13) • Tap on the Retry button and repeat 3.3.4 as instructed above. Connecting Devices If connection fails, please tap on Hubble logo to go back to the Wi-Fi® network before showing the connection status (Pictures i11, i12).
• It will take a few minutes for the Camera to connect to Camera list. (Picture i14) i13 20 i14 Getting started - i11 i12 • Press Watch Live Camera to view Camera video. (Picture i13) • Tap on the Retry button and repeat 3.3.4 as instructed above. Connecting Devices If connection fails, please tap on Hubble logo to go back to the Wi-Fi® network before showing the connection status (Pictures i11, i12).
User Guide
Page 40
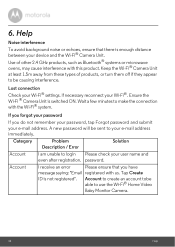
...receive an error Please ensure that there is enough distance between your user name and even after registration. Wait a few minutes to use the Wi-Fi® Home Video Baby Monitor Camera. 40 Help Help Noise interference To avoid background noise or echoes, ensure that you do not ...password and submit your e-mail address immediately. password. Account to create an account tobe able to make the connection with this product. Keep the Wi-Fi® Camera Unit at least 1.5m away from these types of other 2.4 GHz products, such as Bluetooth® systems or microwave ovens...
...receive an error Please ensure that there is enough distance between your user name and even after registration. Wait a few minutes to use the Wi-Fi® Home Video Baby Monitor Camera. 40 Help Help Noise interference To avoid background noise or echoes, ensure that you do not ...password and submit your e-mail address immediately. password. Account to create an account tobe able to make the connection with this product. Keep the Wi-Fi® Camera Unit at least 1.5m away from these types of other 2.4 GHz products, such as Bluetooth® systems or microwave ovens...
User Guide
Page 42
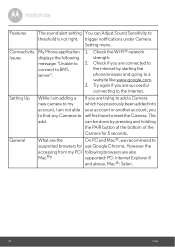
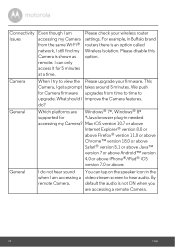
... accessing from my PC/ following strength. Features The sound alert setting You can be done by starting the server". Connectivity My Phone application 1. Check the Wi-Fi® network Issues displays the following browsers are trying to add a Camera new camera to my which has previously been added into account, I am...
... accessing from my PC/ following strength. Features The sound alert setting You can be done by starting the server". Connectivity My Phone application 1. Check the Wi-Fi® network Issues displays the following browsers are trying to add a Camera new camera to my which has previously been added into account, I am...
User Guide
Page 43
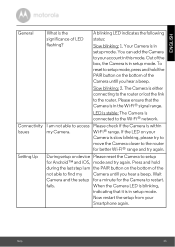
... PAIR button on the bottom of the Camera untill you hear a beep. When the Camera LED is blinking, indicating that the Camera is in the Wi-Fi® signal range. Now restart the setup from your account in setup mode. Your Camera is slow blinking, please try to move the Camera... stable: The Camera is the significance of the box, the Camera is within Issues my Camera. Help 43 ENGLISH General What is connected to the Wi-Fi® network. The Camera is in this mode. Please ensure that it is either connecting to the router or lost the link to the...
... PAIR button on the bottom of the Camera untill you hear a beep. When the Camera LED is blinking, indicating that the Camera is in the Wi-Fi® signal range. Now restart the setup from your account in setup mode. Your Camera is slow blinking, please try to move the Camera... stable: The Camera is the significance of the box, the Camera is within Issues my Camera. Help 43 ENGLISH General What is connected to the Wi-Fi® network. The Camera is in this mode. Please ensure that it is either connecting to the router or lost the link to the...
User Guide
Page 44
... for 5 minutes at a time. default the audio is not ON when you are Windows® 7*, Windows® 8* supported for Camera firmware upgrades from the same Wi-Fi® network, I still find my Camera is an option called Wireless Isolation. What should I get a prompt takes around 5 minutes. General I do ? Please disable this...
... for 5 minutes at a time. default the audio is not ON when you are Windows® 7*, Windows® 8* supported for Camera firmware upgrades from the same Wi-Fi® network, I still find my Camera is an option called Wireless Isolation. What should I get a prompt takes around 5 minutes. General I do ? Please disable this...
User Guide
Page 45
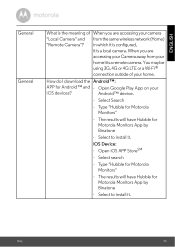
..."? Select to install it . ENGLISH General General What is the meaning of your iOS devices? The results will have Hubble for Motorola Monitors App by Binatone - Select to install it . Android™ device. - Type "Hubble for Android™ and - How do I download the Android™: APP for Motorola Monitors"...is configured, it is a local camera. Open Google Play App on your home. You may be using 3G, 4G or 4G LTE or a Wi-Fi® connection outside of When you are accessing your camera "Local Camera" and from your home it is a remote camera. The results will...
..."? Select to install it . ENGLISH General General What is the meaning of your iOS devices? The results will have Hubble for Motorola Monitors App by Binatone - Select to install it . Android™ device. - Type "Hubble for Android™ and - How do I download the Android™: APP for Motorola Monitors"...is configured, it is a local camera. Open Google Play App on your home. You may be using 3G, 4G or 4G LTE or a Wi-Fi® connection outside of When you are accessing your camera "Local Camera" and from your home it is a remote camera. The results will...
User Guide
Page 51
...108/EC on Annex III of the Directive 1999/5/EC and the following products Type of equipment: Model Name: Wi-Fi Video Camera FOCUS66-B,FOCUS66-B2, FOCUS66-S, FOCUS66-S2 FOCUS66-W, FOCUS66-W2, SCOUT66 Country of the Member States relating to electromagnetic compatibility (EMC) and the European Community Directive 2006/95...complies with the European Approval Marking CE as show. Any UnauthoriVed modification of Conformity We the manufacturer / Importer : Binatone Telecom Plc 1 Apsley Way London NW2 7HF, United Kingdom. EC Declaration of the product voids this Declaration. ENGLISH...
...108/EC on Annex III of the Directive 1999/5/EC and the following products Type of equipment: Model Name: Wi-Fi Video Camera FOCUS66-B,FOCUS66-B2, FOCUS66-S, FOCUS66-S2 FOCUS66-W, FOCUS66-W2, SCOUT66 Country of the Member States relating to electromagnetic compatibility (EMC) and the European Community Directive 2006/95...complies with the European Approval Marking CE as show. Any UnauthoriVed modification of Conformity We the manufacturer / Importer : Binatone Telecom Plc 1 Apsley Way London NW2 7HF, United Kingdom. EC Declaration of the product voids this Declaration. ENGLISH...

User Guide
Page 53
and other trademarks are trademarks or registered trademarks of Motorola Trademark Holdings, LLC. Wi-Fi is a trademark of companies. All rights reserved. Version 2.0 Printed in the U.S. Mac, Mac OS, iPhone, iPad and Safari are registered ...and /or its affiliates. All other countries. MOTOROLA and the Stylized M logo are the property of Google Inc. Manufactured, distributed or sold by Binatone Electronics International LTD., official licensee for this product. Windows XP and Internet Explorer are trademarks of their respective owners. © 2014 Motorola Mobility LLC...
and other trademarks are trademarks or registered trademarks of Motorola Trademark Holdings, LLC. Wi-Fi is a trademark of companies. All rights reserved. Version 2.0 Printed in the U.S. Mac, Mac OS, iPhone, iPad and Safari are registered ...and /or its affiliates. All other countries. MOTOROLA and the Stylized M logo are the property of Google Inc. Manufactured, distributed or sold by Binatone Electronics International LTD., official licensee for this product. Windows XP and Internet Explorer are trademarks of their respective owners. © 2014 Motorola Mobility LLC...