

Instruction Manual
Page 2
... the sewing machine is provided with this manual. Do not operate this instruction manual. 16. Keep fingers away from outlet. 9. t!Jrer as threading the needle, changing the needl\3, threading the bobbin, or changing the presser foot. 15. Replacement parts for its intended use a bent needle. 13. WARN ING - To unplug, grasp the plug...
... the sewing machine is provided with this manual. Do not operate this instruction manual. 16. Keep fingers away from outlet. 9. t!Jrer as threading the needle, changing the needl\3, threading the bobbin, or changing the presser foot. 15. Replacement parts for its intended use a bent needle. 13. WARN ING - To unplug, grasp the plug...

Instruction Manual
Page 6
... 26 Reverse Sewing Lever 27 Drop Feed Lever 27 THREADING THE MACHINE 28 Winding the Bobbin 28 Lower Threading 29 Upper (Needle) Threading 30 Using the Needle Threader (75 only 32 Quick Thread-setting System FAST START BOBBIN (75 only 34 Drawing Up Lower Thread (50, 60 and 70 only) ..... 35 Twin...-Needle Sewing (60, 70 and 75 only 36 Thread Tension 37 CHART ...
... 26 Reverse Sewing Lever 27 Drop Feed Lever 27 THREADING THE MACHINE 28 Winding the Bobbin 28 Lower Threading 29 Upper (Needle) Threading 30 Using the Needle Threader (75 only 32 Quick Thread-setting System FAST START BOBBIN (75 only 34 Drawing Up Lower Thread (50, 60 and 70 only) ..... 35 Twin...-Needle Sewing (60, 70 and 75 only 36 Thread Tension 37 CHART ...
Instruction Manual
Page 9
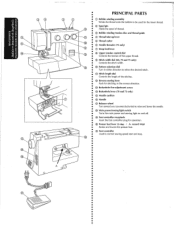
• • • PRINCIPAl PARTS • (j) Bobbin winding assembly • • Winds the thread onto the bobbin to be used for the lower thread. • ®Spool pin • • Holds the spool of thread. • ® Bobbin winding tension disc and thread guide @ Thread take-up lever ® Thread cutter ® Needle threader (75 only) IJ) Drop feed lever...
• • • PRINCIPAl PARTS • (j) Bobbin winding assembly • • Winds the thread onto the bobbin to be used for the lower thread. • ®Spool pin • • Holds the spool of thread. • ® Bobbin winding tension disc and thread guide @ Thread take-up lever ® Thread cutter ® Needle threader (75 only) IJ) Drop feed lever...
Instruction Manual
Page 36
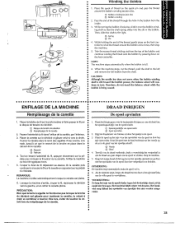
... staat, zal de vers !a gauche, et en retirer Ia canette pleine. Winding the Bobbin 1. Pass the end of the thread, gently press on the foot con• troller to wind the thread around the bobbin winding tension disc. Knip het stukje draad af dat nag boven het spoeltje uitsteekt en...pe~ • dale pour enrouler le fil auteur de Ia canette. Place the spool of the bobbin and • continue winding the thread onto the bobbin by pressing down on the spool pin and pass the thread around the bobbin a few times, then stop t •• the machine. • 5. OPMERKING: De ...
... staat, zal de vers !a gauche, et en retirer Ia canette pleine. Winding the Bobbin 1. Pass the end of the thread, gently press on the foot con• troller to wind the thread around the bobbin winding tension disc. Knip het stukje draad af dat nag boven het spoeltje uitsteekt en...pe~ • dale pour enrouler le fil auteur de Ia canette. Place the spool of the bobbin and • continue winding the thread onto the bobbin by pressing down on the spool pin and pass the thread around the bobbin a few times, then stop t •• the machine. • 5. OPMERKING: De ...
Instruction Manual
Page 37
... and pulling it out from a full bobbin and insert the bobbin into the bobbin case. (See fig. 8-1.) Pull the trailing thread into the shuttle race and release the latch. Unwind about 10 em (4'') of thread from the shuttle race (fig. NOTE: If the bobbin case is , tot in het canette..., comme illustre sur 4. Ia fig. 8~2, jusqu'a ce qu'i! I. Make sure the bobbin case finger fits into the m.;tchine, it enters the delivery eye under the tension spring (fig. A B-2 8-3 c lower Threading Turn power switch to the left, as shown in fig. Open de spoelhuisklep achter bet ...
... and pulling it out from a full bobbin and insert the bobbin into the bobbin case. (See fig. 8-1.) Pull the trailing thread into the shuttle race and release the latch. Unwind about 10 em (4'') of thread from the shuttle race (fig. NOTE: If the bobbin case is , tot in het canette..., comme illustre sur 4. Ia fig. 8~2, jusqu'a ce qu'i! I. Make sure the bobbin case finger fits into the m.;tchine, it enters the delivery eye under the tension spring (fig. A B-2 8-3 c lower Threading Turn power switch to the left, as shown in fig. Open de spoelhuisklep achter bet ...
Instruction Manual
Page 42
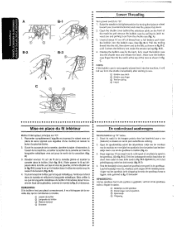
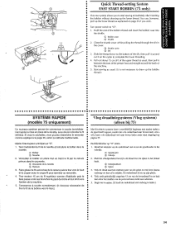
... and straight toward the back of ~" •• the machine. • 5. Slide the thread down to start sewing immediately after inserting the bobbin without drawing up the bobbin • thread.) SYSTEME RAPIDE •• (modele 75 uniquement) a ••• Ce nouveau systeme ...interrupteur principal sur "0". •• 1. Pull out about 15 em {6 11 ) of the bobbin thread and insert the bobbin case into the shuttle. Close the shuttle cover while pulling the thread through the slit in the cover. ® Shuttle cover @Slit 3. Hold the end of ...
... and straight toward the back of ~" •• the machine. • 5. Slide the thread down to start sewing immediately after inserting the bobbin without drawing up the bobbin • thread.) SYSTEME RAPIDE •• (modele 75 uniquement) a ••• Ce nouveau systeme ...interrupteur principal sur "0". •• 1. Pull out about 15 em {6 11 ) of the bobbin thread and insert the bobbin case into the shuttle. Close the shuttle cover while pulling the thread through the slit in the cover. ® Shuttle cover @Slit 3. Hold the end of ...

Instruction Manual
Page 43
... your left hand, hold the end of the upper thread. The upper •• thread should have caught the lower thread in a large loop . • 4. Pull the upper thread toward you (counterclockwise) until the needle moves down and back up from the bobbin in a loop. Pull out about 15 em (6~') ...of both threads and place them toward you and ~he lower thread will come • up again to their highest positions. 2. Raise the presser foot and the needle ...
... your left hand, hold the end of the upper thread. The upper •• thread should have caught the lower thread in a large loop . • 4. Pull the upper thread toward you (counterclockwise) until the needle moves down and back up from the bobbin in a loop. Pull out about 15 em (6~') ...of both threads and place them toward you and ~he lower thread will come • up again to their highest positions. 2. Raise the presser foot and the needle ...
Instruction Manual
Page 45
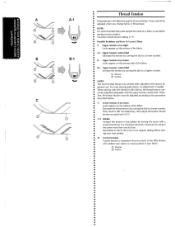
...Increase the tension by turning the dial to a higher number. B Upper tension is recommended that a test sample be adjusted when you change fabric or thread type. Thread Tension Thread tension will affect the quality of the fabric . lt may need to be made on a fabric scrap before sewing on your stitches. A~1 Upper ...tension cOntrol dial Decrease the tension by turning the dial to a lower number. --"] c A-1 - The.basic thread tension setting is too tight. locks appear on the reverse side of your project.
...Increase the tension by turning the dial to a higher number. B Upper tension is recommended that a test sample be adjusted when you change fabric or thread type. Thread Tension Thread tension will affect the quality of the fabric . lt may need to be made on a fabric scrap before sewing on your stitches. A~1 Upper ...tension cOntrol dial Decrease the tension by turning the dial to a lower number. --"] c A-1 - The.basic thread tension setting is too tight. locks appear on the reverse side of your project.

Instruction Manual
Page 47
CHART OF SEWING FABRICS, NEEDLES AND THREAD COMBINATIONS KNITS Single knit, Double knit, jersey, Tricot NOTE: 1. Utiliser Ia meme tame de fil pour les fils inf8rieur (canette) et superieur (bobine). Polyester enrobe ...de eaton SSiectionner selon le tableau ci-dessus Ia tame de fil et le calibre d'aiguille adequats. 2. Use the same size thread for the upper (spool) and lower {bobbin) threads. #90/14 Cotton-Wrapped Polyester TABLEAU DES COMBINAISONS TISSUIAIGUILLE/FIL TRICOTS Tricot simple, double, jersey, tricot en general #90/14 REMARQUE: 1. Select...
CHART OF SEWING FABRICS, NEEDLES AND THREAD COMBINATIONS KNITS Single knit, Double knit, jersey, Tricot NOTE: 1. Utiliser Ia meme tame de fil pour les fils inf8rieur (canette) et superieur (bobine). Polyester enrobe ...de eaton SSiectionner selon le tableau ci-dessus Ia tame de fil et le calibre d'aiguille adequats. 2. Use the same size thread for the upper (spool) and lower {bobbin) threads. #90/14 Cotton-Wrapped Polyester TABLEAU DES COMBINAISONS TISSUIAIGUILLE/FIL TRICOTS Tricot simple, double, jersey, tricot en general #90/14 REMARQUE: 1. Select...
Instruction Manual
Page 53
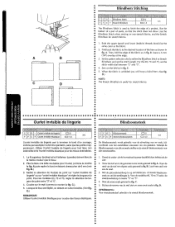
... me le montre stof. 2. A. of the hem as shown in fig. D.) OPMERKING: Voor stretchmateriaal ·]:ebruikt u de stretch blindzoomsteek. Both the upper (spool) and lower {bobbin) threads should be the satne color as in fig. When the fabric is useful for stretch fabrics . 1. C. 4. Le til superieur (bobine) et !e fil infElrieur {canette) doivent...
... me le montre stof. 2. A. of the hem as shown in fig. D.) OPMERKING: Voor stretchmateriaal ·]:ebruikt u de stretch blindzoomsteek. Both the upper (spool) and lower {bobbin) threads should be the satne color as in fig. When the fabric is useful for stretch fabrics . 1. C. 4. Le til superieur (bobine) et !e fil infElrieur {canette) doivent...
Instruction Manual
Page 78
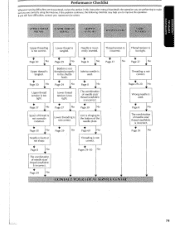
... make sure you to the bottom of thread is not correct. .. If you sti!! Page 30 No Upper thread is incorrect. rectly inserted. .. tight. Page 8 No The combination of needle size/ thread size/fabric ..is . Page 29 No ~ Bobbin is not correct. Page 69 No ~ Threading is not threaded properly in this instruction manual that details...
... make sure you to the bottom of thread is not correct. .. If you sti!! Page 30 No Upper thread is incorrect. rectly inserted. .. tight. Page 8 No The combination of needle size/ thread size/fabric ..is . Page 29 No ~ Bobbin is not correct. Page 69 No ~ Threading is not threaded properly in this instruction manual that details...
Instruction Manual
Page 79
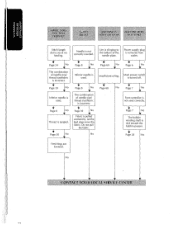
...30 No Page 39 No Fabric is not used correctly. No I ) Foot controller is pulled excessively. Do not pu II the fabric. Page 8 No Thread is used . Let the feed dogs move the fabric. Page 39 No Page 8 No Page 68 No Page 7 No Inferior needle is tangled. No Page... 7 No The bobbin winding shaft is removed from outlet. Power supply plug is slid toward the bobbin presser. Inferior needle is clinging to the bottom of the needle plate. Lint is used . Page 28 No ...
...30 No Page 39 No Fabric is not used correctly. No I ) Foot controller is pulled excessively. Do not pu II the fabric. Page 8 No Thread is used . Let the feed dogs move the fabric. Page 39 No Page 8 No Page 68 No Page 7 No Inferior needle is tangled. No Page... 7 No The bobbin winding shaft is removed from outlet. Power supply plug is slid toward the bobbin presser. Inferior needle is clinging to the bottom of the needle plate. Lint is used . Page 28 No ...
Instruction Manual
Page 85
... 7 • : u Monogramming 65 M Stitch 12 N Needle Inspection 8 Universal Stitching 48 Upper Tension Control Dial 37 Upper Threading 30 w Replacement 8 : Winding the Bobbin 28 Threading 30 Threader 32 : • z o Zigzag Stitching 44 : Zipper Inserting 61 i. 77 A • Page •... Stitching 50 B Balancing the Machine 10 Blindhem Stitching 45 0 p Patchworking 49 Pattern Lengths 12-15 Bobbin o Pattern Selection Dial 11 ! Threading 29, 34 Pattern Widths 12-15 Winding 28 o Performance Checklist 70-71 Bridging Stitch 12 Buttonhole Sewing...
... 7 • : u Monogramming 65 M Stitch 12 N Needle Inspection 8 Universal Stitching 48 Upper Tension Control Dial 37 Upper Threading 30 w Replacement 8 : Winding the Bobbin 28 Threading 30 Threader 32 : • z o Zigzag Stitching 44 : Zipper Inserting 61 i. 77 A • Page •... Stitching 50 B Balancing the Machine 10 Blindhem Stitching 45 0 p Patchworking 49 Pattern Lengths 12-15 Bobbin o Pattern Selection Dial 11 ! Threading 29, 34 Pattern Widths 12-15 Winding 28 o Performance Checklist 70-71 Bridging Stitch 12 Buttonhole Sewing...


