

User Guide
Page 2
...longer require this instruction manual. See instructions for household use , it should the sewing computer be left unattended when using the embroidery module. 18. Use this manual. The wrong plate can cause needle breakage. 7. Always unplug the sewing computer from the electricity...a double-insulated product requires extreme care and knowledge of design and production technologiy. This sewing and embroidery computer is committed to break. 9. ENVIROMENTAL PROTECTION BERNINA is intended for servicing of it has fallen into any possible damage as threading or changing the needle...
...longer require this instruction manual. See instructions for household use , it should the sewing computer be left unattended when using the embroidery module. 18. Use this manual. The wrong plate can cause needle breakage. 7. Always unplug the sewing computer from the electricity...a double-insulated product requires extreme care and knowledge of design and production technologiy. This sewing and embroidery computer is committed to break. 9. ENVIROMENTAL PROTECTION BERNINA is intended for servicing of it has fallen into any possible damage as threading or changing the needle...

User Guide
Page 3
... welcome you completely satisfied. This product was designed and built to the highest standards in the BERNINA sewing family and we can support you will help , ideas and embroidery essentials, to new heights. Please visit your bernette Deco 340. he will spend countless hours enjoying the many possibilities to customize your designs on the screen...
... welcome you completely satisfied. This product was designed and built to the highest standards in the BERNINA sewing family and we can support you will help , ideas and embroidery essentials, to new heights. Please visit your bernette Deco 340. he will spend countless hours enjoying the many possibilities to customize your designs on the screen...

User Guide
Page 4
Contents 3 Important Safety Instructions 1 Welcome 2 Embroidery Computer Overview 4- 6 Getting Ready to Embroider 7- 20 Important Embroidery Information 21- 24 Key Operations 25- 35 Embroidery 36- 40 Lettering 41- 45 Editing and Combining Designs 46- 53 Design Transfer and Compatibility 54- 58 Care and Maintenance 59- 60 Troubleshooting 61 Index 62 Built-in Design Chart Appendix Table of Preset Colors Appendix
Contents 3 Important Safety Instructions 1 Welcome 2 Embroidery Computer Overview 4- 6 Getting Ready to Embroider 7- 20 Important Embroidery Information 21- 24 Key Operations 25- 35 Embroidery 36- 40 Lettering 41- 45 Editing and Combining Designs 46- 53 Design Transfer and Compatibility 54- 58 Care and Maintenance 59- 60 Troubleshooting 61 Index 62 Built-in Design Chart Appendix Table of Preset Colors Appendix
User Guide
Page 5
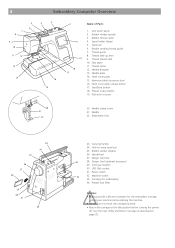
...holder (large) 5. Thread guide 8. Thread take-up lever 9. Pocket for the embroidery carriage behind your machine before starting the machine. • Do not force to ...• Always provide sufficient clearance for scissors 20 21 22 20. Use the keys Utility and Return Carriage as described on page 25. 4 Embroidery Computer Overview 5 4 3 6 7 8 9 10 11 12 13 14 16 15 2 Name of Parts 1 19 18 17 1. Thread... Spool pin 6. Needle threader 13. Hook cover plate 15. Needle clamp screw 21. Embroidery foot 25 26 27 28 23 24 29 30 31 32 23. Hole for...
...holder (large) 5. Thread guide 8. Thread take-up lever 9. Pocket for the embroidery carriage behind your machine before starting the machine. • Do not force to ...• Always provide sufficient clearance for scissors 20 21 22 20. Use the keys Utility and Return Carriage as described on page 25. 4 Embroidery Computer Overview 5 4 3 6 7 8 9 10 11 12 13 14 16 15 2 Name of Parts 1 19 18 17 1. Thread... Spool pin 6. Needle threader 13. Hook cover plate 15. Needle clamp screw 21. Embroidery foot 25 26 27 28 23 24 29 30 31 32 23. Hole for...
User Guide
Page 6
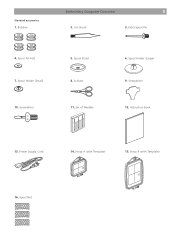
Spool Pin Felt 7. Screwdriver 5. Scissors 11. Instruction Book 13. Hoop B (with Template) 15. Set of Needles 6. Screwdriver 12. Spool Holder (Small) 10. Bobbins Embroidery Computer Overview 5 2. Spool Holder (Large) 9. Spool Net Standard accessories 1. Extra Spool Pin 4. Spool Stand 8. Hoop A (with Template) 16. Lint Brush 3. Power Supply Cord 14.
Spool Pin Felt 7. Screwdriver 5. Scissors 11. Instruction Book 13. Hoop B (with Template) 15. Set of Needles 6. Screwdriver 12. Spool Holder (Small) 10. Bobbins Embroidery Computer Overview 5 2. Spool Holder (Large) 9. Spool Net Standard accessories 1. Extra Spool Pin 4. Spool Stand 8. Hoop A (with Template) 16. Lint Brush 3. Power Supply Cord 14.
User Guide
Page 7
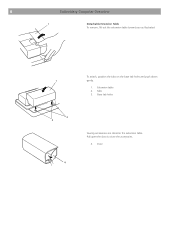
6 Embroidery Computer Overview 1 Detachable Extension Table To remove, lift out the extension table toward you as illustrated. Extension table 2. Tabs 3. Base tab holes 2 3 4 Sewing accessories are stored in the extension table. Pull open the door to store the accessories. 4. Door To attach, position the tabs on the base tab holes and push down 1 gently. 1.
6 Embroidery Computer Overview 1 Detachable Extension Table To remove, lift out the extension table toward you as illustrated. Extension table 2. Tabs 3. Base tab holes 2 3 4 Sewing accessories are stored in the extension table. Pull open the door to store the accessories. 4. Door To attach, position the tabs on the base tab holes and push down 1 gently. 1.
User Guide
Page 8
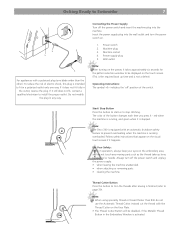
... in a polarized outlet only one blade wider than #30 do not touch any way. Machine socket 4. Follow safety instructions that appear on the embroidery area, and do not use the Automatic Thread Cutter. Note: • When using speciality thread or thread thicker than the other): To reduce ... keep your eyes on the visual touch screen if it is running overloaded. Insert the power supply plug into the machine. Note: The Deco 340 is equipped with an automatic shutdown safety feature to prevent overheating when the machine is running , and green when it happens. Getting Ready ...
... in a polarized outlet only one blade wider than #30 do not touch any way. Machine socket 4. Follow safety instructions that appear on the embroidery area, and do not use the Automatic Thread Cutter. Note: • When using speciality thread or thread thicker than the other): To reduce ... keep your eyes on the visual touch screen if it is running overloaded. Insert the power supply plug into the machine. Note: The Deco 340 is equipped with an automatic shutdown safety feature to prevent overheating when the machine is running , and green when it happens. Getting Ready ...
User Guide
Page 9
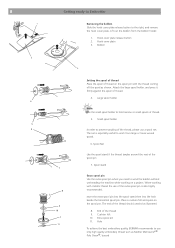
...spool on a project. Attach the large spool holder, and press it firmly against the spool of the thread 9. Hole To achieve the best embroidery quality, BERNINA recommends to work from the bobbin holder. 1. 8 1 Getting ready to Embroider Removing the bobbin Slide the hook cover plate release button to ... holder In order to prevent tangling of the thread, please use of the extra spool pin is especially usefull to use only high quality embroidery thread such as shown. End of thread. 4. Extra spool pin 11. Hook cover plate release button 2. The net is also highly recommended...
...spool on a project. Attach the large spool holder, and press it firmly against the spool of the thread 9. Hole To achieve the best embroidery quality, BERNINA recommends to work from the bobbin holder. 1. 8 1 Getting ready to Embroider Removing the bobbin Slide the hook cover plate release button to ... holder In order to prevent tangling of the thread, please use of the extra spool pin is especially usefull to use only high quality embroidery thread such as shown. End of thread. 4. Extra spool pin 11. Hook cover plate release button 2. The net is also highly recommended...
User Guide
Page 10
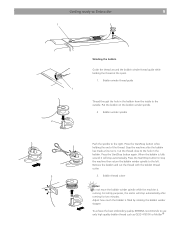
... winder stopper. Bobbin thread cutter Notes: Do not move the bobbin winder spindle while the machine is running for two minutes. To achieve the best embroidery quality, BERNINA recommends to the right. Getting ready to Embroider 9 1 1 2 Winding the bobbin Guide the thread around the bobbin winder thread guide while holding the end...
... winder stopper. Bobbin thread cutter Notes: Do not move the bobbin winder spindle while the machine is running for two minutes. To achieve the best embroidery quality, BERNINA recommends to the right. Getting ready to Embroider 9 1 1 2 Winding the bobbin Guide the thread around the bobbin winder thread guide while holding the end...
User Guide
Page 12
Getting ready to place the embroidery hoop under the thread guide plate (A). Presser foot lifter 2 A B 3 C Hold the thread with both hands and pass the thread around the bottom of the thread ...
Getting ready to place the embroidery hoop under the thread guide plate (A). Presser foot lifter 2 A B 3 C Hold the thread with both hands and pass the thread around the bottom of the thread ...

User Guide
Page 15
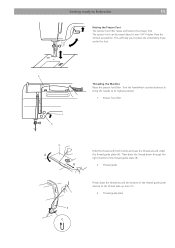
Draw the needle thread to bring up to Embroider Drawing up the Bobbin Thread Raise the presser foot lifter. Thread holder 3 4 Loop of the bobbin thread Pass the needle thread through the hole in the embroidery foot and draw it up a loop of free thread. 3. Hold the needle thread with your finger. 1. Hole 4. Needle thread 1 2 Turn the handwheel one complete turn toward you. 14 1 Getting Ready to the thread holder leaving an inch of the bobbin thread. 2.
Draw the needle thread to bring up to Embroider Drawing up the Bobbin Thread Raise the presser foot lifter. Thread holder 3 4 Loop of the bobbin thread Pass the needle thread through the hole in the embroidery foot and draw it up a loop of free thread. 3. Hold the needle thread with your finger. 1. Hole 4. Needle thread 1 2 Turn the handwheel one complete turn toward you. 14 1 Getting Ready to the thread holder leaving an inch of the bobbin thread. 2.
User Guide
Page 16
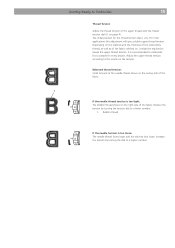
... sample. Bobbin thread 5 If the needle tension is «4». It is recommended to a higher number. 3 Depending on the material and the thickness of the embroidery thread, as well as of the fabric stitched on the right side of the upper thread with the thread tension dial (9. Reduce the 4 tension by...
... sample. Bobbin thread 5 If the needle tension is «4». It is recommended to a higher number. 3 Depending on the material and the thickness of the embroidery thread, as well as of the fabric stitched on the right side of the upper thread with the thread tension dial (9. Reduce the 4 tension by...
User Guide
Page 18
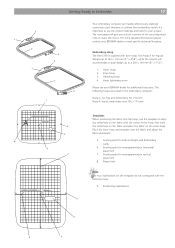
... will give you a short overview of the hoop. Starting point for monogramming in the embroidery computer: Hoop C: for your project. Hoop tightening screw Please see your BERNINA dealer or read specific technical literature. The following hoops are preset in vertical placement 8. Inner... Ready to align the centerlines on the fabric with the reference lines. 9. Embroidery Hoop The Deco 340 is important to use the correct materials and tools for free arm embroidery, 50 x 50 mm Hoop F: round, embroidery area 126 x 110 mm 6 5 STARTINGPOIN T FORMONOGRAMMIN G CENTER POINT 9...
... will give you a short overview of the hoop. Starting point for monogramming in the embroidery computer: Hoop C: for your project. Hoop tightening screw Please see your BERNINA dealer or read specific technical literature. The following hoops are preset in vertical placement 8. Inner... Ready to align the centerlines on the fabric with the reference lines. 9. Embroidery Hoop The Deco 340 is important to use the correct materials and tools for free arm embroidery, 50 x 50 mm Hoop F: round, embroidery area 126 x 110 mm 6 5 STARTINGPOIN T FORMONOGRAMMIN G CENTER POINT 9...
User Guide
Page 19
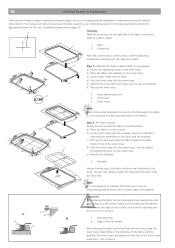
... Place the outer hoop on the surface. 7 Attaching Pins 8 Edge of the outer hoop. b) Place the fabric with the fabric onto the Deco 340. You are embroidering several pieces with the template inserted on the fabric, matching the centerlines on the outer hoop. Note: It is not necessary to...the fabric on a flat surface b) Lay the inner hoop with the same fabric and stabilizer. 7 8 4 5 Important: When placing the fabric on the embroidery hoop, always place the outer hoop on the outer hoop. c) Lay the inner hoop over the edge the surface. 5 3 Step 1: Calibrate the hoop ...
... Place the outer hoop on the surface. 7 Attaching Pins 8 Edge of the outer hoop. b) Place the fabric with the fabric onto the Deco 340. You are embroidering several pieces with the template inserted on the fabric, matching the centerlines on the outer hoop. Note: It is not necessary to...the fabric on a flat surface b) Lay the inner hoop with the same fabric and stabilizer. 7 8 4 5 Important: When placing the fabric on the embroidery hoop, always place the outer hoop on the outer hoop. c) Lay the inner hoop over the edge the surface. 5 3 Step 1: Calibrate the hoop ...
User Guide
Page 20
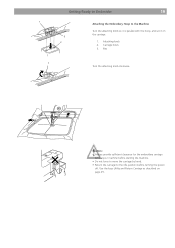
Getting Ready to Embroider 19 1 3 2 Attaching the Embroidery Hoop to the idle position before turning the power off. Use the keys Utility and Return Carriage as described on the carriage. 1. Attaching knob 2. Carriage holes 3. Caution: • Always provide sufficient clearance for the embroidery carriage behind your machine before starting the machine. • Do not force to move the carriage by hand. • Return the carriage to the Machine Turn the attaching knob so it is parallel with the hoop, and set it on page 25. Pins 1 Turn the attaching knob clockwise.
Getting Ready to Embroider 19 1 3 2 Attaching the Embroidery Hoop to the idle position before turning the power off. Use the keys Utility and Return Carriage as described on the carriage. 1. Attaching knob 2. Carriage holes 3. Caution: • Always provide sufficient clearance for the embroidery carriage behind your machine before starting the machine. • Do not force to move the carriage by hand. • Return the carriage to the Machine Turn the attaching knob so it is parallel with the hoop, and set it on page 25. Pins 1 Turn the attaching knob clockwise.

User Guide
Page 21
...Tear-away stabilizers • Similar to reveal the self- Spray adhesive • do not use spray adhesive near or directly at embroidery computer • use spray to stick stabilizer to wrong side of fabric for more stability • sparingly use spray adhesive and spray...to the wrong side of the fabric with temporary spray adhesive before hooping • carefully tear away excess stabilizer from the back of the embroidery after stitching • stabilizer will remain under larger embroidered areas Application: For all wovens and non-stretchables Cut-away stabilizers • one...
...Tear-away stabilizers • Similar to reveal the self- Spray adhesive • do not use spray adhesive near or directly at embroidery computer • use spray to stick stabilizer to wrong side of fabric for more stability • sparingly use spray adhesive and spray...to the wrong side of the fabric with temporary spray adhesive before hooping • carefully tear away excess stabilizer from the back of the embroidery after stitching • stabilizer will remain under larger embroidered areas Application: For all wovens and non-stretchables Cut-away stabilizers • one...
User Guide
Page 22
... such as water soluble stabilizer on the wrong side of the fabric Application: • ideal for fine, loosely woven fabrics, e.g. Important Embroidery Information 21 Spray starch for additional stiffening • spray starch is ideal for stiffening fine, soft or loosely woven fabrics • spray... gently tearing it away when used as a topping on fine fabric • large-scale, densely embroidered motifs (e.g. with a pile and lace embroidery • water soluble stabilizer looks like plastic wrap • dissolve stabilizer in hoop (as the motif is not embroidered on a sample fabric....
... such as water soluble stabilizer on the wrong side of the fabric Application: • ideal for fine, loosely woven fabrics, e.g. Important Embroidery Information 21 Spray starch for additional stiffening • spray starch is ideal for stiffening fine, soft or loosely woven fabrics • spray... gently tearing it away when used as a topping on fine fabric • large-scale, densely embroidered motifs (e.g. with a pile and lace embroidery • water soluble stabilizer looks like plastic wrap • dissolve stabilizer in hoop (as the motif is not embroidered on a sample fabric....
User Guide
Page 23
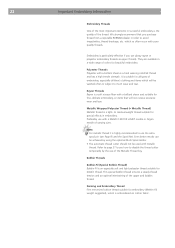
...or subject to see Page 8) and the Spool Net. Bobbin Threads Bobbin-Fil (Special Bobbin Thread) Bobbin-Fil is a light- Embroidery is a hard wearing colorfast thread and has a high tensile strength. Rayon Threads Rayon is a soft viscose fiber with a brilliant ...sheen is particularly effective if you purchase thread from a reputable BERNINA dealer in embroidery. Darning and Embroidery Thread Fine mercerized cotton thread suitable for embroidery (Mettler 60 weight suggested), which will not receive excessive wear and tear. We strongly recommend ...
...or subject to see Page 8) and the Spool Net. Bobbin Threads Bobbin-Fil (Special Bobbin Thread) Bobbin-Fil is a light- Embroidery is a hard wearing colorfast thread and has a high tensile strength. Rayon Threads Rayon is a soft viscose fiber with a brilliant ...sheen is particularly effective if you purchase thread from a reputable BERNINA dealer in embroidery. Darning and Embroidery Thread Fine mercerized cotton thread suitable for embroidery (Mettler 60 weight suggested), which will not receive excessive wear and tear. We strongly recommend ...
User Guide
Page 24
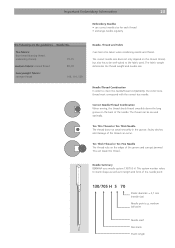
...Thin Thread or Too Thick Needle The thread does not travel smoothly down the long groove on the edges of the needle. Needle Summary BERNINA uses needle system 130/705 H. The fabric weight determines the thread weight and needle size. This can occur. This system number refers ... or Too Fine Needle The thread rubs on the back of the groove and can be taken when combining needle and thread. Important Embroidery Information 23 Embroidery Needles • use correct needle size for each thread • exchange needle regularly The following are the guidelines: Needle No. fine...
...Thin Thread or Too Thick Needle The thread does not travel smoothly down the long groove on the edges of the needle. Needle Summary BERNINA uses needle system 130/705 H. The fabric weight determines the thread weight and needle size. This can occur. This system number refers ... or Too Fine Needle The thread rubs on the back of the groove and can be taken when combining needle and thread. Important Embroidery Information 23 Embroidery Needles • use correct needle size for each thread • exchange needle regularly The following are the guidelines: Needle No. fine...
User Guide
Page 25
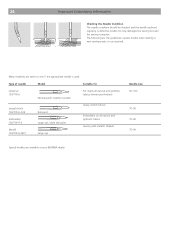
Many materials are available at your BERNINA dealer. Type of needle Model Suitable for Universal 130/705 H Normal point, slightly rounded For nearly all natural and synthetic fabrics (woven and knitted) Jersey/Stretch 130/705 H-SUK Embroidery 130/705 H-E Metafil 130/705 H-MET Ball point Large eye, ...size 60-100 70-90 75-90 75-90 Special needles are easier to sew if the appropriate needle is used. 24 Important Embroidery Information Checking the Needle Condition The needle condition should be checked and the needle replaced regularly. A defective needle not only damages the...
Many materials are available at your BERNINA dealer. Type of needle Model Suitable for Universal 130/705 H Normal point, slightly rounded For nearly all natural and synthetic fabrics (woven and knitted) Jersey/Stretch 130/705 H-SUK Embroidery 130/705 H-E Metafil 130/705 H-MET Ball point Large eye, ...size 60-100 70-90 75-90 75-90 Special needles are easier to sew if the appropriate needle is used. 24 Important Embroidery Information Checking the Needle Condition The needle condition should be checked and the needle replaced regularly. A defective needle not only damages the...


