User Guide
Page 1
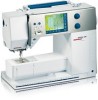
...the embroidery module. 18. Always unplug this instruction manual. 11. Use only attachments recommended by pulling on the cord, instead, grasp the plug before cleaning. Special care is intended for its intended use the BERNINA original stitch plate. Do not pull or push...187;) position then remove the plug from accumulation of doubleinsulated machines. SERVICING DOUBLEINSULATED PRODUCTS In a double-insulated product, two systems of BERNINA for a double-insulated product must be disconnected from the outlet. No grounding means is not in this sewing computer. The symbol ...
...the embroidery module. 18. Always unplug this instruction manual. 11. Use only attachments recommended by pulling on the cord, instead, grasp the plug before cleaning. Special care is intended for its intended use the BERNINA original stitch plate. Do not pull or push...187;) position then remove the plug from accumulation of doubleinsulated machines. SERVICING DOUBLEINSULATED PRODUCTS In a double-insulated product, two systems of BERNINA for a double-insulated product must be disconnected from the outlet. No grounding means is not in this sewing computer. The symbol ...
User Guide
Page 4
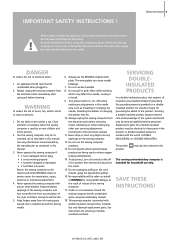
The accessories can be stored in the corresponding compartments Accessories The following accessories are arranged in the styrofoam packing: • foot control • instruction manual • power cable • warranty card • FHS presser foot lifter (Free Hand System) • slide-on table • seam guide for bobbin holders D and ...
The accessories can be stored in the corresponding compartments Accessories The following accessories are arranged in the styrofoam packing: • foot control • instruction manual • power cable • warranty card • FHS presser foot lifter (Free Hand System) • slide-on table • seam guide for bobbin holders D and ...

User Guide
Page 32
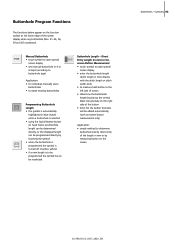
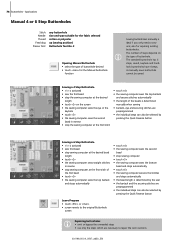
... (field with 1 is blue) • touch symbol • size will be reduced to approx. 4mm (field with 2 is blue) Manual 4 or 6 Step Buttonholes • touch symbol • a special screen appears • sew manual buttonhole in 4 or 6 steps (according to buttonhole type) Delete • touch symbol • deletes individual stitches or letters above...
... (field with 1 is blue) • touch symbol • size will be reduced to approx. 4mm (field with 2 is blue) Manual 4 or 6 Step Buttonholes • touch symbol • a special screen appears • sew manual buttonhole in 4 or 6 steps (according to buttonhole type) Delete • touch symbol • deletes individual stitches or letters above...
User Guide
Page 37
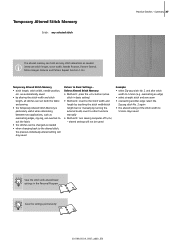
... sew seam • overcasting another edge: select the Zig-zag stitch No. 2 again • the altered setting of the stitch width to other functions manually • Method 3: turn sewing computer off («0») - Summary 37 The altered memory can be saved Example: • select Zig-zag stitch No...active stitch in basic setting) • Method 2: revert to the stitch width and length by touching the stitch width/stitch length bar (or manually by altering the stitch width and stitch length, all stitches can suit both the fabric and sewing • the Temporary Altered Stitch Memory is...
... sew seam • overcasting another edge: select the Zig-zag stitch No. 2 again • the altered setting of the stitch width to other functions manually • Method 3: turn sewing computer off («0») - Summary 37 The altered memory can be saved Example: • select Zig-zag stitch No...active stitch in basic setting) • Method 2: revert to the stitch width and length by touching the stitch width/stitch length bar (or manually by altering the stitch width and stitch length, all stitches can suit both the fabric and sewing • the Temporary Altered Stitch Memory is...
User Guide
Page 38
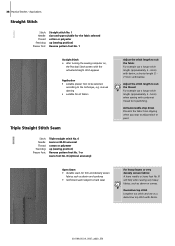
manual darning • suitable for all fabrics Triple Straight Stitch Seam Stitch: Needle: Thread: Feed dog: Presser foot: Triple straight stitch No. 6 Jeans or 80-90 ...
manual darning • suitable for all fabrics Triple Straight Stitch Seam Stitch: Needle: Thread: Feed dog: Presser foot: Triple straight stitch No. 6 Jeans or 80-90 ...
User Guide
Page 43
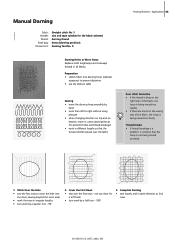
... the rows in different lengths so that the hoop is better spread over the first rows - Complete Darning • sew loosely and in all fabrics. Manual Darning Stitch: Needle: Thread: Feed dog: Presser foot: Straight stitch No. 1 size and type suitable for a soft finish • turn work by hand • work...
... the rows in different lengths so that the hoop is better spread over the first rows - Complete Darning • sew loosely and in all fabrics. Manual Darning Stitch: Needle: Thread: Feed dog: Presser foot: Straight stitch No. 1 size and type suitable for a soft finish • turn work by hand • work...
User Guide
Page 63
... 031196.50.04_0507_a630_EN Direct Entry Length (in mm) or Onscreen Button Measurement • touch symbol to open special screen display • sew manual buttonhole in 4 or 6 steps (according to buttonhole type) Application: • for the button thickness will be added automatically (with the ...determine the buttonhole length by placing the vertical black line precisely on the right side of the button • 2mm for individual manually sewn buttonholes • to be programmed the symbol has to repair existing buttonholes Programming Buttonhole Length • the symbol is ...
... 031196.50.04_0507_a630_EN Direct Entry Length (in mm) or Onscreen Button Measurement • touch symbol to open special screen display • sew manual buttonhole in 4 or 6 steps (according to buttonhole type) Application: • for the button thickness will be added automatically (with the ...determine the buttonhole length by placing the vertical black line precisely on the right side of the button • 2mm for individual manually sewn buttonholes • to be programmed the symbol has to repair existing buttonholes Programming Buttonhole Length • the symbol is ...

User Guide
Page 64
... Automatic buttonhole foot No. 3A Keyhole Buttonholes • mark the bead length only • the correct length eye will be sewn at the same speed Manual Buttonholes • mark the buttonhole length in the desired position • use Buttonhole foot No. 3 Automatic Buttonholes • mark the length of just one buttonhole...
... Automatic buttonhole foot No. 3A Keyhole Buttonholes • mark the bead length only • the correct length eye will be sewn at the same speed Manual Buttonholes • mark the buttonhole length in the desired position • use Buttonhole foot No. 3 Automatic Buttonholes • mark the length of just one buttonhole...
User Guide
Page 68
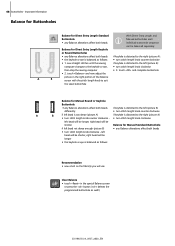
...Length Keyhole or Round Buttonholes • any Balance alterations affect both beads individual buttonhole sequence can be balanced separately Balance for Manual Standard Buttonhole if left (picture B): computer changes to the right (picture A) • turn stitch length knob counter ... 031196.50.04_0507_a630_EN Important Informaiton Balance for Buttonholes Balance for Direct Entry Length Standard With Direct Entry Length and Buttonhole Manual buttonholes each • any Balance alterations affect both beads if keyhole is distorted to the left (picture B) differently...
...Length Keyhole or Round Buttonholes • any Balance alterations affect both beads individual buttonhole sequence can be balanced separately Balance for Manual Standard Buttonhole if left (picture B): computer changes to the right (picture A) • turn stitch length knob counter ... 031196.50.04_0507_a630_EN Important Informaiton Balance for Buttonholes Balance for Direct Entry Length Standard With Direct Entry Length and Buttonhole Manual buttonholes each • any Balance alterations affect both beads if keyhole is distorted to the left (picture B) differently...
User Guide
Page 74
...Presser foot: any buttonhole size and type suitable for the fabric selected cotton or polyester up (sewing position) Buttonhole foot No. 3 Opening Manual Buttonhole • select the type of steps depends on the screen • the sewing computer sews the eye or the keyhole •... 4 steps. The number of buttonhole desired • touch «man» for repairing existing buttonholes. also for the Manual buttonhole function Sewing buttonholes manually is determined by the user • the bartack and the securing stitches are preprogrammed • the individual steps can also ...
...Presser foot: any buttonhole size and type suitable for the fabric selected cotton or polyester up (sewing position) Buttonhole foot No. 3 Opening Manual Buttonhole • select the type of steps depends on the screen • the sewing computer sews the eye or the keyhole •... 4 steps. The number of buttonhole desired • touch «man» for repairing existing buttonholes. also for the Manual buttonhole function Sewing buttonholes manually is determined by the user • the bartack and the securing stitches are preprogrammed • the individual steps can also ...
User Guide
Page 106
...171;OK» or cancel with «ESC» for the third time, the cleaning notification will be on page 103 of the manual. The display can be taken for the third time, the notification will appear again when restarting the sewing computer. Deleta data on the... This notification will penetrate presser foot or stitch plate. Deleting or overwriting data , e.g. After clearing with «ESC» for a service to a BERNINA dealer. Check hook system. Main motor failed. 106 Messages Needle will appear after approx. 2,000,000 stitches. The display can be cleaned / lubricated. ...
...171;OK» or cancel with «ESC» for the third time, the cleaning notification will be on page 103 of the manual. The display can be taken for the third time, the notification will appear again when restarting the sewing computer. Deleta data on the... This notification will penetrate presser foot or stitch plate. Deleting or overwriting data , e.g. After clearing with «ESC» for a service to a BERNINA dealer. Check hook system. Main motor failed. 106 Messages Needle will appear after approx. 2,000,000 stitches. The display can be cleaned / lubricated. ...

User Guide
Page 109
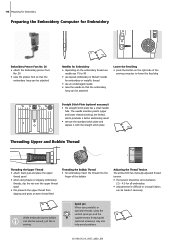
Setting up the Embroidery Computer Details Setting up the Embroidery Computer 109 2 4 3 6 1 Embroidery surface 2 Embroidery arm 3 Embroidery hoop connection 4 Accessory box 1 5 Connecting lug right 6 Connecting lug center 7 Sewing computer connecting cable 8 Cable holder 5 Front view 1 8 8 Back view The side view (handwheel) of the sewing and embroidery 7 computer with the cable connections are shown on page 7 of the sewing computer instruction manual. 031196.50.04_0507_a630_EN
Setting up the Embroidery Computer Details Setting up the Embroidery Computer 109 2 4 3 6 1 Embroidery surface 2 Embroidery arm 3 Embroidery hoop connection 4 Accessory box 1 5 Connecting lug right 6 Connecting lug center 7 Sewing computer connecting cable 8 Cable holder 5 Front view 1 8 8 Back view The side view (handwheel) of the sewing and embroidery 7 computer with the cable connections are shown on page 7 of the sewing computer instruction manual. 031196.50.04_0507_a630_EN
User Guide
Page 114
... the bobbin can be attached Lower the Feed Dog • press the button on the right side of the bobbin Adjusting the Thread Tension The artista 630 has manually adjusted thread tension. • the tension should be wound, just like in sewing. 114 Preparing for Embroidery Preparing the Embroidery Computer for Embroidery Embroidery...
... the bobbin can be attached Lower the Feed Dog • press the button on the right side of the bobbin Adjusting the Thread Tension The artista 630 has manually adjusted thread tension. • the tension should be wound, just like in sewing. 114 Preparing for Embroidery Preparing the Embroidery Computer for Embroidery Embroidery...
User Guide
Page 140
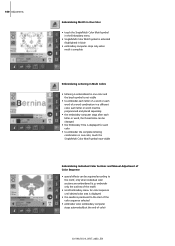
... one color and the brush symbol is embroidered in one color, touch the Single/Multi Color Motif symbol now visible Embroidering Individual Color Sections and Manual Adjustment of color) 031196.50.04_0507_a630_EN embroider only the outlines of the motif) • scroll Embroidery menu for color sequence until desired color area is...
... one color and the brush symbol is embroidered in one color, touch the Single/Multi Color Motif symbol now visible Embroidering Individual Color Sections and Manual Adjustment of color) 031196.50.04_0507_a630_EN embroider only the outlines of the motif) • scroll Embroidery menu for color sequence until desired color area is...

User Guide
Page 149
... / lubricated. The message disappears automatically if the presser foot was raised. The display can be changed . They serve as a reminder, warning, or confirmation of the manual. Does the user really want to a specific fact. Corresponding instructions are on page 103 of selected applications and functions. The message disappears automatically if the...
... / lubricated. The message disappears automatically if the presser foot was raised. The display can be changed . They serve as a reminder, warning, or confirmation of the manual. Does the user really want to a specific fact. Corresponding instructions are on page 103 of selected applications and functions. The message disappears automatically if the...

User Guide
Page 155
... examine, to inspect • when embroidering, the computer checks which embroidery hoop is preprogrammed «auto» appears, i.e. The sewer manually changes the positions on screen. Glossary Glossary 155 Add • to add means to combine by itself • keeping the external needle ...can be reset to the basic settings ESC • closing a function, going back to original position (e.g. to original screen settings) manual • a manual buttonhole is sewn in the memory of the embroidery computer OK • confirming the command entered or change that has been made PC...
... examine, to inspect • when embroidering, the computer checks which embroidery hoop is preprogrammed «auto» appears, i.e. The sewer manually changes the positions on screen. Glossary Glossary 155 Add • to add means to combine by itself • keeping the external needle ...can be reset to the basic settings ESC • closing a function, going back to original position (e.g. to original screen settings) manual • a manual buttonhole is sewn in the memory of the embroidery computer OK • confirming the command entered or change that has been made PC...
User Guide
Page 163
Index Index 171 A Accessories 152-154 • artista Embroidery Software 154 • Embroidery Mega-Hoop 153 • Embroidery Sticks 153 • Suitcase System 152 Accessory Box 4 Accessories Embroidery 110-111 Accessories Sewing 4-5...Term Memory • Buttonhole Program Functions • Buttonholes Summary • Buttonholes with Cord • Cutting Buttonholes open • Important Information • In General • Manual 4 or 6 Step Buttonholes • Sewing Hand-look Buttonhole • Sewing Round and Keyhole Buttonholes 102 53 50 10 10 12 80-83 62-75 69...
Index Index 171 A Accessories 152-154 • artista Embroidery Software 154 • Embroidery Mega-Hoop 153 • Embroidery Sticks 153 • Suitcase System 152 Accessory Box 4 Accessories Embroidery 110-111 Accessories Sewing 4-5...Term Memory • Buttonhole Program Functions • Buttonholes Summary • Buttonholes with Cord • Cutting Buttonholes open • Important Information • In General • Manual 4 or 6 Step Buttonholes • Sewing Hand-look Buttonhole • Sewing Round and Keyhole Buttonholes 102 53 50 10 10 12 80-83 62-75 69...
User Guide
Page 164
...; Buttonholes • Decorative Stitches • Embroidery Mode/ Sewing Mode • Personal Program • Practical Stitches • Quilt Stitches • Setup Program • Tutorial for Embroidery Manual Darning Memory Sewing • Correcting a Stitch Combination • Deleting Drawer 26-28 26 27 26 27, 128 27 26 27 28 28 43 87-91...
...; Buttonholes • Decorative Stitches • Embroidery Mode/ Sewing Mode • Personal Program • Practical Stitches • Quilt Stitches • Setup Program • Tutorial for Embroidery Manual Darning Memory Sewing • Correcting a Stitch Combination • Deleting Drawer 26-28 26 27 26 27, 128 27 26 27 28 28 43 87-91...


