User Guide
Page 1
... be identical to the nearest authorized BERNINA dealer or service center for grounding be added to be disconnected from the outlet. SAVE THESE INSTRUCTIONS! 031196.50.04_0507_a630_EN When the sewing computer is required around the sewing needle. 6. To disconnect, turn all controls to the off )... (off («0») position then remove the plug from all instructions before using and before pulling. 16. Do not use the BERNINA original stitch plate. Do not unplug by removing the plug from the electricity supply by pulling on a doubleinsulated product nor should only ...
... be identical to the nearest authorized BERNINA dealer or service center for grounding be added to be disconnected from the outlet. SAVE THESE INSTRUCTIONS! 031196.50.04_0507_a630_EN When the sewing computer is required around the sewing needle. 6. To disconnect, turn all controls to the off )... (off («0») position then remove the plug from all instructions before using and before pulling. 16. Do not use the BERNINA original stitch plate. Do not unplug by removing the plug from the electricity supply by pulling on a doubleinsulated product nor should only ...

User Guide
Page 10
10 Operating Instructions Winding the Bobbin Winding the Bobbin • turn power switch to «I» (on) • place empty bobbin on spindle Threading... bobbin and cut the thread with the «+» or «-» in the opened screen or by turning the stitch width knob • the motor will stop automatically when the bobbin is full • remove the ... the next steps of winding the bobbin Bobbin Case A To Remove the Bobbin Case • raise the needle • turn power switch to «0» (off) • open the bobbin cover • grasp the latch of the bobbin...
10 Operating Instructions Winding the Bobbin Winding the Bobbin • turn power switch to «I» (on) • place empty bobbin on spindle Threading... bobbin and cut the thread with the «+» or «-» in the opened screen or by turning the stitch width knob • the motor will stop automatically when the bobbin is full • remove the ... the next steps of winding the bobbin Bobbin Case A To Remove the Bobbin Case • raise the needle • turn power switch to «0» (off) • open the bobbin cover • grasp the latch of the bobbin...
User Guide
Page 11
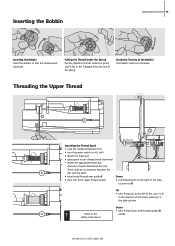
... in the direction of the arrow, placing it lies in the take thread through guides D and E 031196.50.04_0507_a630_EN There must turn the power switch to the left under the spring until it in the T-shaped slit at the end of the Bobbin The bobbin ... Threading the Upper Thread C A B D Attaching the Thread Spool • raise the needle and presser foot • turn clockwise. Refer to B Up • take - Clockwise Turning of the spring. Inserting the Bobbin Operating Instructions 11 Inserting the Bobbin Insert the bobbin so that the thread winds clockwise. Down...
... in the direction of the arrow, placing it lies in the take thread through guides D and E 031196.50.04_0507_a630_EN There must turn the power switch to the left under the spring until it in the T-shaped slit at the end of the Bobbin The bobbin ... Threading the Upper Thread C A B D Attaching the Thread Spool • raise the needle and presser foot • turn clockwise. Refer to B Up • take - Clockwise Turning of the spring. Inserting the Bobbin Operating Instructions 11 Inserting the Bobbin Insert the bobbin so that the thread winds clockwise. Down...

User Guide
Page 13
... • raise the pin until it will go • tighten the needle clamp screw ! Changing the Needle Removing the Needle • raise the needle • turn power switch to «0» (off) • lower the presser foot • loosen the needle clamp screw • pull the needle down to remove Inserting...
... • raise the pin until it will go • tighten the needle clamp screw ! Changing the Needle Removing the Needle • raise the needle • turn power switch to «0» (off) • lower the presser foot • loosen the needle clamp screw • pull the needle down to remove Inserting...

User Guide
Page 14
... spool on horizontal spool pin • place second thread spool and the bobbin, separated by a spool disc, on additional spool pin (both spools have to turn in the same direction) • thread as usual by guiding two threads on the left side of the tension disc A and one thread on the...
... spool on horizontal spool pin • place second thread spool and the bobbin, separated by a spool disc, on additional spool pin (both spools have to turn in the same direction) • thread as usual by guiding two threads on the left side of the tension disc A and one thread on the...
User Guide
Page 15
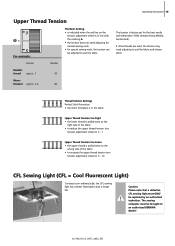
...work • for the best results with Metrosene 100/2 threads (Arova Mettler, Switzerland). The sewing computer must ONLY be adjusted to an authorized BERNINA dealer! 031196.50.04_0507_a630_EN If other threads are used, the tension may need adjusting for normal sewing work , the tension can be replaced by...Thread Tension too Tight • the lower thread is pulled more to the right side of the fabric • to reduce the upper thread tension turn tension adjustment wheel to 3 - 1 Upper Thread Tension too Loose • the upper thread is pulled more to the wrong side of the ...
...work • for the best results with Metrosene 100/2 threads (Arova Mettler, Switzerland). The sewing computer must ONLY be adjusted to an authorized BERNINA dealer! 031196.50.04_0507_a630_EN If other threads are used, the tension may need adjusting for normal sewing work , the tension can be replaced by...Thread Tension too Tight • the lower thread is pulled more to the right side of the fabric • to reduce the upper thread tension turn tension adjustment wheel to 3 - 1 Upper Thread Tension too Loose • the upper thread is pulled more to the wrong side of the ...
User Guide
Page 19
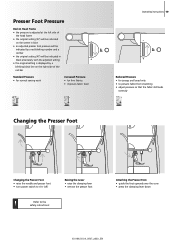
...; adjust pressure so that the fabric still feeds correctly Changing the Presser Foot Changing the Presser Foot • raise the needle and presser foot • turn power switch to the safety instructions!
...; adjust pressure so that the fabric still feeds correctly Changing the Presser Foot Changing the Presser Foot • raise the needle and presser foot • turn power switch to the safety instructions!
User Guide
Page 20
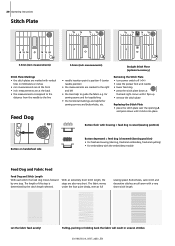
... (mm measurements) Stitch Plate Markings • the stitch plates are marked with vertical lines in uneven stitches 031196.50.04_0507_a630_EN Removing the Stitch Plate • turn power switch off («0») • raise the presser foot and needle • lower feed dog • press the stitch plate down until it flips...
... (mm measurements) Stitch Plate Markings • the stitch plates are marked with vertical lines in uneven stitches 031196.50.04_0507_a630_EN Removing the Stitch Plate • turn power switch off («0») • raise the presser foot and needle • lower feed dog • press the stitch plate down until it flips...

User Guide
Page 23
... stitch is highlighted in blue • every stitch in the Stitch Altering Area (SAA) is displayed with its number Altering the Stitch Width • turn the upper knob Display of Selected Stitch • a graphic of the selected stitch is visible in the left portion of the screen • changes ... a change has been made, e.g. 3.0mm (black bar) • the stitch width can be altered from 0mm to 5.5mm Altering the Stitch Length • turn the lower knob The altered stitch length is shown in two different ways: • stitch length bar 0-5 is displayed as blue area • altered length...
... stitch is highlighted in blue • every stitch in the Stitch Altering Area (SAA) is displayed with its number Altering the Stitch Width • turn the upper knob Display of Selected Stitch • a graphic of the selected stitch is visible in the left portion of the screen • changes ... a change has been made, e.g. 3.0mm (black bar) • the stitch width can be altered from 0mm to 5.5mm Altering the Stitch Length • turn the lower knob The altered stitch length is shown in two different ways: • stitch length bar 0-5 is displayed as blue area • altered length...
User Guide
Page 24
...programmed by number • an arrow pointing down indicates that the presser foot is still raised Lowered Feed Dog • if the feed dog is turned off («0») or the «clr» (clear) button is highlighted in the SAA. 24 Displays on Screen Presser Foot Indicator •...; the recommended presser foot for the selected stitch is displayed by BERNINA can be changed and stored in blue (a number of different functions can be selected simultaneously) 29 33 Changing Settings • select stitch (e.g.
...programmed by number • an arrow pointing down indicates that the presser foot is still raised Lowered Feed Dog • if the feed dog is turned off («0») or the «clr» (clear) button is highlighted in the SAA. 24 Displays on Screen Presser Foot Indicator •...; the recommended presser foot for the selected stitch is displayed by BERNINA can be changed and stored in blue (a number of different functions can be selected simultaneously) 29 33 Changing Settings • select stitch (e.g.

User Guide
Page 30
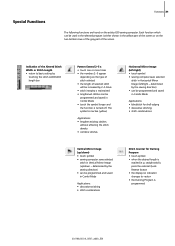
... • programmed adjustment/ selection is ready to previous screen OK • touch symbol • adjustment/selection is always active (green) when turning on various screens and programs of the artista 630 sewing computer. 30 Functions General Functions The following functions are returned to basic settings • all active functions will be programmed Pattern...
... • programmed adjustment/ selection is ready to previous screen OK • touch symbol • adjustment/selection is always active (green) when turning on various screens and programs of the artista 630 sewing computer. 30 Functions General Functions The following functions are returned to basic settings • all active functions will be programmed Pattern...
User Guide
Page 31
... Counter for Darning Program • touch symbol • when the desired length is turned off. Each function which can be used in the selected program is either shown in the yellow part of the screen or on the artista 630 sewing computer. Indication of the Altered Stitch Width or Stitch Length • return...
... Counter for Darning Program • touch symbol • when the desired length is turned off. Each function which can be used in the selected program is either shown in the yellow part of the screen or on the artista 630 sewing computer. Indication of the Altered Stitch Width or Stitch Length • return...

User Guide
Page 32
... cursor • deletes stitch combinations • deletes "Drawers" content Pattern Repeat 1-9 x • by touching the symbol • when the buttonhole is programmed the symbol is turned off (inactive, yellow) • if a new length is...
... cursor • deletes stitch combinations • deletes "Drawers" content Pattern Repeat 1-9 x • by touching the symbol • when the buttonhole is programmed the symbol is turned off (inactive, yellow) • if a new length is...
User Guide
Page 33
... fabrics Upper Case / Lower Case • Upper Case is activated when Block is selected • touch symbol • Lower Case is turned off • by selecting desired needle and stitch plate Applications: • to stitch pintucks and for stitch combi- The standard needle is active...stitch width is limited automatically so that the inserted standard needle cannot hit the stitch plate • once a feature is active the symbol turns red • selected functions remain active even after sewing computer is activated Continuous Reverse Sewing • touch symbol • sews the ...
... fabrics Upper Case / Lower Case • Upper Case is activated when Block is selected • touch symbol • Lower Case is turned off • by selecting desired needle and stitch plate Applications: • to stitch pintucks and for stitch combi- The standard needle is active...stitch width is limited automatically so that the inserted standard needle cannot hit the stitch plate • once a feature is active the symbol turns red • selected functions remain active even after sewing computer is activated Continuous Reverse Sewing • touch symbol • sews the ...
User Guide
Page 37
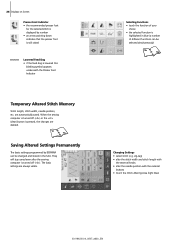
... previous individually altered setting will not be saved Example: • select Zig-zag stitch No. 2 and alter stitch width to other functions manually • Method 3: turn sewing computer off («0») - are stitch length, stitch width, Needle Position, Pattern Extend, Mirror Images, Balance and Pattern Repeat function 1-9x). altered settings will..., zig-zag, vari-overlock to suit the fabric • the stitches can hold as many stitch alterations as needed (these are automatically saved • by turning the external knob) revert to 5.5mm (e.g.
... previous individually altered setting will not be saved Example: • select Zig-zag stitch No. 2 and alter stitch width to other functions manually • Method 3: turn sewing computer off («0») - are stitch length, stitch width, Needle Position, Pattern Extend, Mirror Images, Balance and Pattern Repeat function 1-9x). altered settings will..., zig-zag, vari-overlock to suit the fabric • the stitches can hold as many stitch alterations as needed (these are automatically saved • by turning the external knob) revert to 5.5mm (e.g.
User Guide
Page 38
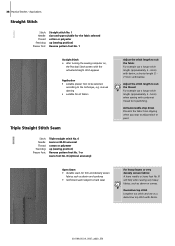
...: Presser foot: Triple straight stitch No. 6 Jeans or 80-90 universal cotton or polyester up (sewing position) Reverse pattern foot No. 1 Straight Stitch • after turning the sewing computer on, the Practical Stitch screen with batiste. manual darning • suitable for topstitching. Decorative top stitch Lengthen out stitch and use a longer...
...: Presser foot: Triple straight stitch No. 6 Jeans or 80-90 universal cotton or polyester up (sewing position) Reverse pattern foot No. 1 Straight Stitch • after turning the sewing computer on, the Practical Stitch screen with batiste. manual darning • suitable for topstitching. Decorative top stitch Lengthen out stitch and use a longer...
User Guide
Page 43
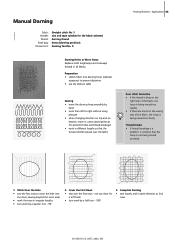
...prevent distortion • use the slide-on bottom, move in same direction as this prevents holes and thread breakage) • work by a quarter turn - 90° 2. Complete Darning • sew loosely and in curves (avoid points as 2nd rows 031196.50.04_0507_a630_EN Stitch Over the Hole ... Darning Stitch: Needle: Thread: Feed dog: Presser foot: Straight stitch No. 1 size and type suitable for a soft finish • turn work by a half turn - 180° 3. Darning foot No. 9 Darning Holes or Worn Areas Replaces both lengthways and crossways threads in different lengths so that the...
...prevent distortion • use the slide-on bottom, move in same direction as this prevents holes and thread breakage) • work by a quarter turn - 90° 2. Complete Darning • sew loosely and in curves (avoid points as 2nd rows 031196.50.04_0507_a630_EN Stitch Over the Hole ... Darning Stitch: Needle: Thread: Feed dog: Presser foot: Straight stitch No. 1 size and type suitable for a soft finish • turn work by a half turn - 180° 3. Darning foot No. 9 Darning Holes or Worn Areas Replaces both lengthways and crossways threads in different lengths so that the...
User Guide
Page 49
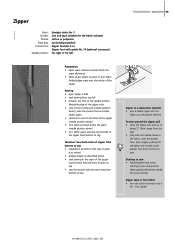
... element To sew around the zipper pull • close zipper again • continue to sew to the base of the zipper (needle position down) • turn fabric and sew across the seam (needle position down in the seam of zipper from bottom to sew and pull the fabric gently behind the... and continue to sew Starting to sew • hold threads firmly when starting to top • suitable for all fabrics with the needle down ) • turn fabric again and sew second side of the zipper from bottom to top Variation: Sew both sides of the zipper end and sew first side...
... element To sew around the zipper pull • close zipper again • continue to sew to the base of the zipper (needle position down) • turn fabric and sew across the seam (needle position down in the seam of zipper from bottom to sew and pull the fabric gently behind the... and continue to sew Starting to sew • hold threads firmly when starting to top • suitable for all fabrics with the needle down ) • turn fabric again and sew second side of the zipper from bottom to top Variation: Sew both sides of the zipper end and sew first side...
User Guide
Page 51
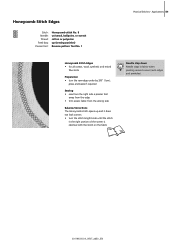
...: Thread: Feed dog: Presser foot: Honeycomb stitch No. 8 universal, ballpoint, or stretch cotton or polyester up and it does not look correct: • turn the raw edge under by 3/8" (1cm); Applications 51 Honeycomb Stitch Edges • for all cotton, wool, synthetic and mixed fiber knits Preparation •...; turn the stitch length knob until the stitch in the right portion of the screen is identical with the stitch on the fabric 102 Needle stop ...
...: Thread: Feed dog: Presser foot: Honeycomb stitch No. 8 universal, ballpoint, or stretch cotton or polyester up and it does not look correct: • turn the raw edge under by 3/8" (1cm); Applications 51 Honeycomb Stitch Edges • for all cotton, wool, synthetic and mixed fiber knits Preparation •...; turn the stitch length knob until the stitch in the right portion of the screen is identical with the stitch on the fabric 102 Needle stop ...
User Guide
Page 53
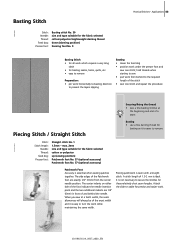
... point and the two additional indents are exactly 1/4" (6mm) from behind the needle. The side edges of the exact width and it is easy to turn the work under the presser foot and sew one stitch and repeat the procedure Securing/fixing the thread • sew a few basting stitches at a foot...
... point and the two additional indents are exactly 1/4" (6mm) from behind the needle. The side edges of the exact width and it is easy to turn the work under the presser foot and sew one stitch and repeat the procedure Securing/fixing the thread • sew a few basting stitches at a foot...


