User Guide
Page 1
...unplug by pulling on the sewing computer. 12. Under no circumstances should always be left unattended when plugged in use the BERNINA original stitch plate. Do not allow to be identical to those parts in this sewing computer is required around the sewing needle... needles. 8. Use this manual. 3. Do not pull or push fabric while stitching, which may also be left unattended when using the embroidery module. 18. Never operate this manual. IMPORTANT SAFETY INSTRUCTIONS ! Servicing a double-insulated product requires extreme care and knowledge of electrical shock: 1....
...unplug by pulling on the sewing computer. 12. Under no circumstances should always be left unattended when plugged in use the BERNINA original stitch plate. Do not allow to be identical to those parts in this sewing computer is required around the sewing needle... needles. 8. Use this manual. 3. Do not pull or push fabric while stitching, which may also be left unattended when using the embroidery module. 18. Never operate this manual. IMPORTANT SAFETY INSTRUCTIONS ! Servicing a double-insulated product requires extreme care and knowledge of electrical shock: 1....
User Guide
Page 7
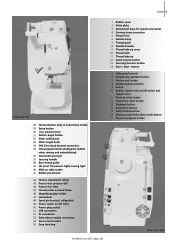
... Handwheel 48 Spool pin (vertical, collapsible) 49 Power switch on /off («0») 50 Power plug socket 51 USB connection 52 PC connection 53 Embroidery module connection 54 Foot control socket 55 Drop feed dog 1 Bobbin cover 2 Stitch plate 3 Attachment base for special accessories 4 Darning hoop connection 5 Presser... cutter 21 Practical stitch button 22 Decorative stitch button 23 Alphabet button 24 Buttonhole button 25 Quilt stitches button 26 Sewing mode/Embroidery mode button 27 Personal program button 47 48 51 52 53 54 55 49 50 Side view right 031196.50.04_0507_a630_EN button ...
... Handwheel 48 Spool pin (vertical, collapsible) 49 Power switch on /off («0») 50 Power plug socket 51 USB connection 52 PC connection 53 Embroidery module connection 54 Foot control socket 55 Drop feed dog 1 Bobbin cover 2 Stitch plate 3 Attachment base for special accessories 4 Darning hoop connection 5 Presser... cutter 21 Practical stitch button 22 Decorative stitch button 23 Alphabet button 24 Buttonhole button 25 Quilt stitches button 26 Sewing mode/Embroidery mode button 27 Personal program button 47 48 51 52 53 54 55 49 50 Side view right 031196.50.04_0507_a630_EN button ...
User Guide
Page 20
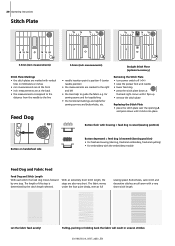
The length of this step is lowered (darning position) • for freehand sewing (darning, freehand embroidery, freehand quilting) • for embroidery with the embroidery module Feed Dog and Fabric Feed Feed Dog and Stitch Length With each stitch the feed dog moves forward by the stitch length selected. 20 Operating ...
The length of this step is lowered (darning position) • for freehand sewing (darning, freehand embroidery, freehand quilting) • for embroidery with the embroidery module Feed Dog and Fabric Feed Feed Dog and Stitch Length With each stitch the feed dog moves forward by the stitch length selected. 20 Operating ...

User Guide
Page 29
... before starting to designate end of stitching in straight stitch Securing stitch No. 5 • securing with Quilters Securing Program No. 324 Securing Function (with attached embroidery module • starts and stops the BSR function (optional) when BSR foot is attached and plugged in the right part of the screen indicates that the...
... before starting to designate end of stitching in straight stitch Securing stitch No. 5 • securing with Quilters Securing Program No. 324 Securing Function (with attached embroidery module • starts and stops the BSR function (optional) when BSR foot is attached and plugged in the right part of the screen indicates that the...
User Guide
Page 95
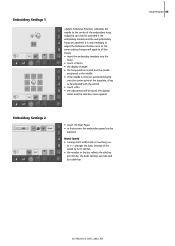
Adjusting can be activated if the embroidery module and the oval embroidery hoop are indicated by 6-10 stitches • the number in the bar reflects the stitches per minute, the basic settings are attached. Embroidery Settings 1 «Adjust Reference Position» calibrates the needle to be adjusted with the arrows ... is only necessary to adjust the Reference Position once as the same setting changes will apply to all the hoops. • insert the embroidery template into the hoop • touch «Check» • the display changes • the hoop position is read and the...
Adjusting can be activated if the embroidery module and the oval embroidery hoop are indicated by 6-10 stitches • the number in the bar reflects the stitches per minute, the basic settings are attached. Embroidery Settings 1 «Adjust Reference Position» calibrates the needle to be adjusted with the arrows ... is only necessary to adjust the Reference Position once as the same setting changes will apply to all the hoops. • insert the embroidery template into the hoop • touch «Check» • the display changes • the hoop position is read and the...
User Guide
Page 99
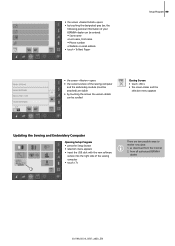
...BERNINA dealer can be entered: • Store name • Last name, First name • Phone number • Website or email address • touch «To Next Page» Setup-Program 99 • the screen «Version» opens • the current version of the sewing computer and the embroidery module... (must be attached) are visible • by touching the arrows the version details can be scrolled Closing Screen • touch «ESC» • the screen closes and the selection menu appears Updating the Sewing and Embroidery Computer Opening ...
...BERNINA dealer can be entered: • Store name • Last name, First name • Phone number • Website or email address • touch «To Next Page» Setup-Program 99 • the screen «Version» opens • the current version of the sewing computer and the embroidery module... (must be attached) are visible • by touching the arrows the version details can be scrolled Closing Screen • touch «ESC» • the screen closes and the selection menu appears Updating the Sewing and Embroidery Computer Opening ...
User Guide
Page 110
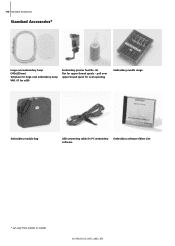
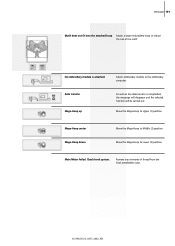
110 Standard Accessories Standard Accessories* Large oval embroidery hoop (145x255mm) Template for large oval embroidery hoop VAR. 01 for a630 Embroidery presser foot No. 26 Net for PC embroidery software Embroidery software Editor Lite * can vary from market to market 031196.50.04_0507_a630_EN pull over upper thread spool for even spooling Embroidery needle range Embroidery module bag USB connecting cable for upper thread spools -
110 Standard Accessories Standard Accessories* Large oval embroidery hoop (145x255mm) Template for large oval embroidery hoop VAR. 01 for a630 Embroidery presser foot No. 26 Net for PC embroidery software Embroidery software Editor Lite * can vary from market to market 031196.50.04_0507_a630_EN pull over upper thread spool for even spooling Embroidery needle range Embroidery module bag USB connecting cable for upper thread spools -
User Guide
Page 111
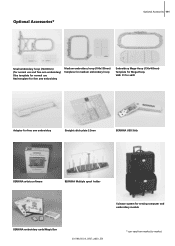
... use Red template for free arm embroidery Medium embroidery hoop (100x130mm) Template for medium embroidery hoop Embroidery Mega-Hoop (150x400mm) Template for Mega-Hoop, VAR. 01 for a630 Adapter for free arm embroidery Straight stitch plate 5.5mm BERNINA USB Stick BERNINA artista software BERNINA Multiple spool holder Suitcase system for sewing computer and embroidery module BERNINA embroidery cards/Magic Box 031196.50.04_0507_a630_EN...
... use Red template for free arm embroidery Medium embroidery hoop (100x130mm) Template for medium embroidery hoop Embroidery Mega-Hoop (150x400mm) Template for Mega-Hoop, VAR. 01 for a630 Adapter for free arm embroidery Straight stitch plate 5.5mm BERNINA USB Stick BERNINA artista software BERNINA Multiple spool holder Suitcase system for sewing computer and embroidery module BERNINA embroidery cards/Magic Box 031196.50.04_0507_a630_EN...
User Guide
Page 112
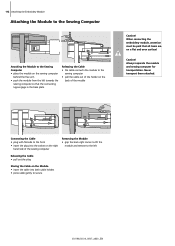
...out the plug Storing the Cable on the Module • insert the cable into both cable holders • press cable gently to the sewing computer • pull the cable out of the module Caution! Caution! When connecting the embroidery module, attention must be paid that the connecting... lugs engage in the base plate Releasing the Cable • the cable connects the module to secure 031196.50.04_0507_a630_EN Never transport them attached...
...out the plug Storing the Cable on the Module • insert the cable into both cable holders • press cable gently to the sewing computer • pull the cable out of the module Caution! Caution! When connecting the embroidery module, attention must be paid that the connecting... lugs engage in the base plate Releasing the Cable • the cable connects the module to secure 031196.50.04_0507_a630_EN Never transport them attached...
User Guide
Page 113
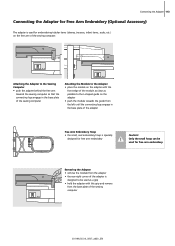
... sewing computer 031196.50.04_0507_a630_EN Removing the Adapter • remove the module from the adapter • the rear right corner of the adapter is designed to be used for free arm embroidery. Connecting the Adapter 113 Connecting the Adapter for Free Arm Embroidery (Optional Accessory) The adapter is used for embroidering tubular items...
... sewing computer 031196.50.04_0507_a630_EN Removing the Adapter • remove the module from the adapter • the rear right corner of the adapter is designed to be used for free arm embroidery. Connecting the Adapter 113 Connecting the Adapter for Free Arm Embroidery (Optional Accessory) The adapter is used for embroidering tubular items...
User Guide
Page 124
... color numbers • touch symbol • the Color Motif display appears (the display closes by touching «Check Module» the embroidery module is calibrated (reads the reference points). No embroidery hoop must be attached! • the display can be closed by touching the «ESC» on-screen button....50.04_0507_a630_EN Check • touch symbol • the hoop moves vertically so that the size of the attached hoop may be read in the embroidery computer • if only the hoop should be read, touch «ESC» • motif stitching area is read with the 4 arrows...
... color numbers • touch symbol • the Color Motif display appears (the display closes by touching «Check Module» the embroidery module is calibrated (reads the reference points). No embroidery hoop must be attached! • the display can be closed by touching the «ESC» on-screen button....50.04_0507_a630_EN Check • touch symbol • the hoop moves vertically so that the size of the attached hoop may be read in the embroidery computer • if only the hoop should be read, touch «ESC» • motif stitching area is read with the 4 arrows...
User Guide
Page 150
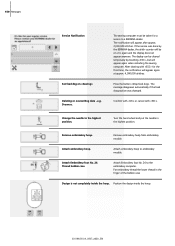
...Attach embroidery hoop. Attach embroidery hoop to the highest position. Attach Embroidery foot No. 26. Remove embroidery hoop from embroidery module. The notification will appear again when restarting the sewing computer. Press the button «Drop feed dog». The display can be cleared temporarily by the BERNINA ... stitches. If the service was changed. After clearing with «ESC». Thread bobbin case Attach Embroidery foot No. 26 to a BERNINA dealer. Remove embroidery hoop. Turn the hand wheel and put the needle in the finger of the bobbin case Design is...
...Attach embroidery hoop. Attach embroidery hoop to the highest position. Attach Embroidery foot No. 26. Remove embroidery hoop from embroidery module. The notification will appear again when restarting the sewing computer. Press the button «Drop feed dog». The display can be cleared temporarily by the BERNINA ... stitches. If the service was changed. After clearing with «ESC». Thread bobbin case Attach Embroidery foot No. 26 to a BERNINA dealer. Remove embroidery hoop. Turn the hand wheel and put the needle in the finger of the bobbin case Design is...
User Guide
Page 151
... Middle (2) position. Mega-Hoop center Mega-Hoop down Move the Mega-Hoop to the embroidery computer. Check hook system. Remove any remnants of the motif No embroidery module is compledted, the messeage will disappear and the selected function will be carried out. Data transfer Mega-Hoop up As soon as the data ... Lower (3) position. Move the Mega-Hoop to Upper (1) position. Main Motor failed. Messages 151 Motif does not fit into the attached hoop Attach a larger embroidery hoop or reduce the size of thread from the hook area/bobbin case. 031196.50.04_0507_a630_EN
... Middle (2) position. Mega-Hoop center Mega-Hoop down Move the Mega-Hoop to the embroidery computer. Check hook system. Remove any remnants of the motif No embroidery module is compledted, the messeage will disappear and the selected function will be carried out. Data transfer Mega-Hoop up As soon as the data ... Lower (3) position. Move the Mega-Hoop to Upper (1) position. Main Motor failed. Messages 151 Motif does not fit into the attached hoop Attach a larger embroidery hoop or reduce the size of thread from the hook area/bobbin case. 031196.50.04_0507_a630_EN

User Guide
Page 152
... in the suitcase for storage (embroidery arm faces front) • load compartments and bags with particular ease and elegance. The suitcase system must be transported as carry-on luggage only! 152 Accessories Accessories Suitcase System BERNINA offers a variety of extras (optional... (screen faces front) • load compartments and bags with the sewing and embroidery system artista 630, for Sewing Computer • simply remove bags and compartments to place the embroidery module in conveniently arranged compartments and bags. The suitcase system protects the computers from dust...
... in the suitcase for storage (embroidery arm faces front) • load compartments and bags with particular ease and elegance. The suitcase system must be transported as carry-on luggage only! 152 Accessories Accessories Suitcase System BERNINA offers a variety of extras (optional... (screen faces front) • load compartments and bags with the sewing and embroidery system artista 630, for Sewing Computer • simply remove bags and compartments to place the embroidery module in conveniently arranged compartments and bags. The suitcase system protects the computers from dust...
User Guide
Page 154
... your BERNINA dealer for other accessories for symbol) Embroidery Design (PC) Saving Options • on PC • on artista 630 embroidery computer • on a personal design stick Warning: After data transfer from the PC to combine, extend, and change existing motifs on your embroidery computer! 031196.50.04_0507_a630_EN The USB connecting cable comes with the embroidery module. The...
... your BERNINA dealer for other accessories for symbol) Embroidery Design (PC) Saving Options • on PC • on artista 630 embroidery computer • on a personal design stick Warning: After data transfer from the PC to combine, extend, and change existing motifs on your embroidery computer! 031196.50.04_0507_a630_EN The USB connecting cable comes with the embroidery module. The...
User Guide
Page 163
... Index 171 A Accessories 152-154 • artista Embroidery Software 154 • Embroidery Mega-Hoop 153 • Embroidery Sticks 153 • Suitcase System 152 Accessory Box 4 Accessories Embroidery 110-111 Accessories Sewing 4-5 Alphabets, Lettering for Embroidery 135-138 • Altering Lettering 136 •...61 • Summary 59 Altering Motifs 132-133 Altering Stitch Length 23 Altering Stitch Width 23 Attaching the Embroidery Module 112 B Balance Basting Stitch Blind Hem Bobbin Case: removing/inserting Bobbin Thread Cutter Bringing up the Lower Thread...
... Index 171 A Accessories 152-154 • artista Embroidery Software 154 • Embroidery Mega-Hoop 153 • Embroidery Sticks 153 • Suitcase System 152 Accessory Box 4 Accessories Embroidery 110-111 Accessories Sewing 4-5 Alphabets, Lettering for Embroidery 135-138 • Altering Lettering 136 •...61 • Summary 59 Altering Motifs 132-133 Altering Stitch Length 23 Altering Stitch Width 23 Attaching the Embroidery Module 112 B Balance Basting Stitch Blind Hem Bobbin Case: removing/inserting Bobbin Thread Cutter Bringing up the Lower Thread...


