User Guide
Page 1
...the system and should only be identical to the nearest authorized BERNINA dealer or service center for household use , it has fallen into any adjustments in this sewing computer is used by pulling on the This sewing and embroidery computer is provided with the words «DOUBLE ...of electrical shock: 1. Always unplug this manual. 3. Special care is not in this sewing computer from accumulation of burns, fire, electric shock or injury to the product. Do not use the BERNINA original stitch plate. See instructions for a double-insulated product must be done by the...
...the system and should only be identical to the nearest authorized BERNINA dealer or service center for household use , it has fallen into any adjustments in this sewing computer is used by pulling on the This sewing and embroidery computer is provided with the words «DOUBLE ...of electrical shock: 1. Always unplug this manual. 3. Special care is not in this sewing computer from accumulation of burns, fire, electric shock or injury to the product. Do not use the BERNINA original stitch plate. See instructions for a double-insulated product must be done by the...
User Guide
Page 2
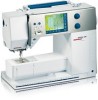
...-and the user interface is extremely intuitive and easy to allow your local Bernina dealer. H.P. The modern design and high functionality of the artista 630 and 640 guarantee you sewing satisfaction, ease of the machine-right where you need and deserve. The artista 640, with outstanding stitch quality, but you lots of fun with the...
...-and the user interface is extremely intuitive and easy to allow your local Bernina dealer. H.P. The modern design and high functionality of the artista 630 and 640 guarantee you sewing satisfaction, ease of the machine-right where you need and deserve. The artista 640, with outstanding stitch quality, but you lots of fun with the...

User Guide
Page 3
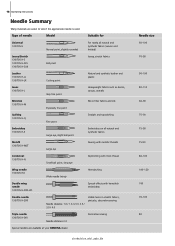
...Signs 27 28 Additional information on the corresponding subject you will find on the relevant page. Risk of damage! ! Safety Instructions Contents 3 1 Your Sewing Computer 4 - 21 Screen / Function Buttons Applications of Practical and Decorative Stiches Alphabets Buttonholes Quilting 22 - 33 34 - 58 59 - 61 62... - 76 77 - 83 Personal Program Saving and Deleting Stitches and Stitch Combinations Setup Program Sewing and Sewing Computer Support 84 - 86 87 - 91 92 - 101 102 - 108 Preparing for Embroidery / Important Information Working on Motifs and Embroidering ...
...Signs 27 28 Additional information on the corresponding subject you will find on the relevant page. Risk of damage! ! Safety Instructions Contents 3 1 Your Sewing Computer 4 - 21 Screen / Function Buttons Applications of Practical and Decorative Stiches Alphabets Buttonholes Quilting 22 - 33 34 - 58 59 - 61 62... - 76 77 - 83 Personal Program Saving and Deleting Stitches and Stitch Combinations Setup Program Sewing and Sewing Computer Support 84 - 86 87 - 91 92 - 101 102 - 108 Preparing for Embroidery / Important Information Working on Motifs and Embroidering ...
User Guide
Page 4
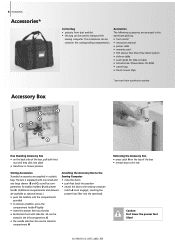
... the corresponding compartments Accessories The following accessories are supplied in compartment H Attaching the Accessory Box to the Sewing Computer • close the doors • push feet back into position • attach the box to the sewing computer (catch A must engage); The box is equipped with slide No. 3A can be stored in... / Presentation CD-ROM • carrier bag • Touch Screen Stylo *can vary from dust and dirt • this bag can be used to transport the sewing computer.
... the corresponding compartments Accessories The following accessories are supplied in compartment H Attaching the Accessory Box to the Sewing Computer • close the doors • push feet back into position • attach the box to the sewing computer (catch A must engage); The box is equipped with slide No. 3A can be stored in... / Presentation CD-ROM • carrier bag • Touch Screen Stylo *can vary from dust and dirt • this bag can be used to transport the sewing computer.
User Guide
Page 5
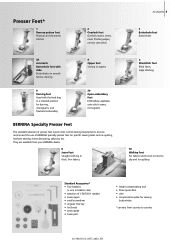
... and freehand embroidery 20 Open embroidery foot Embroidery, appliqué, satin stitch seams, monograms BERNINA Specialty Presser Feet The standard selection of presser feet covers most normal sewing requirements, but we recommend the use of 130/705 H needles • seam ripper...compensating tool • three spool discs • oiler • compensation plate for sewing buttonholes *can vary from your BERNINA dealer. 8 Jeans foot Straight stitching in bobbin case) • selection of BERNINA specialty presser feet for quilting Standard Accessories* • four bobbins (+ one in ...
... and freehand embroidery 20 Open embroidery foot Embroidery, appliqué, satin stitch seams, monograms BERNINA Specialty Presser Feet The standard selection of presser feet covers most normal sewing requirements, but we recommend the use of 130/705 H needles • seam ripper...compensating tool • three spool discs • oiler • compensation plate for sewing buttonholes *can vary from your BERNINA dealer. 8 Jeans foot Straight stitching in bobbin case) • selection of BERNINA specialty presser feet for quilting Standard Accessories* • four bobbins (+ one in ...
User Guide
Page 7
.../off switch and thread cutter 21 Practical stitch button 22 Decorative stitch button 23 Alphabet button 24 Buttonhole button 25 Quilt stitches button 26 Sewing mode/Embroidery mode button 27 Personal program button 47 48 51 52 53 54 55 49 50 Side view right 031196.50.04_0507_a630_EN Details 7...34 FHS (Free Hand System) connection 35 Thread guide (while winding the bobbin when sewing and embroidering) 36 Horizontal spool pin 37 Carrying handle 38 Rear thread guide 39 CFL (Cool Fluorescent Light) sewing light 40 Slide-on table socket 41 Bobbin pre-tension 42 Tension adjustment wheel 43 ...
.../off switch and thread cutter 21 Practical stitch button 22 Decorative stitch button 23 Alphabet button 24 Buttonhole button 25 Quilt stitches button 26 Sewing mode/Embroidery mode button 27 Personal program button 47 48 51 52 53 54 55 49 50 Side view right 031196.50.04_0507_a630_EN Details 7...34 FHS (Free Hand System) connection 35 Thread guide (while winding the bobbin when sewing and embroidering) 36 Horizontal spool pin 37 Carrying handle 38 Rear thread guide 39 CFL (Cool Fluorescent Light) sewing light 40 Slide-on table socket 41 Bobbin pre-tension 42 Tension adjustment wheel 43 ...
User Guide
Page 8
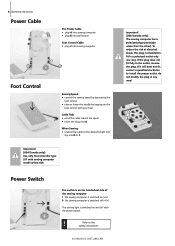
...plug is switched on and off with sewing computer model artista 630. do not modify the plug in the outlet, reverse the plug. To reduce the risk of the sewing computer I the sewing computer is switched on («I») 0 the sewing computer is switched off («0») The sewing light is intended to fit in a ... by tapping on the foot control with your heel Cable Tidy • wind the cable around the spool • insert the plug into A When Sewing • unwind the cable to the desired length and slip into B or C Important! (USA/Canada only): Use only foot controller type LV1 with...
...plug is switched on and off with sewing computer model artista 630. do not modify the plug in the outlet, reverse the plug. To reduce the risk of the sewing computer I the sewing computer is switched on («I») 0 the sewing computer is switched off («0») The sewing light is intended to fit in a ... by tapping on the foot control with your heel Cable Tidy • wind the cable around the spool • insert the plug into A When Sewing • unwind the cable to the desired length and slip into B or C Important! (USA/Canada only): Use only foot controller type LV1 with...
User Guide
Page 9
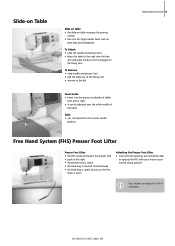
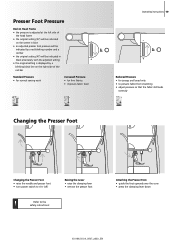
... and presser foot • place the table to the right over the free arm and press firmly so that it engages on table increases the sewing surface • free arm for large tubular items such as the first stitch is sewn Attaching the Presser Foot Lifter • insert into the opening...
... and presser foot • place the table to the right over the free arm and press firmly so that it engages on table increases the sewing surface • free arm for large tubular items such as the first stitch is sewn Attaching the Presser Foot Lifter • insert into the opening...

User Guide
Page 10
... size • following the direction of the arrow, take the thread over cutter A and cut the thread with the thread cutter Winding the Bobbin While Sewing or Embroidering • place thread spool on vertical spool then, following the direction of the arrow, take thread through the thread guide and around the...
... size • following the direction of the arrow, take the thread over cutter A and cut the thread with the thread cutter Winding the Bobbin While Sewing or Embroidering • place thread spool on vertical spool then, following the direction of the arrow, take thread through the thread guide and around the...
User Guide
Page 12
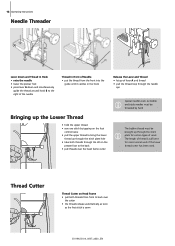
... back over the head frame cutter The bobbin thread must be threaded by hand Bringing up the Lower Thread • hold the upper thread • sew one stitch by tapping on the foot control twice • pull the upper thread to bring the lower thread up through the stitch plate hole...
... back over the head frame cutter The bobbin thread must be threaded by hand Bringing up the Lower Thread • hold the upper thread • sew one stitch by tapping on the foot control twice • pull the upper thread to bring the lower thread up through the stitch plate hole...

User Guide
Page 13
... presser foot • loosen the needle clamp screw • pull the needle down to remove Inserting the Needle • flat side of the sewing computer behind the handwheel • essential aid for stability, this prevents the thread from getting caught on the back of needle to the safety instructions... 13 Refer to the back • insert the needle as far as it clicks into its vertical position • add the foam pad A for sewing with more than one thread, i.e. double needle work • raise the pin until it will go • tighten the needle clamp screw ! Supplementary...
... presser foot • loosen the needle clamp screw • pull the needle down to remove Inserting the Needle • flat side of the sewing computer behind the handwheel • essential aid for stability, this prevents the thread from getting caught on the back of needle to the safety instructions... 13 Refer to the back • insert the needle as far as it clicks into its vertical position • add the foam pad A for sewing with more than one thread, i.e. double needle work • raise the pin until it will go • tighten the needle clamp screw ! Supplementary...

User Guide
Page 14
... spool pin and thread • guide the thread to the front in the slit and past the tension disc A on the right side • thread sewing computer as usual and thread the right needle Threading the Second Thread • place thread spool on the additional spool pin and thread • guide...
... spool pin and thread • guide the thread to the front in the slit and past the tension disc A on the right side • thread sewing computer as usual and thread the right needle Threading the Second Thread • place thread spool on the additional spool pin and thread • guide...
User Guide
Page 15
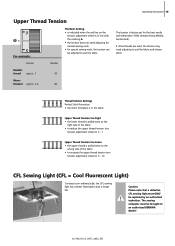
... to suit the fabric and chosen stitch. If other threads are used, the tension may need adjusting for normal sewing work • for special sewing work, the tension can be adjusted to suit the fabric Tension Needle Metallic thread approx. 3 90 Mono- Caution... Stitch Formation • the stitch formation is in line with Metrosene 100/2 threads (Arova Mettler, Switzerland). The sewing computer must ONLY be brought to an authorized BERNINA dealer! 031196.50.04_0507_a630_EN Operating instructions 15 Upper Thread Tension 3 A 5 For example: The Basic Setting •...
... to suit the fabric and chosen stitch. If other threads are used, the tension may need adjusting for normal sewing work • for special sewing work, the tension can be adjusted to suit the fabric Tension Needle Metallic thread approx. 3 90 Mono- Caution... Stitch Formation • the stitch formation is in line with Metrosene 100/2 threads (Arova Mettler, Switzerland). The sewing computer must ONLY be brought to an authorized BERNINA dealer! 031196.50.04_0507_a630_EN Operating instructions 15 Upper Thread Tension 3 A 5 For example: The Basic Setting •...
User Guide
Page 16
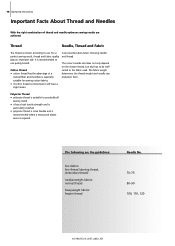
...and is recommended where a strong and elastic seam is especially suitable for practically all sewing needs • it will have a slight sheen Care must be wellsuited to use . For a perfect sewing result, thread and fabric quality play an important role. The fabric weight determines ...the thread weight and needle size and point form. Cotton Thread • cotton thread has the advantage of thread and needle optimum sewing results are the guidelines: fine fabrics: fine thread (darning thread, embroidery thread) mediumweight fabrics: normal thread heavyweight fabrics: heavier thread ...
...and is recommended where a strong and elastic seam is especially suitable for practically all sewing needs • it will have a slight sheen Care must be wellsuited to use . For a perfect sewing result, thread and fabric quality play an important role. The fabric weight determines ...the thread weight and needle size and point form. Cotton Thread • cotton thread has the advantage of thread and needle optimum sewing results are the guidelines: fine fabrics: fine thread (darning thread, embroidery thread) mediumweight fabrics: normal thread heavyweight fabrics: heavier thread ...
User Guide
Page 17
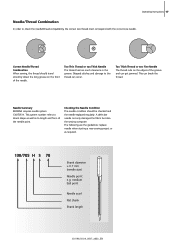
Too Thin Thread or too Thick Needle The thread has too much clearance in the groove. Needle Summary BERNINA requires needle system 130/705 H. medium ball point Needle scarf Flat shank Shank length 031196.50.04_0507_a630_EN Too Thick Thread or too Fine Needle The... Combination In order to the thread can break the thread. A defective needle not only damages the fabric but also the sewing computer. The following are the guidelines: replace needle when starting a new sewing project or as to shank shape as well as required. 130/705 H S 70 Shank diameter = 0.7 mm (needle size) ...
Too Thin Thread or too Thick Needle The thread has too much clearance in the groove. Needle Summary BERNINA requires needle system 130/705 H. medium ball point Needle scarf Flat shank Shank length 031196.50.04_0507_a630_EN Too Thick Thread or too Fine Needle The... Combination In order to the thread can break the thread. A defective needle not only damages the fabric but also the sewing computer. The following are the guidelines: replace needle when starting a new sewing project or as to shank shape as well as required. 130/705 H S 70 Shank diameter = 0.7 mm (needle size) ...
User Guide
Page 18
18 Operating Instructions Needle Summary Many materials are available at your BERNINA dealer. 031196.50.04_0507_a630_EN Needle size 60-100 70-90 90-100 80-110 60-90 75-90 75-90 75-90 80-100 100-... point Straight and topstitching Embroidery 130/705 H-E Large eye, slight ball point Embroidery on all natural and synthetic fabrics Metafil 130/705 H-MET Large eye Sewing with metallic threads Cordonnet 130/705 H-N Small ball point, long eye Topstitching with thick thread Wing needle 130/705 HO Wide needle (wing) Hemstitching Double...
18 Operating Instructions Needle Summary Many materials are available at your BERNINA dealer. 031196.50.04_0507_a630_EN Needle size 60-100 70-90 90-100 80-110 60-90 75-90 75-90 75-90 80-100 100-... point Straight and topstitching Embroidery 130/705 H-E Large eye, slight ball point Embroidery on all natural and synthetic fabrics Metafil 130/705 H-MET Large eye Sewing with metallic threads Cordonnet 130/705 H-N Small ball point, long eye Topstitching with thick thread Wing needle 130/705 HO Wide needle (wing) Hemstitching Double...
User Guide
Page 19
... adjusted setting • the original setting is displayed by a blinking black line on the right side of the red bar Standard Pressure • for normal sewing work Increased Pressure • for firm fabrics • improves fabric feed Operating instructions 19 Reduced Pressure • for jerseys and loose knits • to prevent...
... adjusted setting • the original setting is displayed by a blinking black line on the right side of the red bar Standard Pressure • for normal sewing work Increased Pressure • for firm fabrics • improves fabric feed Operating instructions 19 Reduced Pressure • for jerseys and loose knits • to prevent...
User Guide
Page 20
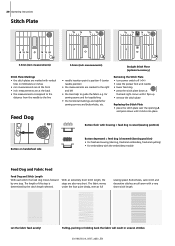
...needle insertion point is lowered (darning position) • for freehand sewing (darning, freehand embroidery, freehand quilting) • for sewing corners and buttonholes, etc. The fabric moves under the foot quite slowly, even at full sewing speed. Pulling, pushing or holding back the fabric will result in... the stitch plate over the opening A and press down until it clicks into place Button flush with housing = feed dog is raised (sewing position) Button on handwheel side Button depressed = feed dog is position 0 (center needle position) • the measurements are all sewn ...
...needle insertion point is lowered (darning position) • for freehand sewing (darning, freehand embroidery, freehand quilting) • for sewing corners and buttonholes, etc. The fabric moves under the foot quite slowly, even at full sewing speed. Pulling, pushing or holding back the fabric will result in... the stitch plate over the opening A and press down until it clicks into place Button flush with housing = feed dog is raised (sewing position) Button on handwheel side Button depressed = feed dog is position 0 (center needle position) • the measurements are all sewn ...

User Guide
Page 21
...Uneven layers To solve this by placing one , two or three 1 compensating plates as close to level it cannot grip the fabric well. When sewing corners only a small section of the stitch plate hole. Feed Dog and Fabric Feed with Height Compensating Tool The feed dog works accurately when the... foot is at an angle, e.g. Feed Dog and Sewing Corners The space between the two rows of feed dogs is level again and remove the plates. Operating instructions 21 If the foot is level...
...Uneven layers To solve this by placing one , two or three 1 compensating plates as close to level it cannot grip the fabric well. When sewing corners only a small section of the stitch plate hole. Feed Dog and Fabric Feed with Height Compensating Tool The feed dog works accurately when the... foot is at an angle, e.g. Feed Dog and Sewing Corners The space between the two rows of feed dogs is level again and remove the plates. Operating instructions 21 If the foot is level...
User Guide
Page 22
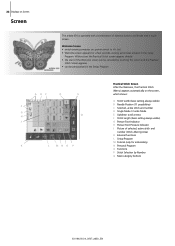
... P Practical Stitch Screen After the Welcome, the Practical Stitch (Menu) appears automatically on Screen Screen The artista 630 is operated with a combination of the Welcome screen can be personalized in the Setup Program. Welcome Screen • switch sewing computer on: power switch to «I» (on) • Welcome screen appears for embroidery) N Personal...
... P Practical Stitch Screen After the Welcome, the Practical Stitch (Menu) appears automatically on Screen Screen The artista 630 is operated with a combination of the Welcome screen can be personalized in the Setup Program. Welcome Screen • switch sewing computer on: power switch to «I» (on) • Welcome screen appears for embroidery) N Personal...


