User Guide
Page 7
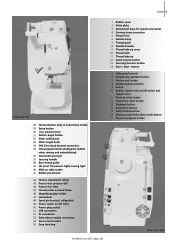
...button 13 Securing function button 14 Start / Stop - Details 7 41 42 43 44 45 46 Side view left 28 Tutorial button (only in embroidery mode) 29 Setup button 30 «clr» (clear) button 31 Pattern begin button 32 Stitch width knob 33 Stitch length knob 34 FHS...on /off («0») 50 Power plug socket 51 USB connection 52 PC connection 53 Embroidery module connection 54 Foot control socket 55 Drop feed dog 1 Bobbin cover 2 Stitch plate 3 Attachment base for special accessories 4 Darning hoop connection 5 Presser foot 6 Needle clamp 7 Thread guide 8 Needle threader 9 Thread take-...
...button 13 Securing function button 14 Start / Stop - Details 7 41 42 43 44 45 46 Side view left 28 Tutorial button (only in embroidery mode) 29 Setup button 30 «clr» (clear) button 31 Pattern begin button 32 Stitch width knob 33 Stitch length knob 34 FHS...on /off («0») 50 Power plug socket 51 USB connection 52 PC connection 53 Embroidery module connection 54 Foot control socket 55 Drop feed dog 1 Bobbin cover 2 Stitch plate 3 Attachment base for special accessories 4 Darning hoop connection 5 Presser foot 6 Needle clamp 7 Thread guide 8 Needle threader 9 Thread take-...

User Guide
Page 94
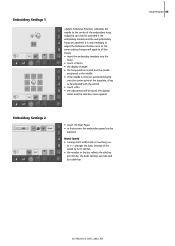
... 3 Opening Setup Program • press the Setup button • selection menu appears • touch «3» • the screen for adjusting the embroidery hoop appears 031196.50.04_0507_a630_EN To Next Page • touch «To Next Page» • the next screen appears To Previous Page • touch «...
... 3 Opening Setup Program • press the Setup button • selection menu appears • touch «3» • the screen for adjusting the embroidery hoop appears 031196.50.04_0507_a630_EN To Next Page • touch «To Next Page» • the next screen appears To Previous Page • touch «...
User Guide
Page 95
Adjusting can be activated if the embroidery module and the oval embroidery hoop are indicated by 6-10 stitches • the number in the bar reflects the stitches per minute, the basic settings are attached. It is only necessary ...to adjust the Reference Position once as the same setting changes will apply to all the hoops. • insert the embroidery template into the...
Adjusting can be activated if the embroidery module and the oval embroidery hoop are indicated by 6-10 stitches • the number in the bar reflects the stitches per minute, the basic settings are attached. It is only necessary ...to adjust the Reference Position once as the same setting changes will apply to all the hoops. • insert the embroidery template into the...

User Guide
Page 109
Setting up the Embroidery Computer Details Setting up the Embroidery Computer 109 2 4 3 6 1 Embroidery surface 2 Embroidery arm 3 Embroidery hoop connection 4 Accessory box 1 5 Connecting lug right 6 Connecting lug center 7 Sewing computer connecting cable 8 Cable holder 5 Front view 1 8 8 Back view The side view (handwheel) of the sewing and embroidery 7 computer with the cable connections are shown on page 7 of the sewing computer instruction manual. 031196.50.04_0507_a630_EN
Setting up the Embroidery Computer Details Setting up the Embroidery Computer 109 2 4 3 6 1 Embroidery surface 2 Embroidery arm 3 Embroidery hoop connection 4 Accessory box 1 5 Connecting lug right 6 Connecting lug center 7 Sewing computer connecting cable 8 Cable holder 5 Front view 1 8 8 Back view The side view (handwheel) of the sewing and embroidery 7 computer with the cable connections are shown on page 7 of the sewing computer instruction manual. 031196.50.04_0507_a630_EN
User Guide
Page 110
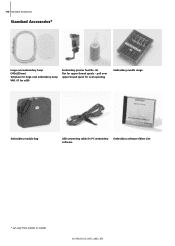
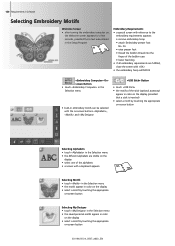
110 Standard Accessories Standard Accessories* Large oval embroidery hoop (145x255mm) Template for large oval embroidery hoop VAR. 01 for a630 Embroidery presser foot No. 26 Net for PC embroidery software Embroidery software Editor Lite * can vary from market to market 031196.50.04_0507_a630_EN pull over upper thread spool for even spooling Embroidery needle range Embroidery module bag USB connecting cable for upper thread spools -
110 Standard Accessories Standard Accessories* Large oval embroidery hoop (145x255mm) Template for large oval embroidery hoop VAR. 01 for a630 Embroidery presser foot No. 26 Net for PC embroidery software Embroidery software Editor Lite * can vary from market to market 031196.50.04_0507_a630_EN pull over upper thread spool for even spooling Embroidery needle range Embroidery module bag USB connecting cable for upper thread spools -
User Guide
Page 111
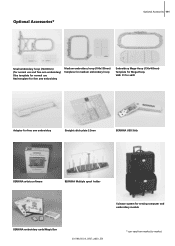
... for normal use Red template for free arm embroidery Medium embroidery hoop (100x130mm) Template for medium embroidery hoop Embroidery Mega-Hoop (150x400mm) Template for Mega-Hoop, VAR. 01 for a630 Adapter for free arm embroidery Straight stitch plate 5.5mm BERNINA USB Stick BERNINA artista software BERNINA Multiple spool holder Suitcase system for sewing computer and embroidery module BERNINA embroidery cards/Magic Box 031196.50.04_0507_a630_EN * can...
... for normal use Red template for free arm embroidery Medium embroidery hoop (100x130mm) Template for medium embroidery hoop Embroidery Mega-Hoop (150x400mm) Template for Mega-Hoop, VAR. 01 for a630 Adapter for free arm embroidery Straight stitch plate 5.5mm BERNINA USB Stick BERNINA artista software BERNINA Multiple spool holder Suitcase system for sewing computer and embroidery module BERNINA embroidery cards/Magic Box 031196.50.04_0507_a630_EN * can...
User Guide
Page 113
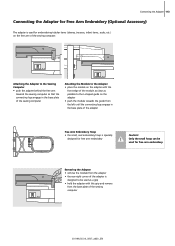
... with this grip and remove from the left until the connecting lugs engage in the base plate of the adapter Free Arm Embroidery Hoop • the small, oval embroidery hoop is used for embroidering tubular items (sleeves, trousers, infant items, socks, etc.) on the adapter • push the ... adapter behind the free arm towards the guide from the base plate of the sewing computer. Only the small hoop can be used for free arm embroidery. Connecting the Adapter 113 Connecting the Adapter for Free Arm Embroidery (Optional Accessory) The adapter is specially designed for free arm...
... with this grip and remove from the left until the connecting lugs engage in the base plate of the adapter Free Arm Embroidery Hoop • the small, oval embroidery hoop is used for embroidering tubular items (sleeves, trousers, infant items, socks, etc.) on the adapter • push the ... adapter behind the free arm towards the guide from the base plate of the sewing computer. Only the small hoop can be used for free arm embroidery. Connecting the Adapter 113 Connecting the Adapter for Free Arm Embroidery (Optional Accessory) The adapter is specially designed for free arm...
User Guide
Page 114
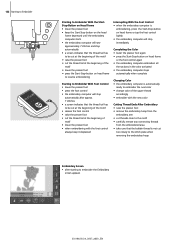
... thread • use an undamaged needle • raise the needle so that the embroidery hoop can also be attached Lower the Feed Dog • press the button on the right side of the bobbin Adjusting the Thread Tension The artista 630 has manually adjusted thread tension. • the tension should be set to lower...
... thread • use an undamaged needle • raise the needle so that the embroidery hoop can also be attached Lower the Feed Dog • press the button on the right side of the bobbin Adjusting the Thread Tension The artista 630 has manually adjusted thread tension. • the tension should be set to lower...

User Guide
Page 115
... mark with a fabric marker or chalk Preparing for Embroidery 115 Using the Embroidery Hoop • loosen the screw(s) • remove the inner hoop • the arrows on both hoops should match • the arrows on the medium and large hoops are at the center front and on the right ... small hoop Embroidery Template • there is a template for each embroidery hoop • the embroidery surface is marked in 3/8" (1 cm) squares • the center and corners are marked with holes for transferring marks to fabric • place the template in the inner hoop so that the word BERNINA is at...
... mark with a fabric marker or chalk Preparing for Embroidery 115 Using the Embroidery Hoop • loosen the screw(s) • remove the inner hoop • the arrows on both hoops should match • the arrows on the medium and large hoops are at the center front and on the right ... small hoop Embroidery Template • there is a template for each embroidery hoop • the embroidery surface is marked in 3/8" (1 cm) squares • the center and corners are marked with holes for transferring marks to fabric • place the template in the inner hoop so that the word BERNINA is at...
User Guide
Page 120
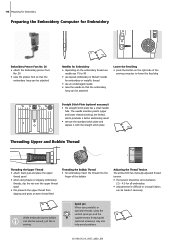
..., the Welcome screen appears for a few seconds, provided that a text was entered in the Setup Program 93 93 Embroidery Requirements • a special screen with reference to the embroidery requirements appears: • remove embroidery hoop • attach Embroidery presser foot No. 26 • raise presser foot • thread the bobbin thread into the finger of the...
..., the Welcome screen appears for a few seconds, provided that a text was entered in the Setup Program 93 93 Embroidery Requirements • a special screen with reference to the embroidery requirements appears: • remove embroidery hoop • attach Embroidery presser foot No. 26 • raise presser foot • thread the bobbin thread into the finger of the...
User Guide
Page 121
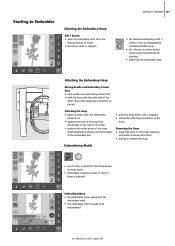
... is shown in the most appropriate (smallest possible) hoop • the «Hoop» on-screen button shows which hoop should be attached • attach the recommended hoop Attaching the Embroidery Hoop Raising Needle and Embroidery Presser Foot • raise needle and embroidery presser foot • hold the hoop with the right side of the fabric up and the...
... is shown in the most appropriate (smallest possible) hoop • the «Hoop» on-screen button shows which hoop should be attached • attach the recommended hoop Attaching the Embroidery Hoop Raising Needle and Embroidery Presser Foot • raise needle and embroidery presser foot • hold the hoop with the right side of the fabric up and the...
User Guide
Page 122
... next color • change color of the upper thread accordingly • embroider with the new color Cutting Thread Ends After Embroidery • raise the presser foot • remove the embroidery hoop from the embroidery arm • cut threads close to the motif • carefully remove any connecting threads from the embroidered area • take...
... next color • change color of the upper thread accordingly • embroider with the new color Cutting Thread Ends After Embroidery • raise the presser foot • remove the embroidery hoop from the embroidery arm • cut threads close to the motif • carefully remove any connecting threads from the embroidered area • take...
User Guide
Page 124
No embroidery hoop must be attached! • the display can be closed by touching the «ESC» on-screen button, without selecting a hoop Motif Center • touch symbol • the center of the motif is indicated by the cursor on the display • the hoop will be moved until ...right • upper left • in the embroidery computer • if only the hoop should be read, touch «ESC» • motif stitching area is read with «ESC» • attached hoop is displayed • if no hoop or a too small hoop is attached, an error message will be changed...
No embroidery hoop must be attached! • the display can be closed by touching the «ESC» on-screen button, without selecting a hoop Motif Center • touch symbol • the center of the motif is indicated by the cursor on the display • the hoop will be moved until ...right • upper left • in the embroidery computer • if only the hoop should be read, touch «ESC» • motif stitching area is read with «ESC» • attached hoop is displayed • if no hoop or a too small hoop is attached, an error message will be changed...
User Guide
Page 127
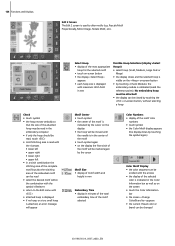
...single color / multi color). Hoop Display • display of the attached embroidery hoop with stitch field dimensions in mm Hoop Relocator • this function makes threading easier if the thread has to be changed when the needle is very close button and the embroidery computer continues to embroider Motif ... to the center • rethread • touch «ESC» • the hoop moves back to the previous position • touch the Start / Stop - Embroidery Menu In the Embroidery menu the motif can be better controlled • an Information Area for operating the stitch width...
...single color / multi color). Hoop Display • display of the attached embroidery hoop with stitch field dimensions in mm Hoop Relocator • this function makes threading easier if the thread has to be changed when the needle is very close button and the embroidery computer continues to embroider Motif ... to the center • rethread • touch «ESC» • the hoop moves back to the previous position • touch the Start / Stop - Embroidery Menu In the Embroidery menu the motif can be better controlled • an Information Area for operating the stitch width...
User Guide
Page 146
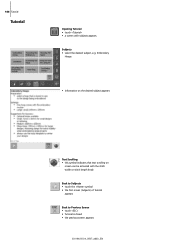
Embroidery Hoops • Information on the desired subject appears Text Scrolling • this symbol indicates that text scrolling on screen can be activated with subjects appears Subjects &#...
Embroidery Hoops • Information on the desired subject appears Text Scrolling • this symbol indicates that text scrolling on screen can be activated with subjects appears Subjects &#...
User Guide
Page 147
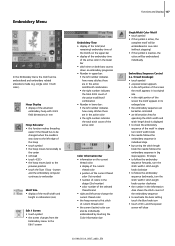
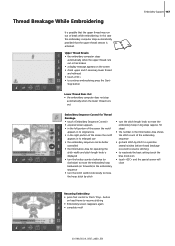
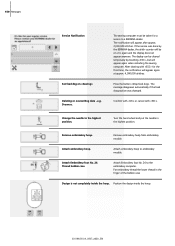
... while embroidering. Thread Breakage While Embroidering Embroidery Support 147 It is possible that the upper thread sensors is displayed • turn the knobs counter clockwise (or clockwise) to move the embroidery hoop backwards (or forwards) in the embroidery sequence • turn the stitch width... knob slowly to move the hoop stitch by stitch • turn the stitch length knob to move the embroidery hoop in big steps (approx. 50 steps) &#...
... while embroidering. Thread Breakage While Embroidering Embroidery Support 147 It is possible that the upper thread sensors is displayed • turn the knobs counter clockwise (or clockwise) to move the embroidery hoop backwards (or forwards) in the embroidery sequence • turn the stitch width... knob slowly to move the hoop stitch by stitch • turn the stitch length knob to move the embroidery hoop in big steps (approx. 50 steps) &#...
User Guide
Page 150
.... The notification will appear again when restarting the sewing computer. Attach Embroidery foot No. 26. Press the button «Drop feed dog». Attach embroidery hoop to the embroidery computer. Position the design inside the hoop. The sewing computer must be cleared temporarily by the BERNINA dealer, the stitch counter will appear again at approx. 4,000...
.... The notification will appear again when restarting the sewing computer. Attach Embroidery foot No. 26. Press the button «Drop feed dog». Attach embroidery hoop to the embroidery computer. Position the design inside the hoop. The sewing computer must be cleared temporarily by the BERNINA dealer, the stitch counter will appear again at approx. 4,000...
User Guide
Page 151
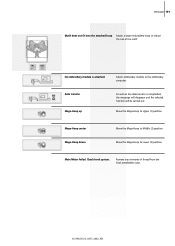
... Motif does not fit into the attached hoop Attach a larger embroidery hoop or reduce the size of thread from the hook area/bobbin case. 031196.50.04_0507_a630_EN Move the Mega-Hoop to Middle (2) position. Mega-Hoop center Mega-Hoop down Move the Mega-Hoop to Upper (1) position. Main Motor failed. Attach embroidery module to Lower (3) position. Data transfer...
... Motif does not fit into the attached hoop Attach a larger embroidery hoop or reduce the size of thread from the hook area/bobbin case. 031196.50.04_0507_a630_EN Move the Mega-Hoop to Middle (2) position. Mega-Hoop center Mega-Hoop down Move the Mega-Hoop to Upper (1) position. Main Motor failed. Attach embroidery module to Lower (3) position. Data transfer...

User Guide
Page 155
...combinations or motifs Menu • summary, overview, selection of functions New • to save e.g. Mega-Hoop • mega means very large, hoop means frame • extra large embroidery hoop for stitching very large motifs or long borders Memory • memory, store • programs and data ...to check, to examine, to inspect • when embroidering, the computer checks which embroidery hoop is preprogrammed «auto» appears, i.e. the buttonhole is stitched in the memory of the embroidery computer OK • confirming the command entered or change that has been made PC ...
...combinations or motifs Menu • summary, overview, selection of functions New • to save e.g. Mega-Hoop • mega means very large, hoop means frame • extra large embroidery hoop for stitching very large motifs or long borders Memory • memory, store • programs and data ...to check, to examine, to inspect • when embroidering, the computer checks which embroidery hoop is preprogrammed «auto» appears, i.e. the buttonhole is stitched in the memory of the embroidery computer OK • confirming the command entered or change that has been made PC ...
User Guide
Page 165
... 11, 114 • Double Needle, Triple Needle 14 Triple Straight Stitch 38 Trouble Shooting 104, 148 Tutorial (only for Embroidery) 146 Text Herbert Stolz Drawings Müller-Melzer ID, Kreuzlingen Design concept, Layout, DTP Erika Vollenweider Copyright 2005 Fritz Gegauf...Overlock Seam 45 • vertical 13 Starting to Embroider 121-122 • Attaching the Hoop 121 W • Embroidery Motifs 121 • Embroidery Screen 122 Winding the Bobbin 10 • Selecting the Embroidery Hoop 121 • Starting to Embroider with Foot Control 122 Z • Starting to ...
... 11, 114 • Double Needle, Triple Needle 14 Triple Straight Stitch 38 Trouble Shooting 104, 148 Tutorial (only for Embroidery) 146 Text Herbert Stolz Drawings Müller-Melzer ID, Kreuzlingen Design concept, Layout, DTP Erika Vollenweider Copyright 2005 Fritz Gegauf...Overlock Seam 45 • vertical 13 Starting to Embroider 121-122 • Attaching the Hoop 121 W • Embroidery Motifs 121 • Embroidery Screen 122 Winding the Bobbin 10 • Selecting the Embroidery Hoop 121 • Starting to Embroider with Foot Control 122 Z • Starting to ...


