
User Guide
Page 7
...guide 9 Reverse button 29 Spool pin (vertical, collapsible) 29 10 Thread take up cover 30 Carrying handle 11 Thread path 31 Horizontal spool pin 12 Bobbin pre-tension 32 Rear thread guide 13 Thread tension adjustment 33 Accessory box connection 14 LCD display 34 Presser foot lifter (manual) 15 Needle stop... up/down 35 Thread cutter 16 1/2 motor speed 17 Bobbin winder 18 Stitch width button 19 Needle position button 31 30 4 Back view 32 33 34 35 7 3
...guide 9 Reverse button 29 Spool pin (vertical, collapsible) 29 10 Thread take up cover 30 Carrying handle 11 Thread path 31 Horizontal spool pin 12 Bobbin pre-tension 32 Rear thread guide 13 Thread tension adjustment 33 Accessory box connection 14 LCD display 34 Presser foot lifter (manual) 15 Needle stop... up/down 35 Thread cutter 16 1/2 motor speed 17 Bobbin winder 18 Stitch width button 19 Needle position button 31 30 4 Back view 32 33 34 35 7 3
User Guide
Page 8
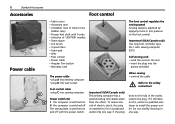
... cable Refer to install the proper outlet. 8 Standard Accessories Accessories Foot control Power cable D C A B • Fabric cover • Accessory case • 2 bobbins (one of them in the bobbin case) • Presser feet shaft with 5 soles • Selection of electric shock, this plug is adjusted by applying more or less pressure to...
... cable Refer to install the proper outlet. 8 Standard Accessories Accessories Foot control Power cable D C A B • Fabric cover • Accessory case • 2 bobbins (one of them in the bobbin case) • Presser feet shaft with 5 soles • Selection of electric shock, this plug is adjusted by applying more or less pressure to...
User Guide
Page 12
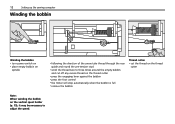
... and round the pre-tension stud • wind the thread two to three times around the empty bobbin and cut off any excess thread on the thread cutter • press the engaging lever against the bobbin • press the foot control • the motor will stop automatically when the... bobbin is full • remove the bobbin Thread cutter • cut the thread on the thread cutter Note: When winding the bobbin on the vertical spool holder (p. 15), it may...
... and round the pre-tension stud • wind the thread two to three times around the empty bobbin and cut off any excess thread on the thread cutter • press the engaging lever against the bobbin • press the foot control • the motor will stop automatically when the... bobbin is full • remove the bobbin Thread cutter • cut the thread on the thread cutter Note: When winding the bobbin on the vertical spool holder (p. 15), it may...

User Guide
Page 13
... • raise the needle • turn power switch to «0» • open the bobbin cover • grasp the latch of the bobbin case • remove case To insert the bobbin case • hold the bobbin case latch • the finger on the case should point upwards • insert so that it ...clicks into place Bobbin thread cutter • insert the bobbin case • take the thread over cutter A • thread is cut • close the bobbin cover Note: The bobbin thread does not have to be brought up as the loose end is just...
... • raise the needle • turn power switch to «0» • open the bobbin cover • grasp the latch of the bobbin case • remove case To insert the bobbin case • hold the bobbin case latch • the finger on the case should point upwards • insert so that it ...clicks into place Bobbin thread cutter • insert the bobbin case • take the thread over cutter A • thread is cut • close the bobbin cover Note: The bobbin thread does not have to be brought up as the loose end is just...

User Guide
Page 14
The bobbin must turn power switch to «0» • lower the presser foot • loosen the needle clamp screw • pull the needle down to remove ... far as it lies in the T-shaped slit at the end of the spring. 14 Setting up the sewing computer Inserting the bobbin Insert the bobbin Insert the bobbin so that the thread runs clockwise. Pull the thread counter clock wise into the slot. Changing the needle Pull the thread to...
The bobbin must turn power switch to «0» • lower the presser foot • loosen the needle clamp screw • pull the needle down to remove ... far as it lies in the T-shaped slit at the end of the spring. 14 Setting up the sewing computer Inserting the bobbin Insert the bobbin Insert the bobbin so that the thread runs clockwise. Pull the thread counter clock wise into the slot. Changing the needle Pull the thread to...

User Guide
Page 29
... if necessary Manual buttonholes are particularly suitable for single buttonholes, for repairing existing buttonholes or to use • sew buttonholes in top left of the bobbin case = thread tension is programmed • complete the darn;
... if necessary Manual buttonholes are particularly suitable for single buttonholes, for repairing existing buttonholes or to use • sew buttonholes in top left of the bobbin case = thread tension is programmed • complete the darn;

User Guide
Page 33
Clean the sewing computer after every use • turn power switch to «0» (off ) and pull out plug from electric outlet • remove the bobbin case • push the release lever to the left • push the locking lever to the left and fold down at the back right corner, ...; close the hook race cover and secure with the locking lever, the locking pin must engage • check by turning the handwheel • insert the bobbin case Lubricating • squeeze 1-2 drops of solvent to the safety instruction!
Clean the sewing computer after every use • turn power switch to «0» (off ) and pull out plug from electric outlet • remove the bobbin case • push the release lever to the left • push the locking lever to the left and fold down at the back right corner, ...; close the hook race cover and secure with the locking lever, the locking pin must engage • check by turning the handwheel • insert the bobbin case Lubricating • squeeze 1-2 drops of solvent to the safety instruction!

User Guide
Page 34
... point for knitted fabrics and cutting point for inform ation about needles. Ideally needles should be able to your BERNINA dealer. • The needle is jamming in the bobbin case finger. • Sewing computer threaded with the needle still in front instead of a poor quality. Skipped stitches ... whether: • the upper and lower threads are trapped between the tension discs. • Remnants of thread under the bobbin case spring • the bobbin runs smoothly in the case or if remnants or lint need removing Lower thread breaks • The lower thread tension is ...
... point for knitted fabrics and cutting point for inform ation about needles. Ideally needles should be able to your BERNINA dealer. • The needle is jamming in the bobbin case finger. • Sewing computer threaded with the needle still in front instead of a poor quality. Skipped stitches ... whether: • the upper and lower threads are trapped between the tension discs. • Remnants of thread under the bobbin case spring • the bobbin runs smoothly in the case or if remnants or lint need removing Lower thread breaks • The lower thread tension is ...
User Guide
Page 35
...presser foot sole 15 Changing the needle 14 Cleaning 33 Clear / Delete 22 F Fabric cover Fabric feed Feed-dog Foot control H Honeycomb stitch I Inserting the bobbin L LCD display Lens Set M Maintenance 1/2 Motor speed D Darning program Delete / Clear Details of the sewing computer Display Double overlock stitch 23, 29 22... stitch 23, 27 Supplementary spool pin 15 T Thread cutter Thread tension Threading Threads Triple straight stitch Trouble shooting U Upper thread W Winding the bobbin Z Zig-zag stitch Zippers 12, 13, 17 19 16 31 23, 25 34 16 12 23, 24 28 2011/09 EN 033644.50.04
...presser foot sole 15 Changing the needle 14 Cleaning 33 Clear / Delete 22 F Fabric cover Fabric feed Feed-dog Foot control H Honeycomb stitch I Inserting the bobbin L LCD display Lens Set M Maintenance 1/2 Motor speed D Darning program Delete / Clear Details of the sewing computer Display Double overlock stitch 23, 29 22... stitch 23, 27 Supplementary spool pin 15 T Thread cutter Thread tension Threading Threads Triple straight stitch Trouble shooting U Upper thread W Winding the bobbin Z Zig-zag stitch Zippers 12, 13, 17 19 16 31 23, 25 34 16 12 23, 24 28 2011/09 EN 033644.50.04


