
XL Series User Manual
Page 4
...the monitor height ...20 Rotating the monitor ...21 Viewing angle adjustment ...22 Using the monitor wall mounting kit 23 Getting the most from your BenQ monitor 24 How to install the monitor on a new computer 25 How to upgrade the monitor on an existing computer 26 How to install ... panel...32 The S Switch ...33 Basic menu operation...34 Initial setup for playing games ...36 Picture optimization ...38 Customizing the hot keys...38 Setting up your own game mode ...38 Downloading more game modes using Game Mode Loader 39 Adjusting display mode ...39 Using Smart Scaling...40 Using Instant...
...the monitor height ...20 Rotating the monitor ...21 Viewing angle adjustment ...22 Using the monitor wall mounting kit 23 Getting the most from your BenQ monitor 24 How to install the monitor on a new computer 25 How to upgrade the monitor on an existing computer 26 How to install ... panel...32 The S Switch ...33 Basic menu operation...34 Initial setup for playing games ...36 Picture optimization ...38 Customizing the hot keys...38 Setting up your own game mode ...38 Downloading more game modes using Game Mode Loader 39 Adjusting display mode ...39 Using Smart Scaling...40 Using Instant...

XL Series User Manual
Page 21
Select Portrait in Orientation, and apply the setting. The monitor should be vertically extended to allow to rotate the display. Refer to the help document of the LCD display hitting the monitor base ...
Select Portrait in Orientation, and apply the setting. The monitor should be vertically extended to allow to rotate the display. Refer to the help document of the LCD display hitting the monitor base ...
XL Series User Manual
Page 24
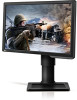
...button, insert the BenQ LCD Monitor CD-ROM and select the appropriate monitor model. Furthermore, if your computer is connected to a network which has security access requirements, network policy settings may prevent you from your BenQ monitor Getting the most from your BenQ monitor To gain the... most benefit from your new BenQ color LCD flat screen monitor, you should install the custom BenQ LCD Monitor driver software as provided on...
...button, insert the BenQ LCD Monitor CD-ROM and select the appropriate monitor model. Furthermore, if your computer is connected to a network which has security access requirements, network policy settings may prevent you from your BenQ monitor Getting the most from your BenQ monitor To gain the... most benefit from your new BenQ color LCD flat screen monitor, you should install the custom BenQ LCD Monitor driver software as provided on...

XL Series User Manual
Page 27
... Charm bar. Open Display Properties. Click the Driver tab and the Update Driver button. 6. Click Browse and navigate to Settings, Control Panel, Devices and Printers and right-click the name of your BenQ monitor 27 You may be prompted to restart your computer after the driver update is the drive letter designator... monitor from the menu. 3. Go to the following directory: d:\BenQ_LCD\Driver\ (where d is complete. Click Generic PnP Monitor, and then the Properties button. 5. Insert the BenQ LCD Monitor CD-ROM into a CD drive on the computer. 7.
... Charm bar. Open Display Properties. Click the Driver tab and the Update Driver button. 6. Click Browse and navigate to Settings, Control Panel, Devices and Printers and right-click the name of your BenQ monitor 27 You may be prompted to restart your computer after the driver update is the drive letter designator... monitor from the menu. 3. Go to the following directory: d:\BenQ_LCD\Driver\ (where d is complete. Click Generic PnP Monitor, and then the Properties button. 5. Insert the BenQ LCD Monitor CD-ROM into a CD drive on the computer. 7.

XL Series User Manual
Page 29
... files to your monitor from provided driver list, and click Next. Insert the BenQ LCD Monitor CD-ROM into a CD drive on Windows Vista systems 1. it may differ from your system - The Display Settings window will display. 3. Click Continue in the prompted User Account Control window. ...CD-ROM drive). The drive letter for driver software. 8. Getting the most from the example above depending upon your BenQ monitor 29 How to install on the computer. 7. Open Display Settings. Click Browse and navigate to the following directory: d:\BenQ_LCD\Driver\ (where d is complete.
... files to your monitor from provided driver list, and click Next. Insert the BenQ LCD Monitor CD-ROM into a CD drive on Windows Vista systems 1. it may differ from your system - The Display Settings window will display. 3. Click Continue in the prompted User Account Control window. ...CD-ROM drive). The drive letter for driver software. 8. Getting the most from the example above depending upon your BenQ monitor 29 How to install on the computer. 7. Open Display Settings. Click Browse and navigate to the following directory: d:\BenQ_LCD\Driver\ (where d is complete.

XL Series User Manual
Page 30
...See Brightness (during 2D playback) / NVIDIA® 3D LightBoost™ (during 3D playback) on page 54 for 3D playback. System requirements • BenQ LCD Monitor XL2420T / XL2420TX / XL2720T • Compatible 3D glasses • PC with Microsoft Windows Vista, Windows 7, or Windows 8 Operating System •...is not visible to you want to adjust the brightness when watching 3D content, go to System and Emitter Mode and change the setting as well. To improve the performance of your monitor Your monitor supports playing three-dimensional (3D) content transferred through HDMI cable ...
...See Brightness (during 2D playback) / NVIDIA® 3D LightBoost™ (during 3D playback) on page 54 for 3D playback. System requirements • BenQ LCD Monitor XL2420T / XL2420TX / XL2720T • Compatible 3D glasses • PC with Microsoft Windows Vista, Windows 7, or Windows 8 Operating System •...is not visible to you want to adjust the brightness when watching 3D content, go to System and Emitter Mode and change the setting as well. To improve the performance of your monitor Your monitor supports playing three-dimensional (3D) content transferred through HDMI cable ...

XL Series User Manual
Page 33
...8226; Press to switch to Gamer 2 (Picture Mode). • Press and hold for 5 seconds to save the customized display settings for Gamer 1. 4. S Switch is designed for BenQ LCD Monitor XL2420T, XL2420TX, and XL2720T exclusively. Return button Returns to adjust your monitor prior to the monitor. How to the...Picture Mode). • Press and hold for 5 seconds to control and access the OSD menus. Do not connect it to save the customized display settings for Gamer 3. Gamer 3 button • Press to switch to Gamer 3 (Picture Mode). • Press and hold for 5 seconds to other...
...8226; Press to switch to Gamer 2 (Picture Mode). • Press and hold for 5 seconds to save the customized display settings for Gamer 1. 4. S Switch is designed for BenQ LCD Monitor XL2420T, XL2420TX, and XL2720T exclusively. Return button Returns to adjust your monitor prior to the monitor. How to the...Picture Mode). • Press and hold for 5 seconds to control and access the OSD menus. Do not connect it to save the customized display settings for Gamer 3. Gamer 3 button • Press to switch to Gamer 3 (Picture Mode). • Press and hold for 5 seconds to other...
XL Series User Manual
Page 34
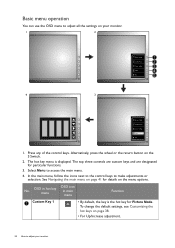
... make adjustments or selection. In the main menu, follow the icons next to the control keys to access the main menu. 4. To change the default settings, see Customizing the hot keys on page 38. • For Up/Increase adjustment. 34 How to adjust your monitor. 1 2 Picture Mode Display Mode Smart Scaling.... 3. No. The hot key menu is the hot key for Picture Mode. Basic menu operation You can use the OSD menu to adjust all the settings on your monitor OSD in hot key menu OSD icon in main menu Function Custom Key 1 • By default, the key is displayed.
... make adjustments or selection. In the main menu, follow the icons next to the control keys to access the main menu. 4. To change the default settings, see Customizing the hot keys on page 38. • For Up/Increase adjustment. 34 How to adjust your monitor. 1 2 Picture Mode Display Mode Smart Scaling.... 3. No. The hot key menu is the hot key for Picture Mode. Basic menu operation You can use the OSD menu to adjust all the settings on your monitor OSD in hot key menu OSD icon in main menu Function Custom Key 1 • By default, the key is displayed.
XL Series User Manual
Page 35
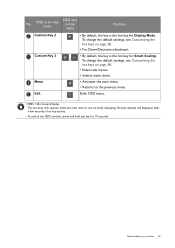
... 3 • By default, the key is the hot key for Smart Scaling. / To change the default settings, see Customizing the hot keys on page 38. • For Down/Decrease adjustment. To change the default settings, see Customizing the hot keys on page 38. • Enters sub menus. • Selects menu items. Menu...
... 3 • By default, the key is the hot key for Smart Scaling. / To change the default settings, see Customizing the hot keys on page 38. • For Down/Decrease adjustment. To change the default settings, see Customizing the hot keys on page 38. • Enters sub menus. • Selects menu items. Menu...

XL Series User Manual
Page 36
Set the screen refresh rate to adjust the screen refresh rate. Right-click the desktop and select Screen resolution. a. Depending on the operating system on your ... Help document of your PC, different procedures should be followed to 120 Hertz (120 Hz). You might want to adjust your gaming experience. Click Advanced settings. And then click Apply and Yes to 120 Hertz. Under the Monitor tab, change the screen refresh rate to confirm the change. Initial setup for...
Set the screen refresh rate to adjust the screen refresh rate. Right-click the desktop and select Screen resolution. a. Depending on the operating system on your ... Help document of your PC, different procedures should be followed to 120 Hertz (120 Hz). You might want to adjust your gaming experience. Click Advanced settings. And then click Apply and Yes to 120 Hertz. Under the Monitor tab, change the screen refresh rate to confirm the change. Initial setup for...

XL Series User Manual
Page 38
...own game mode easily. 1. Select Menu to System. 4. In the sub menu, select a function that you can always adjust the screen geometric settings manually using a digital (DVI, HDMI, or DP) cable to use the Auto Adjustment function. You could also use any of vertical lines), ... when you can be accessed by this endeavour, BenQ has provided a screen test image utility which is designed for these keys. 1. Select Menu to your operating system. Settings that the connected graphic card on the S Switch to change setting in different OSD menus. If you wish, you...
...own game mode easily. 1. Select Menu to System. 4. In the sub menu, select a function that you can always adjust the screen geometric settings manually using a digital (DVI, HDMI, or DP) cable to use the Auto Adjustment function. You could also use any of vertical lines), ... when you can be accessed by this endeavour, BenQ has provided a screen test image utility which is designed for these keys. 1. Select Menu to your operating system. Settings that the connected graphic card on the S Switch to change setting in different OSD menus. If you wish, you...

XL Series User Manual
Page 39
...Downloading more game modes using Game Mode Loader Instead of the game mode buttons (depending on your own display settings, you can download the game modes available on the BenQ website and apply the settings directly. 1. • Brightness (during 2D playback) / NVIDIA® 3D LightBoost™ (during 3D playback... the CD. Downloading more optimized game modes on the website. How to gaming.benq.com. 2. Download and install the game mode loader. 3. After all at any time, go to Save Settings and save as one of aspect ratios other than your monitor aspect ratio and sizes...
...Downloading more game modes using Game Mode Loader Instead of the game mode buttons (depending on your own display settings, you can download the game modes available on the BenQ website and apply the settings directly. 1. • Brightness (during 2D playback) / NVIDIA® 3D LightBoost™ (during 3D playback... the CD. Downloading more optimized game modes on the website. How to gaming.benq.com. 2. Download and install the game mode loader. 3. After all at any time, go to Save Settings and save as one of aspect ratios other than your monitor aspect ratio and sizes...

XL Series User Manual
Page 40
Go to Picture Advanced and Smart Scaling. 2. Select On. 40 How to precisely suit your monitor The setting will take effect immediately. Go to Picture and Instant Mode. 2. Using Instant Mode While playing games, you can press the custom key and adjust the ...
Go to Picture Advanced and Smart Scaling. 2. Select On. 40 How to precisely suit your monitor The setting will take effect immediately. Go to Picture and Instant Mode. 2. Using Instant Mode While playing games, you can press the custom key and adjust the ...

XL Series User Manual
Page 41
... OSD menu languages may vary depending on page 34 for more information on page 53 under System and OSD Settings for details. See Basic menu operation on the input sources, functions and settings. For more details. And keys that are not available will be disabled and the corresponding OSD icons will... the following pages: • Display menu on page 42 • Picture menu on page 44 • Picture Advanced menu on page 46 • Save Settings menu on page 50 • Audio menu on page 51 • System menu on your region, see Language on each menu, please refer to bring...
... OSD menu languages may vary depending on page 34 for more information on page 53 under System and OSD Settings for details. See Basic menu operation on the input sources, functions and settings. For more details. And keys that are not available will be disabled and the corresponding OSD icons will... the following pages: • Display menu on page 42 • Picture menu on page 44 • Picture Advanced menu on page 46 • Save Settings menu on page 50 • Audio menu on page 51 • System menu on your region, see Language on each menu, please refer to bring...
XL Series User Manual
Page 42
...H. Position Pixel Clock Not applicable to the previous menu, select . 6. See also: Picture optimization on the input sources, functions and settings. Menu options that are not available will disappear. And keys that are not available will be disabled and the corresponding OSD icons will become... clock frequency timing to make selection. Select Menu from the hot key menu. 2. Item Function Auto Adjustment Optimizes and adjusts the screen settings automatically for you. Display menu Available menu options may vary depending on page 38. 0 to 100 Not applicable to a sub menu,...
...H. Position Pixel Clock Not applicable to the previous menu, select . 6. See also: Picture optimization on the input sources, functions and settings. Menu options that are not available will disappear. And keys that are not available will be disabled and the corresponding OSD icons will become... clock frequency timing to make selection. Select Menu from the hot key menu. 2. Item Function Auto Adjustment Optimizes and adjusts the screen settings automatically for you. Display menu Available menu options may vary depending on page 38. 0 to 100 Not applicable to a sub menu,...

XL Series User Manual
Page 44
To exit the menu, select . Select to go to make selection. To return to select a menu item. Display Picture Picture Advanced Save Settings Audio System Brightness Contrast Sharpness Black eQualizer Gamma Color Temperature Hue Saturation Normal Bluish Reddish User Mode Mode: Photo R GB 100 100 100 1. Select Menu ...™ • Adjusts the brightness during 3D playback. (during 2D playback). Picture menu Available menu options may vary depending on the input sources, functions and settings. Menu options that are not available will disappear.
To exit the menu, select . Select to go to make selection. To return to select a menu item. Display Picture Picture Advanced Save Settings Audio System Brightness Contrast Sharpness Black eQualizer Gamma Color Temperature Hue Saturation Normal Bluish Reddish User Mode Mode: Photo R GB 100 100 100 1. Select Menu ...™ • Adjusts the brightness during 3D playback. (during 2D playback). Picture menu Available menu options may vary depending on the input sources, functions and settings. Menu options that are not available will disappear.

XL Series User Manual
Page 45
... Adjusts the degree of how we perceive colors. 0 ~ 100 Saturation Adjusts the purity degree of colors. 0 ~ 100 Reset Color Resets the custom color settings to the factory defaults. • YES • NO AMA Improves the gray level response time of the LCD panel. • ON • OFF Instant...• ON have a real-time experience while playing games. • OFF To optimize the picture quality, disable Instant Mode if the source is factory pre-set to the image. Go to the succeeding R (red), G (green), and B (blue) menus to change to the news print standard white color. Range...
... Adjusts the degree of how we perceive colors. 0 ~ 100 Saturation Adjusts the purity degree of colors. 0 ~ 100 Reset Color Resets the custom color settings to the factory defaults. • YES • NO AMA Improves the gray level response time of the LCD panel. • ON • OFF Instant...• ON have a real-time experience while playing games. • OFF To optimize the picture quality, disable Instant Mode if the source is factory pre-set to the image. Go to the succeeding R (red), G (green), and B (blue) menus to change to the news print standard white color. Range...

XL Series User Manual
Page 46
...mode that best suits the type of images shown on the input sources, functions and settings. Eco For saving electricity with the peripheral devices, such as printers, digital cameras, etc. Change the setting if needed. Movie For viewing videos. And keys that are not available will be...will become grayed out. Select Menu from the hot key menu. 2. Standard For basic PC application. Display Picture Picture Advanced Save Settings Audio System Picture Mode Senseye Demo Dynamic Contrast Over-scan Display Mode Smart Scaling Color Format HDMI 3D Format Standard Movie Photo sRGB...
...mode that best suits the type of images shown on the input sources, functions and settings. Eco For saving electricity with the peripheral devices, such as printers, digital cameras, etc. Change the setting if needed. Movie For viewing videos. And keys that are not available will be...will become grayed out. Select Menu from the hot key menu. 2. Standard For basic PC application. Display Picture Picture Advanced Save Settings Audio System Picture Mode Senseye Demo Dynamic Contrast Over-scan Display Mode Smart Scaling Color Format HDMI 3D Format Standard Movie Photo sRGB...

XL Series User Manual
Page 47
...0 to automatically detect the distribution of Standard mode, while the right window presents the images under the selected mode from Component). Change the setting if needed. The function is to 5 • ON • OFF Available only when the input source is displayed without geometric distortion ...of 4:3 aspect ratio. Slightly enlarges the input image. Use this feature to be divided into two windows; This feature is pre-set. Navigating the main menu 47 Displays the preview of Picture Mode, different Display Mode option is provided to allow aspect ratios other than...
...0 to automatically detect the distribution of Standard mode, while the right window presents the images under the selected mode from Component). Change the setting if needed. The function is to 5 • ON • OFF Available only when the input source is displayed without geometric distortion ...of 4:3 aspect ratio. Slightly enlarges the input image. Use this feature to be divided into two windows; This feature is pre-set. Navigating the main menu 47 Displays the preview of Picture Mode, different Display Mode option is provided to allow aspect ratios other than...
XL Series User Manual
Page 48
...Color Format If the Display Mode is 1:1 (and the resolution of the input source is 17", 19", 19"W, or 21.5", the last 4 scaling settings (in different resolutions of the input source) will be saved for quick access. If the input source is HDMI or DP, color format is automatically... of the input source) will be saved for quick access. (For XL2720T) In almost all display modes except Full, Aspect, and 1:1, the last 9 scaling settings (in different resolutions of 5:4 aspect ratio. Item Smart Scaling Function 19" (5:4) (XL2720T only) 19"W (16:10) Displays the input image as if on ...
...Color Format If the Display Mode is 1:1 (and the resolution of the input source is 17", 19", 19"W, or 21.5", the last 4 scaling settings (in different resolutions of the input source) will be saved for quick access. If the input source is HDMI or DP, color format is automatically... of the input source) will be saved for quick access. (For XL2720T) In almost all display modes except Full, Aspect, and 1:1, the last 9 scaling settings (in different resolutions of 5:4 aspect ratio. Item Smart Scaling Function 19" (5:4) (XL2720T only) 19"W (16:10) Displays the input image as if on ...


