US One Year LCD Monitor Warranty
Page 1
...replaced parts or products shall be reported within thirty (30) days of the original warranty period specified above. BenQ may use during the warranty period subject to the exclusions set forth below : • One (1) year from defects in the continental United States, Hawaii, and Alaska...pay shipping freight to process the replacement. END USER LIMITED WARRANTY LCD MONITORS Subject to the terms and conditions set forth below , BenQ America Corp. ("BenQ") warrants the BenQ LCD Monitor ("Product"), you are entitled to depot repair service during the warranty period in order to the...
...replaced parts or products shall be reported within thirty (30) days of the original warranty period specified above. BenQ may use during the warranty period subject to the exclusions set forth below : • One (1) year from defects in the continental United States, Hawaii, and Alaska...pay shipping freight to process the replacement. END USER LIMITED WARRANTY LCD MONITORS Subject to the terms and conditions set forth below , BenQ America Corp. ("BenQ") warrants the BenQ LCD Monitor ("Product"), you are entitled to depot repair service during the warranty period in order to the...

US One Year LCD Monitor Warranty
Page 3
...states or provinces/jurisdictions do not allow limitations on how long an implied warranty lasts. Other Limitations EXCEPT FOR THE WARRANTIES SET FORTH HEREIN, BenQ DISCLAIMS ALL OTHER WARRANTIES, EXPRESSED OR IMPLIED OR STATUTORY, INCLUDING BUT NOT LIMITED TO THE IMPLIED WARRANTIES OF MERCHANTABILITY OR ... APPLICABLE, UNDER THE WARRANTY SERVICES DESCRIBED HEREIN IS YOUR SOLE AND EXCLUSIVE REMEDY WITH RESPECT TO ANY BREACH OF THE BenQ LIMITED WARRANTY SET FORTH HEREIN. In such states or provinces/jurisdictions, the exclusions or limitations of this limited warranty may also have other...
...states or provinces/jurisdictions do not allow limitations on how long an implied warranty lasts. Other Limitations EXCEPT FOR THE WARRANTIES SET FORTH HEREIN, BenQ DISCLAIMS ALL OTHER WARRANTIES, EXPRESSED OR IMPLIED OR STATUTORY, INCLUDING BUT NOT LIMITED TO THE IMPLIED WARRANTIES OF MERCHANTABILITY OR ... APPLICABLE, UNDER THE WARRANTY SERVICES DESCRIBED HEREIN IS YOUR SOLE AND EXCLUSIVE REMEDY WITH RESPECT TO ANY BREACH OF THE BenQ LIMITED WARRANTY SET FORTH HEREIN. In such states or provinces/jurisdictions, the exclusions or limitations of this limited warranty may also have other...

User Manual
Page 12
... the display. Go to portrait mode. 3. For details on your computer, select the properties or controller of the graphics processing units (GPU) on the GPU settings, contact the customer service of the GPU. 2. Gently lift the display up and extend the stand to complete the... settings. Pivot the display. Then tilt the monitor. Rotate the monitor 90 degrees clockwise as illustrated. Select to rotate the display 90 degrees, and follow the ...
... the display. Go to portrait mode. 3. For details on your computer, select the properties or controller of the graphics processing units (GPU) on the GPU settings, contact the customer service of the GPU. 2. Gently lift the display up and extend the stand to complete the... settings. Pivot the display. Then tilt the monitor. Rotate the monitor 90 degrees clockwise as illustrated. Select to rotate the display 90 degrees, and follow the ...

User Manual
Page 15
... model, refer to the specification label on as an Administrator or as provided on your computer (after connecting the monitor to your BenQ LCD Monitor will launch its Found New Hardware wizard. The circumstances under which you connect and install your computer), Windows will automatically...existing installation (which has security access requirements, network policy settings may prevent you turn on the BenQ LCD Monitor CD-ROM. Getting the most benefit from your new BenQ color LCD flat screen monitor, you should install the custom BenQ LCD Monitor driver software as a member of the ...
... model, refer to the specification label on as an Administrator or as provided on your computer (after connecting the monitor to your BenQ LCD Monitor will launch its Found New Hardware wizard. The circumstances under which you connect and install your computer), Windows will automatically...existing installation (which has security access requirements, network policy settings may prevent you turn on the BenQ LCD Monitor CD-ROM. Getting the most benefit from your new BenQ color LCD flat screen monitor, you should install the custom BenQ LCD Monitor driver software as a member of the ...

User Manual
Page 19
... d is complete. Click the Monitor tab and the Properties button. 4. Click Browse and navigate to your BenQ monitor 19 Click Continue in the prompted User Account Control window. 5. Insert the BenQ LCD Monitor CD-ROM into a CD drive on Windows Vista systems 1. Open Display Settings. Select Display Settings from the popup menu. Click Close.
... d is complete. Click the Monitor tab and the Properties button. 4. Click Browse and navigate to your BenQ monitor 19 Click Continue in the prompted User Account Control window. 5. Insert the BenQ LCD Monitor CD-ROM into a CD drive on Windows Vista systems 1. Open Display Settings. Select Display Settings from the popup menu. Click Close.
User Manual
Page 20
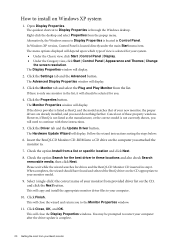
... check Search removable media, then click Next. The Monitor Properties window will display. 3. The Hardware Update Wizard will display. 2. Insert the BenQ LCD Monitor CD-ROM into a CD drive on Windows XP system 1. This will close the wizard and return you need to continue with ...instructions. 5. Alternatively, the Windows menu to Display Properties is through the Windows desktop. Click the Settings tab and the Advanced button. If there is only one monitor in step 6. However, if BenQ is complete. 20 Getting the most from your computer. 10. Please wait while the wizard ...
... check Search removable media, then click Next. The Monitor Properties window will display. 3. The Hardware Update Wizard will display. 2. Insert the BenQ LCD Monitor CD-ROM into a CD drive on Windows XP system 1. This will close the wizard and return you need to continue with ...instructions. 5. Alternatively, the Windows menu to Display Properties is through the Windows desktop. Click the Settings tab and the Advanced button. If there is only one monitor in step 6. However, if BenQ is complete. 20 Getting the most from your computer. 10. Please wait while the wizard ...

User Manual
Page 21
... programs that play 3D playback For the compatible accessories, visit http://www.nvidia.com/object/3d-vision-requirements.html. System requirements • BenQ LCD Monitor XL2410T • Compatible 3D glasses • PC with Microsoft Windows Vista or Windows 7 Operating System • Compatible graphics processing units (GPU... files or the drivers on your BenQ monitor 21 For the appropriate 3D players, check with the 3D content providers. • Contact NVIDIA or visit NVIDIA website (http://www.nvidia.com/page/home.html) for the purchase and the settings of time. Take off the 3D...
... programs that play 3D playback For the compatible accessories, visit http://www.nvidia.com/object/3d-vision-requirements.html. System requirements • BenQ LCD Monitor XL2410T • Compatible 3D glasses • PC with Microsoft Windows Vista or Windows 7 Operating System • Compatible graphics processing units (GPU... files or the drivers on your BenQ monitor 21 For the appropriate 3D players, check with the 3D content providers. • Contact NVIDIA or visit NVIDIA website (http://www.nvidia.com/page/home.html) for the purchase and the settings of time. Take off the 3D...

User Manual
Page 22
... you run auto.exe, a test pattern displays. 2. If you connect a digital video output using geometry menu items. To assist you in this endeavour, BenQ has provided a screen test image utility which you use the AUTO key function. 5. When you notice a horizontal noise, press the or keys to select ...Pixel Clock and press the ENTER key. If you wish, you can always adjust the screen geometric settings manually using a digital (DVI or HDMI) cable to use the AUTO key function. Press the AUTO key on your computer is to your operating...
... you run auto.exe, a test pattern displays. 2. If you connect a digital video output using geometry menu items. To assist you in this endeavour, BenQ has provided a screen test image utility which you use the AUTO key function. 5. When you notice a horizontal noise, press the or keys to select ...Pixel Clock and press the ENTER key. If you wish, you can always adjust the screen geometric settings manually using a digital (DVI or HDMI) cable to use the AUTO key function. Press the AUTO key on your computer is to your operating...

User Manual
Page 23
... not currently displaying. See Smart Scaling on page 32 for more information. 5. The key is also the hot key for adjusting the value of that setting, and will disappear after a few seconds of no key activity. Hot key displays will only operate while the OSD menu is the hot key for...
... not currently displaying. See Smart Scaling on page 32 for more information. 5. The key is also the hot key for adjusting the value of that setting, and will disappear after a few seconds of no key activity. Hot key displays will only operate while the OSD menu is the hot key for...

User Manual
Page 24
...than 1920 x 1080), 17", or 19"W. Smart Scaling hot key Display Mode hot key Press the key to 1:1 (and the resolution is set to display the Smart Scaling indicator. Further press the key will increase the display size, while the key will take effect immediately. See also ...Input on -screen. The setting will take effect immediately. The setting will decrease the display size. You can press and hold the Smart Scaling hot key to switch among Full, Aspect, Overscan, ...
...than 1920 x 1080), 17", or 19"W. Smart Scaling hot key Display Mode hot key Press the key to 1:1 (and the resolution is set to display the Smart Scaling indicator. Further press the key will increase the display size, while the key will take effect immediately. See also ...Input on -screen. The setting will take effect immediately. The setting will decrease the display size. You can press and hold the Smart Scaling hot key to switch among Full, Aspect, Overscan, ...

User Manual
Page 25
... 30 • Audio menu on page 35 • System menu on page 36 How to adjust your region, see "Language on page 37" under "OSD Settings" for more details. Display 2. System Move ENTER Select Use the (up) or (down) keys to highlight a menu item, and press the Exit ENTER key to... enter the Menu item settings. The OSD menu languages may vary depending on your monitor. Position V. Audio 5. Picture 3. Main menu mode You can use the OSD (On Screen Display) menu...
... 30 • Audio menu on page 35 • System menu on page 36 How to adjust your region, see "Language on page 37" under "OSD Settings" for more details. Display 2. System Move ENTER Select Use the (up) or (down) keys to highlight a menu item, and press the Exit ENTER key to... enter the Menu item settings. The OSD menu languages may vary depending on your monitor. Position V. Audio 5. Picture 3. Main menu mode You can use the OSD (On Screen Display) menu...

User Manual
Page 26
... output using a digital (DVI or HDMI) cable to your monitor Display menu Available menu options may vary depending on the input sources, functions and settings. Position Pixel Clock Phase Mode: Standard 10 12 1 12 Move ENTER Select Exit 1. To return to display the main menu. 2. Press the...ENTER key to adjust your monitor, the AUTO key and the Auto Adjustment function will be disabled. 26 How to select screen settings automatically this function. When you . DISPLAY Auto Adjustment H. Press the or keys to make for this option and make adjustments or selections. ...
... output using a digital (DVI or HDMI) cable to your monitor Display menu Available menu options may vary depending on the input sources, functions and settings. Position Pixel Clock Phase Mode: Standard 10 12 1 12 Move ENTER Select Exit 1. To return to display the main menu. 2. Press the...ENTER key to adjust your monitor, the AUTO key and the Auto Adjustment function will be disabled. 26 How to select screen settings automatically this function. When you . DISPLAY Auto Adjustment H. Press the or keys to make for this option and make adjustments or selections. ...
User Manual
Page 28
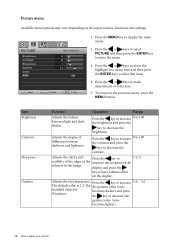
... menu. 2. Press the MENU key to make adjustments or selections. 5. display and press the key to have softness effect on the input sources, functions and settings.
... menu. 2. Press the MENU key to make adjustments or selections. 5. display and press the key to have softness effect on the input sources, functions and settings.
User Manual
Page 29
... Allows video and Press the or still photographs to change adjustments. keys to Bluish: Applies a cool tint to the image and is factory pre-set to the PC industry standard white color. Reddish: Applies a warm tint to the image and is the factory default color. altered to be select...Blue Tailors the image color tint. If Press the or adjust the value. User Mode: The blend of adjust the value. the settings. This is factory pre-set to the news print standard white color. Color - viewed with natural coloring. adjust the value. How to primary colors can be select...
... Allows video and Press the or still photographs to change adjustments. keys to Bluish: Applies a cool tint to the image and is factory pre-set to the PC industry standard white color. Reddish: Applies a warm tint to the image and is the factory default color. altered to be select...Blue Tailors the image color tint. If Press the or adjust the value. User Mode: The blend of adjust the value. the settings. This is factory pre-set to the news print standard white color. Color - viewed with natural coloring. adjust the value. How to primary colors can be select...
User Manual
Page 30
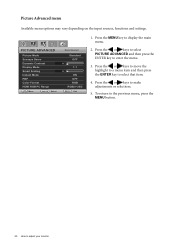
... menu. 2. Press the or keys to make adjustments or selections. 5. Picture Advanced menu Available menu options may vary depending on the input sources, functions and settings.
... menu. 2. Press the or keys to make adjustments or selections. 5. Picture Advanced menu Available menu options may vary depending on the input sources, functions and settings.

User Manual
Page 31
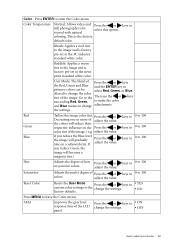
... of Standard mode, while the right window presents the images under the change the settings. • FPS shown on the screen. • User Game-1 • Standard - The adjusted color settings will be divided into two windows; for saving electricity with the peripheral devices, such...Press the or keys to • ON screen images under the specified mode. for all running programs. Displays the preview of images change the settings. • OFF selected mode from Picture Mode. for playing • Photo FPS games. • sRGB • User Game-1 - for...
... of Standard mode, while the right window presents the images under the change the settings. • FPS shown on the screen. • User Game-1 • Standard - The adjusted color settings will be divided into two windows; for saving electricity with the peripheral devices, such...Press the or keys to • ON screen images under the specified mode. for all running programs. Displays the preview of images change the settings. • OFF selected mode from Picture Mode. for playing • Photo FPS games. • sRGB • User Game-1 - for...
User Manual
Page 32
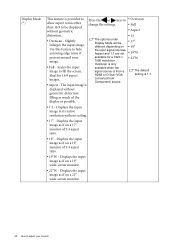
... is only available when the signal source is from a HDMI or D-Sub (VGA converted from Component) source. • 22"W The default setting is provided to allow aspect ratios other than 16:9 to be displayed without scaling. • 17" - Displays the input image in its ...on a 19" wide-screen monitor. • 22"W - Displays the input image as possible. • 1:1 - Use this feature to • Overscan change the settings. • Full • Aspect distortion. • 1:1 • Overscan - Aspect and 1:1 are not • 19"W present around your monitor The input image is...
... is only available when the signal source is from a HDMI or D-Sub (VGA converted from Component) source. • 22"W The default setting is provided to allow aspect ratios other than 16:9 to be displayed without scaling. • 17" - Displays the input image in its ...on a 19" wide-screen monitor. • 22"W - Displays the input image as possible. • 1:1 - Use this feature to • Overscan change the settings. • Full • Aspect distortion. • 1:1 • Overscan - Aspect and 1:1 are not • 19"W present around your monitor The input image is...
User Manual
Page 33
...hot key to 17", 19"W, or 1:1) Resizes the display. If the Display Mode is 1:1 (and the resolution of the input source is set to resize the display Your display may continually. How to System > Information on the monitor. Smart Scaling (available when the Display Mode is ...lower than 1920 x 1080), the last 5 scaling settings (in different resolutions of the input source) will be saved and used whenever 17" or 19"W are not available if this function is activated....
...hot key to 17", 19"W, or 1:1) Resizes the display. If the Display Mode is 1:1 (and the resolution of the input source is set to resize the display Your display may continually. How to System > Information on the monitor. Smart Scaling (available when the Display Mode is ...lower than 1920 x 1080), the last 5 scaling settings (in different resolutions of the input source) will be saved and used whenever 17" or 19"W are not available if this function is activated....
User Manual
Page 34
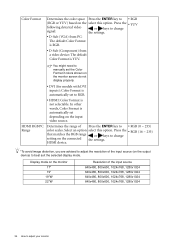
... video source. Select an option select this option. Press the • RGB (16 ~ 235) that matches the RGB range or keys to change signal: the settings. • D-Sub (VGA) from PC: The default Color Format is RGB. • D-Sub (Component) from a video device: The default Color Format is ...not selectable. You might need to manually set to RGB. • HDMI: Color Format is YUV. Display mode on the monitor 17" 19" 19"W 22"W Resolution of Press the ENTER key to...
... video source. Select an option select this option. Press the • RGB (16 ~ 235) that matches the RGB range or keys to change signal: the settings. • D-Sub (VGA) from PC: The default Color Format is RGB. • D-Sub (Component) from a video device: The default Color Format is ...not selectable. You might need to manually set to RGB. • HDMI: Color Format is YUV. Display mode on the monitor 17" 19" 19"W 22"W Resolution of Press the ENTER key to...

User Manual
Page 35
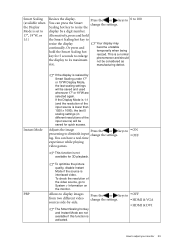
To return to adjust your monitor 35 Press the or keys to • ON change the settings. • OFF How to the previous menu, press the MENU button. Press the or keys to select AUDIO and then press the ENTER key to ... ENTER Select 4. Press the MENU key to display the main menu. Audio menu Available menu options may vary depending on the input sources, functions and settings. 1.
To return to adjust your monitor 35 Press the or keys to • ON change the settings. • OFF How to the previous menu, press the MENU button. Press the or keys to select AUDIO and then press the ENTER key to ... ENTER Select 4. Press the MENU key to display the main menu. Audio menu Available menu options may vary depending on the input sources, functions and settings. 1.


