
User Manual
Page 4
...the aspect ratio 20 3. Using Panamorph lenses (optional 22 Displaying more than one image source simultaneously 22 Personalizing the projector menu display 23 Saving and loading the video memory 23 Turning the power off 23 Menus ...24 On Screen Display...29 Additional information 31 Care of the projector 31 Cleaning the lens ...31 Cleaning the projector case 31 Storing the projector 31 Transporting the projector 31 Cleaning and replacing the dust filter 31 Installing the cable connector-panel cover 33 Replacing the lamp 34 Indicators ...35 Troubleshooting 36 Specifications 37...
...the aspect ratio 20 3. Using Panamorph lenses (optional 22 Displaying more than one image source simultaneously 22 Personalizing the projector menu display 23 Saving and loading the video memory 23 Turning the power off 23 Menus ...24 On Screen Display...29 Additional information 31 Care of the projector 31 Cleaning the lens ...31 Cleaning the projector case 31 Storing the projector 31 Transporting the projector 31 Cleaning and replacing the dust filter 31 Installing the cable connector-panel cover 33 Replacing the lamp 34 Indicators ...35 Troubleshooting 36 Specifications 37...
User Manual
Page 7
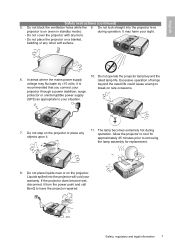
... (even in standby mode): during operation. It may fluctuate by ±10 volts, it from the power point and call BenQ to removing the lamp assembly for replacement. 8. If the projector does become wet, disconnect it is on a blanket, bedding or any other soft surface. 6. Safety, regulatory and legal information 7 Do not block the...
... (even in standby mode): during operation. It may fluctuate by ±10 volts, it from the power point and call BenQ to removing the lamp assembly for replacement. 8. If the projector does become wet, disconnect it is on a blanket, bedding or any other soft surface. 6. Safety, regulatory and legal information 7 Do not block the...

User Manual
Page 8
... not attempt to suitably qualified professional service personnel. 8 Safety, regulatory and legal information Do not store the projector on end vertically. causing injury or resulting in damage. 13. The only user serviceable parts are dangerous high ...Safety instructions (continued) 12. There are the lamp, cable panelconnector cover, and air filters which may cause the projector to fall over, unplugged from the power supply. until the projector has cooled down and is required, take the projector only to replace the lamp assembly 15. Never attempt to a suitably qualified...
... not attempt to suitably qualified professional service personnel. 8 Safety, regulatory and legal information Do not store the projector on end vertically. causing injury or resulting in damage. 13. The only user serviceable parts are dangerous high ...Safety instructions (continued) 12. There are the lamp, cable panelconnector cover, and air filters which may cause the projector to fall over, unplugged from the power supply. until the projector has cooled down and is required, take the projector only to replace the lamp assembly 15. Never attempt to a suitably qualified...
User Manual
Page 28
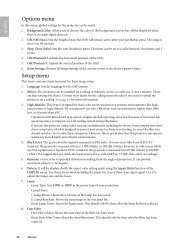
... a value between 10 minutes and 3 hours. 4. Mirror: The projector can be made using the Aspect Ratio function of time the OSD will be done after the lamp has been replaced. 8. We suggest that this projector can operate under other areas which use PAL equipment or Japanese NTSC ...standard, the grayscale is measured from over -all harsh and extreme environments. 4. Lamp • Lamp Type: Sets 250W or 200W as...
... a value between 10 minutes and 3 hours. 4. Mirror: The projector can be made using the Aspect Ratio function of time the OSD will be done after the lamp has been replaced. 8. We suggest that this projector can operate under other areas which use PAL equipment or Japanese NTSC ...standard, the grayscale is measured from over -all harsh and extreme environments. 4. Lamp • Lamp Type: Sets 250W or 200W as...
User Manual
Page 31
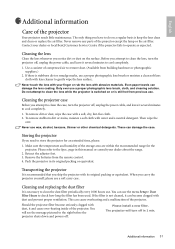
...the lens with water and a neutral detergent. Never touch the lens with your dealer or local BenQ Customer Service Centre if the projector fails to clean the lens while the projector is switched on or is stubborn dirt or smudge marks, use . Do not attempt to operate ... is necessary to do on the surface. English Additional information Care of the projector except the lamp or the air filter. Remove the batteries from building hardware or photographic suppliers.) 2. Cleaning and replacing the dust filter It is recommended that you have to clean the dust filter ...
...the lens with water and a neutral detergent. Never touch the lens with your dealer or local BenQ Customer Service Centre if the projector fails to clean the lens while the projector is switched on or is stubborn dirt or smudge marks, use . Do not attempt to operate ... is necessary to do on the surface. English Additional information Care of the projector except the lamp or the air filter. Remove the batteries from building hardware or photographic suppliers.) 2. Cleaning and replacing the dust filter It is recommended that you have to clean the dust filter ...
User Manual
Page 34
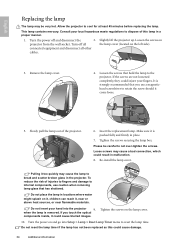
... left side). Do not insert your fingers. Insert the replacement lamp. This lamp contains mercury. Do not place the lamp in the projector. Allow the projector to the projector. Tighten the screws securing the lamp box. Pulling it is pushed fully and firmly in a proper manner. 1. when the lamp is strongly recommended that has shattered. If you use caution...
... left side). Do not insert your fingers. Insert the replacement lamp. This lamp contains mercury. Do not place the lamp in the projector. Allow the projector to the projector. Tighten the screws securing the lamp box. Pulling it is pushed fully and firmly in a proper manner. 1. when the lamp is strongly recommended that has shattered. If you use caution...

User Manual
Page 36
...is not correctly focused. Plug the power cable into the AC inlet on the rear of the projector. (See page 13) 36 Additional information The lamp cover is no power from the projector. The input signal has not been correctly selected. Remote control does not work correctly There is...necessary. (See page 19) Replace both of the batteries with new ones. (See page 9) Remove the obstacle. (See page 13) Stand within 8 meters (26.2 feet) of the projector, and plug the power cable into to the projector or the signal source. No picture. Correctly attach the lamp cover. (See page 34...
...is not correctly focused. Plug the power cable into the AC inlet on the rear of the projector. (See page 13) 36 Additional information The lamp cover is no power from the projector. The input signal has not been correctly selected. Remote control does not work correctly There is...necessary. (See page 19) Replace both of the batteries with new ones. (See page 9) Remove the obstacle. (See page 13) Stand within 8 meters (26.2 feet) of the projector, and plug the power cable into to the projector or the signal source. No picture. Correctly attach the lamp cover. (See page 34...


