
W6000 User Manual
Page 2
... Connecting HDMI devices 17 Connecting component-video devices ....18 Connecting S-Video or video devices ......18 Connecting a computer 19 Using the projector 20 Turning the projector on 20 Selecting an input source 21 Fine-tuning the image size and clarity 21 Using the menus 22 Securing the projector 22 Using a security cable lock 22 Utilizing the password function 23 Adjusting the projected image 25 2 Table of contents Adjusting the projection angle 25 Correcting picture distortion 25 Using the preset and user modes...
... Connecting HDMI devices 17 Connecting component-video devices ....18 Connecting S-Video or video devices ......18 Connecting a computer 19 Using the projector 20 Turning the projector on 20 Selecting an input source 21 Fine-tuning the image size and clarity 21 Using the menus 22 Securing the projector 22 Using a security cable lock 22 Utilizing the password function 23 Adjusting the projected image 25 2 Table of contents Adjusting the projection angle 25 Correcting picture distortion 25 Using the preset and user modes...
W6000 User Manual
Page 4
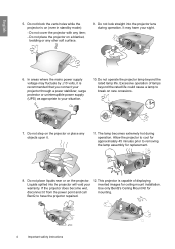
..., it from the power point and call BenQ to removing the lamp assembly for approximately 45 minutes prior to have the projector repaired. 12. Do not step on a blanket, bedding or any item; - English 5. Excessive operation of displaying inverted images for mounting. 4 Important safety instructions Do not place liquids near or on rare occasions. 7. Liquids spilled into the projector lens during operation. Do not block...
..., it from the power point and call BenQ to removing the lamp assembly for approximately 45 minutes prior to have the projector repaired. 12. Do not step on a blanket, bedding or any item; - English 5. Excessive operation of displaying inverted images for mounting. 4 Important safety instructions Do not place liquids near or on rare occasions. 7. Liquids spilled into the projector lens during operation. Do not block...
W6000 User Manual
Page 7
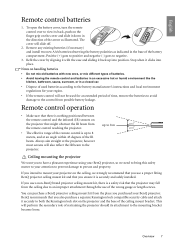
... the battery compartment. Overview 7 Remove any existing batteries (if necessary) and install two new AAA batteries observing the battery polarities as illustrated. up to 8 m Ceiling mounting the projector We want you ensure it is up into place. To open the battery cover, turn the remote control over to view its attachment to 8 meters, and at the projector, however most screens will perform the secondary...
... the battery compartment. Overview 7 Remove any existing batteries (if necessary) and install two new AAA batteries observing the battery polarities as illustrated. up to 8 m Ceiling mounting the projector We want you ensure it is up into place. To open the battery cover, turn the remote control over to view its attachment to 8 meters, and at the projector, however most screens will perform the secondary...

W6000 User Manual
Page 9
... 4. RS-232 control port Used to interface with video equipment" on page 10 for details.) 2. Ceiling mount holes 19 19 18 Overview 9 HDMI ports 10. USB port 13. Lamp cover 3 3. Projection lens 6. Vent (heated air exhaust) 5. Rear IR sensor 9. S-Video input (mini 4-pin DIN) 12. RGB (PC)/Component video (YPbPr/YCbCr) signal input jack 17. Adjustable feet 19. Kensington lock slot 18. Lens shift lever 4 5 6 Rear view See "Connecting with a PC or home theater control/automation system...
... 4. RS-232 control port Used to interface with video equipment" on page 10 for details.) 2. Ceiling mount holes 19 19 18 Overview 9 HDMI ports 10. USB port 13. Lamp cover 3 3. Projection lens 6. Vent (heated air exhaust) 5. Rear IR sensor 9. S-Video input (mini 4-pin DIN) 12. RGB (PC)/Component video (YPbPr/YCbCr) signal input jack 17. Adjustable feet 19. Kensington lock slot 18. Lens shift lever 4 5 6 Rear view See "Connecting with a PC or home theater control/automation system...

W6000 User Manual
Page 10
... any changes made using the On-Screen Display (OSD) menu. Zoom ring Adjusts the size of the projected image. ENTER Enacts the selected On-Screen Display (OSD) menu item. 12. PRESET MODE Sequentially selects a predefined picture setting available for each input. English Controls and functions Control panel 1 2 3 4 5 6 7 8 6 6 9 10 11 6 12 1. II POWER Performs the same action as the source selection keys (COMP, VIDEO, S-VIDEO, HDMI1, HDMI2, PC) on page 21 2. MENU Toggles the On-Screen Display (OSD) menu...
... any changes made using the On-Screen Display (OSD) menu. Zoom ring Adjusts the size of the projected image. ENTER Enacts the selected On-Screen Display (OSD) menu item. 12. PRESET MODE Sequentially selects a predefined picture setting available for each input. English Controls and functions Control panel 1 2 3 4 5 6 7 8 6 6 9 10 11 6 12 1. II POWER Performs the same action as the source selection keys (COMP, VIDEO, S-VIDEO, HDMI1, HDMI2, PC) on page 21 2. MENU Toggles the On-Screen Display (OSD) menu...
W6000 User Manual
Page 12
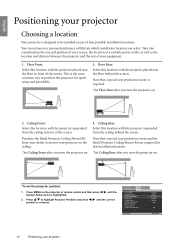
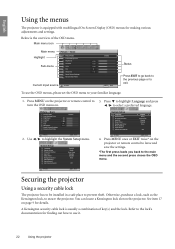
... to position the projector for this installation location. *Set Ceiling Rear after you turn the projector on . 4. Take into consideration the size and position of your screen, the location of a suitable power outlet, as well as the location and distance between the projector and the rest of the screen. System Setup Language Splash Screen Projector Position Auto Off Sleep Timer Background Color Menu Settings Input Source Auto Source Search S-Video English BenQ Floor Front Disable Disable Blue Off EXIT Back...
... to position the projector for this installation location. *Set Ceiling Rear after you turn the projector on . 4. Take into consideration the size and position of your screen, the location of a suitable power outlet, as well as the location and distance between the projector and the rest of the screen. System Setup Language Splash Screen Projector Position Auto Off Sleep Timer Background Color Menu Settings Input Source Auto Source Search S-Video English BenQ Floor Front Disable Disable Blue Off EXIT Back...
W6000 User Manual
Page 22
Basic Picture Mode Load Settings From Brightness Contrast Color Tint Sharpness Reset Picture Settings Rename User Mode Current input source S-Video + 50 + 50 + 50 0 + 3 Cinema EXIT Back Status Press EXIT to go back to the previous page or to secure the projector. System Setup Language Splash Screen Projector Position Auto Off Sleep Timer Background Color Menu Settings Input Source Auto Source Search English BenQ Floor Front Disable Disable Blue Off System Setup Language Splash Screen Projector Position Auto Off Sleep Timer Background Color Menu Settings Input Source Auto Source ...
Basic Picture Mode Load Settings From Brightness Contrast Color Tint Sharpness Reset Picture Settings Rename User Mode Current input source S-Video + 50 + 50 + 50 0 + 3 Cinema EXIT Back Status Press EXIT to go back to the previous page or to secure the projector. System Setup Language Splash Screen Projector Position Auto Off Sleep Timer Background Color Menu Settings Input Source Auto Source Search English BenQ Floor Front Disable Disable Blue Off System Setup Language Splash Screen Projector Position Auto Off Sleep Timer Background Color Menu Settings Input Source Auto Source ...
W6000 User Manual
Page 23
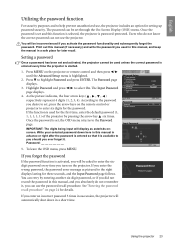
... desire to set , the OSD menu returns to help prevent unauthorized use, the projector includes an option for the password. The Password page displays. 3. As the picture indicates, the four arrow keys ( , , , ) respectively represent 4 digits (1, 2, 3, 4). According to the password you did not record the password in this manual, and keep the manual in succession, the projector will display as pictured to you should you enter the wrong password, the password error message as...
... desire to set , the OSD menu returns to help prevent unauthorized use, the projector includes an option for the password. The Password page displays. 3. As the picture indicates, the four arrow keys ( , , , ) respectively represent 4 digits (1, 2, 3, 4). According to the password you did not record the password in this manual, and keep the manual in succession, the projector will display as pictured to you should you enter the wrong password, the password error message as...
W6000 User Manual
Page 24
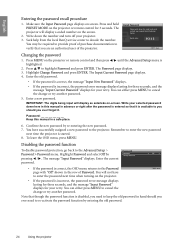
... PRESET MODE on -screen. The Password page displays. 3. Recall code: 0 2 1 2 EXIT Back Changing the password 1. Confirm the new password by Password Change Password Off pressing / . You have to enter the new password next time the projector is highlighted. 2. Seek help from the local BenQ service center to highlight Password and press ENTER. To leave the OSD menu, press MENU. You can either press MENU to verify that though the password function is incorrect, the password error message displays...
... PRESET MODE on -screen. The Password page displays. 3. Recall code: 0 2 1 2 EXIT Back Changing the password 1. Confirm the new password by Password Change Password Off pressing / . You have to enter the new password next time the projector is highlighted. 2. Seek help from the local BenQ service center to highlight Password and press ENTER. To leave the OSD menu, press MENU. You can either press MENU to verify that though the password function is incorrect, the password error message displays...

W6000 User Manual
Page 26
... MODE repeatedly or USER 1, USER 2/ISF NIGHT, USER 3/ISF DAY, DEFAULT on the remote control, or PRESET MODE on that particular input. Advanced menu is highlighted. 2. Your selection is automatically stored in the projector and associated with a low brightness level, this is most recently used picture mode and settings for that input and resolution will be altered via the available items shown in the Picture -- Each time you change the input source...
... MODE repeatedly or USER 1, USER 2/ISF NIGHT, USER 3/ISF DAY, DEFAULT on the remote control, or PRESET MODE on that particular input. Advanced menu is highlighted. 2. Your selection is automatically stored in the projector and associated with a low brightness level, this is most recently used picture mode and settings for that input and resolution will be altered via the available items shown in the Picture -- Each time you change the input source...

W6000 User Manual
Page 27
... message displays. 3. Press to select a sub-menu item to save and leave the settings. Press / to the preset factory values: 1. To reset the picture mode to select the first character. 4. Press / to highlight Load Settings From. To rename user modes: 1. Resetting the picture mode All of the picture modes (except the selected User mode) as a starting point and customize the settings. 1. Advanced menus can use one of the adjustments you want to change User 1, User...
... message displays. 3. Press to select a sub-menu item to save and leave the settings. Press / to the preset factory values: 1. To reset the picture mode to select the first character. 4. Press / to highlight Load Settings From. To rename user modes: 1. Resetting the picture mode All of the picture modes (except the selected User mode) as a starting point and customize the settings. 1. Advanced menus can use one of the adjustments you want to change User 1, User...

W6000 User Manual
Page 31
... professional installer. Picture -- Advanced Black Level Clarity Control Color Temperature Color Temperature User_ Fine Tuning Gamma Selection Brilliant Color Color Management Film Mode 3D Comb Filter Dynamic Black 0 IRE Normal 2.4 On ENTER On On On S-Video EXIT Back Color Management Primary Color Range Saturation +15 +15 Magenta EXIT Back Red Yellow Green Magenta Cyan Blue Setting Film Mode This feature helps improve picture quality when projecting video image from a film-sourced DVD. Saturation is too high, that color...
... professional installer. Picture -- Advanced Black Level Clarity Control Color Temperature Color Temperature User_ Fine Tuning Gamma Selection Brilliant Color Color Management Film Mode 3D Comb Filter Dynamic Black 0 IRE Normal 2.4 On ENTER On On On S-Video EXIT Back Color Management Primary Color Range Saturation +15 +15 Magenta EXIT Back Red Yellow Green Magenta Cyan Blue Setting Film Mode This feature helps improve picture quality when projecting video image from a film-sourced DVD. Saturation is too high, that color...
W6000 User Manual
Page 36
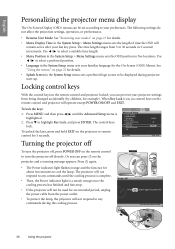
... be used for 5 seconds. Power Off Press button again to select a preferred position. • Language in the System Setup > Menu Settings menu sets the length of time the OSD will operate except POWER ON/OFF and EXIT. Use / to power off. Locking control keys With the control keys on the projector and a warning message appears. Press MENU and then press / until the cooling process is complete. • Then, the Power indicator light is...
... be used for 5 seconds. Power Off Press button again to select a preferred position. • Language in the System Setup > Menu Settings menu sets the length of time the OSD will operate except POWER ON/OFF and EXIT. Use / to power off. Locking control keys With the control keys on the projector and a warning message appears. Press MENU and then press / until the cooling process is complete. • Then, the Power indicator light is...
W6000 User Manual
Page 38
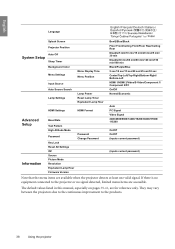
English Language Splash Screen Projector Position Auto Off System Setup Sleep Timer Background Color Menu Settings Input Source Auto Source Search Lamp Settings Menu Display Time Menu Position Lamp Power Reset Lamp Timer Equivalent Lamp Hour HDMI Settings HDMI Format Advanced Setup Information Baud Rate Test Pattern High Altitude Mode Password Key Lock Reset All Settings ISF Source Picture Mode Resolution Equivalent Lamp Hour Firmware Version Password Change Password BenQ/Blue/Black Floor Front/Ceiling Front/Floor Rear/Ceiling Rear Disable/5 min/10 min/15 min/20 min/25 min/ 30 min ...
English Language Splash Screen Projector Position Auto Off System Setup Sleep Timer Background Color Menu Settings Input Source Auto Source Search Lamp Settings Menu Display Time Menu Position Lamp Power Reset Lamp Timer Equivalent Lamp Hour HDMI Settings HDMI Format Advanced Setup Information Baud Rate Test Pattern High Altitude Mode Password Key Lock Reset All Settings ISF Source Picture Mode Resolution Equivalent Lamp Hour Firmware Version Password Change Password BenQ/Blue/Black Floor Front/Ceiling Front/Floor Rear/Ceiling Rear Disable/5 min/10 min/15 min/20 min/25 min/ 30 min ...

W6000 User Manual
Page 41
... projector 41 Reset Lamp Timer Once the lamp is intended for details. See "Resetting the lamp timer" on page 23 for details. Equivalent Lamp Hour HDMI Settings (Auto) Baud Rate (115200) Test Pattern High Altitude Mode (Off) Password Key Lock Shows the lamp hour information. You can connect the projector using a suitable RS-232 cable and update or download the projector's firmware. Selects a baud rate that is identical with your last key press. Menu Position (Center) Sets the On-Screen Display...
... projector 41 Reset Lamp Timer Once the lamp is intended for details. See "Resetting the lamp timer" on page 23 for details. Equivalent Lamp Hour HDMI Settings (Auto) Baud Rate (115200) Test Pattern High Altitude Mode (Off) Password Key Lock Shows the lamp hour information. You can connect the projector using a suitable RS-232 cable and update or download the projector's firmware. Selects a baud rate that is identical with your last key press. Menu Position (Center) Sets the On-Screen Display...
W6000 User Manual
Page 44
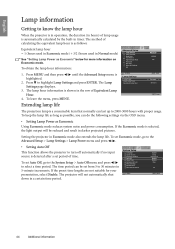
...Splash Screen Projector Position Auto Off Sleep Timer Background Color Menu Settings Input Source Auto Source Search S-Video English BenQ Floor Front Disable Disable Blue On EXIT Back 44 Additional information English Lamp information Getting to know the lamp hour When the projector is in operation, the duration (in hours) of Equivalent Lamp Hour. 4. The Lamp Settings page displays. 3. Setting the projector in timer. To obtain the lamp hour information: Advanced Setup Lamp Settings HDMI Settings Baud Rate Test Pattern High Altitude Mode Password Key Lock Reset All Settings...
...Splash Screen Projector Position Auto Off Sleep Timer Background Color Menu Settings Input Source Auto Source Search S-Video English BenQ Floor Front Disable Disable Blue On EXIT Back 44 Additional information English Lamp information Getting to know the lamp hour When the projector is in operation, the duration (in hours) of Equivalent Lamp Hour. 4. The Lamp Settings page displays. 3. Setting the projector in timer. To obtain the lamp hour information: Advanced Setup Lamp Settings HDMI Settings Baud Rate Test Pattern High Altitude Mode Password Key Lock Reset All Settings...
W6000 User Manual
Page 45
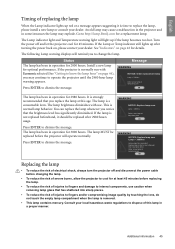
... dismiss the message. English Timing of replacing the lamp When the Lamp indicator lights up red or a message appears suggesting it should be replaced before the projector will light up after 2980 hours usage. This is a consumable item. WARNING NOTICE: Replace lamp soon Lamp > 2980hrs Order a new lamp at lamp.benq.com OK The lamp has been in operation for optimal performance. Additional information 45 Turn the power off and disconnect the power cable before replacing the lamp. •...
... dismiss the message. English Timing of replacing the lamp When the Lamp indicator lights up red or a message appears suggesting it should be replaced before the projector will light up after 2980 hours usage. This is a consumable item. WARNING NOTICE: Replace lamp soon Lamp > 2980hrs Order a new lamp at lamp.benq.com OK The lamp has been in operation for optimal performance. Additional information 45 Turn the power off and disconnect the power cable before replacing the lamp. •...

W6000 User Manual
Page 48
... Red Red Red Green Green Green Orange Orange Orange Temp Off Off Red Red Red Red Green Green Orange Red Red Red Red Red Red Red Red Red Lamp Red Red Off Red Green Orange Red Orange Red Red Green Orange Red Green Orange Red Green Orange Status & Description • The lamp has been damaged. When the projector is turned off and contact your local BenQ customer center for purchasing a new lamp. • The lamp is blocked. • The projector may be in a normal state Power Orange Green Flashing Green Temp Off Off Off Orange Flashing Off Lamp Off Stand-by mode Status & Description...
... Red Red Red Green Green Green Orange Orange Orange Temp Off Off Red Red Red Red Green Green Orange Red Red Red Red Red Red Red Red Red Lamp Red Red Off Red Green Orange Red Orange Red Red Green Orange Red Green Orange Red Green Orange Status & Description • The lamp has been damaged. When the projector is turned off and contact your local BenQ customer center for purchasing a new lamp. • The lamp is blocked. • The projector may be in a normal state Power Orange Green Flashing Green Temp Off Off Off Orange Flashing Off Lamp Off Stand-by mode Status & Description...
W6000 User Manual
Page 56
... the indicator shows yellow or amber, it means that the monitor is using the full power. For example, connectors are color-coded to help users easily connecting products to computer systems correctly. • Some models of BenQ's monitors and projectors contain additional USB and DVI ports for connection to more devices such as below: • BenQ's monitors have a variety of settings of pre-programmed flicker-free timing to make the screen...
... the indicator shows yellow or amber, it means that the monitor is using the full power. For example, connectors are color-coded to help users easily connecting products to computer systems correctly. • Some models of BenQ's monitors and projectors contain additional USB and DVI ports for connection to more devices such as below: • BenQ's monitors have a variety of settings of pre-programmed flicker-free timing to make the screen...
W6000 Datasheet
Page 1
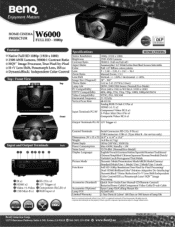
... Input xl ual HMMII Control Terminals Serial Connector: RS-232c 9 Pin xl USB Connector: USB xl (Type Mini B - BenQ Enjoyment Matters W6000 HOME CINEMA PROJECTOR FULL HD - 1080p IIYAS INSIQUUENIS *Native Full HD 1080p (1920 x 1080) *2500 ANSI Lumens, 50000:1 Contrast Ratio HQV'' Image Processor, True Pixel-by-Pixel 9 H+V Lens Shift, Panamorph Lens, ISFccc e DynamicBlack; Top Benn Front Specifications Native Resolution Brightness Contrast Ratio Aspect Ratio Color Lens Zoom Ratio Lens Shift Image Size...
... Input xl ual HMMII Control Terminals Serial Connector: RS-232c 9 Pin xl USB Connector: USB xl (Type Mini B - BenQ Enjoyment Matters W6000 HOME CINEMA PROJECTOR FULL HD - 1080p IIYAS INSIQUUENIS *Native Full HD 1080p (1920 x 1080) *2500 ANSI Lumens, 50000:1 Contrast Ratio HQV'' Image Processor, True Pixel-by-Pixel 9 H+V Lens Shift, Panamorph Lens, ISFccc e DynamicBlack; Top Benn Front Specifications Native Resolution Brightness Contrast Ratio Aspect Ratio Color Lens Zoom Ratio Lens Shift Image Size...


