User Manual
Page 2
... 3 Overview 6 Shipping contents 6 Remote control batteries 6 Remote control operation 6 Projector features 7 Projector exterior view 8 Controls and functions 9 Control panel 9 Remote control 10 Positioning your projector........ 11 Choosing a location 11 Obtaining a preferred projected image size 12 Shifting the ... information 41 Care of the projector 41 Cleaning and replacing the dust filter 41 Lamp information 43 Getting to know the lamp hour 43 Extending lamp life 43 Timing of replacing the lamp 44 Replacing the lamp 44 Indicators 47 Troubleshooting 48 Specifications...
... 3 Overview 6 Shipping contents 6 Remote control batteries 6 Remote control operation 6 Projector features 7 Projector exterior view 8 Controls and functions 9 Control panel 9 Remote control 10 Positioning your projector........ 11 Choosing a location 11 Obtaining a preferred projected image size 12 Shifting the ... information 41 Care of the projector 41 Cleaning and replacing the dust filter 41 Lamp information 43 Getting to know the lamp hour 43 Extending lamp life 43 Timing of replacing the lamp 44 Replacing the lamp 44 Indicators 47 Troubleshooting 48 Specifications...
User Manual
Page 4
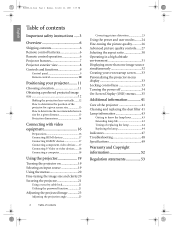
... operation. Use only BenQ's Ceiling Mounting Kit for ceiling mount installation. Do not place the projector on the projector. Do not operate the projector lamp beyond the rated life could cause a lamp to have the projector repaired. projector through a power stabilizer, surge protector or uninterruptible power supply (UPS) as appropriate to removing the lamp assembly for replacement. 8. In areas where...
... operation. Use only BenQ's Ceiling Mounting Kit for ceiling mount installation. Do not place the projector on the projector. Do not operate the projector lamp beyond the rated life could cause a lamp to have the projector repaired. projector through a power stabilizer, surge protector or uninterruptible power supply (UPS) as appropriate to removing the lamp assembly for replacement. 8. In areas where...
User Manual
Page 5
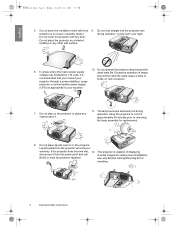
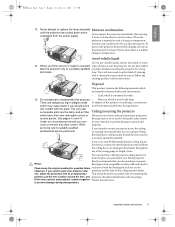
... Kensington lock compatible security cable and attach it Please keep the original packing for a long technician. use a non-BenQ brand projector ceiling mount kit, there is contained in temperature. to both the Kensington lock slot on the ceiling, we need ... follow the cleaning product's safety instructions. Never attempt to replace the lamp assembly Moisture condensation until the projector has cooled down and is exposed to a suitably qualified or plastic products touching the projector for possible future securely to prevent damage during transportation. time...
... Kensington lock compatible security cable and attach it Please keep the original packing for a long technician. use a non-BenQ brand projector ceiling mount kit, there is contained in temperature. to both the Kensington lock slot on the ceiling, we need ... follow the cleaning product's safety instructions. Never attempt to replace the lamp assembly Moisture condensation until the projector has cooled down and is exposed to a suitably qualified or plastic products touching the projector for possible future securely to prevent damage during transportation. time...

User Manual
Page 41
...cloth with its original packing or equivalent. page in its original packing or equivalent. Pack the projector in this manual or consult your dealer or local BenQ Customer Service Centre if the projector fails to the Spec. This can cause over-heating inside of the storage area are within the...Never remove any parts of compressed air to gently wipe the lens surface. Use a canister of the projector except the lamp or the air filter. If there is keep the lens clean and clean or replace the air filter. Then wipe the case. When you attempt to clean the case, turn the...
...cloth with its original packing or equivalent. page in its original packing or equivalent. Pack the projector in this manual or consult your dealer or local BenQ Customer Service Centre if the projector fails to the Spec. This can cause over-heating inside of the storage area are within the...Never remove any parts of compressed air to gently wipe the lens surface. Use a canister of the projector except the lamp or the air filter. If there is keep the lens clean and clean or replace the air filter. Then wipe the case. When you attempt to clean the case, turn the...
User Manual
Page 42
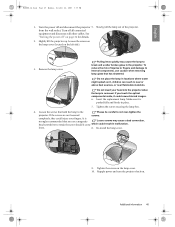
... has been no further action taken. Re-install the filter and cover securely, then turn the projector on the lower ends of OK. • The projector will automatically shut down the projector if turned on the power again. Resetting the filter timer 4. English W20000-en.book Page 42...stop running. 5. loosened cover vertically upwards and then away • If the filter grill is not new or replaced as a clean artist's paintbrush) to '0'. Press to reset the lamp timer. Re-install the filter grill and cover securely. 3. The filter time will be reset to vacuum or ...
... has been no further action taken. Re-install the filter and cover securely, then turn the projector on the lower ends of OK. • The projector will automatically shut down the projector if turned on the power again. Resetting the filter timer 4. English W20000-en.book Page 42...stop running. 5. loosened cover vertically upwards and then away • If the filter grill is not new or replaced as a clean artist's paintbrush) to '0'. Press to reset the lamp timer. Re-install the filter grill and cover securely. 3. The filter time will be reset to vacuum or ...

User Manual
Page 44
..." on page 43), you replace the lamp at least 45 minutes before replacing the lamp. WARNING NOTICE: Replace lamp now Lamp > 3000hrs Lamp-usage time exceeded Replace lamp (refer to User Manual) then reset lamp timer OK Replacing the lamp To reduce the risk of electrical shock, always turn the projector off and let the projector cool for details. The lamp is normally run with use...
..." on page 43), you replace the lamp at least 45 minutes before replacing the lamp. WARNING NOTICE: Replace lamp now Lamp > 3000hrs Lamp-usage time exceeded Replace lamp (refer to User Manual) then reset lamp timer OK Replacing the lamp To reduce the risk of electrical shock, always turn the projector off and let the projector cool for details. The lamp is normally run with use...
User Manual
Page 45
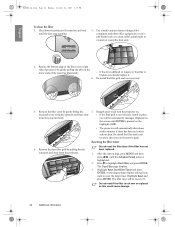
... other cables. from the wall socket. Insert the replacement lamp. If the screws are not loosened screws. Loose screws may cause the lamp to retain the screw should it come which could cause blurred images. 6. Turn off and disconnect the projector 5. Reapply power and turn the projector back on page 34 for details. 2. Slowly pull...
... other cables. from the wall socket. Insert the replacement lamp. If the screws are not loosened screws. Loose screws may cause the lamp to retain the screw should it come which could cause blurred images. 6. Turn off and disconnect the projector 5. Reapply power and turn the projector back on page 34 for details. 2. Slowly pull...

User Manual
Page 46
...and press ENTER. ISF S-Video Lamp Lamp Power Lamp Hours Reset Lamp Timer ENTER Off EXIT Back Normal ENTER WARNING EXIT Back Reset Lamp Timer? Press to reset the lamp timer. Pattern Dust Filter 3. Highlight Reset and Key Lock Reset All Settings press ENTER. The Lamp page displays. Reset Cancel 46...until the Advanced Setup menu is highlighted. The lamp time will be reset to '0'. English W20000-en.book Page 46 Monday, October 22, 2007 3:35 PM Resetting the lamp timer Do not reset the lamp timer if the lamp has not been replaced as this could cause damage. 1. Advanced Setup...
...and press ENTER. ISF S-Video Lamp Lamp Power Lamp Hours Reset Lamp Timer ENTER Off EXIT Back Normal ENTER WARNING EXIT Back Reset Lamp Timer? Press to reset the lamp timer. Pattern Dust Filter 3. Highlight Reset and Key Lock Reset All Settings press ENTER. The Lamp page displays. Reset Cancel 46...until the Advanced Setup menu is highlighted. The lamp time will be reset to '0'. English W20000-en.book Page 46 Monday, October 22, 2007 3:35 PM Resetting the lamp timer Do not reset the lamp timer if the lamp has not been replaced as this could cause damage. 1. Advanced Setup...
User Manual
Page 48
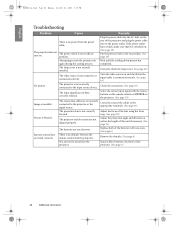
...ones. (See page 6) Remote control does There is an obstacle between the not work correctly remote control and the projector. Adjust the focus of the projector. (See page 6) 48 Additional information The lamp cover is switched on. (See page 19) Put the power switch in the on turn the... projector on and check that it is not securely attached. The projector is not correctly connected to the appropriate terminals. (See page 16) The projection lens is not correctly focused. Replace both...
...ones. (See page 6) Remote control does There is an obstacle between the not work correctly remote control and the projector. Adjust the focus of the projector. (See page 6) 48 Additional information The lamp cover is switched on. (See page 19) Put the power switch in the on turn the... projector on and check that it is not securely attached. The projector is not correctly connected to the appropriate terminals. (See page 16) The projection lens is not correctly focused. Replace both...


