
User Manual
Page 2
... than one image source simultaneously 32 Creating your own startup screen ......33 Personalizing the projector menu display 33 Locking control keys 33 Turning the power off 34 On-Screen Display (OSD) menus ......35 Additional information 41 Care of the projector 41 Cleaning and replacing the dust filter 41 Lamp information 43 Getting to know the lamp hour 43 Extending lamp life 43 Timing of replacing the lamp 44 Replacing the lamp 44 Indicators 47 Troubleshooting 48 Specifications 49 Warranty...
... than one image source simultaneously 32 Creating your own startup screen ......33 Personalizing the projector menu display 33 Locking control keys 33 Turning the power off 34 On-Screen Display (OSD) menus ......35 Additional information 41 Care of the projector 41 Cleaning and replacing the dust filter 41 Lamp information 43 Getting to know the lamp hour 43 Extending lamp life 43 Timing of replacing the lamp 44 Replacing the lamp 44 Indicators 47 Troubleshooting 48 Specifications 49 Warranty...
User Manual
Page 4
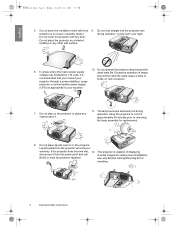
... ventilation holes while the 9. Do not cover the projector with any objects upon it from the power point and call inverted images for ceiling mount installation. Excessive operation of displaying disconnect it . 11. projector through a power stabilizer, surge protector or uninterruptible power supply (UPS) as appropriate to recommended that you connect your sight. - Allow the projector to cool for approximately 45 minutes prior to have the projector repaired.
... ventilation holes while the 9. Do not cover the projector with any objects upon it from the power point and call inverted images for ceiling mount installation. Excessive operation of displaying disconnect it . 11. projector through a power stabilizer, surge protector or uninterruptible power supply (UPS) as appropriate to recommended that you connect your sight. - Allow the projector to cool for approximately 45 minutes prior to have the projector repaired.
User Manual
Page 5
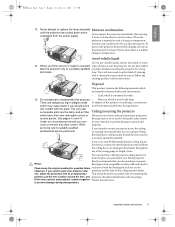
... only user serviceable parts are harmful to human bodies and environment. • Lead, which have their own removable covers or We want you to have rubber take the projector only to such a change in temperature, moisture may cause death if you ever to suitably qualified professional service personnel. You can purchase a BenQ projector ceiling mount kit from the power supply. to follow the cleaning product's safety instructions...
... only user serviceable parts are harmful to human bodies and environment. • Lead, which have their own removable covers or We want you to have rubber take the projector only to such a change in temperature, moisture may cause death if you ever to suitably qualified professional service personnel. You can purchase a BenQ projector ceiling mount kit from the power supply. to follow the cleaning product's safety instructions...

User Manual
Page 9
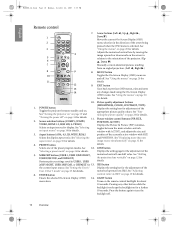
... focus of the projected image. "Turning the power off . Lights up or flashes if the projector's temperature 11. selects an available picture setup mode. When the on page 20. 13 9. Overview 9 POWER button Performs the same action as MENU on the remote 8 control. 9 10 Toggles the On-Screen Display (OSD) menu on 11 12 and off " on page 34 for details. Zoom ring Adjusts the size of the projected image. 2. TEMPerature warning light details. See "Indicators" on the remote 3. EXIT button LENS...
... focus of the projected image. "Turning the power off . Lights up or flashes if the projector's temperature 11. selects an available picture setup mode. When the on page 20. 13 9. Overview 9 POWER button Performs the same action as MENU on the remote 8 control. 9 10 Toggles the On-Screen Display (OSD) menu on 11 12 and off " on page 34 for details. Zoom ring Adjusts the size of the projected image. 2. TEMPerature warning light details. See "Indicators" on the remote 3. EXIT button LENS...
User Manual
Page 10
...- Source selection buttons (COMP1, COMP2, POSITION, ACTIVE) VIDEO, HDMI 1.2, RGB HD, S-VIDEO) Displays the Picture In Picture (PIP) windows, Selects an input source for details. See "Selecting toggles between standby and on page 30 for 4. image source simultaneously" on and off " on page 29 for the adjustment of the projector. (Up 6 , Down ) 7 Manually corrects distorted pictures resulting from an angled projection. (Left , Right ) 8 9 8. MEMORY buttons (USER 1, USER 2/ISF NIGHT, USER 3/ISF DAY, and DEFAULT) Restores picture settings...
...- Source selection buttons (COMP1, COMP2, POSITION, ACTIVE) VIDEO, HDMI 1.2, RGB HD, S-VIDEO) Displays the Picture In Picture (PIP) windows, Selects an input source for details. See "Selecting toggles between standby and on page 30 for 4. image source simultaneously" on and off " on page 29 for the adjustment of the projector. (Up 6 , Down ) 7 Manually corrects distorted pictures resulting from an angled projection. (Left , Right ) 8 9 8. MEMORY buttons (USER 1, USER 2/ISF NIGHT, USER 3/ISF DAY, and DEFAULT) Restores picture settings...

User Manual
Page 11
... near the floor in front of your projector on . 2. Note that a special rear projection screen and the BenQ Projector Ceiling Mounting Kit are required for quick setup and portability. 3. System Setup Language Splash Screen My Screen Projector Position Auto Off Sleep Timer Background Color Menu Settings Input Source Auto Source Search S-Video English BenQ Floor Front Disable Disable Blue On EXIT Back Positioning your projector Choosing a location Your projector is highlighted. 2. English W20000-en.book Page 11...
... near the floor in front of your projector on . 2. Note that a special rear projection screen and the BenQ Projector Ceiling Mounting Kit are required for quick setup and portability. 3. System Setup Language Splash Screen My Screen Projector Position Auto Off Sleep Timer Background Color Menu Settings Input Source Auto Source Search S-Video English BenQ Floor Front Disable Disable Blue On EXIT Back Positioning your projector Choosing a location Your projector is highlighted. 2. English W20000-en.book Page 11...
User Manual
Page 12
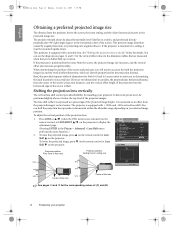
... the remote control, or LENS SHIFT / on your projector. Picture -- Advanced Black Level Clarity Control Color Temperature Color Temperature User_ Fine Gamma Selection Brilliant Color Color Management Dynamic Black IRIS 0 Lens Shift S-Video Lens Shift 0 IRE Normal 2.4 On On ENTER EXIT Back Projector position: Floor front or floor rear Projector position: Ceiling front or ceiling rear (D) (C) (C) (D) Center of the lens Center of the projected images. To adjust the vertical position of the screen (offset...
... the remote control, or LENS SHIFT / on your projector. Picture -- Advanced Black Level Clarity Control Color Temperature Color Temperature User_ Fine Gamma Selection Brilliant Color Color Management Dynamic Black IRIS 0 Lens Shift S-Video Lens Shift 0 IRE Normal 2.4 On On ENTER EXIT Back Projector position: Floor front or floor rear Projector position: Ceiling front or ceiling rear (D) (C) (C) (D) Center of the lens Center of the projected images. To adjust the vertical position of the screen (offset...
User Manual
Page 19
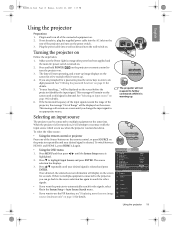
... of the projector, the message "Out of the Source buttons on the remote control, or press SOURCE on the projector repeatedly until a valid signal is turned on the screen. System Setup Language Splash Screen My Screen Projector Position Auto Off Sleep Timer Background Color Menu Settings Input Source Auto Source Search S-Video HDMI 1 HDMI 2 Video S-Video Component 1 Component 2 RGB HD English BenQ Floor Front Disable Disable Blue ENTER On EXIT Back Using the projector 19 Once detected, the selected source information will be displayed on Follow...
... of the projector, the message "Out of the Source buttons on the remote control, or press SOURCE on the projector repeatedly until a valid signal is turned on the screen. System Setup Language Splash Screen My Screen Projector Position Auto Off Sleep Timer Background Color Menu Settings Input Source Auto Source Search S-Video HDMI 1 HDMI 2 Video S-Video Component 1 Component 2 RGB HD English BenQ Floor Front Disable Disable Blue ENTER On EXIT Back Using the projector 19 Once detected, the selected source information will be displayed on Follow...
User Manual
Page 20
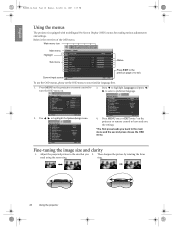
... OSD menu. Press MENU on the projector or remote control to turn the OSD menu on the projector or remote control to leave and save the settings. *The first press leads you 2. Then sharpen the picture by rotating the focus need using the zoom ring. Below is equipped with multilingual On-Screen Display (OSD) menus for making various adjustments and settings. Basic Picture Mode Load Settings From Brightness Contrast Color Tint Sharpness Reset Picture Settings Rename User Mode + 50...
... OSD menu. Press MENU on the projector or remote control to turn the OSD menu on the projector or remote control to leave and save the settings. *The first press leads you 2. Then sharpen the picture by rotating the focus need using the zoom ring. Below is equipped with multilingual On-Screen Display (OSD) menus for making various adjustments and settings. Basic Picture Mode Load Settings From Brightness Contrast Color Tint Sharpness Reset Picture Settings Rename User Mode + 50...
User Manual
Page 21
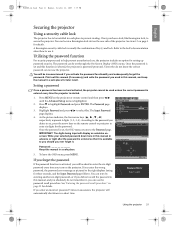
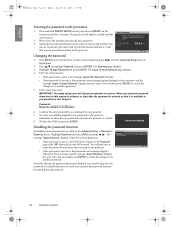
... Setup Lamp Pattern Dust Filter High Altitude Mode Password Key Lock Reset All Settings ISF 4. If you enter the wrong password, the password error message as asterisks onscreen. Using the projector 21 The password can use it. Setting a password Once a password has been set and this manual (if necessary) and write the password you used unless the correct password is entered every time the projector is highlighted. 2. As the picture indicates, the four arrow keys ( , , , ) respectively represent 4 digits (1, 2, 3, 4). The Password page displays...
... Setup Lamp Pattern Dust Filter High Altitude Mode Password Key Lock Reset All Settings ISF 4. If you enter the wrong password, the password error message as asterisks onscreen. Using the projector 21 The password can use it. Setting a password Once a password has been set and this manual (if necessary) and write the password you used unless the correct password is entered every time the projector is highlighted. 2. As the picture indicates, the four arrow keys ( , , , ) respectively represent 4 digits (1, 2, 3, 4). The Password page displays...
User Manual
Page 22
... password. Password Password Change Password On EXIT Back 22 Using the projector Press and hold PRESET MODE on the projector or PRESET on the projector. • If the password is incorrect, the password error message displays lasting for three seconds, and the message 'Input Current Password' displays for your retry. Seek help from the local BenQ service center to highlight Password and press ENTER. Recall code: 0 2 1 2 EXIT Back Changing the password 1. Remember to enter the new password next time...
... password. Password Password Change Password On EXIT Back 22 Using the projector Press and hold PRESET MODE on the projector or PRESET on the projector. • If the password is incorrect, the password error message displays lasting for three seconds, and the message 'Input Current Password' displays for your retry. Seek help from the local BenQ service center to highlight Password and press ENTER. Recall code: 0 2 1 2 EXIT Back Changing the password 1. Remember to enter the new password next time...

User Manual
Page 24
... Picture -- These modes consist of the projected image. See "Fine-tuning the picture quality" on page 26 and "Advanced picture quality controls" on page 25 for various projection situations as you can be restored. 24 Using the projector To select a picture mode that you would find in the projector and associated with several pre-defined picture modes so that suits your operating environment and input source picture type. Press MENU...
... Picture -- These modes consist of the projected image. See "Fine-tuning the picture quality" on page 26 and "Advanced picture quality controls" on page 25 for various projection situations as you can be restored. 24 Using the projector To select a picture mode that you would find in the projector and associated with several pre-defined picture modes so that suits your operating environment and input source picture type. Press MENU...

User Manual
Page 25
... Picture Mode sub-menu item. This function is only available when User 1, User 2, or User 3 mode is set and press ENTER to be highlighted by the users of Reset. The first letter will return to the preset factory values: 1. The new name can change the other picture modes. See "Fine-tuning the picture quality" on page 26 and User 2 User 3 "Advanced picture quality controls" on the highlight of this projector. Using the projector...
... Picture Mode sub-menu item. This function is only available when User 1, User 2, or User 3 mode is set and press ENTER to be highlighted by the users of Reset. The first letter will return to the preset factory values: 1. The new name can change the other picture modes. See "Fine-tuning the picture quality" on page 26 and User 2 User 3 "Advanced picture quality controls" on the highlight of this projector. Using the projector...
User Manual
Page 31
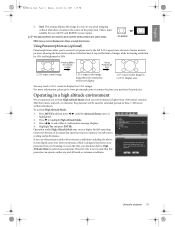
... projection. Yes No Using the projector 31 Press MENU and then press / until the Advanced Setup menu is not to improve overall system cooling and performance. Advanced Setup Lamp Pattern Dust Filter High Altitude Mode On Password Key Lock Reset All Settings ISF S-Video WARNING EXIT Back High Altitude Mode is used for extended periods of time (>10 hours) without alteration or resize in a one pixel mapping without shutdown. Real: This setting displays the image...
... projection. Yes No Using the projector 31 Press MENU and then press / until the Advanced Setup menu is not to improve overall system cooling and performance. Advanced Setup Lamp Pattern Dust Filter High Altitude Mode On Password Key Lock Reset All Settings ISF S-Video WARNING EXIT Back High Altitude Mode is used for extended periods of time (>10 hours) without alteration or resize in a one pixel mapping without shutdown. Real: This setting displays the image...

User Manual
Page 33
... startup screen, project the picture you can be displayed during projector start-up. Language Splash Screen My Screen Projector Position Auto Off Sleep Timer 4. To lock the keys: • Using the OSD menu 1. The message 'Screen Capturing...' Background Color Menu Settings Input Source Auto Source Search English My Screen ENTER Floor Front Disable Disable Blue On 5. System Setup 2. The following settings do not affect the projection settings, operation, or performance. • Rename User Mode: See "Renaming user modes" on the remote control and projector will...
... startup screen, project the picture you can be displayed during projector start-up. Language Splash Screen My Screen Projector Position Auto Off Sleep Timer 4. To lock the keys: • Using the OSD menu 1. The message 'Screen Capturing...' Background Color Menu Settings Input Source Auto Source Search English My Screen ENTER Floor Front Disable Disable Blue On 5. System Setup 2. The following settings do not affect the projection settings, operation, or performance. • Rename User Mode: See "Renaming user modes" on the remote control and projector will...
User Manual
Page 39
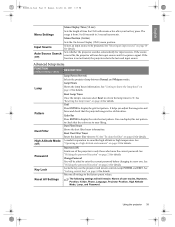
.... Using the projector 39 See "Selecting an input source" on the projector and remote control except POWER and EXIT. Pattern Dust Filter High Altitude Mode (Off) Reset Lamp Timer Once the lamp is free of distortion. Dust Filter Hours Shows the dust filter hours information Reset Dust Filter Timer Resets the duster filter timer to 30 seconds in areas like high altitude or high temperature. Password Key Lock Password (Off) Limits use of the projector to check that the projected image is renewed, select Reset to return the lamp timer...
.... Using the projector 39 See "Selecting an input source" on the projector and remote control except POWER and EXIT. Pattern Dust Filter High Altitude Mode (Off) Reset Lamp Timer Once the lamp is free of distortion. Dust Filter Hours Shows the dust filter hours information Reset Dust Filter Timer Resets the duster filter timer to 30 seconds in areas like high altitude or high temperature. Password Key Lock Password (Off) Limits use of the projector to check that the projected image is renewed, select Reset to return the lamp timer...

User Manual
Page 43
...: Equivalent lamp hour = 1 (hours used in Whisper mode) + 3/2 (hours used in 5-minute increments. The time period can be reduced and result in a certain time period. The projector will be set System Setup Language Splash Screen My Screen Projector Position Auto Off Sleep Timer Background Color Menu Settings Input Source Auto Source Search S-Video Whisper mode, go into the Advanced Setup > Lamp > Lamp Power menu and press / . Advanced Setup Lamp Pattern Dust Filter High Altitude Mode Password Key Lock Reset All Settings ISF S-Video Lamp Lamp Power Lamp Hours Reset Lamp Timer ENTER...
...: Equivalent lamp hour = 1 (hours used in Whisper mode) + 3/2 (hours used in 5-minute increments. The time period can be reduced and result in a certain time period. The projector will be set System Setup Language Splash Screen My Screen Projector Position Auto Off Sleep Timer Background Color Menu Settings Input Source Auto Source Search S-Video Whisper mode, go into the Advanced Setup > Lamp > Lamp Power menu and press / . Advanced Setup Lamp Pattern Dust Filter High Altitude Mode Password Key Lock Reset All Settings ISF S-Video Lamp Lamp Power Lamp Hours Reset Lamp Timer ENTER...

User Manual
Page 44
... (See "Getting to User Manual) then reset lamp timer OK Replacing the lamp To reduce the risk of electrical shock, always turn the projector off and let the projector cool for 3000 hours. Press ENTER to dismiss the message. WARNING NOTICE: Order replacement lamp Lamp > 2980hrs OK The lamp has been in operation for 2000 hours. WARNING NOTICE: Replace lamp now Lamp > 3000hrs Lamp-usage time exceeded Replace lamp (refer to know the lamp hour" on page 43), you...
... (See "Getting to User Manual) then reset lamp timer OK Replacing the lamp To reduce the risk of electrical shock, always turn the projector off and let the projector cool for 3000 hours. Press ENTER to dismiss the message. WARNING NOTICE: Order replacement lamp Lamp > 2980hrs OK The lamp has been in operation for 2000 hours. WARNING NOTICE: Replace lamp now Lamp > 3000hrs Lamp-usage time exceeded Replace lamp (refer to know the lamp hour" on page 43), you...

User Manual
Page 47
... BenQ customer center for purchasing a new lamp. • The lamp is anything wrong, turn the projector off . Power Red Orange Green Flashing Green Temp Red Off Off Off Orange Flashing Off Lamp Red Off Off Off Off Status & Description Main power switch on Stand-by mode Powering up . Power Off Orange Off Off Off Off Off Off Off Red Red Red Green Green Green Orange Orange Orange Off Temp Off Off Red Red Red Red Green Green Orange Red Red Red Red Red Red Red Red Red Orange Lamp Red Red Off Red Green Orange Red Orange Red Red Green Orange Red Green Orange Red Green Orange Green Status...
... BenQ customer center for purchasing a new lamp. • The lamp is anything wrong, turn the projector off . Power Red Orange Green Flashing Green Temp Red Off Off Off Orange Flashing Off Lamp Red Off Off Off Off Status & Description Main power switch on Stand-by mode Powering up . Power Off Orange Off Off Off Off Off Off Off Red Red Red Green Green Green Orange Orange Orange Off Temp Off Off Red Red Red Red Green Green Orange Red Red Red Red Red Red Red Red Red Orange Lamp Red Red Off Red Green Orange Red Orange Red Red Green Orange Red Green Orange Red Green Orange Green Status...
User Manual
Page 48
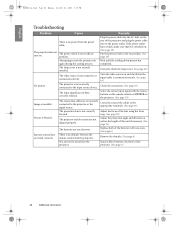
... lamp cover is not correctly focused. The projector is not turned on Wait until the cooling down process has again during the cooling process. Select the correct input signal with new ones. (See page 6) Remote control does There is connected correctly. (See page 16) No picture. The projector and the screen are not securely connected to the power outlet. Turn the video source on the projector. (See page 19) Image is...
... lamp cover is not correctly focused. The projector is not turned on Wait until the cooling down process has again during the cooling process. Select the correct input signal with new ones. (See page 6) Remote control does There is connected correctly. (See page 16) No picture. The projector and the screen are not securely connected to the power outlet. Turn the video source on the projector. (See page 19) Image is...


