
User Manual
Page 1
W500 LCD Projector Home Entertainment Series User Manual Welcome
W500 LCD Projector Home Entertainment Series User Manual Welcome

User Manual
Page 2
...12 Replacing the remote control batteries 13 Remote control effective range 13 Positioning your projector 14 Choosing a location 14 Obtaining a preferred projected picture size 15 How to determine the position of the projector for a given screen size 15 How to determine the recommended screen size for... a HDMI device 20 Connecting a Component-Video source device 21 Connecting an S-video or a composite Video source device 22 Using the projector 23 Start up ...23 Utilizing the password function 24 Setting a password ...24 If you forget the password 24 Entering the password recall...
...12 Replacing the remote control batteries 13 Remote control effective range 13 Positioning your projector 14 Choosing a location 14 Obtaining a preferred projected picture size 15 How to determine the position of the projector for a given screen size 15 How to determine the recommended screen size for... a HDMI device 20 Connecting a Component-Video source device 21 Connecting an S-video or a composite Video source device 22 Using the projector 23 Start up ...23 Utilizing the password function 24 Setting a password ...24 If you forget the password 24 Entering the password recall...

User Manual
Page 3
...32 Operating in a high altitude environment 33 Searching for details on the projected image 33 Creating your own startup screen 33 Personalizing the projector menu display 34 Turning the power off 34 Menus ...35 On Screen Display (OSD) structure 35 Using the menus 36 Picture--Basic ...menu 38 System Setup menu 39 Advanced Setup menu 40 Information menu 41 Maintenance ...42 Care of the projector 42 Cleaning the lens ...42 Storing the projector 42 Transporting the projector 42 Cleaning and replacing the dust filter 42 Lamp Information 44 Calculation of lamp hour 44 Replacing the...
...32 Operating in a high altitude environment 33 Searching for details on the projected image 33 Creating your own startup screen 33 Personalizing the projector menu display 34 Turning the power off 34 Menus ...35 On Screen Display (OSD) structure 35 Using the menus 36 Picture--Basic ...menu 38 System Setup menu 39 Advanced Setup menu 40 Information menu 41 Maintenance ...42 Care of the projector 42 Cleaning the lens ...42 Storing the projector 42 Transporting the projector 42 Cleaning and replacing the dust filter 42 Lamp Information 44 Calculation of lamp hour 44 Replacing the...

User Manual
Page 4
English Indicators ...47 Troubleshooting 49 Specifications ...50 Projector specifications 50 Optical ...50 Electrical ...50 Terminals ...50 General characteristics 50 Dimensions 50 Timing chart 51 Warranty and Copyright information 53 Copyright ...53 Disclaimer 53 Warranty ...53 Regulation statements 54 FCC statement 54 EEC statement 54 MIC statement 54 WEEE directive 54 4 Table of contents
English Indicators ...47 Troubleshooting 49 Specifications ...50 Projector specifications 50 Optical ...50 Electrical ...50 Terminals ...50 General characteristics 50 Dimensions 50 Timing chart 51 Warranty and Copyright information 53 Copyright ...53 Disclaimer 53 Warranty ...53 Regulation statements 54 FCC statement 54 EEC statement 54 MIC statement 54 WEEE directive 54 4 Table of contents

User Manual
Page 5
...may become excessively high, such as it is important that is poorly ventilated or confined. Allow at angle of air around the projector; - locations with all windows closed; 2. Do not use of a car with an ambient temperature above sea level. 3. ... manual before you think service or repair is required, take the projector only to a suitably qualified technician. 10000 feet Important safety instructions 5 surface during operation. - English Important safety instructions Your BenQ projector is designed and tested to meet the latest standards for future following...
...may become excessively high, such as it is important that is poorly ventilated or confined. Allow at angle of air around the projector; - locations with all windows closed; 2. Do not use of a car with an ambient temperature above sea level. 3. ... manual before you think service or repair is required, take the projector only to a suitably qualified technician. 10000 feet Important safety instructions 5 surface during operation. - English Important safety instructions Your BenQ projector is designed and tested to meet the latest standards for future following...

User Manual
Page 6
... supply voltage rated lamp life. The lamp becomes extremely hot during projector is recommended beyond the 6. approximately 45 minutes prior to have the projector repaired. 6 Important safety instructions If the projector does become wet, disconnect it from the power point and call BenQ to removing the lamp assembly for upon it is on (even...
... supply voltage rated lamp life. The lamp becomes extremely hot during projector is recommended beyond the 6. approximately 45 minutes prior to have the projector repaired. 6 Important safety instructions If the projector does become wet, disconnect it from the power point and call BenQ to removing the lamp assembly for upon it is on (even...

User Manual
Page 7
... panels. The only user serviceable parts are dangerous high voltages inside which have a pleasant experience using your BenQ projector, so we strongly recommend that you use a proper fitting BenQ projector ceiling mount kit and that you ensure it securely to an improper attachment through the use a non...your attention to prevent possible damage to replace the lamp assembly until 15. If you use of the ceiling mount bracket. BenQ recommends that the projector may fall over, causing injury or resulting in damage. Under no circumstances should come into contact with live parts. You...
... panels. The only user serviceable parts are dangerous high voltages inside which have a pleasant experience using your BenQ projector, so we strongly recommend that you use a proper fitting BenQ projector ceiling mount kit and that you ensure it securely to an improper attachment through the use a non...your attention to prevent possible damage to replace the lamp assembly until 15. If you use of the ceiling mount bracket. BenQ recommends that the projector may fall over, causing injury or resulting in damage. Under no circumstances should come into contact with live parts. You...

User Manual
Page 8
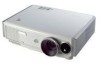
The projector offers the following features. • Three-panel LCD system to deliver superior brightness, color saturation and color depth • HQV (Hollywood Quality Video) scaler functionality to provide excellent ...vary depending on the ambient lighting conditions, selected input source contrast/brightness settings, and is normal and expected behavior. 8 Introduction English Introduction Projector features The projector integrates high-performance optical engine projection and a user-friendly design to projection distance. • The lamp brightness will decline over the ...
The projector offers the following features. • Three-panel LCD system to deliver superior brightness, color saturation and color depth • HQV (Hollywood Quality Video) scaler functionality to provide excellent ...vary depending on the ambient lighting conditions, selected input source contrast/brightness settings, and is normal and expected behavior. 8 Introduction English Introduction Projector features The projector integrates high-performance optical engine projection and a user-friendly design to projection distance. • The lamp brightness will decline over the ...

User Manual
Page 9
... PC equipment. Spare lamp kit 3. Ceiling mount kit Introduction 9 Standard accessories Some of the accessories may not be available depending on your place of purchase. Projector Remote control and two AAA batteries User manual Quick start guide User manual CD Warranty card Safety manual Power cable Component Video cable Optional accessories...
... PC equipment. Spare lamp kit 3. Ceiling mount kit Introduction 9 Standard accessories Some of the accessories may not be available depending on your place of purchase. Projector Remote control and two AAA batteries User manual Quick start guide User manual CD Warranty card Safety manual Power cable Component Video cable Optional accessories...

User Manual
Page 10
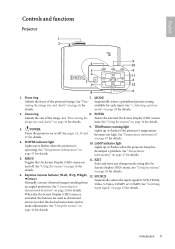
... side 9 22. Lens cap 8 Rear side See "Connection" on page 19 for details) 2. Inlet (cool air intake) 21. Ceiling mounting bracket screw holes 23. English Projector exterior view Front and upper side 1 2 2 3 4 5 1. Projection lens 7 6. AC power cord inlet 11. RGB socket 16.
... side 9 22. Lens cap 8 Rear side See "Connection" on page 19 for details) 2. Inlet (cool air intake) 21. Ceiling mounting bracket screw holes 23. English Projector exterior view Front and upper side 1 2 2 3 4 5 1. Projection lens 7 6. AC power cord inlet 11. RGB socket 16.
User Manual
Page 11
... too high. MENU 11. Keystone /Arrows buttons (eLeft, cUp, fRight, dDown) 12. When the On-Screen Display (OSD) menu is operating. English Controls and functions Projector 1 2 9 4 10 5 6 6 11 3 6 7 12 8 6 1. Focus ring 7. See "Using the menus" details. SOURCE Sequentially selects the input signal...-Screen Display (OSD) menu on page 26 for Screen Display (OSD) menu. LAMP indicator light Lights up or flashes when the projector lamp has developed a problem. and off . Selecting a picture details. Introduction 11 See "Fine-tuning the Enacts the selected On-...
... too high. MENU 11. Keystone /Arrows buttons (eLeft, cUp, fRight, dDown) 12. When the On-Screen Display (OSD) menu is operating. English Controls and functions Projector 1 2 9 4 10 5 6 6 11 3 6 7 12 8 6 1. Focus ring 7. See "Using the menus" details. SOURCE Sequentially selects the input signal...-Screen Display (OSD) menu on page 26 for Screen Display (OSD) menu. LAMP indicator light Lights up or flashes when the projector lamp has developed a problem. and off . Selecting a picture details. Introduction 11 See "Fine-tuning the Enacts the selected On-...
User Manual
Page 12
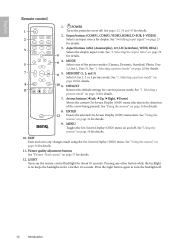
POWER 1 Turns the projector on for a further 10 seconds. MODE Selects one of the arrow being pressed. Selecting a picture mode" on page 36 for details. 7 8 5. See "Using the menus" ...
POWER 1 Turns the projector on for a further 10 seconds. MODE Selects one of the arrow being pressed. Selecting a picture mode" on page 36 for details. 7 8 5. See "Using the menus" ...

User Manual
Page 13
...that might obstruct the infra-red beam. • Operating the projector from the front • Operating the projector from possible battery leakage. Remote control effective range Infra-Red (IR) remote control sensors are located on the projector that there are no obstacles between the remote control and the sensors... like the kitchen, bathroom, sauna, sunroom, or in a closed car. • Dispose of used for an extended period of the projector. The remote control must be used batteries according to view its back, push on the finger grip on the cover and slide it back...
...that might obstruct the infra-red beam. • Operating the projector from the front • Operating the projector from possible battery leakage. Remote control effective range Infra-Red (IR) remote control sensors are located on the projector that there are no obstacles between the remote control and the sensors... like the kitchen, bathroom, sauna, sunroom, or in a closed car. • Dispose of used for an extended period of the projector. The remote control must be used batteries according to view its back, push on the finger grip on the cover and slide it back...

User Manual
Page 14
Your room layout or personal preference will dictate which installation location you turn the projector on. Ceiling front: Select this location with the projector suspended from the ceiling in front of screen. Purchase the BenQ Projector Ceiling Mounting Kit from floor behind the screen. Floor rear: 4. the ceiling behind the screen. Note that a special rear...
Your room layout or personal preference will dictate which installation location you turn the projector on. Ceiling front: Select this location with the projector suspended from the ceiling in front of screen. Purchase the BenQ Projector Ceiling Mounting Kit from floor behind the screen. Floor rear: 4. the ceiling behind the screen. Note that a special rear...

User Manual
Page 15
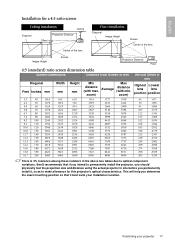
BenQ has provided separate tables of dimensions for your projector. This prevents image distortion caused by the physical space available in the column labelled "Average". This projector is positioned further away from the screen, the projected image size increases, and the vertical offset also increases ...down so that your measured distance is the projected image size of the average distance value. 4. You can be used for your projector. In these situations, some image distortion will need to account for details. The closest match in the projected image size. English ...
BenQ has provided separate tables of dimensions for your projector. This prevents image distortion caused by the physical space available in the column labelled "Average". This projector is positioned further away from the screen, the projected image size increases, and the vertical offset also increases ...down so that your measured distance is the projected image size of the average distance value. 4. You can be used for your projector. In these situations, some image distortion will need to account for details. The closest match in the projected image size. English ...

User Manual
Page 16
... 137 -1507 149 -1644 162 -1781 174 -1918 187 -2055 199 -2192 212 -2329 224 -2466 237 -2603 249 -2740 311 -3424 16 Positioning your projector Installation for a 16:9 ratio screen Height Height Ceiling Installation Ceiling Diagonal Offset Projection Distance Center of the lens Screen Floor Installation Diagonal Screen Center of...
... 137 -1507 149 -1644 162 -1781 174 -1918 187 -2055 199 -2192 212 -2329 224 -2466 237 -2603 249 -2740 311 -3424 16 Positioning your projector Installation for a 16:9 ratio screen Height Height Ceiling Installation Ceiling Diagonal Offset Projection Distance Center of the lens Screen Floor Installation Diagonal Screen Center of...
User Manual
Page 17
... to optical component variations. This will help you permanently install it best suits your projector 17 Positioning your installation location. English Installation for this projector's optical characteristics. Average distance (with max. BenQ recommends that if you intend to permanently install the projector, you should physically test the projection size and distance using the actual...
... to optical component variations. This will help you permanently install it best suits your projector 17 Positioning your installation location. English Installation for this projector's optical characteristics. Average distance (with max. BenQ recommends that if you intend to permanently install the projector, you should physically test the projection size and distance using the actual...
User Manual
Page 18
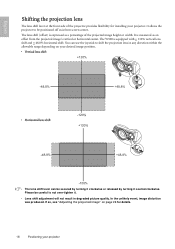
The W500 is measured as a percentage of the projector provides flexibility for details. 18 Positioning your projector. In the unlikely event, image distortion was produced. Please be careful to not over-tighten it counterclockwise. It is equipped with + 110% vertical ... it . • Lens shift adjustment will not result in any direction within the allowable range depending on page 26 for installing your projector It allows the projector to shift the projection lens in degraded picture quality. The lens shift (offset) is expressed as an offset from screen center. You ...
The W500 is measured as a percentage of the projector provides flexibility for details. 18 Positioning your projector. In the unlikely event, image distortion was produced. Please be careful to not over-tighten it counterclockwise. It is equipped with + 110% vertical ... it . • Lens shift adjustment will not result in any direction within the allowable range depending on page 26 for installing your projector It allows the projector to shift the projection lens in degraded picture quality. The lens shift (offset) is expressed as an offset from screen center. You ...

User Manual
Page 19
... computer (either through a VGA cable or a HDMI cable): • With a VGA cable: • With a HDMI cable: 1. The projector can be like Fn + F3 or CRT/LCD key turns the external display on the laptop. We recommend that allow you need to do not turn on their external video... a signal source to the equipment sockets. Most cables are firmly fitted to the projector, be supplied with proper type plugs. 3. Press Fn and the labeled function key simultaneously. Turn off . Locate a function key labeled CRT/LCD or a function key with a monitor symbol on /off all cable plugs are ...
... computer (either through a VGA cable or a HDMI cable): • With a VGA cable: • With a HDMI cable: 1. The projector can be like Fn + F3 or CRT/LCD key turns the external display on the laptop. We recommend that allow you need to do not turn on their external video... a signal source to the equipment sockets. Most cables are firmly fitted to the projector, be supplied with proper type plugs. 3. Press Fn and the labeled function key simultaneously. Turn off . Locate a function key labeled CRT/LCD or a function key with a monitor symbol on /off all cable plugs are ...

User Manual
Page 20
... option. See "Connecting an S-video or a composite Video source device" on both composite Video and S-Video output terminals on your projector to various Video source devices that provide any one of the above connecting methods, however each provides a different level of the available methods...use to connect to the device. Better video quality The S-Video method provides a better quality analog video than optimal result from your projector, being the least video quality of video quality. Connecting a HDMI device Examine your connection method of the Video source device. 2. Connect...
... option. See "Connecting an S-video or a composite Video source device" on both composite Video and S-Video output terminals on your projector to various Video source devices that provide any one of the above connecting methods, however each provides a different level of the available methods...use to connect to the device. Better video quality The S-Video method provides a better quality analog video than optimal result from your projector, being the least video quality of video quality. Connecting a HDMI device Examine your connection method of the Video source device. 2. Connect...


