
W1070 User Manual
Page 11
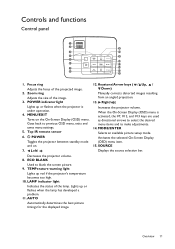
... when the lamp has developed a problem. 11. AUTO Automatically determines the best picture timings for the displayed image. 12. MODE/ENTER Selects an available picture setup mode. Overview 11 POWER Toggles the projector between standby mode and on the On-Screen Display (OSD) menu. LAMP indicator light Indicates the status of...
... when the lamp has developed a problem. 11. AUTO Automatically determines the best picture timings for the displayed image. 12. MODE/ENTER Selects an available picture setup mode. Overview 11 POWER Toggles the projector between standby mode and on the On-Screen Display (OSD) menu. LAMP indicator light Indicates the status of...

W1070 User Manual
Page 12
...-Screen Display (OSD) menu. Right When the On-Screen Display (OSD) menu is provided for adjustment of the projector. 3. MODE/ENTER Selects an available picture setup mode. AUTO Automatically determines the best picture timings for the displayed image. 14.
...-Screen Display (OSD) menu. Right When the On-Screen Display (OSD) menu is provided for adjustment of the projector. 3. MODE/ENTER Selects an available picture setup mode. AUTO Automatically determines the best picture timings for the displayed image. 14.
W1070 User Manual
Page 13
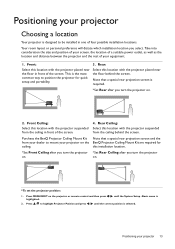
...Ceiling after you turn the projector on . *To set the projector position: 1. Press MENU/EXIT on the BenQ Projector Ceiling Mount Kit are required for quick setup and portability. Select this location with the projector placed near the floor behind the screen. Front Ceiling: Select... locations. Rear Ceiling: Select this location with the projector suspended from your dealer to highlight Projector Position and press / until the System Setup : Basic menu is selected. Press / to mount your projector on the projector or remote control and then press / until the correct...
...Ceiling after you turn the projector on . *To set the projector position: 1. Press MENU/EXIT on the BenQ Projector Ceiling Mount Kit are required for quick setup and portability. Select this location with the projector placed near the floor behind the screen. Front Ceiling: Select... locations. Rear Ceiling: Select this location with the projector suspended from your dealer to highlight Projector Position and press / until the System Setup : Basic menu is selected. Press / to mount your projector on the projector or remote control and then press / until the correct...

W1070 User Manual
Page 25
... on the screen for seconds. Press MENU/EXIT and then press / until your desired character is highlighted. 2. Press / / / until the System Setup : Basic menu is selected and press MODE/ENTER. • If you want the projector to automatically search for a valid input source, the projector ... top to highlight Input Source and press MODE/ENTER. Sharpen the picture by rotating the focus ring. Press / repeatedly until the System Setup : Basic menu is selected and press MODE/ ENTER. Once detected, the selected source information will attempt to multiple equipment at the same...
... on the screen for seconds. Press MENU/EXIT and then press / until your desired character is highlighted. 2. Press / / / until the System Setup : Basic menu is selected and press MODE/ENTER. • If you want the projector to automatically search for a valid input source, the projector ... top to highlight Input Source and press MODE/ENTER. Sharpen the picture by rotating the focus ring. Press / repeatedly until the System Setup : Basic menu is selected and press MODE/ ENTER. Once detected, the selected source information will attempt to multiple equipment at the same...

W1070 User Manual
Page 26
...Language and press MODE/ENTER. 4. Press / / / to prevent theft. System Setup : Basic Language Splash Screen Projector Position Auto Off Sleep Timer Menu Settings Input Source Source Rename Auto Source Search BenQ Front Disable Disable Off 3. S-Video Exit Securing the projector Using a security cable... Exit 2. Below is usually a combination of the OSD menu. System Setup : Basic Language Splash Screen Projector Position Auto Off Sleep Timer Menu Settings Input Source Source Rename Auto Source Search ENTER BenQ Front Disable Disable Off S-Video Exit 5. Using the menus The projector ...
...Language and press MODE/ENTER. 4. Press / / / to prevent theft. System Setup : Basic Language Splash Screen Projector Position Auto Off Sleep Timer Menu Settings Input Source Source Rename Auto Source Search BenQ Front Disable Disable Off 3. S-Video Exit Securing the projector Using a security cable... Exit 2. Below is usually a combination of the OSD menu. System Setup : Basic Language Splash Screen Projector Position Auto Off Sleep Timer Menu Settings Input Source Source Rename Auto Source Search ENTER BenQ Front Disable Disable Off S-Video Exit 5. Using the menus The projector ...
W1070 User Manual
Page 27
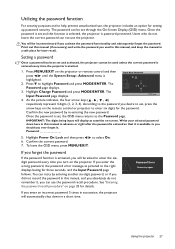
... input will be asked to enter the sixdigit password every time you turn on the projector or remote control and then press / until the System Setup : Advanced menu is available to you should you ever forget it , you used unless the correct password is entered every time the projector is set...
... input will be asked to enter the sixdigit password every time you turn on the projector or remote control and then press / until the System Setup : Advanced menu is available to you should you ever forget it , you used unless the correct password is entered every time the projector is set...
W1070 User Manual
Page 28
... Disabling the password function To disable password protection, go back to select Off. Highlight Power On Lock and then press / to the System Setup : Advanced > Password > Password menu. Entering the password recall procedure 1. Recall code: XXX XXX XXX XXX Exit Changing the password 1. Enter...forget it is available to enter the new password next time the projector is highlighted. 2. Write down the recall code, and contact BenQ Customer Center. Highlight Change Password and press MODE/ENTER. The Input Current Password page displays. 4. IMPORTANT: The digits being input will...
... Disabling the password function To disable password protection, go back to select Off. Highlight Power On Lock and then press / to the System Setup : Advanced > Password > Password menu. Entering the password recall procedure 1. Recall code: XXX XXX XXX XXX Exit Changing the password 1. Enter...forget it is available to enter the new password next time the projector is highlighted. 2. Write down the recall code, and contact BenQ Customer Center. Highlight Change Password and press MODE/ENTER. The Input Current Password page displays. 4. IMPORTANT: The digits being input will...

W1070 User Manual
Page 31
.... To reset the picture mode to highlight Reset and press MODE/ENTER. Press / to the preset factory values: 1. Adjusting Contrast Highlight Contrast in the System Setup : Advanced menu. on page 46 for details. 10. Press to select a sub-menu item to reset other picture modes. In the Picture menu, highlight Preset...
.... To reset the picture mode to highlight Reset and press MODE/ENTER. Press / to the preset factory values: 1. Adjusting Contrast Highlight Contrast in the System Setup : Advanced menu. on page 46 for details. 10. Press to select a sub-menu item to reset other picture modes. In the Picture menu, highlight Preset...

W1070 User Manual
Page 35
... Mute on the projector or remote control. To leave and save the settings, press MENU/EXIT. Press MENU/EXIT and then press / until the Audio Setup menu is setting On or Off here. a setting of that color will be overpowering and unrealistic. 6. Repeat steps 1 above . 2. Adjusting the sound The sound adjustments...
... Mute on the projector or remote control. To leave and save the settings, press MENU/EXIT. Press MENU/EXIT and then press / until the Audio Setup menu is setting On or Off here. a setting of that color will be overpowering and unrealistic. 6. Repeat steps 1 above . 2. Adjusting the sound The sound adjustments...

W1070 User Manual
Page 37
... while searching for navigating the picture. • Using the remote control 1. When the key is pressed again, the picture is further reduced until the System Setup : Advanced menu is suitable for images which are already in /out function, and press AUTO to restore the picture to improve overall system cooling and...
... while searching for navigating the picture. • Using the remote control 1. When the key is pressed again, the picture is further reduced until the System Setup : Advanced menu is suitable for images which are already in /out function, and press AUTO to restore the picture to improve overall system cooling and...

W1070 User Manual
Page 39
...be set according to your preferences. Actual lamp life may vary due to select a suitable time length. • Menu Position in the System Setup : Basic > Menu Settings menu sets the OSD position in five locations. The following settings do not affect the projection settings, operation, or ...performance. • Menu Display Time in the System Setup : Basic > Menu Settings menu sets the length of time the OSD will remain active after your familiar language for 3 seconds. To lock...
...be set according to your preferences. Actual lamp life may vary due to select a suitable time length. • Menu Position in the System Setup : Basic > Menu Settings menu sets the OSD position in five locations. The following settings do not affect the projection settings, operation, or ...performance. • Menu Display Time in the System Setup : Basic > Menu Settings menu sets the length of time the OSD will remain active after your familiar language for 3 seconds. To lock...

W1070 User Manual
Page 40
Color Temperature Fine Tuning Gamma Selection Red Gain/Green Gain/Blue Gain/Red Offset/ Green Offset/Blue Offset 1.6/1.8/2.0/2.2/2.4/2.5/2.6/2.8/BenQ Brilliant Color On/Off Color Management Primary Color/Hue/Gain/Saturation Reset Picture Settings Mute On/Off Volume 0-10 Power ...Display (OSD) structure Please note that the on-screen display (OSD) menus vary according to the signal type selected. Main menu Picture Audio Setup Display Sub-menu Options Preset Mode Cinema/Dynamic/Standard/User 1/User 2/User 3/3D/ISF Night/ISF Day User Mode Management Brightness 0-100 Contrast...
Color Temperature Fine Tuning Gamma Selection Red Gain/Green Gain/Blue Gain/Red Offset/ Green Offset/Blue Offset 1.6/1.8/2.0/2.2/2.4/2.5/2.6/2.8/BenQ Brilliant Color On/Off Color Management Primary Color/Hue/Gain/Saturation Reset Picture Settings Mute On/Off Volume 0-10 Power ...Display (OSD) structure Please note that the on-screen display (OSD) menus vary according to the signal type selected. Main menu Picture Audio Setup Display Sub-menu Options Preset Mode Cinema/Dynamic/Standard/User 1/User 2/User 3/3D/ISF Night/ISF Day User Mode Management Brightness 0-100 Contrast...

W1070 User Manual
Page 41
Using the projector 41 Language System Setup : Basic System Setup : Advanced Information Splash Screen Projector Position Auto Off Sleep Timer Menu Display Time Menu Settings Menu Position Blank Reminder Message Input Source Source Rename Auto ... Password Change Password Power On Lock Key Lock Reset All Settings ISF Source Preset Mode Resolution Color System Equivalent Lamp Hour 3D Format Firmware Version BenQ/Black/Blue Front/Front Ceiling/Rear/Rear Ceiling Disable/5 min/10 min/15 min/20 min/25 min/ 30 min Disable/30 min/60 min...
Using the projector 41 Language System Setup : Basic System Setup : Advanced Information Splash Screen Projector Position Auto Off Sleep Timer Menu Display Time Menu Settings Menu Position Blank Reminder Message Input Source Source Rename Auto ... Password Change Password Power On Lock Key Lock Reset All Settings ISF Source Preset Mode Resolution Color System Equivalent Lamp Hour 3D Format Firmware Version BenQ/Black/Blue Front/Front Ceiling/Rear/Rear Ceiling Disable/5 min/10 min/15 min/20 min/25 min/ 30 min Disable/30 min/60 min...

W1070 User Manual
Page 43
... available when the Component or PC signal is 100% displayed. You can also manually press Overscan Adjustment / to decide how much to be concealed. Audio Setup menu Function Mute Description See "Muting the sound" on page 35 for details. To move the projected picture, use the directional arrow keys. Setting 0 means...
... available when the Component or PC signal is 100% displayed. You can also manually press Overscan Adjustment / to decide how much to be concealed. Audio Setup menu Function Mute Description See "Muting the sound" on page 35 for details. To move the projected picture, use the directional arrow keys. Setting 0 means...
W1070 User Manual
Page 44
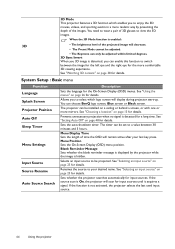
System Setup : Basic menu Function Language Splash Screen Projector Position Auto Off Sleep Timer Menu Settings Input Source Source Rename Auto Source Search Description Sets the language ..., videos, and sporting events in a more mirrors. See "Using the menus" on page 13 for input sources until it acquires a signal. The timer can choose BenQ logo screen, Blue screen or Black screen. If the source scan is detected for the On-Screen Display (OSD) menus. See "Choosing a location" on page...
System Setup : Basic menu Function Language Splash Screen Projector Position Auto Off Sleep Timer Menu Settings Input Source Source Rename Auto Source Search Description Sets the language ..., videos, and sporting events in a more mirrors. See "Using the menus" on page 13 for input sources until it acquires a signal. The timer can choose BenQ logo screen, Blue screen or Black screen. If the source scan is detected for the On-Screen Display (OSD) menus. See "Choosing a location" on page...
W1070 User Manual
Page 45
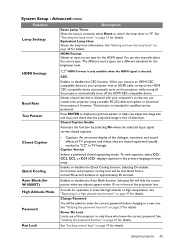
.... See "Resetting the lamp timer" on page 51 for the brightness level. A mode for details. Power On Lock Limits use of the projection lens. System Setup : Advanced menu Function Lamp Settings Description Reset Lamp Timer Once the lamp is renewed, select Reset to return the lamp timer to only those who...
.... See "Resetting the lamp timer" on page 51 for the brightness level. A mode for details. Power On Lock Limits use of the projection lens. System Setup : Advanced menu Function Lamp Settings Description Reset Lamp Timer Once the lamp is renewed, select Reset to return the lamp timer to only those who...

W1070 User Manual
Page 46
... Position, High Altitude Mode, Password, Key Lock, and ISF. For more information, please go to obtain optimal picture quality from BenQ video display devices. Information menu This menu shows you purchased the projector. Color System Shows input system format: NTSC, PAL, SECAM... current operating status of the input source. Function Source Description Shows the current signal source. Accordingly, we recommend that setup and calibration be performed by authorized ISF calibrators. Resolution Shows the native resolution of the projector. The ISF (Imaging Science...
... Position, High Altitude Mode, Password, Key Lock, and ISF. For more information, please go to obtain optimal picture quality from BenQ video display devices. Information menu This menu shows you purchased the projector. Color System Shows input system format: NTSC, PAL, SECAM... current operating status of the input source. Function Source Description Shows the current signal source. Accordingly, we recommend that setup and calibration be performed by authorized ISF calibrators. Resolution Shows the native resolution of the projector. The ISF (Imaging Science...

W1070 User Manual
Page 48
...30% lamp power consumption Saves up to select a time period. The projector will be set Economic or SmartEco mode, go to the System Setup : Basic > Auto Off menu and press / to 70%. Lamp information Getting to 30 minutes in 5-minute increments. See "Setting Lamp Power... Lamp Settings page displays. 3. Using SmartEco mode reduces system noise and lamp power consumption by 30%. Then press / repeatedly until the System Setup : Advanced menu is detected after a set Auto Off, go to highlight Lamp Settings and press MODE/ENTER. To obtain the lamp hour information...
...30% lamp power consumption Saves up to select a time period. The projector will be set Economic or SmartEco mode, go to the System Setup : Basic > Auto Off menu and press / to 70%. Lamp information Getting to 30 minutes in 5-minute increments. See "Setting Lamp Power... Lamp Settings page displays. 3. Using SmartEco mode reduces system noise and lamp power consumption by 30%. Then press / repeatedly until the System Setup : Advanced menu is detected after a set Auto Off, go to highlight Lamp Settings and press MODE/ENTER. To obtain the lamp hour information...

W1070 User Manual
Page 51
... will be reset to highlight Lamp Settings and press MODE/ENTER. After the start-up logo, press MENU/EXIT and then press / until the System Setup : Advanced menu is highlighted. 14. Replace the lamp cover on the projector. 11. Press to "0". A warning message displays asking if you want to reset the...
... will be reset to highlight Lamp Settings and press MODE/ENTER. After the start-up logo, press MENU/EXIT and then press / until the System Setup : Advanced menu is highlighted. 14. Replace the lamp cover on the projector. 11. Press to "0". A warning message displays asking if you want to reset the...
