W1070 User Manual
Page 4
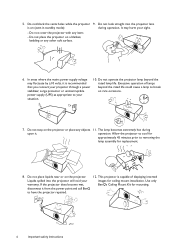
... the projector to cool for approximately 45 minutes prior to your sight. - If the projector does become wet, BenQ's Ceiling Mount Kit for replacement. 8. Do not block the vents holes while the projector 9. In areas where the mains power supply voltage 10. ... lamp becomes extremely hot during operation. It may fluctuate by ±10 volts, it is capable of lamps that you connect your images for ceiling mount installation. Do not operate the projector lamp beyond the rated life could cause a lamp to have the projector repaired. 4 Important safety instructions Do...
... the projector to cool for approximately 45 minutes prior to your sight. - If the projector does become wet, BenQ's Ceiling Mount Kit for replacement. 8. Do not block the vents holes while the projector 9. In areas where the mains power supply voltage 10. ... lamp becomes extremely hot during operation. It may fluctuate by ±10 volts, it is capable of lamps that you connect your images for ceiling mount installation. Do not operate the projector lamp beyond the rated life could cause a lamp to have the projector repaired. 4 Important safety instructions Do...
W1070 User Manual
Page 7
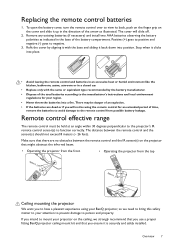
..., so we strongly recommend that you will slide off. 2. Make sure that there are dead or if you use a proper fitting BenQ projector ceiling mount kit and that might obstruct the infra-red beam. • Operating the projector from the front • Operating the projector from possible ... remove the batteries to avoid damage to the remote control from the top Approx. +15º Approx. +15º Ceiling mounting the projector We want you intend to mount your attention to prevent damage to your projector on the cover and slide it back down into place. • Avoid leaving...
..., so we strongly recommend that you will slide off. 2. Make sure that there are dead or if you use a proper fitting BenQ projector ceiling mount kit and that might obstruct the infra-red beam. • Operating the projector from the front • Operating the projector from possible ... remove the batteries to avoid damage to the remote control from the top Approx. +15º Approx. +15º Ceiling mounting the projector We want you intend to mount your attention to prevent damage to your projector on the cover and slide it back down into place. • Avoid leaving...

W1070 User Manual
Page 8
You can purchase a BenQ projector ceiling mount kit from the ceiling due to an improper attachment through the use a non-BenQ brand projector ceiling mount kit, there is a safety risk that you purchased your BenQ projector. This will perform the secondary role of the wrong gauge or length screws. BenQ recommends that the projector may fall from the place you...
You can purchase a BenQ projector ceiling mount kit from the ceiling due to an improper attachment through the use a non-BenQ brand projector ceiling mount kit, there is a safety risk that you purchased your BenQ projector. This will perform the secondary role of the wrong gauge or length screws. BenQ recommends that the projector may fall from the place you...
W1070 User Manual
Page 10
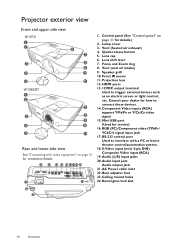
... signal 15. RGB (PC)/Component video (YPbPr/ YCbCr) signal input jack 17. AC Power cable inlet 22. Projector exterior view Front and upper side view W1070 1 2 6 7 3 8 9 4 10 5 11 W1080ST 1 2 7 3 8 9 4 10 5 11 Rear and lower side view See "Connecting with a PC or home theater control/automation system. 18. ... as an electric screen or light control, etc. Control panel (See "Control panel" on page 21 for service) 16. Lens cap 6. Ceiling mount holes 24. Lamp cover 3. Speaker grill 10. HDMI ports 13. 12VDC output terminal Used to connect these devices. 14.
... signal 15. RGB (PC)/Component video (YPbPr/ YCbCr) signal input jack 17. AC Power cable inlet 22. Projector exterior view Front and upper side view W1070 1 2 6 7 3 8 9 4 10 5 11 W1080ST 1 2 7 3 8 9 4 10 5 11 Rear and lower side view See "Connecting with a PC or home theater control/automation system. 18. ... as an electric screen or light control, etc. Control panel (See "Control panel" on page 21 for service) 16. Lens cap 6. Ceiling mount holes 24. Lamp cover 3. Speaker grill 10. HDMI ports 13. 12VDC output terminal Used to connect these devices. 14.
W1070 User Manual
Page 13
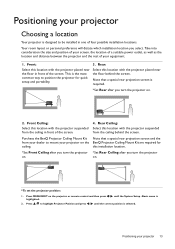
... this location with the projector placed near the floor in front of the screen. 4. Rear Ceiling: Select this location with the projector suspended from the ceiling in front of the screen. Press MENU/EXIT on the BenQ Projector Ceiling Mount Kit are required for quick setup and portability. Positioning your projector Choosing a location Your projector...
... this location with the projector placed near the floor in front of the screen. 4. Rear Ceiling: Select this location with the projector suspended from the ceiling in front of the screen. Press MENU/EXIT on the BenQ Projector Ceiling Mount Kit are required for quick setup and portability. Positioning your projector Choosing a location Your projector...

W1070 User Manual
Page 14
... determine the recommended screen size for a given distance This method can see the diagrams on W1070. Refer to the table and find the closest match to know what screen size will also... pages 16 and 18 for the vertical offset values in your room. 1. Lens shift is mounted on page 16 indicates that row to the left columns labelled "Screen dimensions". Decide the exact...square) to the projection distance. The closest match in the columns of "Projection distance [mm]" on a ceiling, it must be used for situations where you have purchased this row shows that a 170-inch screen ...
... determine the recommended screen size for a given distance This method can see the diagrams on W1070. Refer to the table and find the closest match to know what screen size will also... pages 16 and 18 for the vertical offset values in your room. 1. Lens shift is mounted on page 16 indicates that row to the left columns labelled "Screen dimensions". Decide the exact...square) to the projection distance. The closest match in the columns of "Projection distance [mm]" on a ceiling, it must be used for situations where you have purchased this row shows that a 170-inch screen ...

W1070 User Manual
Page 55
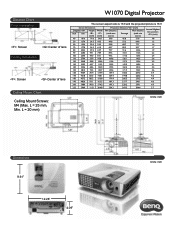
Dimensions 311.87 mm x 244.12 mm x 109.26 mm (W x D x H) 244.12 109.26 311.87 46.21 115 80 Ceiling mount installation Ceiling mount screws: 160 M4 (Max L = 25 mm; Min L= 20 mm) Unit: mm 137 43.55 Unit: mm 625.95 577.7 537.9 95.33 163.12 311.95 102.97 244.12 Using the projector 55
Dimensions 311.87 mm x 244.12 mm x 109.26 mm (W x D x H) 244.12 109.26 311.87 46.21 115 80 Ceiling mount installation Ceiling mount screws: 160 M4 (Max L = 25 mm; Min L= 20 mm) Unit: mm 137 43.55 Unit: mm 625.95 577.7 537.9 95.33 163.12 311.95 102.97 244.12 Using the projector 55
W1070 Data Sheet
Page 2
Distance Chart Floor Installation : Screen :Center of lens Ceiling Installation : Screen :Center of lens Ceiling Mount Chart Ceiling Mount Screws: M4 (Max. L = 25 mm, Min. L = 20 mm) W1070 Digital Projector The screen aspect ratio is 16:9 and the projected picture is 16:9 Screen Dimensions Diagonal Height Width Inch mm (inch) (inch) 40 1016 ...
Distance Chart Floor Installation : Screen :Center of lens Ceiling Installation : Screen :Center of lens Ceiling Mount Chart Ceiling Mount Screws: M4 (Max. L = 25 mm, Min. L = 20 mm) W1070 Digital Projector The screen aspect ratio is 16:9 and the projected picture is 16:9 Screen Dimensions Diagonal Height Width Inch mm (inch) (inch) 40 1016 ...


