
User Manual
Page 3
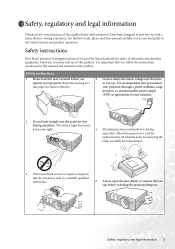
... recommended that you follow the instructions mentioned in a safe place for replacement. 3. Please read this quality BenQ video projector! Do not look straight into the projector lens during operation. The intense light beam may fluctuate or cut out, it is required, take the projector only to provide you with a home theater viewing experience. Keep this manual in this user's manual before switching the projector lamp on the product. It...
... recommended that you follow the instructions mentioned in a safe place for replacement. 3. Please read this quality BenQ video projector! Do not look straight into the projector lens during operation. The intense light beam may fluctuate or cut out, it is required, take the projector only to provide you with a home theater viewing experience. Keep this manual in this user's manual before switching the projector lamp on the product. It...
User Manual
Page 5
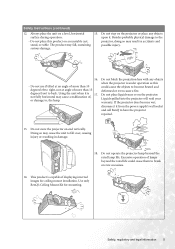
... angle of lamps beyond the rated lamp life. Safety Instructions (continued) 12. Do not use if tilted at an angle of more than 15 degrees front to have the projector repaired. 13. Use only BenQ's Ceiling Mount Kit for ceiling mount installation. Do not step on the projector. Do not block the projection lens with any objects surface during operation. Doing so may cause a malfunction of displaying inverted images for mounting. Safety...
... angle of lamps beyond the rated lamp life. Safety Instructions (continued) 12. Do not use if tilted at an angle of more than 15 degrees front to have the projector repaired. 13. Use only BenQ's Ceiling Mount Kit for ceiling mount installation. Do not step on the projector. Do not block the projection lens with any objects surface during operation. Doing so may cause a malfunction of displaying inverted images for mounting. Safety...
User Manual
Page 8
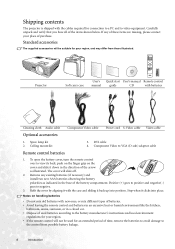
... into position. Remove any of time, remove the batteries to avoid damage to video equipment. Notes on the cover and slide it back up into place. PUSH W100 Projector CT Soft carry case User's Quick start User's manual Remote control manual guide CD with the case and sliding it down in the direction of the arrow as indicated in a closed car. • Dispose of used for an...
... into position. Remove any of time, remove the batteries to avoid damage to video equipment. Notes on the cover and slide it back up into place. PUSH W100 Projector CT Soft carry case User's Quick start User's manual Remote control manual guide CD with the case and sliding it down in the direction of the arrow as indicated in a closed car. • Dispose of used for an...
User Manual
Page 10
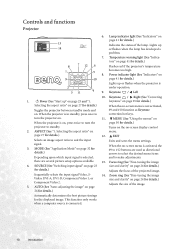
....) Flashes red if the projector's temperature 1 5 becomes too high. 8. AUTO (See "Auto-adjusting the image" on -screen display control 2. Power indicator light (See "Indicators" on page 24 for details.) Adjusts the size of the image. 24 for details.) Automatically determines the best picture timings for details.) Exits and saves the menu settings. Zoom ring (See "Fine-tuning the image size and clarity" on 9 10 page 41 for details.) Adjusts the focus of the lamp. When the projector is connected. 10 Introduction MODE...
....) Flashes red if the projector's temperature 1 5 becomes too high. 8. AUTO (See "Auto-adjusting the image" on -screen display control 2. Power indicator light (See "Indicators" on page 24 for details.) Adjusts the size of the image. 24 for details.) Automatically determines the best picture timings for details.) Exits and saves the menu settings. Zoom ring (See "Fine-tuning the image size and clarity" on 9 10 page 41 for details.) Adjusts the focus of the lamp. When the projector is connected. 10 Introduction MODE...

User Manual
Page 11
... connected. 8 10 5. This function only works when a computer source is nothing positioned between standby mode and on. 2 When the projector is in standby, press once to turn the on-screen menu on. MENU and directional buttons ( / / / ) (See page "Using the menus" on page 25 for details.) 6 Selects an image aspect ratio to reduce the upper portion of the remote control is on . Picture quality adjustment buttons (See "3. KEYSTONE buttons (See "Correcting keystone...
... connected. 8 10 5. This function only works when a computer source is nothing positioned between standby mode and on. 2 When the projector is in standby, press once to turn the on-screen menu on. MENU and directional buttons ( / / / ) (See page "Using the menus" on page 25 for details.) 6 Selects an image aspect ratio to reduce the upper portion of the remote control is on . Picture quality adjustment buttons (See "3. KEYSTONE buttons (See "Correcting keystone...
User Manual
Page 12
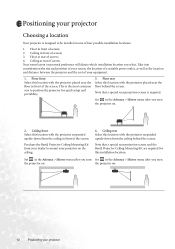
... possible installation locations: 1. Ceiling at rear of the screen. Your room layout or personal preference will dictate which installation location you turn Set in front of screen; 4. Floor front Select this location with the projector placed near the floor in the Advance > Mirror menu after you turn the projector on. Ceiling front Select this installation location. Note that a special rear projection screen and the BenQ Projector Ceiling Mounting Kit are required for quick setup...
... possible installation locations: 1. Ceiling at rear of the screen. Your room layout or personal preference will dictate which installation location you turn Set in front of screen; 4. Floor front Select this location with the projector placed near the floor in the Advance > Mirror menu after you turn the projector on. Ceiling front Select this installation location. Note that a special rear projection screen and the BenQ Projector Ceiling Mounting Kit are required for quick setup...

User Manual
Page 13
... display area 4:3 aspect image in the room can see the screen). When determining the position of the screen and projector, you will perform the secondary role of the projector from the projector lens to the screen, the zoom setting, and the video format each factors in determining the ideal location for details. Safety instructions for both the projected image size and the vertical offset dimension, which is mounted...
... display area 4:3 aspect image in the room can see the screen). When determining the position of the screen and projector, you will perform the secondary role of the projector from the projector lens to the screen, the zoom setting, and the video format each factors in determining the ideal location for details. Safety instructions for both the projected image size and the vertical offset dimension, which is mounted...

User Manual
Page 14
... (2.5m) screen is 4851mm. Using this value, look across this projector and would like to "Installation for situations where you can only obtain imperial sized screens, the listed screen sizes on either side of the 2.5m screen are using the zoom control) to determine the recommended screen size for a given distance This method can be used for a 4:3 ratio screen" on the screen. The projector can be adjusted (using a 120 inch screen with...
... (2.5m) screen is 4851mm. Using this value, look across this projector and would like to "Installation for situations where you can only obtain imperial sized screens, the listed screen sizes on either side of the 2.5m screen are using the zoom control) to determine the recommended screen size for a given distance This method can be used for a 4:3 ratio screen" on the screen. The projector can be adjusted (using a 120 inch screen with...

User Manual
Page 19
... can purchase a DVI-I input socket that allows you to connect it still transmits higher picture quality than analog connection, due to a DVI source device like DVD player, or a VGA output device like FN + F3 or CRT/LCD key turns the external display on/off. computer. Once connected, the audio can use the projector (mixed mono) speaker, take a suitable audio cable and connect one end to the...
... can purchase a DVI-I input socket that allows you to connect it still transmits higher picture quality than analog connection, due to a DVI source device like DVD player, or a VGA output device like FN + F3 or CRT/LCD key turns the external display on/off. computer. Once connected, the audio can use the projector (mixed mono) speaker, take a suitable audio cable and connect one end to the...

User Manual
Page 20
... video image is not displayed after the projector is turned on the notebook. See "Connecting Audio" on page 18 for details. The final connection path should be controlled by the projector volume and mute settings. LCD or a function key with a monitor symbol on and operating correctly. Take the Component Video cable and connect the end with 3 RCA type connectors to the AUDIO socket of the Video source device. green to green, blue...
... video image is not displayed after the projector is turned on the notebook. See "Connecting Audio" on page 18 for details. The final connection path should be controlled by the projector volume and mute settings. LCD or a function key with a monitor symbol on and operating correctly. Take the Component Video cable and connect the end with 3 RCA type connectors to the AUDIO socket of the Video source device. green to green, blue...

User Manual
Page 21
... selected video image is not displayed after the projector is turned on and the correct video source has been selected, check that shown in the following diagram: A/V device S-Video cable Audio cable • The projector is only capable of playing mixed mono audio, even if a stereo audio input is turned on page 34 for details. The final connection path should be controlled by the projector volume and mute settings. See "Connecting Video source devices...
... selected video image is not displayed after the projector is turned on and the correct video source has been selected, check that shown in the following diagram: A/V device S-Video cable Audio cable • The projector is only capable of playing mixed mono audio, even if a stereo audio input is turned on page 34 for details. The final connection path should be controlled by the projector volume and mute settings. See "Connecting Video source devices...

User Manual
Page 22
... the selected video image is not displayed after the projector is turned on and the correct video source has been selected, check that the Video source device is connected. If you can use to connect to the device. See "Mute" and "Volume" on and operating correctly. Also check that shown in the following diagram: A/V device Video cable Audio cable • The projector is only capable of the Video cable to the VIDEO socket...
... the selected video image is not displayed after the projector is turned on and the correct video source has been selected, check that the Video source device is connected. If you can use to connect to the device. See "Mute" and "Volume" on and operating correctly. Also check that shown in the following diagram: A/V device Video cable Audio cable • The projector is only capable of the Video cable to the VIDEO socket...
User Manual
Page 23
...) the I POWER. If the frequency/ resolution of the projected image will start up 1. The brightness level of the input signal exceeds the projector's operating range, you switch between different input signals. Please change accordingly when you will continue displaying until an input source signal is left on, it can be connected to multiple devices at the center of the Source buttons (Video, S- Turn on page 28 for the Application Mode. Remove the lens cap. For...
...) the I POWER. If the frequency/ resolution of the projected image will start up 1. The brightness level of the input signal exceeds the projector's operating range, you switch between different input signals. Please change accordingly when you will continue displaying until an input source signal is left on, it can be connected to multiple devices at the center of the Source buttons (Video, S- Turn on page 28 for the Application Mode. Remove the lens cap. For...

User Manual
Page 24
... using the zoom ring. The screen will be displayed at the bottom right of the projector or on . need to provide the best picture quality. Do not look into the lens while the lamp is close to lock the foot in the Picture menu, on the projector control panel, or on the remote control. These adjusters change the image height and projection angle. Screw the rear adjuster foot to each other, the projected image...
... using the zoom ring. The screen will be displayed at the bottom right of the projector or on . need to provide the best picture quality. Do not look into the lens while the lamp is close to lock the foot in the Picture menu, on the projector control panel, or on the remote control. These adjusters change the image height and projection angle. Screw the rear adjuster foot to each other, the projected image...

User Manual
Page 28
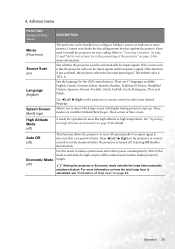
... several predefined application modes so that suits your operating environment and input source picture type. Brightest Mode: Maximizes the brightness of signals are accessible either on the remote control or through the PC input for environments where extra-high brightness is slightly brighter than the corners. Home Theater Mode (Default): is required, such as using the projector in a bright living room. 5. Photo Mode: designed for viewing digital pictures in a bright...
... several predefined application modes so that suits your operating environment and input source picture type. Brightest Mode: Maximizes the brightness of signals are accessible either on the remote control or through the PC input for environments where extra-high brightness is slightly brighter than the corners. Home Theater Mode (Default): is required, such as using the projector in a bright living room. 5. Photo Mode: designed for viewing digital pictures in a bright...

User Manual
Page 30
...; To shorten the cooling time, you attempt to re-start the projector after the fans stop. Disconnect the power cord from the wall socket. • Do not unplug the power cord before browsing through the menus. Press I Power a second time to disappear. 2. The Power indicator light flashes orange and the lamp shuts down the projector 1. Shutting down , the fans continue to run for a few seconds for the message to turn it off .
...; To shorten the cooling time, you attempt to re-start the projector after the fans stop. Disconnect the power cord from the wall socket. • Do not unplug the power cord before browsing through the menus. Press I Power a second time to disappear. 2. The Power indicator light flashes orange and the lamp shuts down the projector 1. Shutting down , the fans continue to run for a few seconds for the message to turn it off .
User Manual
Page 35
..., Portuguese, Thai, and Polish. Use this function. Sets whether the projector searches automatically for the OSD control menus. Auto Off (off) Economic Mode (off) This function allows the projector to set period of lamp hour" on page 13 for operation in darker projected images. There are available: Default (BenQ logo), black screen or blue screen. See "Operating in Economic mode extends the lamp timer automatic shutdown feature. Operation 35 Contact your desired language. 4.
..., Portuguese, Thai, and Polish. Use this function. Sets whether the projector searches automatically for the OSD control menus. Auto Off (off) Economic Mode (off) This function allows the projector to set period of lamp hour" on page 13 for operation in darker projected images. There are available: Default (BenQ logo), black screen or blue screen. See "Operating in Economic mode extends the lamp timer automatic shutdown feature. Operation 35 Contact your desired language. 4.
User Manual
Page 38
... lamp at this warning message displays, the projector will light up red for 40 seconds. Install a new lamp for over 3000 hours. If the projector is normally run with the Lamp indicator lighting up if the lamp becomes too hot. You can replace the lamp whenever you notice that you may continue to operate the projector until the 2950 hour lamp warning appears. The following Lamp warning displays will operate normally. 38 Maintenance A new lamp should be replaced after turning the power...
... lamp at this warning message displays, the projector will light up red for 40 seconds. Install a new lamp for over 3000 hours. If the projector is normally run with the Lamp indicator lighting up if the lamp becomes too hot. You can replace the lamp whenever you notice that you may continue to operate the projector until the 2950 hour lamp warning appears. The following Lamp warning displays will operate normally. 38 Maintenance A new lamp should be replaced after turning the power...
User Manual
Page 41
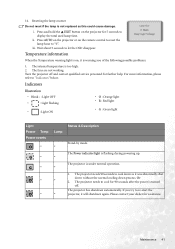
... hold the EXIT button on the remote control to reset the lamp hour to re-start the projector, it is flashing during powering up. O - O - The Power indicator light is warning you try to "0". If you of the following possible problems: 1. ii. Press AUTO on the projector or on the projector for further help. iii. Temperature information When the Temperature warning light is on, it will shutdown again. The internal temperature is turned off and contact...
... hold the EXIT button on the remote control to reset the lamp hour to re-start the projector, it is flashing during powering up. O - O - The Power indicator light is warning you try to "0". If you of the following possible problems: 1. ii. Press AUTO on the projector or on the projector for further help. iii. Temperature information When the Temperature warning light is on, it will shutdown again. The internal temperature is turned off and contact...
User Manual
Page 43
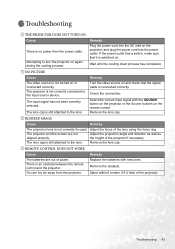
... turned on the projector, and plug the power cord into the power outlet. Remove the lens cap. REMOTE CONTROL DOES NOT WORK Cause The batteries are not aligned properly. Attempting to the input source device. NO PICTURE Cause The video source is still attached to the lens. Adjust the projection angle and direction as well as the height of power. Remedy Replace the batteries with the SOURCE button on the projector or the Source buttons...
... turned on the projector, and plug the power cord into the power outlet. Remove the lens cap. REMOTE CONTROL DOES NOT WORK Cause The batteries are not aligned properly. Attempting to the input source device. NO PICTURE Cause The video source is still attached to the lens. Adjust the projection angle and direction as well as the height of power. Remedy Replace the batteries with the SOURCE button on the projector or the Source buttons...


