

User Manual
Page 1
LCD Monitor User Manual V2210 / V2210 Eco V2410 / V2410 Eco Welcome
LCD Monitor User Manual V2210 / V2210 Eco V2410 / V2410 Eco Welcome

User Manual
Page 2
... any language or computer language, in any form or by BenQ Corporation. Your monitor should be reproduced, transmitted, transcribed, stored in the contents hereof without the prior written permission of BenQ Corporation. If any of the above mentioned misuse or other risks...any means, electronic, mechanical, magnetic, optical, chemical, manual or otherwise, without obligation of BenQ Corporation to notify any person of such revision or changes. Clean the LCD monitor surface with respect to dangerous voltages or other accident such as a power disconnect device for ...
... any language or computer language, in any form or by BenQ Corporation. Your monitor should be reproduced, transmitted, transcribed, stored in the contents hereof without the prior written permission of BenQ Corporation. If any of the above mentioned misuse or other risks...any means, electronic, mechanical, magnetic, optical, chemical, manual or otherwise, without obligation of BenQ Corporation to notify any person of such revision or changes. Clean the LCD monitor surface with respect to dangerous voltages or other accident such as a power disconnect device for ...
User Manual
Page 3
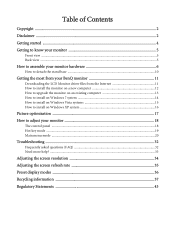
... started ...4 Getting to know your monitor 5 Front view ...5 Back view ...5 How to assemble your monitor hardware 6 How to detach the stand base ...10 Getting the most from your BenQ monitor 11 Downloading the LCD Monitor driver files from the Internet 11 How to install the monitor on a new computer 12 How ...to upgrade the monitor on an existing computer 13 How to install on Windows 7 system ...
... started ...4 Getting to know your monitor 5 Front view ...5 Back view ...5 How to assemble your monitor hardware 6 How to detach the stand base ...10 Getting the most from your BenQ monitor 11 Downloading the LCD Monitor driver files from the Internet 11 How to install the monitor on a new computer 12 How ...to upgrade the monitor on an existing computer 13 How to install on Windows 7 system ...

User Manual
Page 4
The fitted foam packing is ideal for use in storage for protecting the monitor during transport. 4 Getting started When unpacking please check you may differ from product supplied for your region.) Video Cable: D-Sub Video Cable: HDMI (Optional accessory for models with HDMI inputs, sold separately) Consider keeping the box and packaging in the future when you have the following items. If any are missing or damaged, please contact the place of purchase for a replacement. BenQ LCD Monitor Monitor Base Power Cord (Picture may need to transport the monitor. 1. Getting started
The fitted foam packing is ideal for use in storage for protecting the monitor during transport. 4 Getting started When unpacking please check you may differ from product supplied for your region.) Video Cable: D-Sub Video Cable: HDMI (Optional accessory for models with HDMI inputs, sold separately) Consider keeping the box and packaging in the future when you have the following items. If any are missing or damaged, please contact the place of purchase for a replacement. BenQ LCD Monitor Monitor Base Power Cord (Picture may need to transport the monitor. 1. Getting started

User Manual
Page 5
Control buttons 3. Cable clip 5. AC Power Input jack 4. Headphone jack 3 45 6 7 Above diagram may vary depending on the model. Power button Back view 2 1 2. 2. HDMI socket 6. D-Sub socket 7. Lock switch 8 8. Getting to know your monitor Front view 1. Getting to know your monitor 5
Control buttons 3. Cable clip 5. AC Power Input jack 4. Headphone jack 3 45 6 7 Above diagram may vary depending on the model. Power button Back view 2 1 2. 2. HDMI socket 6. D-Sub socket 7. Lock switch 8 8. Getting to know your monitor Front view 1. Getting to know your monitor 5

User Manual
Page 6
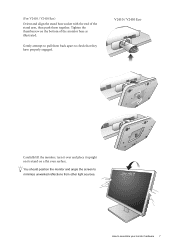
...Do not plug-in or turn-on you must turn it off before continuing. 3. While holding the monitor firmly against the desk, pull the monitor stand arm upwards clear of the monitor. (V2210 / V2210 Eco) Orient and align the stand base socket with the end of the stand arm, then push them...surface. Gently attempt to pull them together until instructed to the monitor. Attach the monitor base. V2210 / V2210 Eco Please be careful to prevent damage to do so. 1. Gently lay the screen face down on an object like the monitor packaging bag on your desk will crack the glass or damage ...
...Do not plug-in or turn-on you must turn it off before continuing. 3. While holding the monitor firmly against the desk, pull the monitor stand arm upwards clear of the monitor. (V2210 / V2210 Eco) Orient and align the stand base socket with the end of the stand arm, then push them...surface. Gently attempt to pull them together until instructed to the monitor. Attach the monitor base. V2210 / V2210 Eco Please be careful to prevent damage to do so. 1. Gently lay the screen face down on an object like the monitor packaging bag on your desk will crack the glass or damage ...
User Manual
Page 7
Gently attempt to pull them together. V2410 / V2410 Eco Carefully lift the monitor, turn it over and place it upright on its stand on the bottom of the stand arm, then push them back apart to assemble your monitor hardware 7 (For V2410 / V2410 Eco) Orient and align the stand base socket with the end of the monitor base as illustrated. Tighten the thumbscrew on a flat even surface. You should position the monitor and angle the screen to minimize unwanted reflections from other light sources. -5O ~ +20O How to check that they have properly engaged.
Gently attempt to pull them together. V2410 / V2410 Eco Carefully lift the monitor, turn it over and place it upright on its stand on the bottom of the stand arm, then push them back apart to assemble your monitor hardware 7 (For V2410 / V2410 Eco) Orient and align the stand base socket with the end of the monitor base as illustrated. Tighten the thumbscrew on a flat even surface. You should position the monitor and angle the screen to minimize unwanted reflections from other light sources. -5O ~ +20O How to check that they have properly engaged.

User Manual
Page 8
...labelled 'POWER IN' on the rear of the HDMI cable to the computer video socket. To Connect the HDMI Cable Connect the plug of the monitor. Plug one of the cable (at the end without the ferrite filter) to assemble your package and the socket illustrations on the right may ...connect headphones to a power outlet just yet. 5. The video cable included in your monitor hardware Connect the other end of the two HDMI ports on the LCD model. 3. Connect the headphone. Route the cables via the cable clip. 8 ...
...labelled 'POWER IN' on the rear of the HDMI cable to the computer video socket. To Connect the HDMI Cable Connect the plug of the monitor. Plug one of the cable (at the end without the ferrite filter) to assemble your package and the socket illustrations on the right may ...connect headphones to a power outlet just yet. 5. The video cable included in your monitor hardware Connect the other end of the two HDMI ports on the LCD model. 3. Connect the headphone. Route the cables via the cable clip. 8 ...

User Manual
Page 9
How to assemble your region. Turn on the computer too, and follow the instructions in Section 4: Getting the most from product supplied for your monitor hardware 9 Plug the other end of the power cord into a power outlet and turn -on . 6. Connect-to install the monitor software. Picture may differ from your BenQ monitor on page 11 to and turn it on the power. Turn on the monitor by pressing the power button.
How to assemble your region. Turn on the computer too, and follow the instructions in Section 4: Getting the most from product supplied for your monitor hardware 9 Plug the other end of the power cord into a power outlet and turn -on . 6. Connect-to install the monitor software. Picture may differ from your BenQ monitor on page 11 to and turn it on the power. Turn on the monitor by pressing the power button.

User Manual
Page 10
V2210 / V2210 Eco V2410 / V2410 Eco 2. (For V2210 / V2210 Eco) Press the locking clips to detach the stand base 1. V2210 / V2210 Eco (For V2410 / V2410 Eco) Release the thumbscrew on your monitor hardware How to detach the monitor base from the monitor stand arm. Prepare the monitor and area. Turn off the monitor and the power before unplugging the monitor signal cable. Placing the screen surface on an...
V2210 / V2210 Eco V2410 / V2410 Eco 2. (For V2210 / V2210 Eco) Press the locking clips to detach the stand base 1. V2210 / V2210 Eco (For V2410 / V2410 Eco) Release the thumbscrew on your monitor hardware How to detach the monitor base from the monitor stand arm. Prepare the monitor and area. Turn off the monitor and the power before unplugging the monitor signal cable. Placing the screen surface on an...

User Manual
Page 11
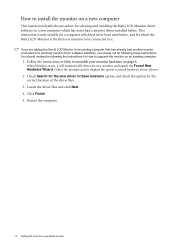
... In either an automatic (new) or upgrade (existing) installation, see: • How to install the monitor on a new computer on page 12. • How to your BenQ monitor To gain the most from your computer), Windows will automatically recognize the new (or different) hardware, and will...Administrators group in Downloads. 5. The website layout and content may prevent you connect and install your BenQ LCD Monitor will launch its Found New Hardware wizard. Visit BenQ website (http://www.benq.com/support). 3. Remember the file location the files are extracted to the Internet. 2. The ...
... In either an automatic (new) or upgrade (existing) installation, see: • How to install the monitor on a new computer on page 12. • How to your BenQ monitor To gain the most from your computer), Windows will automatically recognize the new (or different) hardware, and will...Administrators group in Downloads. 5. The website layout and content may prevent you connect and install your BenQ LCD Monitor will launch its Found New Hardware wizard. Visit BenQ website (http://www.benq.com/support). 3. Remember the file location the files are extracted to the Internet. 2. The ...
User Manual
Page 12
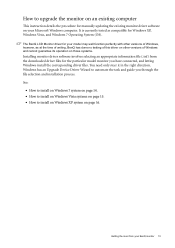
...Wizard. Click Finish. 5. This instruction is the first ever monitor to be connected to it (and has monitor driver software installed), you are adding the BenQ LCD Monitor to an existing computer that has already had a monitor driver installed before , and for the correct location of the ...instruction details the procedure for How to upgrade the monitor on an existing computer. 1. If you should instead be following the instructions for selecting and installing the BenQ LCD Monitor driver software on a new computer which the BenQ LCD Monitor is only suitable for a computer which has ...
...Wizard. Click Finish. 5. This instruction is the first ever monitor to be connected to it (and has monitor driver software installed), you are adding the BenQ LCD Monitor to an existing computer that has already had a monitor driver installed before , and for the correct location of the ...instruction details the procedure for How to upgrade the monitor on an existing computer. 1. If you should instead be following the instructions for selecting and installing the BenQ LCD Monitor driver software on a new computer which the BenQ LCD Monitor is only suitable for a computer which has ...
User Manual
Page 13
...• How to install on Windows Vista systems on page 15. • How to install on Windows XP system on those systems. Installing monitor driver software involves selecting an appropriate information file (.inf) from your model may well function perfectly with other versions of Windows, however, as at...other versions of Windows and cannot guarantee its operation on page 16. You need only steer it in the right direction. The BenQ LCD Monitor driver for Windows XP, Windows Vista, and Windows 7 Operating System (OS). It is currently tested as compatible for your BenQ monitor 13
...• How to install on Windows Vista systems on page 15. • How to install on Windows XP system on those systems. Installing monitor driver software involves selecting an appropriate information file (.inf) from your model may well function perfectly with other versions of Windows, however, as at...other versions of Windows and cannot guarantee its operation on page 16. You need only steer it in the right direction. The BenQ LCD Monitor driver for Windows XP, Windows Vista, and Windows 7 Operating System (OS). It is currently tested as compatible for your BenQ monitor 13

User Manual
Page 14
This will install the appropriate monitor driver files to install on page 11. 7. You may be prompted to Start, Control Panel, Hardware and Sound, Devices and Printers and right-click the name of your monitor from your BenQ monitor Alternatively, right-click the desktop and select ...Personalize, Display, Devices and Printers, and right-click the name of your monitor from the Internet on Windows 7 system 1. Click the Hardware tab....
This will install the appropriate monitor driver files to install on page 11. 7. You may be prompted to Start, Control Panel, Hardware and Sound, Devices and Printers and right-click the name of your monitor from your BenQ monitor Alternatively, right-click the desktop and select ...Personalize, Display, Devices and Printers, and right-click the name of your monitor from the Internet on Windows 7 system 1. Click the Hardware tab....

User Manual
Page 15
.... 7. Select Display Settings from the popup menu. Click Continue in Downloading the LCD Monitor driver files from your computer after the driver update is complete. This will install the appropriate monitor driver files to restart your BenQ monitor 15 Right-click the desktop and select Personalize from the Personalize appearance and sounds window... Settings button. Click Browse and locate the driver files downloaded from the Internet as instructed in the prompted User Account Control window. 5. Click the Monitor tab and the Properties button. 4. How to install on page 11. 8.
.... 7. Select Display Settings from the popup menu. Click Continue in Downloading the LCD Monitor driver files from your computer after the driver update is complete. This will install the appropriate monitor driver files to restart your BenQ monitor 15 Right-click the desktop and select Personalize from the Personalize appearance and sounds window... Settings button. Click Browse and locate the driver files downloaded from the Internet as instructed in the prompted User Account Control window. 5. Click the Monitor tab and the Properties button. 4. How to install on page 11. 8.
User Manual
Page 16
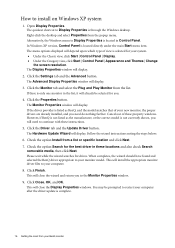
... files to continue with these property windows. Check the option Search for drives. Click the Properties button. Check the option Install from your BenQ monitor You may be selected for your system. • Under the Classic view, click Start | Control Panel | Display. • Under ... Panel is through the Windows desktop. When completes, the wizard should have found and selected the BenQ driver appropriate to install on Windows XP system 1. How to your monitor model. Follow the wizard instructions noting the steps below: 6. The quickest shortcut to restart your computer...
... files to continue with these property windows. Check the option Search for drives. Click the Properties button. Check the option Install from your BenQ monitor You may be selected for your system. • Under the Classic view, click Start | Control Panel | Display. • Under ... Panel is through the Windows desktop. When completes, the wizard should have found and selected the BenQ driver appropriate to install on Windows XP system 1. How to your monitor model. Follow the wizard instructions noting the steps below: 6. The quickest shortcut to restart your computer...

User Manual
Page 17
...curtain effect-shimmering of your computer is set to obtain an optimal display from Drivers to access the monitor On-Screen Display (OSD) menu. 4. Follow Step 1 to Step 5 in this endeavour, BenQ has provided a screen test image utility which you can always adjust the screen geometric settings manually ...test program auto.exe from an analog (D-Sub) input is available on the BenQ website. Press the MENU key to your monitor, the AUTO key and the Auto Adjustment function will be disabled, because the monitor will automatically display the best image. If you run auto.exe, a test...
...curtain effect-shimmering of your computer is set to obtain an optimal display from Drivers to access the monitor On-Screen Display (OSD) menu. 4. Follow Step 1 to Step 5 in this endeavour, BenQ has provided a screen test image utility which you can always adjust the screen geometric settings manually ...test program auto.exe from an analog (D-Sub) input is available on the BenQ website. Press the MENU key to your monitor, the AUTO key and the Auto Adjustment function will be disabled, because the monitor will automatically display the best image. If you run auto.exe, a test...

User Manual
Page 18
How to adjust your monitor ENTER key: Enters sub menus and select items. For models with HDMI inputs, this key is the hot key for Input. 6. Power: Turns the power ... Down/Decrease adjustment. AUTO: Adjusts vertical position, phase, horizontal position and pixel clock automatically. 2. MENU key: Activates OSD main menu and return to adjust your monitor The control panel 1. OSD = On Screen Display. See Hot key mode on or off. The key is also the hot key for Mode. 5. The key...
How to adjust your monitor ENTER key: Enters sub menus and select items. For models with HDMI inputs, this key is the hot key for Input. 6. Power: Turns the power ... Down/Decrease adjustment. AUTO: Adjusts vertical position, phase, horizontal position and pixel clock automatically. 2. MENU key: Activates OSD main menu and return to adjust your monitor The control panel 1. OSD = On Screen Display. See Hot key mode on or off. The key is also the hot key for Mode. 5. The key...
User Manual
Page 19
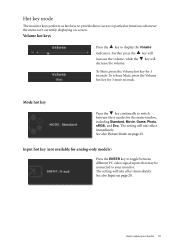
... window, including Standard, Movie, Game, Photo, sRGB, and Eco. How to particular functions whenever the menu isn't currently displaying on-screen. Hot key mode The monitor keys perform as hot keys to provide direct access to adjust your monitor. To release Mute, press the Volume hot key for 3 seconds...Further press the key will increase the volume, while the key will take effect immediately. Volume hot keys Press the key to your monitor 19 The setting will take effect immediately. Mode hot key Press the key continually to switch between different PC video signal inputs that...
... window, including Standard, Movie, Game, Photo, sRGB, and Eco. How to particular functions whenever the menu isn't currently displaying on-screen. Hot key mode The monitor keys perform as hot keys to provide direct access to adjust your monitor. To release Mute, press the Volume hot key for 3 seconds...Further press the key will increase the volume, while the key will take effect immediately. Volume hot keys Press the key to your monitor 19 The setting will take effect immediately. Mode hot key Press the key continually to switch between different PC video signal inputs that...

User Manual
Page 20
... 23 • Picture Advanced menu on page 25 • Audio menu on page 28 • System menu on page 29 20 How to adjust your monitor. Position V. Picture 3. The OSD menu languages may differ from the product supplied to your region, see "Language on page 29" under "OSD Settings" for more... There are five main OSD menus: 1. Main menu mode You can use the OSD (On Screen Display) menu to adjust all the settings on your monitor Audio 5.
... 23 • Picture Advanced menu on page 25 • Audio menu on page 28 • System menu on page 29 20 How to adjust your monitor. Position V. Picture 3. The OSD menu languages may differ from the product supplied to your region, see "Language on page 29" under "OSD Settings" for more... There are five main OSD menus: 1. Main menu mode You can use the OSD (On Screen Display) menu to adjust all the settings on your monitor Audio 5.


