
User Guide
Page 2
...DLP projector! DANGER: Do not point the laser in bold font as books or bags on the unit and in the unit. Aside from the projection lamp, there are used on the unit. - To avoid damage to important information. Important: Provides additional information that you to open the unit case. Remote Control Some remote controls... ¾ Do not place heavy objects such as in this manual for pointing out items on the remote control to situations that you to alert you of the projector. ii - Keep this manual to situations that may damage the unit. General Safety Information ¾ ...
...DLP projector! DANGER: Do not point the laser in bold font as books or bags on the unit and in the unit. Aside from the projection lamp, there are used on the unit. - To avoid damage to important information. Important: Provides additional information that you to open the unit case. Remote Control Some remote controls... ¾ Do not place heavy objects such as in this manual for pointing out items on the remote control to situations that you to alert you of the projector. ii - Keep this manual to situations that may damage the unit. General Safety Information ¾ ...
User Guide
Page 3
... the Projection Lamp on page 42. - Cleaning the Projector ¾ Unplug the power cord before cleaning. Refer to cool for this procedure. Replacing the Lamp Replacing the lamp can be in the way of foot traffic. ¾ Remove the batteries from the remote control when storing or not in the Regulatory Compliance section...
... the Projection Lamp on page 42. - Cleaning the Projector ¾ Unplug the power cord before cleaning. Refer to cool for this procedure. Replacing the Lamp Replacing the lamp can be in the way of foot traffic. ¾ Remove the batteries from the remote control when storing or not in the Regulatory Compliance section...

User Guide
Page 5
...-screen Display (OSD) buttons and LEDs 3 Rear view ...4 Bottom view...5 REMOTE CONTROL PARTS ...6 REMOTE CONTROL OPERATING RANGE...8 PROJECTOR AND REMOTE CONTROL BUTTONS...8 SETUP AND OPERATION...9 INSERTING THE REMOTE CONTROL BATTERIES ...9 CONNECTING INPUT DEVICES ...10 STARTING AND SHUTTING DOWN THE PROJECTOR...11 SETTING AN ACCESS PASSWORD (SECURITY LOCK) ...12 ADJUSTING THE PROJECTOR LEVEL ...13 ADJUSTING THE ZOOM, FOCUS AND KEYSTONE ...14 ADJUSTING...
...-screen Display (OSD) buttons and LEDs 3 Rear view ...4 Bottom view...5 REMOTE CONTROL PARTS ...6 REMOTE CONTROL OPERATING RANGE...8 PROJECTOR AND REMOTE CONTROL BUTTONS...8 SETUP AND OPERATION...9 INSERTING THE REMOTE CONTROL BATTERIES ...9 CONNECTING INPUT DEVICES ...10 STARTING AND SHUTTING DOWN THE PROJECTOR...11 SETTING AN ACCESS PASSWORD (SECURITY LOCK) ...12 ADJUSTING THE PROJECTOR LEVEL ...13 ADJUSTING THE ZOOM, FOCUS AND KEYSTONE ...14 ADJUSTING...
User Guide
Page 7
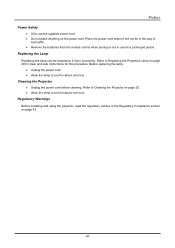
... the original packaging material should you ever need to return the Equipment for warranty service. - 1 - Note: It is recommend that the following items are included: DLP PROJECTOR REMOTE CONTROL (WITH TWO AAA BATTERIES) USB CABLE POWER CORD COMPUTER CABLE (VGA-VGA) CD-ROM (THIS USER'S MANUAL) QUICK START GUIDE AUDIO CABLE (STEREO MINI JACK...
... the original packaging material should you ever need to return the Equipment for warranty service. - 1 - Note: It is recommend that the following items are included: DLP PROJECTOR REMOTE CONTROL (WITH TWO AAA BATTERIES) USB CABLE POWER CORD COMPUTER CABLE (VGA-VGA) CD-ROM (THIS USER'S MANUAL) QUICK START GUIDE AUDIO CABLE (STEREO MINI JACK...
User Guide
Page 8
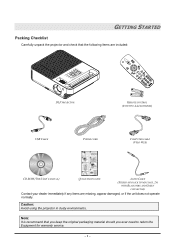
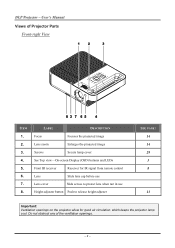
... IR signal from remote control Lens Slide lens cap before use Lens cover Slide across to protect lens when not in use Height-adjuster button Push to release height adjuster SEE PAGE: 14 14 29 3 8 13 Important: Ventilation openings on the projector allow for good ...air circulation, which keeps the projector lamp cool. Do not obstruct any of Projector Parts Front-right View ITEM 1. 2. 3. 4. 5. 6. 7. 8. DDLLPP PPrroojjeeccttoorr -- UUsseerr''ss MMaannuuaall ...
... IR signal from remote control Lens Slide lens cap before use Lens cover Slide across to protect lens when not in use Height-adjuster button Push to release height adjuster SEE PAGE: 14 14 29 3 8 13 Important: Ventilation openings on the projector allow for good ...air circulation, which keeps the projector lamp cool. Do not obstruct any of Projector Parts Front-right View ITEM 1. 2. 3. 4. 5. 6. 7. 8. DDLLPP PPrroojjeeccttoorr -- UUsseerr''ss MMaannuuaall ...
User Guide
Page 10
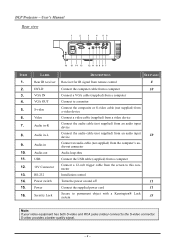
... in-R Audio in-L Audio-in Audio-out USB 12V Connector RS-232 Power switch Power Security Lock DESCRIPTION SEE PAGE: Receiver for IR signal from remote control 8 Connect the computer cable from a computer 10 Connect a VGA cable (supplied) from a computer Connect to a monitor Connect the composite or ...Audio loop-thru Connect the USB cable (supplied) from a computer Connect a 12-volt trigger cable from the screen to this connector Installation control Turns the power on and off 11 Connect the supplied power cord 11 Secure to permanent object with a Kensington® Lock system 33...
... in-R Audio in-L Audio-in Audio-out USB 12V Connector RS-232 Power switch Power Security Lock DESCRIPTION SEE PAGE: Receiver for IR signal from remote control 8 Connect the computer cable from a computer 10 Connect a VGA cable (supplied) from a computer Connect to a monitor Connect the composite or ...Audio loop-thru Connect the USB cable (supplied) from a computer Connect a 12-volt trigger cable from the screen to this connector Installation control Turns the power on and off 11 Connect the supplied power cord 11 Secure to permanent object with a Kensington® Lock system 33...
User Guide
Page 12
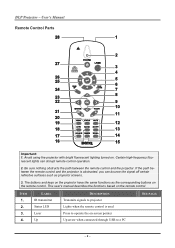
... on the remote control. The buttons and keys on the projector have the same functions as projector screens. 3. ITEM 1. 2. 3. 4. If the path between the remote control and the projector. This user's manual describes the functions based on the remote control. Be sure nothing obstructs the path between the remote control and the projector is used Press to projector Lights when the remote control is obstructed...
... on the remote control. The buttons and keys on the projector have the same functions as projector screens. 3. ITEM 1. 2. 3. 4. If the path between the remote control and the projector. This user's manual describes the functions based on the remote control. Be sure nothing obstructs the path between the remote control and the projector is used Press to projector Lights when the remote control is obstructed...
User Guide
Page 13
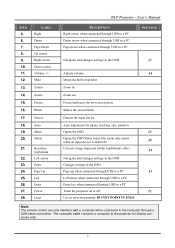
...Zoom in Zoom out Freeze/unfreezes the on -screen pointer. Left cursor 23. The computer cable connects a computer to a PC Turns the projector on or off 11 Use as on -screen picture Makes the screen blank Detects the input device Auto adjustment for phase, tracking, size, ... Down cursor Volume +/Mute Zoom+ ZoomFreeze Blank Source Auto Menu Status 21. Keystone top/bottom 22. Enter 24. Note: The remote control can only interface with a computer when connected to the computer through USB to the projector for display purposes only. - 7 - Left 26. Page Up 25.
...Zoom in Zoom out Freeze/unfreezes the on -screen pointer. Left cursor 23. The computer cable connects a computer to a PC Turns the projector on or off 11 Use as on -screen picture Makes the screen blank Detects the input device Auto adjustment for phase, tracking, size, ... Down cursor Volume +/Mute Zoom+ ZoomFreeze Blank Source Auto Menu Status 21. Keystone top/bottom 22. Enter 24. Note: The remote control can only interface with a computer when connected to the computer through USB to the projector for display purposes only. - 7 - Left 26. Page Up 25.
User Guide
Page 14
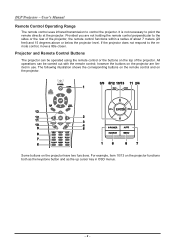
...''ss MMaannuuaall Remote Control Operating Range The remote control uses infrared transmission to the sides or the rear of the projector, the remote control functions within a radius of the projector. For example, item 10/13 on the projector are not holding the remote control perpendicular to control the projector. Provided you are limited in OSD menus. - 8 - DDLLPP PPrroojjeeccttoorr -- Projector and Remote Control Buttons The projector can be...
...''ss MMaannuuaall Remote Control Operating Range The remote control uses infrared transmission to the sides or the rear of the projector, the remote control functions within a radius of the projector. For example, item 10/13 on the projector are not holding the remote control perpendicular to control the projector. Provided you are limited in OSD menus. - 8 - DDLLPP PPrroojjeeccttoorr -- Projector and Remote Control Buttons The projector can be...
User Guide
Page 15
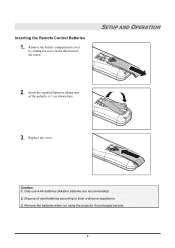
Inserting the Remote Control Batteries 1. Remove the batteries when not using the projector for prolonged periods. - 9 - Insert the supplied batteries taking note of the arrow. Remove the battery compartment cover by sliding the cover in the direction of the polarity (+/-) as shown here. 3. SETUP AND OPERATION 2. Replace the cover. Caution: 1. Dispose of used batteries according to local ordinance regulations. 3. Only use AAA batteries (Alkaline batteries are recommended). 2.
Inserting the Remote Control Batteries 1. Remove the batteries when not using the projector for prolonged periods. - 9 - Insert the supplied batteries taking note of the arrow. Remove the battery compartment cover by sliding the cover in the direction of the polarity (+/-) as shown here. 3. SETUP AND OPERATION 2. Replace the cover. Caution: 1. Dispose of used batteries according to local ordinance regulations. 3. Only use AAA batteries (Alkaline batteries are recommended). 2.
User Guide
Page 16
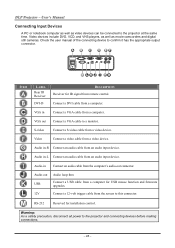
... computer's audio-out connector. VGA out S-video Connect a VGA cable to this connector. Audio in Connect a VGA cable from remote control. Audio-in -R Connect an audio cable from a computer. Audio-out USB Audio loop-thru Connect a USB cable from a computer for installation... a safety precaution, disconnect all power to confirm it has the appropriate output connector. Check the user manual of the connecting device to the projector and connecting devices before making connections. - 10 - Audio in Connect an audio cable from an audio input device. Video devices include DVD...
... computer's audio-out connector. VGA out S-video Connect a VGA cable to this connector. Audio in Connect a VGA cable from remote control. Audio-in -R Connect an audio cable from a computer. Audio-out USB Audio loop-thru Connect a USB cable from a computer for installation... a safety precaution, disconnect all power to confirm it has the appropriate output connector. Check the user manual of the connecting device to the projector and connecting devices before making connections. - 10 - Audio in Connect an audio cable from an audio input device. Video devices include DVD...
User Guide
Page 20
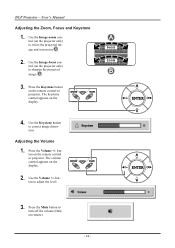
UUsseerr''ss MMaannuuaall Adjusting the Zoom, Focus and Keystone 1. The keystone control appears on the remote control or projector. button on the display. 4. Use the Image-zoom control (on remote). - 14 - Adjusting the Volume 1. Press the Mute button to turn off the volume (Only on the projector only) to sharpen the projected image A . 3. Use the Volume +/- Use the...
UUsseerr''ss MMaannuuaall Adjusting the Zoom, Focus and Keystone 1. The keystone control appears on the remote control or projector. button on the display. 4. Use the Image-zoom control (on remote). - 14 - Adjusting the Volume 1. Press the Mute button to turn off the volume (Only on the projector only) to sharpen the projected image A . 3. Use the Volume +/- Use the...
User Guide
Page 21
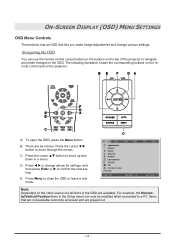
... on the remote control and on the top of the projector to navigate and make image adjustments and change values for settings, and then press Enter or X to confirm the new setting. For example, the Horizontal/Vertical Position items in the Setup menu can use the remote control cursor buttons ...or the buttons on the projector. A. Press the cursor W X button to move up and down in the OSD are grayed out. - 15 - Navigating ...
... on the remote control and on the top of the projector to navigate and make image adjustments and change values for settings, and then press Enter or X to confirm the new setting. For example, the Horizontal/Vertical Position items in the Setup menu can use the remote control cursor buttons ...or the buttons on the projector. A. Press the cursor W X button to move up and down in the OSD are grayed out. - 15 - Navigating ...
User Guide
Page 33
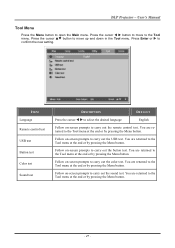
...button. Press the cursor ST button to carry out the color test. Follow on -screen prompts to carry out the sound test. ITEM Language Remote control test USB test Button test Color test Sound test DESCRIPTION Press the cursor W X to select the desired language DEFAULT English Follow on -screen prompts... to carry out the remote control test. Follow on -screen prompts to carry out the button test. Press Enter or X to the Tool menu at the end or by ...
...button. Press the cursor ST button to carry out the color test. Follow on -screen prompts to carry out the sound test. ITEM Language Remote control test USB test Button test Color test Sound test DESCRIPTION Press the cursor W X to select the desired language DEFAULT English Follow on -screen prompts... to carry out the remote control test. Follow on -screen prompts to carry out the button test. Press Enter or X to the Tool menu at the end or by ...
User Guide
Page 42
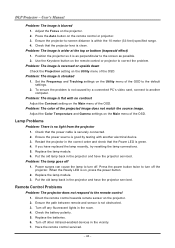
...power source is securely connected. 2. Replace the lamp module. 3. Put the old lamp back in the projector and have the projector serviced. Remote Control Problems Problem: The projector does not respond to turn off 1. Turn off any fluorescent lights in the room. 4. Adjust the ...the Power LED is not caused by testing with no light from the projector 1. Have the remote control serviced. - 36 - DDLLPP PPrroojjeeccttoorr -- Adjust the Color Temperature and Gamma settings on the remote control or projector. 3. UUsseerr''ss MMaannuuaall Problem: The image is not obstructed. 3. ...
...power source is securely connected. 2. Replace the lamp module. 3. Put the old lamp back in the projector and have the projector serviced. Remote Control Problems Problem: The projector does not respond to turn off 1. Turn off any fluorescent lights in the room. 4. Adjust the ...the Power LED is not caused by testing with no light from the projector 1. Have the remote control serviced. - 36 - DDLLPP PPrroojjeeccttoorr -- Adjust the Color Temperature and Gamma settings on the remote control or projector. 3. UUsseerr''ss MMaannuuaall Problem: The image is not obstructed. 3. ...
User Guide
Page 43
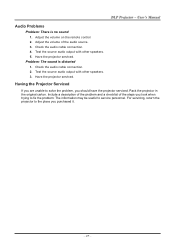
...audio output with other speakers. 5. Check the audio cable connection. 2. Have the projector serviced. Pack the projector in the original carton. Adjust the volume of the steps you should have the projector serviced. Test the source audio output with other speakers. 3. For servicing, return the... projector to solve the problem, you took when trying to fix the problem: The information may be useful to service personnel. Include a description of the problem and a checklist of the audio source. 3. Adjust the volume on the remote control. 2. UUsseerr''ss ...
...audio output with other speakers. 5. Check the audio cable connection. 2. Have the projector serviced. Pack the projector in the original carton. Adjust the volume of the steps you should have the projector serviced. Test the source audio output with other speakers. 3. For servicing, return the... projector to solve the problem, you took when trying to fix the problem: The information may be useful to service personnel. Include a description of the problem and a checklist of the audio source. 3. Adjust the volume on the remote control. 2. UUsseerr''ss ...

