

User Manual
Page 2
... 18 Connecting video devices 18 Connecting a computer 19 Connecting a monitor 19 Using the projector 20 Turning the projector on 20 Selecting an input source 21 Using the menus 22 Securing the projector 22 Using a security cable lock 22 Utilizing the password function 23 Adjusting the projected image 25 Adjusting the projection angle 25 Auto-adjusting the image 25 Fine-tuning the image size and clarity ..... 25 Correcting picture distortion 26 2 Table of contents Using the preset and user modes ...... 27...
... 18 Connecting video devices 18 Connecting a computer 19 Connecting a monitor 19 Using the projector 20 Turning the projector on 20 Selecting an input source 21 Using the menus 22 Securing the projector 22 Using a security cable lock 22 Utilizing the password function 23 Adjusting the projected image 25 Adjusting the projection angle 25 Auto-adjusting the image 25 Fine-tuning the image size and clarity ..... 25 Correcting picture distortion 26 2 Table of contents Using the preset and user modes ...... 27...
User Manual
Page 4
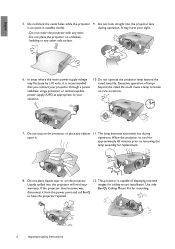
... lamps that you connect your images for replacement. 8. Do not operate the projector lamp beyond the rated life could cause a lamp to removing the lamp assembly for ceiling mount installation. The lamp becomes extremely hot during operation. It may fluctuate by ±10 volts, it from the power point and call BenQ to your sight. - Do not cover the projector with any other soft surface. 6. operation. In areas where the mains power supply...
... lamps that you connect your images for replacement. 8. Do not operate the projector lamp beyond the rated life could cause a lamp to removing the lamp assembly for ceiling mount installation. The lamp becomes extremely hot during operation. It may fluctuate by ±10 volts, it from the power point and call BenQ to your sight. - Do not cover the projector with any other soft surface. 6. operation. In areas where the mains power supply...

User Manual
Page 7
...lock compatible security cable and attach it down in the direction of the arrow as indicated in a closed car. • Dispose of used batteries according to the battery manufacturer's instructions and local environment regulations for your BenQ projector, so we strongly recommend that you use a proper fitting BenQ projector ceiling mount kit and that you use of the remote control.... To open the battery cover, turn the remote control over to view its attachment to negative. 3. This will slide off. 2. Remove any existing batteries (if necessary) and install two new AAA batteries...
...lock compatible security cable and attach it down in the direction of the arrow as indicated in a closed car. • Dispose of used batteries according to the battery manufacturer's instructions and local environment regulations for your BenQ projector, so we strongly recommend that you use a proper fitting BenQ projector ceiling mount kit and that you use of the remote control.... To open the battery cover, turn the remote control over to view its attachment to negative. 3. This will slide off. 2. Remove any existing batteries (if necessary) and install two new AAA batteries...

User Manual
Page 8
... The projector supports a wide variety of inputs for connection to your video and PC equipment, including component video, and composite video, as well as HDMI, PC, and an output trigger for connection to automated screen and environment lighting systems. • Professional calibration control To reach a higher standard of performance, the projector incorporates Expert Mode settings in its OSD menus, which requires professional calibration service from authorized installers...
... The projector supports a wide variety of inputs for connection to your video and PC equipment, including component video, and composite video, as well as HDMI, PC, and an output trigger for connection to automated screen and environment lighting systems. • Professional calibration control To reach a higher standard of performance, the projector incorporates Expert Mode settings in its OSD menus, which requires professional calibration service from authorized installers...

User Manual
Page 9
Lamp cover 3. Vent (heated air exhaust) 7. RJ45 LAN input jack 10. Mini B type USB port 13. Adjustable feet 20. Lens shift lever 5. Consult your dealer for how to trigger external devices such as an electric screen or light control, etc. Component Video inputs (BNC)/RGBHV 5 BNCs for connecting either RGB or component (YPbPr), SD or HD video signals. 16. Audio input jack Audio output jack 18. Kensington lock slot 19. Control panel (See "Control panel" on page...
Lamp cover 3. Vent (heated air exhaust) 7. RJ45 LAN input jack 10. Mini B type USB port 13. Adjustable feet 20. Lens shift lever 5. Consult your dealer for how to trigger external devices such as an electric screen or light control, etc. Component Video inputs (BNC)/RGBHV 5 BNCs for connecting either RGB or component (YPbPr), SD or HD video signals. 16. Audio input jack Audio output jack 18. Kensington lock slot 19. Control panel (See "Control panel" on page...
User Manual
Page 10
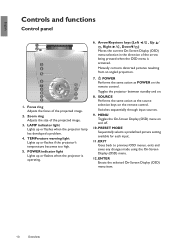
... a predefined picture setting available for each input. 11. English Controls and functions Control panel 1 2 3 4 5 6 7 10 6 6 8 11 6 9 12 1. ENTER Enacts the selected On-Screen Display (OSD) menu item. 10 Overview Toggles the projector between standby and on and off. 10. POWER indicator light Lights up or flashes when the projector lamp has developed a problem. 4. TEMPerature warning light Lights up or flashes if the projector's temperature becomes too high. 5. SOURCE Performs the same action as POWER on the remote control. Arrow/Keystone keys (Left...
... a predefined picture setting available for each input. 11. English Controls and functions Control panel 1 2 3 4 5 6 7 10 6 6 8 11 6 9 12 1. ENTER Enacts the selected On-Screen Display (OSD) menu item. 10 Overview Toggles the projector between standby and on and off. 10. POWER indicator light Lights up or flashes when the projector lamp has developed a problem. 4. TEMPerature warning light Lights up or flashes if the projector's temperature becomes too high. 5. SOURCE Performs the same action as POWER on the remote control. Arrow/Keystone keys (Left...
User Manual
Page 11
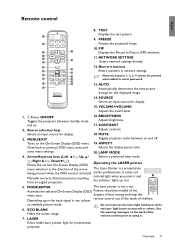
... to using it and the indicator lights up red. 5. LAMP MODE 4. Do not look into the laser light window or shine 6. ECO BLANK Hides the screen image. 7. Overview 11 TEST Displays the test pattern. 1 9. MUTE 3. aid for the displayed image. 14. See the warning messages on the back of the menu item. Remote control English 8. FREEZE 2 Freezes the projected image. 10. NETWORK SETTING 14 Enters network settings directly. 7 12. AUTO 12 Automatically determines the best picture timings...
... to using it and the indicator lights up red. 5. LAMP MODE 4. Do not look into the laser light window or shine 6. ECO BLANK Hides the screen image. 7. Overview 11 TEST Displays the test pattern. 1 9. MUTE 3. aid for the displayed image. 14. See the warning messages on the back of the menu item. Remote control English 8. FREEZE 2 Freezes the projected image. 10. NETWORK SETTING 14 Enters network settings directly. 7 12. AUTO 12 Automatically determines the best picture timings...
User Manual
Page 12
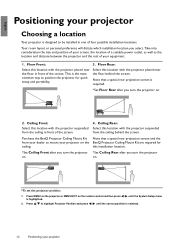
... the BenQ Projector Ceiling Mount Kit Note that a special rear projection screen is required. *Set Floor Rear after you select. on . 2. Take into consideration the size and position of your screen, the location of a suitable power outlet, as well as the location and distance between the projector and the rest of the screen. Select this installation location. *Set Ceiling Front after you turn the projector *Set Ceiling Rear after you turn the projector on the remote control...
... the BenQ Projector Ceiling Mount Kit Note that a special rear projection screen is required. *Set Floor Rear after you select. on . 2. Take into consideration the size and position of your screen, the location of a suitable power outlet, as well as the location and distance between the projector and the rest of the screen. Select this installation location. *Set Ceiling Front after you turn the projector *Set Ceiling Rear after you turn the projector on the remote control...

User Manual
Page 13
English Obtaining a preferred projected image size The distance from the projector lens to the screen, the zoom setting, and the video format each factors in the columns of "Projection distance [cm]" on page 16 for details. Be aware that these different screen sizes at the projection distance. This projector is 494 cm. Looking across this row shows that the 4.5 m measured projection distance will have to tilt it down or up...
English Obtaining a preferred projected image size The distance from the projector lens to the screen, the zoom setting, and the video format each factors in the columns of "Projection distance [cm]" on page 16 for details. Be aware that these different screen sizes at the projection distance. This projector is 494 cm. Looking across this row shows that the 4.5 m measured projection distance will have to tilt it down or up...
User Manual
Page 22
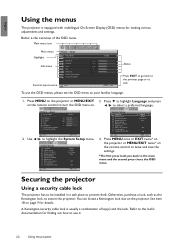
... Picture Mode Load Settings From Brightness Contrast Color Tint Sharpness Reset Picture Settings Rename User Mode Current input source Video + 50 + 50 + 50 0 + 3 Cinema EXIT Back Status Press EXIT to go back to the previous page or to prevent theft. Otherwise, purchase a lock, such as the Kensington lock, to highlight the System Setup menu. System Setup Language Splash Screen Projector Position Background Color Menu Settings Operation Settings Input Source Auto Source Search Closed Caption Standby Monitor Out Video English BenQ Floor Front Blue...
... Picture Mode Load Settings From Brightness Contrast Color Tint Sharpness Reset Picture Settings Rename User Mode Current input source Video + 50 + 50 + 50 0 + 3 Cinema EXIT Back Status Press EXIT to go back to the previous page or to prevent theft. Otherwise, purchase a lock, such as the Kensington lock, to highlight the System Setup menu. System Setup Language Splash Screen Projector Position Background Color Menu Settings Operation Settings Input Source Auto Source Search Closed Caption Standby Monitor Out Video English BenQ Floor Front Blue...
User Manual
Page 23
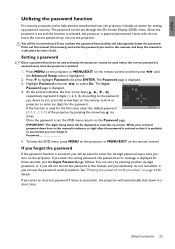
... six digits for the password. Press to select On. Input Password 4. Once the password is displayed. If you can not use the projector. Users who do not remember it, you enter the wrong password, the password error message is started. 1. Print out this manual (if necessary) and write the password you used in this manual, and keep the manual in this manual, and you desire to set through the On-Screen Display (OSD) menu. Highlight Password...
... six digits for the password. Press to select On. Input Password 4. Once the password is displayed. If you can not use the projector. Users who do not remember it, you enter the wrong password, the password error message is started. 1. Print out this manual (if necessary) and write the password you used in this manual, and keep the manual in this manual, and you desire to set through the On-Screen Display (OSD) menu. Highlight Password...
User Manual
Page 24
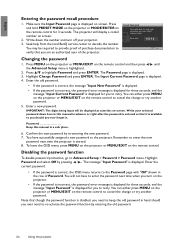
... old password. 24 Using the projector Seek help from the local BenQ service center to highlight Password and press ENTER. You can either press MENU on the projector or MENU/EXIT on -screen. Password Keep this manual in a safe place. 6. Disabling the password function To disable password protection, go to enter the new password next time the projector is displayed. 3. Highlight Password and select Off by re-entering the new password. 7. The message "Input Password" is displayed. 4. Highlight Change Password...
... old password. 24 Using the projector Seek help from the local BenQ service center to highlight Password and press ENTER. You can either press MENU on the projector or MENU/EXIT on -screen. Password Keep this manual in a safe place. 6. Disabling the password function To disable password protection, go to enter the new password next time the projector is displayed. 3. Highlight Password and select Off by re-entering the new password. 7. The message "Input Password" is displayed. 4. Highlight Change Password...

User Manual
Page 27
... is emphasized in a blackened (little light) environment. • Dynamic: Maximizes the brightness of the projected image. Each time you change the picture mode, the projector also changes the setting to -life images regardless of RGB colors to provide true-to the one to suit your need: • Using the remote control Press PRESET MODE on the projector or MODE/ENTER on that input and resolution will be altered via the available...
... is emphasized in a blackened (little light) environment. • Dynamic: Maximizes the brightness of the projected image. Each time you change the picture mode, the projector also changes the setting to -life images regardless of RGB colors to provide true-to the one to suit your need: • Using the remote control Press PRESET MODE on the projector or MODE/ENTER on that input and resolution will be altered via the available...

User Manual
Page 28
... highlight of the settings to the preset factory values: 1. The new name can change the other picture modes. Do not to be confused with the Reset Picture Settings function here with a key press on the remote control to highlight Reset and press ENTER. English Setting the User 1/User 2 mode There are two user-definable modes if the current available picture modes are not suitable for details. 28 Using the projector The first...
... highlight of the settings to the preset factory values: 1. The new name can change the other picture modes. Do not to be confused with the Reset Picture Settings function here with a key press on the remote control to highlight Reset and press ENTER. English Setting the User 1/User 2 mode There are two user-definable modes if the current available picture modes are not suitable for details. 28 Using the projector The first...

User Manual
Page 38
... opens. You can adjust the Lan Control Settings. Once set , access to manage the projector, configure the Lan control settings and secure access of it. protected. i iii ii iv v i. ii. ii To switch input source, click on page 11 for the Video signal. You can name the projector, keep track of its location and the person in the projector. 38 Using the projector The tools page allows you were using the remote control or control panel...
... opens. You can adjust the Lan Control Settings. Once set , access to manage the projector, configure the Lan control settings and secure access of it. protected. i iii ii iv v i. ii. ii To switch input source, click on page 11 for the Video signal. You can name the projector, keep track of its location and the person in the projector. 38 Using the projector The tools page allows you were using the remote control or control panel...

User Manual
Page 44
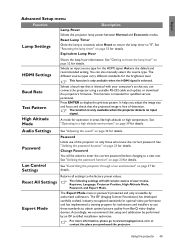
English Main menu Lamp Settings Sub-menu Lamp Power Reset Lamp Timer Equivalent Lamp Hour HDMI Settings HDMI Format Baud Rate Advanced Setup Information Test Pattern High Altitude Mode Audio Settings Password Lan Control Settings Reset All Settings Expert Mode Source Picture Mode Resolution Equivalent Lamp Hour Firmware Version SRS Mute Volume Treble Bass Power On/Off Ring Tone Password Change Password Control By DHCP Projector IP Address Subnet Mask Default Gateway DNS Server AMX Device Discovery Apply Options Normal/Economic Auto PC Signal Video Signal 2400/4800/9600/14400/19200/...
English Main menu Lamp Settings Sub-menu Lamp Power Reset Lamp Timer Equivalent Lamp Hour HDMI Settings HDMI Format Baud Rate Advanced Setup Information Test Pattern High Altitude Mode Audio Settings Password Lan Control Settings Reset All Settings Expert Mode Source Picture Mode Resolution Equivalent Lamp Hour Firmware Version SRS Mute Volume Treble Bass Power On/Off Ring Tone Password Change Password Control By DHCP Projector IP Address Subnet Mask Default Gateway DNS Server AMX Device Discovery Apply Options Normal/Economic Auto PC Signal Video Signal 2400/4800/9600/14400/19200/...
User Manual
Page 47
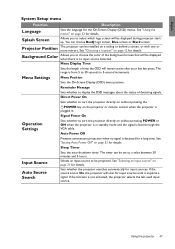
... screen, Blue screen or Black screen. If the source scan is detected for details. Background Color Allows you to display the OSD messages about the status of time the OSD will be set to 30 seconds in standby mode and the signal is plugged in. Signal Power On Operation Settings Sets whether to turn the projector directly on the projector or remote control when the projector is feed through the VGA cable. Auto Power Off Prevents unnecessary projection when no input source...
... screen, Blue screen or Black screen. If the source scan is detected for details. Background Color Allows you to display the OSD messages about the status of time the OSD will be set to 30 seconds in standby mode and the signal is plugged in. Signal Power On Operation Settings Sets whether to turn the projector directly on the projector or remote control when the projector is feed through the VGA cable. Auto Power Off Prevents unnecessary projection when no input source...
User Manual
Page 49
... the projected image is free of distortion. This function is password protected and only accessible by an ISF certified installation technician. Expert Mode The Expert Mode menu is intended for the HDMI signal. Reset Lamp Timer Once the lamp is only available when the projector detects no input signal. Selects an input source type for qualified service personnel. Press ENTER to "0". It helps you adjust the image size and focus and check that you purchased the projector. Change Password...
... the projected image is free of distortion. This function is password protected and only accessible by an ISF certified installation technician. Expert Mode The Expert Mode menu is intended for the HDMI signal. Reset Lamp Timer Once the lamp is only available when the projector detects no input signal. Selects an input source type for qualified service personnel. Press ENTER to "0". It helps you adjust the image size and focus and check that you purchased the projector. Change Password...

User Manual
Page 52
... Using Economic mode reduces system noise and power consumption. The projector will be set Auto Power Off, go to the Advanced Setup > Lamp Settings > Lamp Power menu and press / . • Setting Auto Power Off This function allows the projector to turn off automatically if no input source is highlighted. 2. Press MENU on the projector or MENU/EXIT on the remote control, and then press / until the Advanced Setup menu is detected after a set Economic mode, go to the System Setup > Operation Settings > Auto Power...
... Using Economic mode reduces system noise and power consumption. The projector will be set Auto Power Off, go to the Advanced Setup > Lamp Settings > Lamp Power menu and press / . • Setting Auto Power Off This function allows the projector to turn off automatically if no input source is highlighted. 2. Press MENU on the projector or MENU/EXIT on the remote control, and then press / until the Advanced Setup menu is detected after a set Economic mode, go to the System Setup > Operation Settings > Auto Power...
User Manual
Page 53
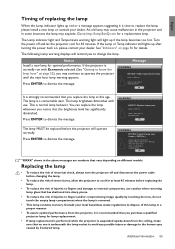
... the lamp hour" on different models. WARNING NOTICE: Replace lamp soon Lamp > XXXX hrs Order a new lamp at least 45 minutes before the projector will operate normally. English Timing of replacing the lamp When the Lamp indicator lights up red or a message appears suggesting it is recommended that you notice that has shattered into sharp pieces. • To reduce the risk of injuries to fingers and/or compromising image quality...
... the lamp hour" on different models. WARNING NOTICE: Replace lamp soon Lamp > XXXX hrs Order a new lamp at least 45 minutes before the projector will operate normally. English Timing of replacing the lamp When the Lamp indicator lights up red or a message appears suggesting it is recommended that you notice that has shattered into sharp pieces. • To reduce the risk of injuries to fingers and/or compromising image quality...


