

User Manual
Page 3
... 5 Setting up the display 6 Mounting the display 6 Parts of the display and their functions 8 Front panel (RP653 / RP703 8 Front panel (RP750 / 750K 8 Input/output terminals (RP653 / RP703 10 Input/output terminals (RP750 / RP750K 11 Remote control 12 Using the remote control 14 Connection 16 Connecting the VGA input 16 Connecting the touch module 16 Connecting the digital inputs 17 Connecting the AV inputs 18 Connecting the coaxial output 19 Connecting the video output 20 Connecting to serial port 21 Connecting power 22 Basic operations 23 Turning the display...
... 5 Setting up the display 6 Mounting the display 6 Parts of the display and their functions 8 Front panel (RP653 / RP703 8 Front panel (RP750 / 750K 8 Input/output terminals (RP653 / RP703 10 Input/output terminals (RP750 / RP750K 11 Remote control 12 Using the remote control 14 Connection 16 Connecting the VGA input 16 Connecting the touch module 16 Connecting the digital inputs 17 Connecting the AV inputs 18 Connecting the coaxial output 19 Connecting the video output 20 Connecting to serial port 21 Connecting power 22 Basic operations 23 Turning the display...

User Manual
Page 4
... Setting up the Internet connection 25 Updating software 28 Adjusting audio volume level 29 Important instructions for using the touch screen 34 Menu operations 35 One touch menu operation 35 Settings menu 35 System settings 39 Android system interface 41 Main interface 41 EZWrite 3.0 42 Product information 68 Specifications (RP653 / RP703 68 Specifications (RP750 / RP750K 70 Dimensions (RP653 73 Dimensions (RP703 74 Dimensions (RP750/750K 75 Supported input signal resolution (RP653/RP703/RP750)... 76 Supported input signal resolution (RP750K 78 Troubleshooting...
... Setting up the Internet connection 25 Updating software 28 Adjusting audio volume level 29 Important instructions for using the touch screen 34 Menu operations 35 One touch menu operation 35 Settings menu 35 System settings 39 Android system interface 41 Main interface 41 EZWrite 3.0 42 Product information 68 Specifications (RP653 / RP703 68 Specifications (RP750 / RP750K 70 Dimensions (RP653 73 Dimensions (RP703 74 Dimensions (RP750/750K 75 Supported input signal resolution (RP653/RP703/RP750)... 76 Supported input signal resolution (RP750K 78 Troubleshooting...

User Manual
Page 5
... plug of the power supply cord shall remain readily operable. No user serviceable parts inside . Refer servicing to ensure the best working condition. • Use only the accessories approved or recommended by a qualified technician. The exclamation point within the product's enclosure that may result in any openings and vents on an uneven, sloping or unstable surface (such as in serious personal injuries. Check...
... plug of the power supply cord shall remain readily operable. No user serviceable parts inside . Refer servicing to ensure the best working condition. • Use only the accessories approved or recommended by a qualified technician. The exclamation point within the product's enclosure that may result in any openings and vents on an uneven, sloping or unstable surface (such as in serious personal injuries. Check...

User Manual
Page 6
...plug has two blades and a third grounding prong. The wide blade or the third prong are provided for replacement of this display • This display weights more people available to help lift or a flat cart to transport the display to rain or moisture, does not operate normally, or has been dropped. Protect the power cord from being walked on the LCD panel...Read these instructions. 3. Clean only with the manufacturer's instructions. 8. If the provided plug does not fit into the apparatus, the apparatus has been exposed to its final location. • Keep the display horizontal as ...
...plug has two blades and a third grounding prong. The wide blade or the third prong are provided for replacement of this display • This display weights more people available to help lift or a flat cart to transport the display to rain or moisture, does not operate normally, or has been dropped. Protect the power cord from being walked on the LCD panel...Read these instructions. 3. Clean only with the manufacturer's instructions. 8. If the provided plug does not fit into the apparatus, the apparatus has been exposed to its final location. • Keep the display horizontal as ...
User Manual
Page 7
... of the display, and the bright light will make viewing the display more difficult than 30 minutes. Note: Under certain circumstances, condensation may remain constantly lit (in malfunction. • Confirm there is recommended to do so could result in red, blue or green) or unlit. See More settings on the screen as visible fixed lines and shades. Failure to enable Pixel Shift. If...
... of the display, and the bright light will make viewing the display more difficult than 30 minutes. Note: Under certain circumstances, condensation may remain constantly lit (in malfunction. • Confirm there is recommended to do so could result in red, blue or green) or unlit. See More settings on the screen as visible fixed lines and shades. Failure to enable Pixel Shift. If...

User Manual
Page 14
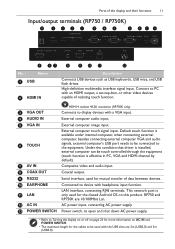
... computer VGA and audio signals, external computer's USB port needs to the equipment. Open and shut down AC power supply. This network port is effective in VGA and HDMI channel by default) Composite video and audio input. Name 1 USB 2 HDMI IN 3 VGA OUT 4 AUDIO IN 5 VGA IN 6 TOUCH 7 AV IN 8 COAX OUT 9 RS232 10 EARPHONE 11 LAN 12 POWER SWITCH 13 AC IN Description Connect USB devices such as USB keyboards, USB mice, and USB flash drives. External computer audio input. Serial interface, used...
... computer VGA and audio signals, external computer's USB port needs to the equipment. Open and shut down AC power supply. This network port is effective in VGA and HDMI channel by default) Composite video and audio input. Name 1 USB 2 HDMI IN 3 VGA OUT 4 AUDIO IN 5 VGA IN 6 TOUCH 7 AV IN 8 COAX OUT 9 RS232 10 EARPHONE 11 LAN 12 POWER SWITCH 13 AC IN Description Connect USB devices such as USB keyboards, USB mice, and USB flash drives. External computer audio input. Serial interface, used...
User Manual
Page 15
... computer image input. 6 TOUCH External computer touch signal input. Name 1 USB 2 HDMI IN Description Connects USB devices such as USB keyboards, USB mice, and USB flash drives. Under the condition that driver is installed, external computer can be touch controlled through the equipment (touch function is available under internal computer, when connecting external computer, besides connecting external computer VGA and audio signals, external computer's USB port needs to be used for the closed Android OS on this product. Default touch...
... computer image input. 6 TOUCH External computer touch signal input. Name 1 USB 2 HDMI IN Description Connects USB devices such as USB keyboards, USB mice, and USB flash drives. Under the condition that driver is installed, external computer can be touch controlled through the equipment (touch function is available under internal computer, when connecting external computer, besides connecting external computer VGA and audio signals, external computer's USB port needs to be used for the closed Android OS on this product. Default touch...

User Manual
Page 20
... failure image still exists, use another USB type B to respective input source. To view images from this input, press the INPUT button on the remote control to switch to A cable. • TOUCH must be used with a suitable audio cable. 3. Connect the VGA IN jack on a computer using the supplied USB cable. Connecting the touch module Connect the TOUCH (type B) jack on the display to the VGA output jack on the display to the USB port of the display supports easy Plug-and-Play operation. Avoid connecting the display...
... failure image still exists, use another USB type B to respective input source. To view images from this input, press the INPUT button on the remote control to switch to A cable. • TOUCH must be used with a suitable audio cable. 3. Connect the VGA IN jack on a computer using the supplied USB cable. Connecting the touch module Connect the TOUCH (type B) jack on the display to the VGA output jack on the display to the USB port of the display supports easy Plug-and-Play operation. Avoid connecting the display...

User Manual
Page 25
Connection 21 Connecting to serial port Directly connect the computer to connect central control equipment and machine, certain function of sound volume, etc. RS-232C cable Computer • The applicable cable is not supplied and should be controlled via central control equipment, such as: machine on/off, and adjustment of the machine can be purchased separately. • This connection is applicable to straight-through RS-232C cable only. • After using serial port line to RS232 ports on the input/output terminals.
Connection 21 Connecting to serial port Directly connect the computer to connect central control equipment and machine, certain function of sound volume, etc. RS-232C cable Computer • The applicable cable is not supplied and should be controlled via central control equipment, such as: machine on/off, and adjustment of the machine can be purchased separately. • This connection is applicable to straight-through RS-232C cable only. • After using serial port line to RS232 ports on the input/output terminals.

User Manual
Page 26
Never unscrew or remove any covers. There are no user serviceable parts in your region. • Only use extension cords or multiple outlet power boards. • There are dangerous voltages inside the display. Turn off the power and unplug the power cord if you use an appropriate power cord for your reference only. 22 Connection Connecting power Plug one end of the power cord into the Power jack on the display and the other end into...
Never unscrew or remove any covers. There are no user serviceable parts in your region. • Only use extension cords or multiple outlet power boards. • There are dangerous voltages inside the display. Turn off the power and unplug the power cord if you use an appropriate power cord for your reference only. 22 Connection Connecting power Plug one end of the power cord into the Power jack on the display and the other end into...
User Manual
Page 27
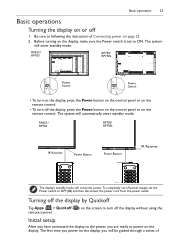
... mode. Before turning on or off the display without using the remote control. RP653 / RP703 RP750/ RP750k Power Switch Power Switch • To turn on the display, press the Power button on the control panel or on the display. The system will be guided through a series of Connecting power on the remote control. The first time you power on the display, you are ready to power on the remote control. • To turn off 1. Basic operations 23 Basic operations Turning the display...
... mode. Before turning on or off the display without using the remote control. RP653 / RP703 RP750/ RP750k Power Switch Power Switch • To turn on the display, press the Power button on the control panel or on the display. The system will be guided through a series of Connecting power on the remote control. The first time you power on the display, you are ready to power on the remote control. • To turn off 1. Basic operations 23 Basic operations Turning the display...

User Manual
Page 28
... with the BenQ screen. Switching input signals To select an input signal do either one of the following: • Press the INPUT button on the remote control. • Press the Menu button on the front panel. • Drag the General Setting menu up with your display and complete the initial setup. 1. Eye Care switches the display low blue light mode and activates the flicker free function. Tap Next on the back of Backlight is a software update available for...
... with the BenQ screen. Switching input signals To select an input signal do either one of the following: • Press the INPUT button on the remote control. • Press the Menu button on the front panel. • Drag the General Setting menu up with your display and complete the initial setup. 1. Eye Care switches the display low blue light mode and activates the flicker free function. Tap Next on the back of Backlight is a software update available for...

User Manual
Page 42
... the remote control or drag the knob to adjust the contrast. Menu Key Lock Description Press ENTER on the remote control or click the switch to adjust the hue. Options are Standard, Warm, or Cold. on the remote control or drag the knob to lock or unlock the buttons on the front panel of the display. 38 Menu operations • Press on the remote control and press ENTER on the remote control...
... the remote control or drag the knob to adjust the contrast. Menu Key Lock Description Press ENTER on the remote control or click the switch to adjust the hue. Options are Standard, Warm, or Cold. on the remote control or drag the knob to lock or unlock the buttons on the front panel of the display. 38 Menu operations • Press on the remote control and press ENTER on the remote control...

User Manual
Page 43
... to set a pixel shift preventing from image retention. Pixel Shift Press ENTER on the remote control or click the icon to view memory consumption of the display. Click to lock or unlock the remote control IR sensor on the front panel of the week. Menu operations 39 IR Lock Press ENTER on the remote control or click the switch to set visual preferences on Font size and Wallpaper. Power Schedule Press...
... to set a pixel shift preventing from image retention. Pixel Shift Press ENTER on the remote control or click the icon to view memory consumption of the display. Click to lock or unlock the remote control IR sensor on the front panel of the week. Menu operations 39 IR Lock Press ENTER on the remote control or click the switch to set visual preferences on Font size and Wallpaper. Power Schedule Press...

User Manual
Page 46
... then touch and drag over the areas on a drawing/annotation which you want to Saving files on the screen. There are Stopwatch / Timer, Buzzers, Draw, Scoreboard, and Team Post. Cooperation tools options are 3 size options: small, medium, and large. There are 12 color options which are red, pink, orange, yellow, light green, green, sky blue, dark blue, purple, white, grey, and black. Click...
... then touch and drag over the areas on a drawing/annotation which you want to Saving files on the screen. There are Stopwatch / Timer, Buzzers, Draw, Scoreboard, and Team Post. Cooperation tools options are 3 size options: small, medium, and large. There are 12 color options which are red, pink, orange, yellow, light green, green, sky blue, dark blue, purple, white, grey, and black. Click...

User Manual
Page 73
.../35.2/35.2 YES YES YES No No YES YES YES • Specifications and functions are subject to change without notice. • To make sure that the touch function works properly on Mac OS X 10.9, you are recommended to perform screen calibration first. Product information 69 Output Audio Computer Video Audio External speaker out (L/R) Audio W (Amp) Internal speaker Supply Power Consumption Max. Contact BenQ dealer for the required...
.../35.2/35.2 YES YES YES No No YES YES YES • Specifications and functions are subject to change without notice. • To make sure that the touch function works properly on Mac OS X 10.9, you are recommended to perform screen calibration first. Product information 69 Output Audio Computer Video Audio External speaker out (L/R) Audio W (Amp) Internal speaker Supply Power Consumption Max. Contact BenQ dealer for the required...
User Manual
Page 75
...8GB Android 4.2.1 Product information 71 Audio Audio W (Amp) Internal speaker Supply Power Consumption Max. T/B/ L/R (mm) Image setting Source/Volume Control Sharpness enhancement Dimming control (Adaptive Contrast) 10-bit color processing De-Interlacing / comb Filter Customized Classroom Mode Blank screen 10W x 2 YES 100 - 240V AC, 50 - 60 Hz RP750: 297W RP750K: 350W ≤...• Specifications and functions are subject to change without notice. • To make sure that the touch function works properly on Mac OS X 10.9, you are recommended to perform screen calibration first. ...
...8GB Android 4.2.1 Product information 71 Audio Audio W (Amp) Internal speaker Supply Power Consumption Max. T/B/ L/R (mm) Image setting Source/Volume Control Sharpness enhancement Dimming control (Adaptive Contrast) 10-bit color processing De-Interlacing / comb Filter Customized Classroom Mode Blank screen 10W x 2 YES 100 - 240V AC, 50 - 60 Hz RP750: 297W RP750K: 350W ≤...• Specifications and functions are subject to change without notice. • To make sure that the touch function works properly on Mac OS X 10.9, you are recommended to perform screen calibration first. ...

User Manual
Page 84
... loose cable connections? Check the power indicator of the Auto Adjust function is not satisfactory, use the Phase, Horizontal Pos. and Vertical Pos. 80 Troubleshooting Troubleshooting Problem No picture No sound The computer input image looks strange The control panel buttons do not work Solution Check the following : • Have you locked the control panel buttons? Refer to Supported input signal resolution (RP653/RP703/RP750) on page 76 and Supported input signal resolution (RP750K) on page 78 to let the display automatically optimize the display of computer image...
... loose cable connections? Check the power indicator of the Auto Adjust function is not satisfactory, use the Phase, Horizontal Pos. and Vertical Pos. 80 Troubleshooting Troubleshooting Problem No picture No sound The computer input image looks strange The control panel buttons do not work Solution Check the following : • Have you locked the control panel buttons? Refer to Supported input signal resolution (RP653/RP703/RP750) on page 76 and Supported input signal resolution (RP750K) on page 78 to let the display automatically optimize the display of computer image...
User Manual
Page 85
... phase position in direct sunlight. • Check for any devices (computer or personal digital assistant, PDA) nearby that transmit infrared signals which may cause interference to signal transmission between the remote control and the remote control sensor window. • Check that the remote control sensor window is not under strong fluorescent lighting, or in menu. • Check whether touch driver is installed and started. • Check whether the size of color, color is incorrect Display format...
... phase position in direct sunlight. • Check for any devices (computer or personal digital assistant, PDA) nearby that transmit infrared signals which may cause interference to signal transmission between the remote control and the remote control sensor window. • Check that the remote control sensor window is not under strong fluorescent lighting, or in menu. • Check whether touch driver is installed and started. • Check whether the size of color, color is incorrect Display format...

User Manual
Page 86
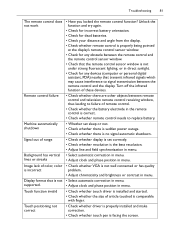
... headphone cable. 82 Troubleshooting No picture and no sound With horizontal or vertical stripes or image dithering No color, color is weak or image is weak With image but without sound Only one speaker has sound VGA output without sound • Check whether the machine is started state. • Check whether signal wire is well plugged, whether INPUT is corresponding to adjust volume. • Check whether audio line is connected correctly. • Adjust sound balance in menu. • Check whether signal wire...
... headphone cable. 82 Troubleshooting No picture and no sound With horizontal or vertical stripes or image dithering No color, color is weak or image is weak With image but without sound Only one speaker has sound VGA output without sound • Check whether the machine is started state. • Check whether signal wire is well plugged, whether INPUT is corresponding to adjust volume. • Check whether audio line is connected correctly. • Adjust sound balance in menu. • Check whether signal wire...


