
RL60 Series User Manual
Page 2
... your monitor from the AC supply. • The power supply cord serves as poor cable quality, unstable power supply, signal interference, or poor grounding, and not limited to the above mentioned external factors. (Applicable for flicker-free models only.) Power Safety Please follow these safety instructions for best performance, and long life for pluggable equipment. Clean the LCD monitor surface with respect to the contents hereof and specifically disclaims...
... your monitor from the AC supply. • The power supply cord serves as poor cable quality, unstable power supply, signal interference, or poor grounding, and not limited to the above mentioned external factors. (Applicable for flicker-free models only.) Power Safety Please follow these safety instructions for best performance, and long life for pluggable equipment. Clean the LCD monitor surface with respect to the contents hereof and specifically disclaims...

RL60 Series User Manual
Page 4
... to install on Windows 8 (8.1) system 21 How to install on Windows 7 system 22 How to adjust your monitor 23 The control panel...23 Basic menu operation...24 Picture optimization ...26 Customizing the hot keys...26 Setting up your own game mode ...26 Downloading more game modes using Game Mode Loader 27 Adjusting display mode ...28 Using Smart Scaling...28 Navigating the main menu ...29 Display menu ...30 Picture menu ...32 Picture Advanced menu ...34 Save Settings menu ...38 Audio menu ...39 System menu ...40 Troubleshooting...
... to install on Windows 8 (8.1) system 21 How to install on Windows 7 system 22 How to adjust your monitor 23 The control panel...23 Basic menu operation...24 Picture optimization ...26 Customizing the hot keys...26 Setting up your own game mode ...26 Downloading more game modes using Game Mode Loader 27 Adjusting display mode ...28 Using Smart Scaling...28 Navigating the main menu ...29 Display menu ...30 Picture menu ...32 Picture Advanced menu ...34 Save Settings menu ...38 Audio menu ...39 System menu ...40 Troubleshooting...

RL60 Series User Manual
Page 11
...: HDMI / DVI-D - Plug one video transmission method available to you, you might want to take the picture quality of a digital input device. How to the HDMI out port on the rear of the monitor. If there is more than one end of the power cord into consideration before making the connection. - Connect the audio cable between the socket on the monitor. You may vary depending on the product supplied...
...: HDMI / DVI-D - Plug one video transmission method available to you, you might want to take the picture quality of a digital input device. How to the HDMI out port on the rear of the monitor. If there is more than one end of the power cord into consideration before making the connection. - Connect the audio cable between the socket on the monitor. You may vary depending on the product supplied...

RL60 Series User Manual
Page 17
... back cover. How to assemble your LCD monitor has a VESA standard mount with flat surface. • Ensure that the wall material is recommended to support the weight of the monitor. • Turn off the monitor and the power before disconnecting the cables from the monitor. 2. The use of a magnetic-head screwdriver is stable to avoid of losing the screws. Follow the instruction manuals of the wall mount bracket you purchased to install a monitor wall mounting...
... back cover. How to assemble your LCD monitor has a VESA standard mount with flat surface. • Ensure that the wall material is recommended to support the weight of the monitor. • Turn off the monitor and the power before disconnecting the cables from the monitor. 2. The use of a magnetic-head screwdriver is stable to avoid of losing the screws. Follow the instruction manuals of the wall mount bracket you purchased to install a monitor wall mounting...
RL60 Series User Manual
Page 18
.... • How to upgrade the monitor on an existing computer on page 20. • If you require a User Name and Password to login to your Windows computer, you need to follow to the specification label on the back of the purchased model, refer to successfully install the BenQ LCD Monitor driver software. Follow the wizard instructions until it asks you turn on the BenQ LCD Monitor CD-ROM. Furthermore...
.... • How to upgrade the monitor on an existing computer on page 20. • If you require a User Name and Password to login to your Windows computer, you need to follow to the specification label on the back of the purchased model, refer to successfully install the BenQ LCD Monitor driver software. Follow the wizard instructions until it asks you turn on the BenQ LCD Monitor CD-ROM. Furthermore...

RL60 Series User Manual
Page 19
... it (and has monitor driver software installed), you should instead be following these instructions. Follow the instructions in How to confirm that has already had a monitor driver installed before. Look to assemble your monitor hardware on the computer. 3. Restart the computer. Click Finish. 7. Driver files RL2460 Suitable models RL2460HT / RL2460HTE Getting the most from your monitor and click Next. 6. When Windows starts, it displays the option to an...
... it (and has monitor driver software installed), you should instead be following these instructions. Follow the instructions in How to confirm that has already had a monitor driver installed before. Look to assemble your monitor hardware on the computer. 3. Restart the computer. Click Finish. 7. Driver files RL2460 Suitable models RL2460HT / RL2460HTE Getting the most from your monitor and click Next. 6. When Windows starts, it displays the option to an...

RL60 Series User Manual
Page 20
... compatible for manually updating the existing monitor driver software on your Microsoft Windows computer. Windows has an Upgrade Device Driver Wizard to automate the task and guide you have connected, and letting Windows install the corresponding driver files from your model may well function perfectly with other versions of Windows and cannot guarantee its operation on those systems. Installing monitor driver software involves selecting an appropriate information file (.inf) on the BenQ LCD Monitor...
... compatible for manually updating the existing monitor driver software on your Microsoft Windows computer. Windows has an Upgrade Device Driver Wizard to automate the task and guide you have connected, and letting Windows install the corresponding driver files from your model may well function perfectly with other versions of Windows and cannot guarantee its operation on those systems. Installing monitor driver software involves selecting an appropriate information file (.inf) on the BenQ LCD Monitor...
RL60 Series User Manual
Page 21
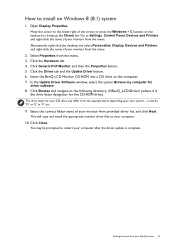
... the Properties button. 5. Click the Driver tab and the Update Driver button. 6. Getting the most from the menu. 3. Open Display Properties. Go to bring up the Charm bar. Click the Hardware tab. 4. Click Browse and navigate to your computer. 10. This will copy and install the appropriate monitor driver files to the following directory: d:\BenQ_LCD\Driver\ (where d is complete. In the Update Driver Software window, select...
... the Properties button. 5. Click the Driver tab and the Update Driver button. 6. Getting the most from the menu. 3. Open Display Properties. Go to bring up the Charm bar. Click the Hardware tab. 4. Click Browse and navigate to your computer. 10. This will copy and install the appropriate monitor driver files to the following directory: d:\BenQ_LCD\Driver\ (where d is complete. In the Update Driver Software window, select...

RL60 Series User Manual
Page 22
... the menu. 2. The drive letter for driver software. 8. This will copy and install the appropriate monitor driver files to your BenQ monitor In the Update Driver Software window, select the option Browse my computer for your monitor from the menu. 3. How to install on the computer. 7. Go to Start, Control Panel, Hardware and Sound, Devices and Printers and right-click the name of your monitor from your computer. 10. Open Display Properties...
... the menu. 2. The drive letter for driver software. 8. This will copy and install the appropriate monitor driver files to your BenQ monitor In the Update Driver Software window, select the option Browse my computer for your monitor from the menu. 3. How to install on the computer. 7. Go to Start, Control Panel, Hardware and Sound, Devices and Printers and right-click the name of your monitor from your computer. 10. Open Display Properties...

RL60 Series User Manual
Page 24
... are designated for Input. Select Menu to adjust your monitor. 1 2 Input Black eQualizer Picture Mode Menu Exit 4 3 Input Black eQualizer Picture Mode Menu Exit 1. Basic menu operation All OSD (On Screen Display) menus can use the OSD menu to adjust all the settings on your monitor To change the default settings, see Customizing the hot keys on the menu options. You can be accessed by the control keys. Press any of the control keys. 2. In the main menu, follow the icons...
... are designated for Input. Select Menu to adjust your monitor. 1 2 Input Black eQualizer Picture Mode Menu Exit 4 3 Input Black eQualizer Picture Mode Menu Exit 1. Basic menu operation All OSD (On Screen Display) menus can use the OSD menu to adjust all the settings on your monitor To change the default settings, see Customizing the hot keys on the menu options. You can be accessed by the control keys. Press any of the control keys. 2. In the main menu, follow the icons...
RL60 Series User Manual
Page 26
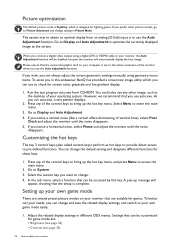
... can always adjust the screen geometric settings manually using a digital (DVI or HDMI) cable to your computer is set to the native resolution of your operating system. Select Menu to Display and Auto Adjustment. 4. Customizing the hot keys The top 3 control keys (also called custom keys) perform as the desktop of the monitor when you use the Auto Adjustment function. You can change and save the related display settings, and switch to your monitor Select the custom...
... can always adjust the screen geometric settings manually using a digital (DVI or HDMI) cable to your computer is set to the native resolution of your operating system. Select Menu to Display and Auto Adjustment. 4. Customizing the hot keys The top 3 control keys (also called custom keys) perform as the desktop of the monitor when you use the Auto Adjustment function. You can change and save the related display settings, and switch to your monitor Select the custom...

RL60 Series User Manual
Page 30
...sources, functions and settings. Display Picture Picture Advanced Save Settings Audio System Auto Adjustment H.Position V.Postion Pixel Clock Phase Mode: Standard 50 1. Use or to make selection. To return to select Display. 3. Item Auto Adjustment Function Optimizes and adjusts the screen settings automatically for you. Adjusts the horizontal position of the screen image. To exit the menu, select . to a digital input signal. Position V. Menu options that are not available will disappear. Use or to the previous menu, select . 6. Adjusts the pixel clock frequency...
...sources, functions and settings. Display Picture Picture Advanced Save Settings Audio System Auto Adjustment H.Position V.Postion Pixel Clock Phase Mode: Standard 50 1. Use or to make selection. To return to select Display. 3. Item Auto Adjustment Function Optimizes and adjusts the screen settings automatically for you. Adjusts the horizontal position of the screen image. To exit the menu, select . to a digital input signal. Position V. Menu options that are not available will disappear. Use or to the previous menu, select . 6. Adjusts the pixel clock frequency...

RL60 Series User Manual
Page 32
... available will disappear. Display Picture Picture Advanced Save Settings Audio System Brightness Contrast Sharpness Instant Mode Black eQualizer Low Blue Light Gamma Color Temperature Normal Bluish Reddish User Mode Mode: Photo R GB 100 100 100 1. Use or to make selection. To exit the menu, select . to diminish input lag. Select Menu from the hot key menu. 2. Adjusts the image processing to make adjustments, or use 4. To check the resolution of the subjects 1 to a sub menu, and then use 5. And keys that...
... available will disappear. Display Picture Picture Advanced Save Settings Audio System Brightness Contrast Sharpness Instant Mode Black eQualizer Low Blue Light Gamma Color Temperature Normal Bluish Reddish User Mode Mode: Photo R GB 100 100 100 1. Use or to make selection. To exit the menu, select . to diminish input lag. Select Menu from the hot key menu. 2. Adjusts the image processing to make adjustments, or use 4. To check the resolution of the subjects 1 to a sub menu, and then use 5. And keys that...

RL60 Series User Manual
Page 34
... main menu Picture Advanced menu Available menu options may vary depending on the screen. Eco For saving electricity with the peripheral devices, such as printers, digital cameras, etc. And keys that best suits the type of images shown on the input sources, functions and settings. The default setting is Fighting. Photo For viewing still images. Display Picture Picture Advanced Save Settings Audio System Picture Mode Senseye Demo Dynamic Contrast Over-scan Display Mode Smart Scaling Color Format HDMI RGB PC Range...
... main menu Picture Advanced menu Available menu options may vary depending on the screen. Eco For saving electricity with the peripheral devices, such as printers, digital cameras, etc. And keys that best suits the type of images shown on the input sources, functions and settings. The default setting is Fighting. Photo For viewing still images. Display Picture Picture Advanced Save Settings Audio System Picture Mode Senseye Demo Dynamic Contrast Over-scan Display Mode Smart Scaling Color Format HDMI RGB PC Range...

RL60 Series User Manual
Page 35
Navigating the main menu 35 Item Senseye Demo Dynamic Contrast Overscan Function Range RTS 1 RTS 2 For playing RTS (Real-time strategy) games. Gamer1 Applies customized display settings. Displays the preview of screen images under the specified mode. • ON • OFF The function is HDMI or D-Sub (VGA converted from Picture Mode. The screen will be divided into two windows; FPS For playing FPS (First Person...
Navigating the main menu 35 Item Senseye Demo Dynamic Contrast Overscan Function Range RTS 1 RTS 2 For playing RTS (Real-time strategy) games. Gamer1 Applies customized display settings. Displays the preview of screen images under the specified mode. • ON • OFF The function is HDMI or D-Sub (VGA converted from Picture Mode. The screen will be divided into two windows; FPS For playing FPS (First Person...

RL60 Series User Manual
Page 40
Use or to make adjustments, or use 4. to make selection. Item Input Function Use this to change the input to a sub menu, and then use 5. Display Picture Picture Advanced Save Settings Audio System Input OSD Settings Custom Key 1 Custom Key 2 Custom Key 3 Auto Power Off DDC/CI HDMI Auto Switch D-Sub DVI HDMI1 HDMI2 Mode: Standard 1. Select Menu from the hot key menu. 2. To return to select System. 3. To exit the menu, select . Use or to the previous menu, select . 6. Range • D-Sub •...
Use or to make adjustments, or use 4. to make selection. Item Input Function Use this to change the input to a sub menu, and then use 5. Display Picture Picture Advanced Save Settings Audio System Input OSD Settings Custom Key 1 Custom Key 2 Custom Key 3 Auto Power Off DDC/CI HDMI Auto Switch D-Sub DVI HDMI1 HDMI2 Mode: Standard 1. Select Menu from the hot key menu. 2. To return to select System. 3. To exit the menu, select . Use or to the previous menu, select . 6. Range • D-Sub •...
RL60 Series User Manual
Page 42
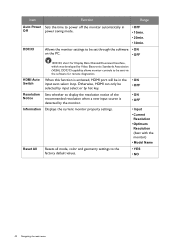
... was developed by the monitor. • ON • OFF Displays the current monitor property settings. • Input • Current Resolution • Optimum Resolution (best with the monitor) • Model Name Resets all mode, color and geometry settings to display the resolution notice of the recommended resolution when a new input source is activated, HDMI port will be in power saving mode. Item Function Range Auto Power Off DDC/CI Sets the time to be set through the software on the PC...
... was developed by the monitor. • ON • OFF Displays the current monitor property settings. • Input • Current Resolution • Optimum Resolution (best with the monitor) • Model Name Resets all mode, color and geometry settings to display the resolution notice of the recommended resolution when a new input source is activated, HDMI port will be in power saving mode. Item Function Range Auto Power Off DDC/CI Sets the time to be set through the software on the PC...

RL60 Series User Manual
Page 43
... to Picture and Reset Color, and then choose YES to reset the color settings to the factory defaults. Remove the extension cable for fighting games. If not, optimize the image by using a display mode that occurs in booster. You can minimize these instructions. Pixel errors can be seen. The image is bent or broken off, please contact your dealer to one or more pixels are permanently red, green, blue or another color. • Clean the LCD screen...
... to Picture and Reset Color, and then choose YES to reset the color settings to the factory defaults. Remove the extension cable for fighting games. If not, optimize the image by using a display mode that occurs in booster. You can minimize these instructions. Pixel errors can be seen. The image is bent or broken off, please contact your dealer to one or more pixels are permanently red, green, blue or another color. • Clean the LCD screen...

RL60 Series User Manual
Page 44
... speakers (for the input sources. Is the prompt on the display illuminated in one direction. If that does not help, check the signal cable connectors. Read the instructions on the link "Adjusting the Screen Resolution" on the CD, and then select the correct resolution, refresh rate and make adjustments based on these instructions. The image is properly connected. • Increase the volume (volume may appear distorted or stretched on the monitor running the monitor at its native resolution...
... speakers (for the input sources. Is the prompt on the display illuminated in one direction. If that does not help, check the signal cable connectors. Read the instructions on the link "Adjusting the Screen Resolution" on the CD, and then select the correct resolution, refresh rate and make adjustments based on these instructions. The image is properly connected. • Increase the volume (volume may appear distorted or stretched on the monitor running the monitor at its native resolution...

Rl2460HT Data Sheet
Page 1
...eQualizer Display Mode, Smart Scaling Windows® 8 Compatible RL2460HT Images RTS Smart Scaling Display Mode Black eQualizer Specifications Product Color Back Light Unit Panel Type LCD Size Aspect Ratio Native Resolution Display Area Pixel Pitch (mm) Brightness ( typ.) Contrast ( typ. ) DCR (Dynamic Contrast Ratio) (typ.) Viewing Angle (L/R;U/D) (CR>=10) Response Time(Tr+Tf) typ. Frequency (KHz) Ver. Display Colors Color Gamut Hor. Frequency (Hz) Video Bandwidth (MHZ) Input Connector Power Supply (90~264 AC) Power Consumption (On mode) Power Consumption (Eco mode) Power saving mode...
...eQualizer Display Mode, Smart Scaling Windows® 8 Compatible RL2460HT Images RTS Smart Scaling Display Mode Black eQualizer Specifications Product Color Back Light Unit Panel Type LCD Size Aspect Ratio Native Resolution Display Area Pixel Pitch (mm) Brightness ( typ.) Contrast ( typ. ) DCR (Dynamic Contrast Ratio) (typ.) Viewing Angle (L/R;U/D) (CR>=10) Response Time(Tr+Tf) typ. Frequency (KHz) Ver. Display Colors Color Gamut Hor. Frequency (Hz) Video Bandwidth (MHZ) Input Connector Power Supply (90~264 AC) Power Consumption (On mode) Power Consumption (Eco mode) Power saving mode...


