
User Manual
Page 8
... accessory) Video Cable: DP to change without prior notice. And the package contents may subject to mini DP Video Cable: HDMI Audio Cable (Optional accessory) USB Cable Hotkey Puck • Available accessories and the pictures shown here may need to transport the monitor. For cables that are not supplied with your...
... accessory) Video Cable: DP to change without prior notice. And the package contents may subject to mini DP Video Cable: HDMI Audio Cable (Optional accessory) USB Cable Hotkey Puck • Available accessories and the pictures shown here may need to transport the monitor. For cables that are not supplied with your...

User Manual
Page 9
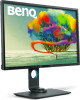
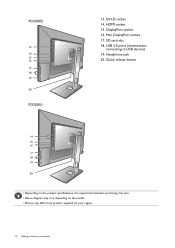
Hotkey Puck socket 5. USB 3.0 ports (downstream; connecting to the PC) 7. USB 3.0 port (upstream 1; Audio Line In 9. Kensington lock slot Getting to know your monitor 9 USB 3.0 port (upstream 2; AC power input jack 11. Power button 1 Back view 45 7 9 68 10 11 23 12 4. Cable management hole 10. Getting to know your monitor Front view 1. AC power switch 12. connecting to the PC) 8. Control buttons 3. Light sensor / Eco sensor 2. connecting to USB devices) 6.
Hotkey Puck socket 5. USB 3.0 ports (downstream; connecting to the PC) 7. USB 3.0 port (upstream 1; Audio Line In 9. Kensington lock slot Getting to know your monitor 9 USB 3.0 port (upstream 2; AC power input jack 11. Power button 1 Back view 45 7 9 68 10 11 23 12 4. Cable management hole 10. Getting to know your monitor Front view 1. AC power switch 12. connecting to the PC) 8. Control buttons 3. Light sensor / Eco sensor 2. connecting to USB devices) 6.
User Manual
Page 10
SD card slot 18. connecting to know your region. 10 Getting to USB devices) 19. Quick release button 14 15 16 17 18 19 20 • Depending on the product specifications, the supported resolution and timing may vary. • Above diagram may vary depending on the model. • Picture may differ from product supplied for your monitor USB 3.0 ports (downstream; Headphone jack 20. HDMI socket 15. Mini DisplayPort socket 17. DisplayPort socket 16. DVI-D socket 14. PD3200Q 13 14 15 16 17 18 19 20 PD3200U 13.
SD card slot 18. connecting to know your region. 10 Getting to USB devices) 19. Quick release button 14 15 16 17 18 19 20 • Depending on the product specifications, the supported resolution and timing may vary. • Above diagram may vary depending on the model. • Picture may differ from product supplied for your monitor USB 3.0 ports (downstream; Headphone jack 20. HDMI socket 15. Mini DisplayPort socket 17. DisplayPort socket 16. DVI-D socket 14. PD3200Q 13 14 15 16 17 18 19 20 PD3200U 13.

User Manual
Page 11
For detailed connection methods, see page 14 - 17. For cables that are for your reference only. PD3200Q PC/Notebook SD card USB peripherals (USB 3.0) Speakers USB peripherals (USB 3.0) PC/Notebook Getting to know your product, you can purchase them separately. Connection The following connection illustrations are not supplied with your monitor 11
For detailed connection methods, see page 14 - 17. For cables that are for your reference only. PD3200Q PC/Notebook SD card USB peripherals (USB 3.0) Speakers USB peripherals (USB 3.0) PC/Notebook Getting to know your product, you can purchase them separately. Connection The following connection illustrations are not supplied with your monitor 11

User Manual
Page 16
...headphones to the headphone jack found on the card to exchange files. Connect USB devices via the upstream USB port at the back). These downstream USB ports transmit data between the PC and the monitor (via other USB ports (downstream) on the monitor. Supported memory card formats are as ...follows: •SD / SDHC / SDXC •MMC 16 How to the monitor. Connect USB devices. Connect the memory card. This upstream USB port transmits data between the PC and the USB devices connected to...
...headphones to the headphone jack found on the card to exchange files. Connect USB devices via the upstream USB port at the back). These downstream USB ports transmit data between the PC and the monitor (via other USB ports (downstream) on the monitor. Supported memory card formats are as ...follows: •SD / SDHC / SDXC •MMC 16 How to the monitor. Connect USB devices. Connect the memory card. This upstream USB port transmits data between the PC and the USB devices connected to...

User Manual
Page 17
... Hotkey Puck to a power outlet just yet. 8. Picture may differ from product supplied for Hotkey Puck connection) on . 6. Plug the other end to the mini USB port (exclusively for your monitor hardware 17
... Hotkey Puck to a power outlet just yet. 8. Picture may differ from product supplied for Hotkey Puck connection) on . 6. Plug the other end to the mini USB port (exclusively for your monitor hardware 17

User Manual
Page 22
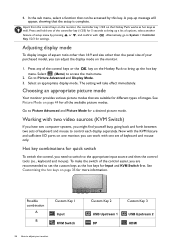
... viewing orientation, the display has to adjust the screen orientation. Pivot the display. Click to launch the Display Pilot Software (downloaded from www.BenQ.com), and check Auto Pivot to set the display to rotate the display. Fully extend the monitor and tilt it is enough room for ... your operating system for cables. You should be rotated 90 degrees. Select Portrait in Orientation, and apply the setting. Remove the connected USB peripherals and audio cable first. 22 How to the help document of the LCD display hitting the monitor base surface while it .
... viewing orientation, the display has to adjust the screen orientation. Pivot the display. Click to launch the Display Pilot Software (downloaded from www.BenQ.com), and check Auto Pivot to set the display to rotate the display. Fully extend the monitor and tilt it is enough room for ... your operating system for cables. You should be rotated 90 degrees. Select Portrait in Orientation, and apply the setting. Remove the connected USB peripherals and audio cable first. 22 How to the help document of the LCD display hitting the monitor base surface while it .

User Manual
Page 33
How to the previous menu. • Activates the hot key menu. • Selects menu items. Hotkey Puck is designed for BenQ LCD Monitor exclusively and is available for compatible models only. OK key ( ) • : Returns to adjust your monitor 33 No. For Down/Decrease adjustment. ) • : Enters sub menus. 6. Do not connect it to other devices with mini USB ports. Navigation buttons • : For Up/Increase adjustment. Name Description 5.
How to the previous menu. • Activates the hot key menu. • Selects menu items. Hotkey Puck is designed for BenQ LCD Monitor exclusively and is available for compatible models only. OK key ( ) • : Returns to adjust your monitor 33 No. For Down/Decrease adjustment. ) • : Enters sub menus. 6. Do not connect it to other devices with mini USB ports. Navigation buttons • : For Up/Increase adjustment. Name Description 5.
User Manual
Page 36
... mode To display images of aspect ratio other than 16:9 and size other than the panel size of your monitor Custom Key 2 Custom Key 3 USB Upstream 1 DP USB Upstream 2 HDMI See Customizing the hot keys on the monitor. 1. 4. Alternatively, go to bring up the hot key menu. The setting will appear, showing...
... mode To display images of aspect ratio other than 16:9 and size other than the panel size of your monitor Custom Key 2 Custom Key 3 USB Upstream 1 DP USB Upstream 2 HDMI See Customizing the hot keys on the monitor. 1. 4. Alternatively, go to bring up the hot key menu. The setting will appear, showing...

User Manual
Page 37
... information. 3. Select KVM switch. Working in PIP/PBP mode (for models with two computers and two monitors Video cable PC 1 PC 2 Video cable PC 1 PC 2 USB cable (type A to adjust your monitor 37 Video cable PC 1 / PC 2 PC 1 Video cable PC 2 Working with PIP/PBP function) on page 37 for PIP...
... information. 3. Select KVM switch. Working in PIP/PBP mode (for models with two computers and two monitors Video cable PC 1 PC 2 Video cable PC 1 PC 2 USB cable (type A to adjust your monitor 37 Video cable PC 1 / PC 2 PC 1 Video cable PC 2 Working with PIP/PBP function) on page 37 for PIP...

User Manual
Page 48
... hot key menu. 2. Select to go to make selection. Menu options that are not available will not appear on the menu. Use or to USB upstream 2 port. To exit the menu, select . And keys that are not available will be disabled and the corresponding OSD icons will disappear.... Switches the keyboard and mouse control over the input source / display connected to select a menu item. USB Upstream 2 To find out the location of USB upstream ports, see Back view on the input sources, functions and settings. For models without certain functions, their settings and ...
... hot key menu. 2. Select to go to make selection. Menu options that are not available will not appear on the menu. Use or to USB upstream 2 port. To exit the menu, select . And keys that are not available will be disabled and the corresponding OSD icons will disappear.... Switches the keyboard and mouse control over the input source / display connected to select a menu item. USB Upstream 2 To find out the location of USB upstream ports, see Back view on the input sources, functions and settings. For models without certain functions, their settings and ...

User Manual
Page 49
... items will not appear on the input sources, functions and settings. Mode: Standard Display Picture Picture Advanced Audio KVM Switch System Ergonomics Eco OSD Settings USB Awake Custom Key 1 Custom Key 2 Custom Key 3 DDC/CI DP Auto Switch HDMI Auto Switch Language Display Time OSD Lock 5 sec. 50 10 sec. 15...
... items will not appear on the input sources, functions and settings. Mode: Standard Display Picture Picture Advanced Audio KVM Switch System Ergonomics Eco OSD Settings USB Awake Custom Key 1 Custom Key 2 Custom Key 3 DDC/CI DP Auto Switch HDMI Auto Switch Language Display Time OSD Lock 5 sec. 50 10 sec. 15...

User Manual
Page 50
... function is in standby mode. The language options displayed on your OSD may differ from being accidentally changed. When this function is disabled, and the USB ports are not supplied with power while the monitor is activated, the OSD controls and hotkey operations will be disabled... To unlock the OSD controls, press and hold any key for 10 seconds. To keep supplying power to the USB ports in your region. • English • Français • Deutsch • Italiano • Español • Polski • Česky • Magyar &#...
... function is in standby mode. The language options displayed on your OSD may differ from being accidentally changed. When this function is disabled, and the USB ports are not supplied with power while the monitor is activated, the OSD controls and hotkey operations will be disabled... To unlock the OSD controls, press and hold any key for 10 seconds. To keep supplying power to the USB ports in your region. • English • Français • Deutsch • Italiano • Español • Polski • Česky • Magyar &#...

User Manual
Page 51
...custom key 3. 3 • Picture Mode • Input • DisplayPort • Mini DisplayPort • HDMI (PD3200Q only) • HDMI1 (PD3200U only) • HDMI2 (PD3200U only) • Rec. 709 • sRGB • CAD / CAM • Animation • Low Blue Light • Darkroom • Brightness... • DualView • KVM Switch • USB Upstream 1 • USB Upstream 2 • Contrast • Volume • Mute DDC/CI ...
...custom key 3. 3 • Picture Mode • Input • DisplayPort • Mini DisplayPort • HDMI (PD3200Q only) • HDMI1 (PD3200U only) • HDMI2 (PD3200U only) • Rec. 709 • sRGB • CAD / CAM • Animation • Low Blue Light • Darkroom • Brightness... • DualView • KVM Switch • USB Upstream 1 • USB Upstream 2 • Contrast • Volume • Mute DDC/CI ...

User Manual
Page 53
... Key 1. Range • Picture Mode • Input • DisplayPort • Mini DisplayPort • HDMI (PD3200Q only) • HDMI1 (PD3200U only) • HDMI2 (PD3200U only) • Rec. 709 • sRGB • CAD / CAM • Animation • Low Blue Light • Darkroom •... Brightness • DualView • KVM Switch • USB Upstream 1 • USB Upstream 2 • Contrast • Volume • Mute • YES •...
... Key 1. Range • Picture Mode • Input • DisplayPort • Mini DisplayPort • HDMI (PD3200Q only) • HDMI1 (PD3200U only) • HDMI2 (PD3200U only) • Rec. 709 • sRGB • CAD / CAM • Animation • Low Blue Light • Darkroom •... Brightness • DualView • KVM Switch • USB Upstream 1 • USB Upstream 2 • Contrast • Volume • Mute • YES •...

User Manual
Page 59
... built-in one direction. No sound can be muted or too low). • Remove your headphone and/or external speakers. (If they are USB-powered, check whether the USB connection is OK. • Increase the volume (volume may be locked, press and hold any key for 10 seconds. No sound can be...
... built-in one direction. No sound can be muted or too low). • Remove your headphone and/or external speakers. (If they are USB-powered, check whether the USB connection is OK. • Increase the volume (volume may be locked, press and hold any key for 10 seconds. No sound can be...
