User Manual
Page 4
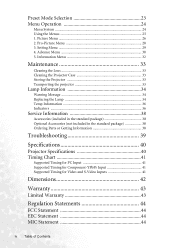
Setting Menu 29 4. Picture Menu 26 2. Information Menu 32 Maintenance 33 Cleaning the Lens 33 Cleaning the Projector Case 33 Storing the Projector 33 Transporting the projector 33 Lamp Information 34 Warning Message 34 Replacing the Lamp 34 Temp Information 36 Indicators ...36 Service Information 38 Accessories (included in the standard package 38 Optional Accessories (not...
Setting Menu 29 4. Picture Menu 26 2. Information Menu 32 Maintenance 33 Cleaning the Lens 33 Cleaning the Projector Case 33 Storing the Projector 33 Transporting the projector 33 Lamp Information 34 Warning Message 34 Replacing the Lamp 34 Temp Information 36 Indicators ...36 Service Information 38 Accessories (included in the standard package 38 Optional Accessories (not...
User Manual
Page 5
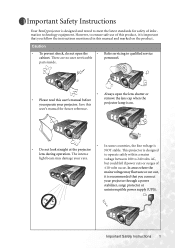
... To prevent shock, do not open the lens shutter or • Please read this remove the lens cap when the projector lamp is designed lens during operation. There are no user serviceable personnel. parts inside. • Always open the • ... Safety Instructions 1 Save this user's manual before you connect your projector through a power stabilizer, surge protector or uninterruptible power supply (UPS). Important Safety Instructions Your BenQ projector is • Do not look straight at the projector NOT stable. user's manual for future reference. • In ...
... To prevent shock, do not open the lens shutter or • Please read this remove the lens cap when the projector lamp is designed lens during operation. There are no user serviceable personnel. parts inside. • Always open the • ... Safety Instructions 1 Save this user's manual before you connect your projector through a power stabilizer, surge protector or uninterruptible power supply (UPS). Important Safety Instructions Your BenQ projector is • Do not look straight at the projector NOT stable. user's manual for future reference. • In ...
User Manual
Page 6
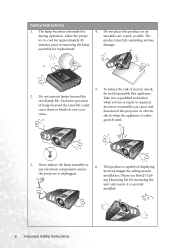
...the unit and ensure it to cool for replacement. 5. Please use BenQ's Ceiling Mounting Kit for ceiling mount installation. The lamp becomes extremely hot 4. Take it is required. This product is capable of the projector or electric shock when the appliance is unplugged. 6. do not ... for approximately 45 product may fall, sustaining serious minutes prior to break on an during operation. Do not operate lamps beyond the rated life could cause them to removing the lamp damage. Never replace the lamp assembly or any electronic components unless the projector is subse-
...the unit and ensure it to cool for replacement. 5. Please use BenQ's Ceiling Mounting Kit for ceiling mount installation. The lamp becomes extremely hot 4. Take it is required. This product is capable of the projector or electric shock when the appliance is unplugged. 6. do not ... for approximately 45 product may fall, sustaining serious minutes prior to break on an during operation. Do not operate lamps beyond the rated life could cause them to removing the lamp damage. Never replace the lamp assembly or any electronic components unless the projector is subse-
User Manual
Page 7
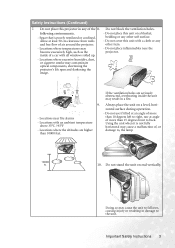
...smoke may become excessively high, such as the inside the unit may result in any of , or damage to the unit. Locations near the projector. - Locations where the altitudes are seriously obstructed, overheating inside of a car with all windows rolled up. - If the ventilation holes are...Safety Instructions (Continued) 7. Space that is not fully horizontal may cause the unit to fall over, causing injury or resulting in damage to , the lamp. 10. Important Safety Instructions 3 Do not place this unit with an ambient temperature above 35°C / 95°F - Do not stand the unit...
...smoke may become excessively high, such as the inside the unit may result in any of , or damage to the unit. Locations near the projector. - Locations where the altitudes are seriously obstructed, overheating inside of a car with all windows rolled up. - If the ventilation holes are...Safety Instructions (Continued) 7. Space that is not fully horizontal may cause the unit to fall over, causing injury or resulting in damage to , the lamp. 10. Important Safety Instructions 3 Do not place this unit with an ambient temperature above 35°C / 95°F - Do not stand the unit...
User Manual
Page 8
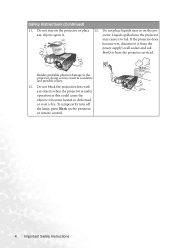
...deformed or even a fire. Besides probable physical damage to the projector, doing so may cause it from the power supply's wall socket and call BenQ to fail. To temporarily turn off the lamp, press Blank on the projector. Safety Instructions (Continued) 11. Do not block the projection... lens with any objects upon it. 13. Liquids spilled into the projector may result in accidents and possible injury...
...deformed or even a fire. Besides probable physical damage to the projector, doing so may cause it from the power supply's wall socket and call BenQ to fail. To temporarily turn off the lamp, press Blank on the projector. Safety Instructions (Continued) 11. Do not block the projection... lens with any objects upon it. 13. Liquids spilled into the projector may result in accidents and possible injury...
User Manual
Page 9
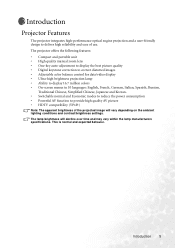
This is normal and expected behavior. The lamp brightness will vary depending on the ambient lighting conditions and contrast/brightness settings. Introduction 5 Introduction Projector Features The projector integrates high-performance optical engine projection and a user-friendly design to provide high quality AV picture... • HDTV compatibility (YPbPr) Note: The apparent brightness of use. The projector offers the following features: • Compact and portable unit • High quality manual zoom lens • One-key auto-...
This is normal and expected behavior. The lamp brightness will vary depending on the ambient lighting conditions and contrast/brightness settings. Introduction 5 Introduction Projector Features The projector integrates high-performance optical engine projection and a user-friendly design to provide high quality AV picture... • HDTV compatibility (YPbPr) Note: The apparent brightness of use. The projector offers the following features: • Compact and portable unit • High quality manual zoom lens • One-key auto-...
User Manual
Page 11
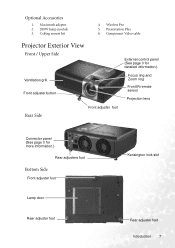
Macintosh adapter 2. 200W lamp module 3. Ceiling mount kit 4. Wireless Pro 5. Presentation Plus 6. Component Video cable Projector Exterior View Front / Upper Side Ventilation grill Front adjuster button Rear Side Front adjuster foot External control panel (See page 9 for detailed information.) Focus ring and Zoom ring Front IR remote sensor Projection lens Connector panel (See page 8 for more information.) Rear adjusters foot Bottom Side Front adjuster foot Lamp door Rear adjuster foot Kensington lock slot Rear adjuster foot Introduction 7 Optional Accessories 1.
Macintosh adapter 2. 200W lamp module 3. Ceiling mount kit 4. Wireless Pro 5. Presentation Plus 6. Component Video cable Projector Exterior View Front / Upper Side Ventilation grill Front adjuster button Rear Side Front adjuster foot External control panel (See page 9 for detailed information.) Focus ring and Zoom ring Front IR remote sensor Projection lens Connector panel (See page 8 for more information.) Rear adjusters foot Bottom Side Front adjuster foot Lamp door Rear adjuster foot Kensington lock slot Rear adjuster foot Introduction 7 Optional Accessories 1.
User Manual
Page 13
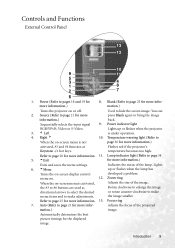
... 5 3 4 1 8 2 7 6 1. Zoom ring When the on or off. Auto (Refer to #6 buttons are used as Flashes red if the projector's Keystone -/+ hot keys. Automatically determines the best picture timings for more information.) Exits and saves the menu settings. 6. 6Menu Indicates the status of the... lamp. You can 2. Power (Refer to page 22 for more information.) Turns the projector on -screen menu is under operation. 10. Focus ring 7. Blank (Refer to pages 18 and...
... 5 3 4 1 8 2 7 6 1. Zoom ring When the on or off. Auto (Refer to #6 buttons are used as Flashes red if the projector's Keystone -/+ hot keys. Automatically determines the best picture timings for more information.) Exits and saves the menu settings. 6. 6Menu Indicates the status of the... lamp. You can 2. Power (Refer to page 22 for more information.) Turns the projector on -screen menu is under operation. 10. Focus ring 7. Blank (Refer to pages 18 and...

User Manual
Page 23
... complete or during the cooling process. 3. To protect the lamp, the projector will run for a few minutes to cool down , to protect the lamp, when you attempt to turn the projector off. 2. Operation 19 Press Power again to start the projector within hours, the fans will not respond to cool down process. Disconnect the power...
... complete or during the cooling process. 3. To protect the lamp, the projector will run for a few minutes to cool down , to protect the lamp, when you attempt to turn the projector off. 2. Operation 19 Press Power again to start the projector within hours, the fans will not respond to cool down process. Disconnect the power...
User Manual
Page 28
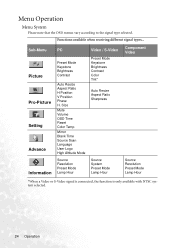
... Time Source Scan Language User Logo High Altitude Mode Source Resolution Preset Mode Lamp Hour Preset Mode Keystone Brightness Contrast Color Tint* Auto Resize Aspect Ratio Sharpness Source System Preset Mode Lamp Hour Component Video Source Resolution Preset Mode Lamp Hour *When a Video or S-Video signal is connected, the function is only available...
... Time Source Scan Language User Logo High Altitude Mode Source Resolution Preset Mode Lamp Hour Preset Mode Keystone Brightness Contrast Color Tint* Auto Resize Aspect Ratio Sharpness Source System Preset Mode Lamp Hour Component Video Source Resolution Preset Mode Lamp Hour *When a Video or S-Video signal is connected, the function is only available...
User Manual
Page 30
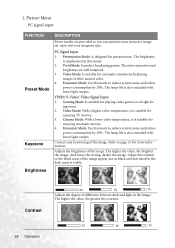
Vivid Mode: Is perfect for cinematic enjoyment displaying images in their natural color. 4. The lamp life is emphasized in the image. Corrects any keystoning of difference between dark and light in this mode to page 20 for enjoying cinematic movies. ...Keystone DESCRIPTION Preset modes are well-balanced. 3. The brightness is also extended with lower light output. The lamp life is visible. The color saturation and brightness are provided so you can optimize your projector image set-up to reduce system noise and reduce power consumption by 20%. The higher the value, the...
Vivid Mode: Is perfect for cinematic enjoyment displaying images in their natural color. 4. The lamp life is emphasized in the image. Corrects any keystoning of difference between dark and light in this mode to page 20 for enjoying cinematic movies. ...Keystone DESCRIPTION Preset modes are well-balanced. 3. The brightness is also extended with lower light output. The lamp life is visible. The color saturation and brightness are provided so you can optimize your projector image set-up to reduce system noise and reduce power consumption by 20%. The higher the value, the...

User Manual
Page 36
Preset Mode Shows the selected mode in Picture menu. Lamp Hour Displays the number of the input signal. As above . Shows the native resolution of hours the lamp has been used. Shows the Video input system format, NTSC, SECAM or PAL. As above . 32 Operation Video / S-Video signal input FUNCTION Source System Preset Mode Lamp Hour DESCRIPTION As above. 5. Information Menu This menu shows you the current operating status of the projector. PC signal / Component Video input FUNCTION Source Resolution DESCRIPTION Shows the current signal source.
Preset Mode Shows the selected mode in Picture menu. Lamp Hour Displays the number of the input signal. As above . Shows the native resolution of hours the lamp has been used. Shows the Video input system format, NTSC, SECAM or PAL. As above . 32 Operation Video / S-Video signal input FUNCTION Source System Preset Mode Lamp Hour DESCRIPTION As above. 5. Information Menu This menu shows you the current operating status of the projector. PC signal / Component Video input FUNCTION Source Resolution DESCRIPTION Shows the current signal source.

User Manual
Page 37
.... Then wipe the case. Please refer to do on the surface. Maintenance 33 Make sure the temperature and humidity of the projector except the lamp. Maintenance Your projector needs little maintenance. Cleaning the Projector Case Before you notice dirt or dust on a regular basis are within the recommended range for an extended time, please...
.... Then wipe the case. Please refer to do on the surface. Maintenance 33 Make sure the temperature and humidity of the projector except the lamp. Maintenance Your projector needs little maintenance. Cleaning the Projector Case Before you notice dirt or dust on a regular basis are within the recommended range for an extended time, please...
User Manual
Page 38
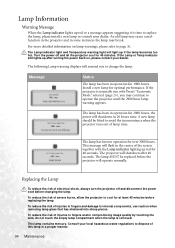
... a proper manner. 34 Maintenance Turn the power off and disconnect the power cord before replacing the lamp. To reduce the risk of this lamp in some instances the lamp may continue to operate the projector until the 2980 hour lamp warning appears. Consult your local hazardous waste regulations to dispose of severe burns, allow the...
... a proper manner. 34 Maintenance Turn the power off and disconnect the power cord before replacing the lamp. To reduce the risk of this lamp in some instances the lamp may continue to operate the projector until the 2980 hour lamp warning appears. Consult your local hazardous waste regulations to dispose of severe burns, allow the...

User Manual
Page 39
... in locations where water might splash on with the lamp cover removed. Pulling it , or near flammable materials. Step 6. Do not over . Maintenance 35 Step 5. Do not place the lamp in the projector. Insert a new lamp. Re-install the lamp cover and tighten the screw. Then loosen the screws... and remove the lamp cover. Move the latch to the projector. It is removed. Lift the handle so that it could cause ...
... in locations where water might splash on with the lamp cover removed. Pulling it , or near flammable materials. Step 6. Do not over . Maintenance 35 Step 5. Do not place the lamp in the projector. Insert a new lamp. Re-install the lamp cover and tighten the screw. Then loosen the screws... and remove the lamp cover. Move the latch to the projector. It is removed. Lift the handle so that it could cause ...
User Manual
Page 40
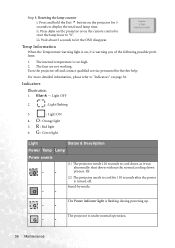
... - : Light OFF 2. : Light flashing 3. : Light ON 4. process. Resetting the lamp counter i. G : Green light Light Status & Description Power Temp Lamp Power events (1) The projector needs 110 seconds to display the total used lamp time. O : Orange light 5. For more detailed information, please refer to "Indicators" on the projector for 110 seconds after the power is too high...
... - : Light OFF 2. : Light flashing 3. : Light ON 4. process. Resetting the lamp counter i. G : Green light Light Status & Description Power Temp Lamp Power events (1) The projector needs 110 seconds to display the total used lamp time. O : Orange light 5. For more detailed information, please refer to "Indicators" on the projector for 110 seconds after the power is too high...

User Manual
Page 41
... to re-start - Please contact your dealer for assistance. The projector has shutdown automatically. If you try to cool down. the projector, it will shutdown again. R O the projector, it will shutdown again. The projector has shutdown automatically. Light Status & Description Power Temp Lamp Lamp events - - (1) The projector needs 110 seconds to re-start - If you try to...
... to re-start - Please contact your dealer for assistance. The projector has shutdown automatically. If you try to cool down. the projector, it will shutdown again. R O the projector, it will shutdown again. The projector has shutdown automatically. Light Status & Description Power Temp Lamp Lamp events - - (1) The projector needs 110 seconds to re-start - If you try to...
User Manual
Page 42
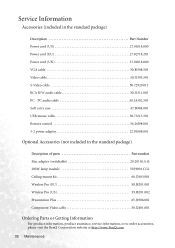
... cable 50.J1311.001 PC - Service Information Accessories (included in the standard package) Description of parts Part number Mac adapter (switchable 20.20118.A15 200W lamp module 59.J9901.CG1 Ceiling mount kit 60.J7683.001 Wireless Pro (EU 59.J8201.001 Wireless Pro (US 59.J8201.002 Presentation Plus 65... Component Video cable 50.J2401.001 Ordering Parts or Getting Information For product information, product assistance, service information, or to order accessories, please visit the BenQ Corporation website at http://www...
... cable 50.J1311.001 PC - Service Information Accessories (included in the standard package) Description of parts Part number Mac adapter (switchable 20.20118.A15 200W lamp module 59.J9901.CG1 Ceiling mount kit 60.J7683.001 Wireless Pro (EU 59.J8201.001 Wireless Pro (US 59.J8201.002 Presentation Plus 65... Component Video cable 50.J2401.001 Ordering Parts or Getting Information For product information, product assistance, service information, or to order accessories, please visit the BenQ Corporation website at http://www...
User Manual
Page 44
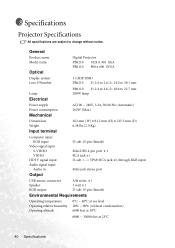
... name Model name Optical Digital Projector PB6210 1024 x 768 XGA PB6110 800 x 600 SVGA Display system Lens F/Number 1-CHIP DMD PB6210 F=2.4 to 2.6, f= 24.0 to 29.1 mm Lamp Electrical PB6110 F=2.4 to 2.6, f= 18.6 to change without condensation) 6000 feet at 30°C 6000 ~ 10000 feet at 23°C 40 Specifications Specifications Projector Specifications All specifications are subject to...
... name Model name Optical Digital Projector PB6210 1024 x 768 XGA PB6110 800 x 600 SVGA Display system Lens F/Number 1-CHIP DMD PB6210 F=2.4 to 2.6, f= 24.0 to 29.1 mm Lamp Electrical PB6110 F=2.4 to 2.6, f= 18.6 to change without condensation) 6000 feet at 30°C 6000 ~ 10000 feet at 23°C 40 Specifications Specifications Projector Specifications All specifications are subject to...

