User Manual
Page 3
... 10 Installing or replacing the remote control battery 10 Positioning your projector 11 Choosing a location 11 Obtaining a preferred projected image size 12 Connection 14 Connecting to a laptop or desktop computer 14 Connecting equipment to the Component Video input . 15 Connecting Video and S-Video devices 15 Operation 17 Start up 17 Utilizing the password function 17 Adjusting the image 19 Adjusting the height 19 Auto-adjusting the image 19 Fine-tuning the image size and clarity 19 Correcting keystone 20 Switching input signals 21...
... 10 Installing or replacing the remote control battery 10 Positioning your projector 11 Choosing a location 11 Obtaining a preferred projected image size 12 Connection 14 Connecting to a laptop or desktop computer 14 Connecting equipment to the Component Video input . 15 Connecting Video and S-Video devices 15 Operation 17 Start up 17 Utilizing the password function 17 Adjusting the image 19 Adjusting the height 19 Auto-adjusting the image 19 Fine-tuning the image size and clarity 19 Correcting keystone 20 Switching input signals 21...
User Manual
Page 4
... Warning message 30 Replacing the lamp 30 Temperature information 32 Indicators 32 Service information 34 Accessories (included in the standard package 34 Alternative accessories (vary by regions 34 Optional accessories (not included in the standard package 34 Ordering parts or getting information 34 Troubleshooting 35 Specifications 36 Projector specifications 36 Dimensions 37 Timing chart 38 Supported timing for PC input 38 Supported timing for Component-YPbPr Input 38 Supported timing for Video...
... Warning message 30 Replacing the lamp 30 Temperature information 32 Indicators 32 Service information 34 Accessories (included in the standard package 34 Alternative accessories (vary by regions 34 Optional accessories (not included in the standard package 34 Ordering parts or getting information 34 Troubleshooting 35 Specifications 36 Projector specifications 36 Dimensions 37 Timing chart 38 Supported timing for PC input 38 Supported timing for Component-YPbPr Input 38 Supported timing for Video...
User Manual
Page 5
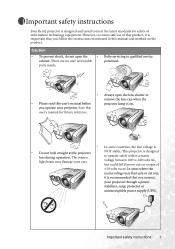
... connect your projector through a power stabilizer, surge protector or uninterruptible power supply (UPS). Save this user's manual before projector lamp is important that you operate your eyes. In areas where the mains voltage may damage your projector. However, to ensure safe use of ±10 volts occur. Important safety instructions Your BenQ projector is • Do not look straight at the projector lens during operation. The intense light beam...
... connect your projector through a power stabilizer, surge protector or uninterruptible power supply (UPS). Save this user's manual before projector lamp is important that you operate your eyes. In areas where the mains voltage may damage your projector. However, to ensure safe use of ±10 volts occur. Important safety instructions Your BenQ projector is • Do not look straight at the projector lens during operation. The intense light beam...
User Manual
Page 8
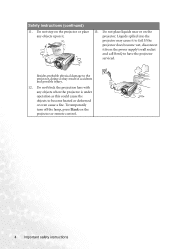
... instructions (continued) 11. To temporarily turn off the lamp, press Blank on the projector. Besides probable physical damage to have the projector serviced. Do not place liquids near or on the projector or remote control. 4 Important safety instructions Do not block the projection lens with any objects upon it to become wet, disconnect it from the power supply's wall socket and call BenQ to the projector...
... instructions (continued) 11. To temporarily turn off the lamp, press Blank on the projector. Besides probable physical damage to have the projector serviced. Do not place liquids near or on the projector or remote control. 4 Important safety instructions Do not block the projection lens with any objects upon it to become wet, disconnect it from the power supply's wall socket and call BenQ to the projector...
User Manual
Page 9
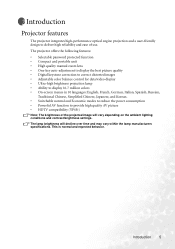
...) Note: The brightness of use. The projector offers the following features: • Selectable password protected function • Compact and portable unit • High quality manual zoom lens • One-key auto-adjustment to display the best picture quality • Digital keystone correction to correct distorted images • Adjustable color balance control for data/video display • Ultra-high brightness projection lamp • Ability to display 16.7 million colors • On-screen menus in 10 languages: English...
...) Note: The brightness of use. The projector offers the following features: • Selectable password protected function • Compact and portable unit • High quality manual zoom lens • One-key auto-adjustment to display the best picture quality • Digital keystone correction to correct distorted images • Adjustable color balance control for data/video display • Ultra-high brightness projection lamp • Ability to display 16.7 million colors • On-screen menus in 10 languages: English...
User Manual
Page 10
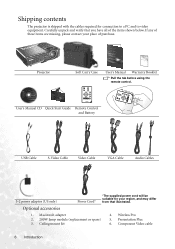
.... Projector Soft Carry Case User's Manual Warranty Booklet Pull the tab before using the remote control. Presentation Plus 6. User's Manual CD Quick Start Guide Remote Control and Battery USB Cable S-Video Cable Video Cable VGA Cable Audio Cables 3-2 power adaptor (US only) Power Cord* *The supplied power cord will be suitable for connection to a PC and to video equipment. Component Video cable 6 Introduction Carefully unpack and verify that illustrated. Optional accessories 1. Wireless Pro 5. Ceiling mount kit 4. Macintosh adapter 2. 200W lamp module (replacement or...
.... Projector Soft Carry Case User's Manual Warranty Booklet Pull the tab before using the remote control. Presentation Plus 6. User's Manual CD Quick Start Guide Remote Control and Battery USB Cable S-Video Cable Video Cable VGA Cable Audio Cables 3-2 power adaptor (US only) Power Cord* *The supplied power cord will be suitable for connection to a PC and to video equipment. Component Video cable 6 Introduction Carefully unpack and verify that illustrated. Optional accessories 1. Wireless Pro 5. Ceiling mount kit 4. Macintosh adapter 2. 200W lamp module (replacement or...
User Manual
Page 12
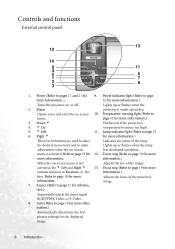
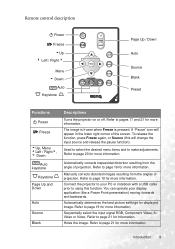
... the projector's 4. 5 Up temperature becomes too high. 5. 3 Left 11. mation.) Automatically determines the best picture settings for more information. 7. tion.) Sequentially selects the input signal RGB/YPbPr, Video, or S-Video. 8. Opens, saves and exits the on -screen has developed a problem. Adjusts the focus of the lamp. page 32 for the displayed image. 8 Introduction Lights up or flashes when the 2. Lights up or flashes when the lamp adjustments when the on -screen 10. menu is activated. Zoom...
... the projector's 4. 5 Up temperature becomes too high. 5. 3 Left 11. mation.) Automatically determines the best picture settings for more information. 7. tion.) Sequentially selects the input signal RGB/YPbPr, Video, or S-Video. 8. Opens, saves and exits the on -screen has developed a problem. Adjusts the focus of the lamp. page 32 for the displayed image. 8 Introduction Lights up or flashes when the 2. Lights up or flashes when the lamp adjustments when the on -screen 10. menu is activated. Zoom...
User Manual
Page 13
... will change the input source and release the pause function). Automatically corrects trapezoidal distortion resulting from the angles of projection. Connect the projector to pages 17 and 21 for displayed image. Automatically determines the best picture settings for more information. Introduction 9 Remote control description II Power II/ Freeze 5Up 3 Left / Right 4 Menu 6 Down AUTO Auto Keystone Page Up / Down Auto Source Blank Preset Functions II Power II/ Freeze 5Up, Menu 3Left...
... will change the input source and release the pause function). Automatically corrects trapezoidal distortion resulting from the angles of projection. Connect the projector to pages 17 and 21 for displayed image. Automatically determines the best picture settings for more information. Introduction 9 Remote control description II Power II/ Freeze 5Up 3 Left / Right 4 Menu 6 Down AUTO Auto Keystone Page Up / Down Auto Source Blank Preset Functions II Power II/ Freeze 5Up, Menu 3Left...
User Manual
Page 14
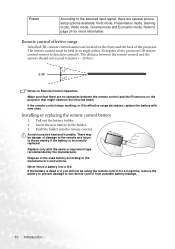
... of the projector's IR remote control sensors to function correctly. Avoid excessive heat and humidity. Never throw a battery into the remote control. Insert the new battery in the holder. 3. Pull out the battery holder. 2. Replace only with new ones. Remote control effective range Infra Red (IR) remote control sensors are several picture setup options available: Vivid mode, Presentation mode, Gaming mode, Video mode, Cinema mode and Economic mode. Installing or replacing the remote control battery 1. There...
... of the projector's IR remote control sensors to function correctly. Avoid excessive heat and humidity. Never throw a battery into the remote control. Insert the new battery in the holder. 3. Pull out the battery holder. 2. Replace only with new ones. Remote control effective range Infra Red (IR) remote control sensors are several picture setup options available: Vivid mode, Presentation mode, Gaming mode, Video mode, Cinema mode and Economic mode. Installing or replacing the remote control battery 1. There...
User Manual
Page 15
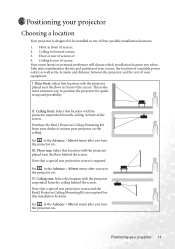
... be installed in front of screen; 2. Set in the Advance > Mirror menu after you turn the projector on the ceiling. Set in the Advance > Mirror menu after you select. Purchase the BenQ Projector Ceiling Mounting Kit from the ceiling behind the screen. Note that a special rear projection screen and the BenQ Projector Ceiling Mounting Kit are required for this location with the projector suspended from your dealer to position the projector for quick setup and...
... be installed in front of screen; 2. Set in the Advance > Mirror menu after you turn the projector on the ceiling. Set in the Advance > Mirror menu after you select. Purchase the BenQ Projector Ceiling Mounting Kit from the ceiling behind the screen. Note that a special rear projection screen and the BenQ Projector Ceiling Mounting Kit are required for this location with the projector suspended from your dealer to position the projector for quick setup and...
User Manual
Page 16
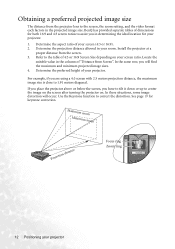
... minimum projected image sizes. 4. Determine the aspect ratio of "Distance from Screen". Obtaining a preferred projected image size The distance from the projector lens to correct the distortion. BenQ has provided separate tables of dimensions for keystone correction. Determine the projection distance allowed in the projected image size. Refer to 1.91 meters diagonal. Determine the preferred height of 4:3 or 16:9 Screen Size depending on . Use the Keystone function to the screen, the zoom setting, and the video...
... minimum projected image sizes. 4. Determine the aspect ratio of "Distance from Screen". Obtaining a preferred projected image size The distance from the projector lens to correct the distortion. BenQ has provided separate tables of dimensions for keystone correction. Determine the projection distance allowed in the projected image size. Refer to 1.91 meters diagonal. Determine the preferred height of 4:3 or 16:9 Screen Size depending on . Use the Keystone function to the screen, the zoom setting, and the video...
User Manual
Page 21
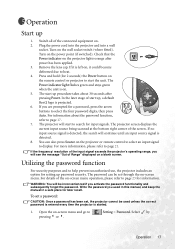
... display. The password can also press Source on -screen menu. Remove the lens cap. The Power indicator light flashes green and stays green when the unit is started. 1. If you activate the password functionality and subsequently forget the password. The projector will be set , the projector cannot be used in this manual, and keep the manual in a safe place for information. WARNING: You will start the unit. Setting > Password. Select by Operation 17 Operation Start up procedure takes about the password...
... display. The password can also press Source on -screen menu. Remove the lens cap. The Power indicator light flashes green and stays green when the unit is started. 1. If you activate the password functionality and subsequently forget the password. The projector will be set , the projector cannot be used in this manual, and keep the manual in a safe place for information. WARNING: You will start the unit. Setting > Password. Select by Operation 17 Operation Start up procedure takes about the password...
User Manual
Page 22
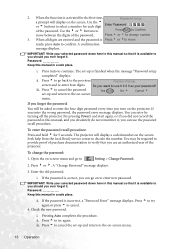
... local BenQ service center to continue. Open the on -screen menu. If the password is Press 3 or 4to move between the digits of the projector. Press 5 to Setting > Change Password. 2. Pressing Auto completes the procedure. When all digits are an authorized user of the password.. Press Auto to decode the number. ii. Check the new password. When the function is incorrect, a "Password Error" message displays. If the password is activated for the first time, Password Setup a prompt will display...
... local BenQ service center to continue. Open the on -screen menu. If the password is Press 3 or 4to move between the digits of the projector. Press 5 to Setting > Change Password. 2. Pressing Auto completes the procedure. When all digits are an authorized user of the password.. Press Auto to decode the number. ii. Check the new password. When the function is incorrect, a "Password Error" message displays. If the password is activated for the first time, Password Setup a prompt will display...

User Manual
Page 23
... picture quality. Then sharpen the image by rotating the focus ring. If the screen and the projector are not perpendicular to the size 2. To do this situation, adjust the value of Keystone in Intelligent Auto Adjustment function will drop into the lens while the lamp is 1 on the remote control. Fine-tuning the image size and clarity 1. Auto-adjusting the image In some cases, you need to change the image height and projection...
... picture quality. Then sharpen the image by rotating the focus ring. If the screen and the projector are not perpendicular to the size 2. To do this situation, adjust the value of Keystone in Intelligent Auto Adjustment function will drop into the lens while the lamp is 1 on the remote control. Fine-tuning the image size and clarity 1. Auto-adjusting the image In some cases, you need to change the image height and projection...

User Manual
Page 25
... > Blank Time Do not block the projection lens from projecting as this could cause the blocking object to cool down the projector lamp. The Power indicator light flashes orange and the lamp shuts down process. The fans will display at the bottom right corner of the screen when the image is complete or during the 90second cooling down . A word "BLANK" will continue to run for 3 seconds. Set the...
... > Blank Time Do not block the projection lens from projecting as this could cause the blocking object to cool down the projector lamp. The Power indicator light flashes orange and the lamp shuts down process. The fans will display at the bottom right corner of the screen when the image is complete or during the 90second cooling down . A word "BLANK" will continue to run for 3 seconds. Set the...

User Manual
Page 31
...: Default (BenQ logo), black screen or blue screen. Operation under "High Altitude Mode" may cause high fan speed. In cases like high altitude and high temperature. Do you should switch to High Altitude mode to solve these symptoms. However, this projector can be installed on ( ), the projector will show a message pictured below as a reminder during projector start -up . Sets whether the projector searches automatically for the OSD control menus. We recommend you use the High Altitude Mode when your projector...
...: Default (BenQ logo), black screen or blue screen. Operation under "High Altitude Mode" may cause high fan speed. In cases like high altitude and high temperature. Do you should switch to High Altitude mode to solve these symptoms. However, this projector can be installed on ( ), the projector will show a message pictured below as a reminder during projector start -up . Sets whether the projector searches automatically for the OSD control menus. We recommend you use the High Altitude Mode when your projector...

User Manual
Page 34
..., always turn the projector off and let the projector cool for 2980 hours, the power will light up red or a message appears suggesting it is normally run with the Lamp indicator lighting up after 40 seconds. The Lamp indicator light and Temperature warning light will shutdown in Information > Lamp Hour menu. Turn the power off and disconnect the power cord before changing the lamp. The lamp hour information is removed. 30 Maintenance A new lamp should be replaced before replacing the lamp. The lamp MUST be...
..., always turn the projector off and let the projector cool for 2980 hours, the power will light up red or a message appears suggesting it is normally run with the Lamp indicator lighting up after 40 seconds. The Lamp indicator light and Temperature warning light will shutdown in Information > Lamp Hour menu. Turn the power off and disconnect the power cord before changing the lamp. The lamp hour information is removed. 30 Maintenance A new lamp should be replaced before replacing the lamp. The lamp MUST be...

User Manual
Page 36
... help. Indicators Illustration 1. O OO The projector needs to cool for 5 seconds to display the total used lamp time. Press and hold the 5 button on the remote control to Indicators below. R : Red light 6. O - - 32 Maintenance An adjustment message will appear. The fans are not working. Blank - : Light OFF 2. : Light flashing 3. : Light ON 4. iii. The internal temperature is not replaced as this could cause damage. Stand-by mode. Step 9. Resetting the lamp counter Do not reset if the lamp is too high...
... help. Indicators Illustration 1. O OO The projector needs to cool for 5 seconds to display the total used lamp time. Press and hold the 5 button on the remote control to Indicators below. R : Red light 6. O - - 32 Maintenance An adjustment message will appear. The fans are not working. Blank - : Light OFF 2. : Light flashing 3. : Light ON 4. iii. The internal temperature is not replaced as this could cause damage. Stand-by mode. Step 9. Resetting the lamp counter Do not reset if the lamp is too high...

User Manual
Page 38
... 3-2 power adaptor 22.91007.001 Optional accessories (not included in the standard package) Description Part Number Signal cable 50.J0508.503 Video cable 50.J1303.501 S-Video cable 50.72920.011 RCA R/W audio cable 50.J1311.001 PC - Service information Accessories (included in the standard package) Description of parts Part number Mac adapter (switchable 20.20118.A15 200W lamp module CS.59J99.1B1 Ceiling mount kit 60.J9319.001 Wireless Pro (EU...
... 3-2 power adaptor 22.91007.001 Optional accessories (not included in the standard package) Description Part Number Signal cable 50.J0508.503 Video cable 50.J1303.501 S-Video cable 50.72920.011 RCA R/W audio cable 50.J1311.001 PC - Service information Accessories (included in the standard package) Description of parts Part number Mac adapter (switchable 20.20118.A15 200W lamp module CS.59J99.1B1 Ceiling mount kit 60.J9319.001 Wireless Pro (EU...

User Manual
Page 39
... PICTURE Cause Remedy The video source is not turned on and check that it is switched on again during the cooling process. Turn the video source on or connected correctly. Select the correct input signal with new ones. BLURRED IMAGE Cause The projection lens is not correctly connected to the lens. The projector and the screen are too far away from the power cable. Remedy Replace the battery with the Source key on the projector...
... PICTURE Cause Remedy The video source is not turned on and check that it is switched on again during the cooling process. Turn the video source on or connected correctly. Select the correct input signal with new ones. BLURRED IMAGE Cause The projection lens is not correctly connected to the lens. The projector and the screen are too far away from the power cable. Remedy Replace the battery with the Source key on the projector...


