User Manual
Page 3
... Side ...7 Controls and Functions 8 External Control Panel 8 Remote Control Description 9 Remote Control Effective Range 10 Installing or Replacing the Battery 10 Connection 11 Connecting to a Laptop or Desktop Computer 11 Connecting Equipment to the Component Video Input 12 Connecting Video and S-Video Devices 12 Installation 14 Choosing a Location 14 Adjusting the Height 15 Screen Size 15 Operation 17 Start Up 17 Shutdown 18 Digital Keystone Correction 19 Source Selection 20 Auto Adjustment 20 Blank 21 Zoom / Focusing 21 Menu Operation 22 Menu System 22 Using the...
... Side ...7 Controls and Functions 8 External Control Panel 8 Remote Control Description 9 Remote Control Effective Range 10 Installing or Replacing the Battery 10 Connection 11 Connecting to a Laptop or Desktop Computer 11 Connecting Equipment to the Component Video Input 12 Connecting Video and S-Video Devices 12 Installation 14 Choosing a Location 14 Adjusting the Height 15 Screen Size 15 Operation 17 Start Up 17 Shutdown 18 Digital Keystone Correction 19 Source Selection 20 Auto Adjustment 20 Blank 21 Zoom / Focusing 21 Menu Operation 22 Menu System 22 Using the...
User Manual
Page 4
... Menu 28 5. Setting Menu 27 4. 2. Information Menu 30 Maintenance 31 Cleaning the Lens 31 Cleaning the Projector Case 31 Storing the Projector 31 Transporting the projector 31 Lamp Information 32 Warning Message 32 Replacing the Lamp 32 Temp Information 34 Indicators ...34 Service Information 36 Accessories (included in the standard package 36 Optional Accessories (not included in the standard package 36 Ordering Parts or Getting Information 36 Troubleshooting 37 Specifications 38 Projector Specifications...
... Menu 28 5. Setting Menu 27 4. 2. Information Menu 30 Maintenance 31 Cleaning the Lens 31 Cleaning the Projector Case 31 Storing the Projector 31 Transporting the projector 31 Lamp Information 32 Warning Message 32 Replacing the Lamp 32 Temp Information 34 Indicators ...34 Service Information 36 Accessories (included in the standard package 36 Optional Accessories (not included in the standard package 36 Ordering Parts or Getting Information 36 Troubleshooting 37 Specifications 38 Projector Specifications...
User Manual
Page 5
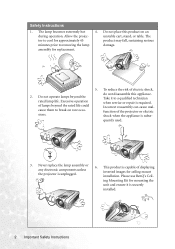
... is designed lens during operation. The intense to 240 volts AC, but could fail if power cuts or surges of this product, it is recommended that you follow the instructions mentioned in this user's manual before you connect your projector. parts inside. • Always open the • Refer servicing to ensure safe use of ±10 volts occur. Important Safety Instructions Your BenQ projector is...
... is designed lens during operation. The intense to 240 volts AC, but could fail if power cuts or surges of this product, it is recommended that you follow the instructions mentioned in this user's manual before you connect your projector. parts inside. • Always open the • Refer servicing to ensure safe use of ±10 volts occur. Important Safety Instructions Your BenQ projector is...
User Manual
Page 6
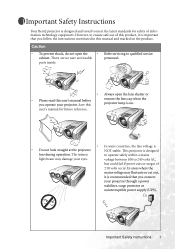
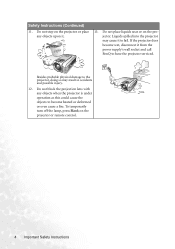
... 45 product may fall, sustaining serious minutes prior to cool for replacement. 5. This product is securely installed. 2 Important Safety Instructions Excessive operation of the projector or electric shock when the appliance is unplugged. 6. Safety Instructions 1. The lamp becomes extremely hot 4. The tor to removing the lamp damage. Incorrect reassembly can cause malfunction of lamps beyond the rated lamp life. Please use BenQ's Ceiling Mounting Kit for ceiling mount installation.
... 45 product may fall, sustaining serious minutes prior to cool for replacement. 5. This product is securely installed. 2 Important Safety Instructions Excessive operation of the projector or electric shock when the appliance is unplugged. 6. Safety Instructions 1. The lamp becomes extremely hot 4. The tor to removing the lamp damage. Incorrect reassembly can cause malfunction of lamps beyond the rated lamp life. Please use BenQ's Ceiling Mounting Kit for ceiling mount installation.
User Manual
Page 8
... possible injury. 12. Do not step on the projector or remote control. 4 Important Safety Instructions Do not block the projection lens with any objects upon it to become wet, disconnect it from the power supply's wall socket and call BenQ to the projector, doing so may cause it . 13. If the projector does become heated or deformed or even cause a fire...
... possible injury. 12. Do not step on the projector or remote control. 4 Important Safety Instructions Do not block the projection lens with any objects upon it to become wet, disconnect it from the power supply's wall socket and call BenQ to the projector, doing so may cause it . 13. If the projector does become heated or deformed or even cause a fire...
User Manual
Page 9
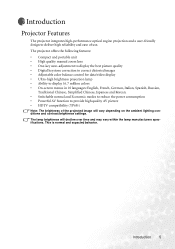
... the ambient lighting conditions and contrast/brightness settings. This is normal and expected behavior. The projector offers the following features: • Compact and portable unit • High quality manual zoom lens • One-key auto-adjustment to display the best picture quality • Digital keystone correction to correct distorted images • Adjustable color balance control for data/video display • Ultra-high brightness projection lamp • Ability to display 16.7 million colors • On-screen menus...
... the ambient lighting conditions and contrast/brightness settings. This is normal and expected behavior. The projector offers the following features: • Compact and portable unit • High quality manual zoom lens • One-key auto-adjustment to display the best picture quality • Digital keystone correction to correct distorted images • Adjustable color balance control for data/video display • Ultra-high brightness projection lamp • Ability to display 16.7 million colors • On-screen menus...
User Manual
Page 11
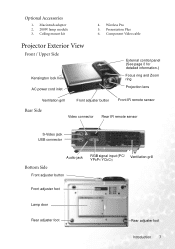
... 6. Ceiling mount kit 4. Macintosh adapter 2. 200W lamp module 3. Optional Accessories 1. Wireless Pro 5. Component Video cable Projector Exterior View Front / Upper Side Kensington lock hole AC power cord inlet External control panel (See page 8 for detailed information.) Focus ring and Zoom ring Projection lens Ventilation grill Front adjuster button Front IR remote sensor Rear Side Video connector Rear IR remote sensor S-Video jack USB connector Audio jack Bottom Side Front adjuster button RGB signal input (PC/ Ventilation grill YPbPr/ YCbCr) Front adjuster foot Lamp...
... 6. Ceiling mount kit 4. Macintosh adapter 2. 200W lamp module 3. Optional Accessories 1. Wireless Pro 5. Component Video cable Projector Exterior View Front / Upper Side Kensington lock hole AC power cord inlet External control panel (See page 8 for detailed information.) Focus ring and Zoom ring Projection lens Ventilation grill Front adjuster button Front IR remote sensor Rear Side Video connector Rear IR remote sensor S-Video jack USB connector Audio jack Bottom Side Front adjuster button RGB signal input (PC/ Ventilation grill YPbPr/ YCbCr) Front adjuster foot Lamp...
User Manual
Page 12
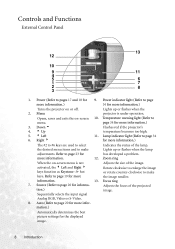
... determines the best picture settings for more information.) 3. Power indicator light (Refer to page 23 for more information.) Turns the projector on or off. Menu projector is not Adjusts the size of the projected tion.) image. Opens, saves and exits the on -screen menu is under operation. page 34 for has developed a problem. Refer to page more information.) 34 for the displayed image. 8 Introduction Zoom ring When the on -screen 10. Focus ring 7.
... determines the best picture settings for more information.) 3. Power indicator light (Refer to page 23 for more information.) Turns the projector on or off. Menu projector is not Adjusts the size of the projected tion.) image. Opens, saves and exits the on -screen menu is under operation. page 34 for has developed a problem. Refer to page more information.) 34 for the displayed image. 8 Introduction Zoom ring When the on -screen 10. Focus ring 7.
User Manual
Page 13
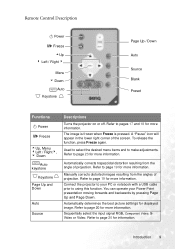
... screen. Automatically determines the best picture settings for more information. Refer to using this function. Used to select the desired menu items and to page 19 for displayed image. Refer to make adjustments. Remote Control Description II Power II/ Freeze 5Up 3 Left / Right 4 Menu 6 Down AUTO Auto Keystone Page Up / Down Auto Source Blank Preset Functions II Power II/ Freeze 5Up, Menu 3Left / Right4, 6 Down AUTO Auto keystone Keystone Page Up and Down Auto Source Descriptions Turns...
... screen. Automatically determines the best picture settings for more information. Refer to using this function. Used to select the desired menu items and to page 19 for displayed image. Refer to make adjustments. Remote Control Description II Power II/ Freeze 5Up 3 Left / Right 4 Menu 6 Down AUTO Auto Keystone Page Up / Down Auto Source Blank Preset Functions II Power II/ Freeze 5Up, Menu 3Left / Right4, 6 Down AUTO Auto keystone Keystone Page Up and Down Auto Source Descriptions Turns...
User Manual
Page 14
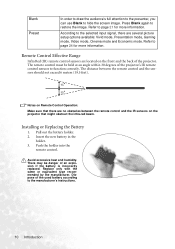
... can use Blank to the selected input signal, there are several picture setup options available: Vivid mode, Presentation mode, Gaming mode, Video mode, Cinema mode and Economic mode. According to hide the screen image. The distance between the remote control and the IR sensors on the front and the back of the used battery according to the manufacturer's instructions. 10 Introduction Avoid excessive heat and humidity. Installing or Replacing the Battery...
... can use Blank to the selected input signal, there are several picture setup options available: Vivid mode, Presentation mode, Gaming mode, Video mode, Cinema mode and Economic mode. According to hide the screen image. The distance between the remote control and the IR sensors on the front and the back of the used battery according to the manufacturer's instructions. 10 Introduction Avoid excessive heat and humidity. Installing or Replacing the Battery...
User Manual
Page 15
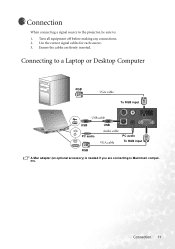
Connection 11 Connecting to a Laptop or Desktop Computer RGB VGA cable To RGB input USB cable USB PC audio USB Audio cable PC audio VGA cable To RGB input RGB A Mac adapter (an optional accessory) is needed if you are firmly inserted. Use the correct signal cables for each source. 3. Ensure the cables are connecting to : 1. Turn all equipment off before making any connections. 2. Connection When connecting a signal source to the projector, be sure to Macintosh computers.
Connection 11 Connecting to a Laptop or Desktop Computer RGB VGA cable To RGB input USB cable USB PC audio USB Audio cable PC audio VGA cable To RGB input RGB A Mac adapter (an optional accessory) is needed if you are firmly inserted. Use the correct signal cables for each source. 3. Ensure the cables are connecting to : 1. Turn all equipment off before making any connections. 2. Connection When connecting a signal source to the projector, be sure to Macintosh computers.

User Manual
Page 21
Turn on the projector or remote control to select an input signal to display if there are 2 or more information, please refer to search for input signals. For more devices are connected to start up , a default BenQ logo appears. 6. Operation 17 Operation Start Up 1. The Power indicator light flashes green and stays green when the power is no input source detected, one of three messages will see the message "Out of the screen. Irrespective of selected input source, the screen shows "Acquiring...
Turn on the projector or remote control to select an input signal to display if there are 2 or more information, please refer to search for input signals. For more devices are connected to start up , a default BenQ logo appears. 6. Operation 17 Operation Start Up 1. The Power indicator light flashes green and stays green when the power is no input source detected, one of three messages will see the message "Out of the screen. Irrespective of selected input source, the screen shows "Acquiring...
User Manual
Page 28
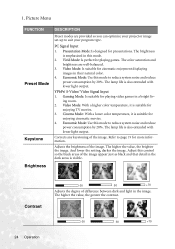
... color temperature, it is also extended with lower light output. The lamp life is suitable for cinematic enjoyment displaying images in this mode to page 19 for more information. Brightness Contrast -30 50 +70 Adjusts the degree of the image appear just as black and that detail in the dark areas is suitable for playing video games in the image. 1. Picture Menu FUNCTION Preset Mode Keystone...
... color temperature, it is also extended with lower light output. The lamp life is suitable for cinematic enjoyment displaying images in this mode to page 19 for more information. Brightness Contrast -30 50 +70 Adjusts the degree of the image appear just as black and that detail in the dark areas is suitable for playing video games in the image. 1. Picture Menu FUNCTION Preset Mode Keystone...
User Manual
Page 34
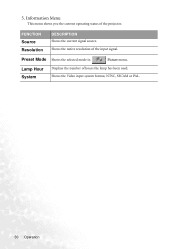
Shows the native resolution of the projector. 5. Information Menu This menu shows you the current operating status of the input signal. FUNCTION Source Resolution DESCRIPTION Shows the current signal source. Lamp Hour System Displays the number of hours the lamp has been used. Preset Mode Shows the selected mode in Picture menu. Shows the Video input system format, NTSC, SECAM or PAL. 30 Operation
Shows the native resolution of the projector. 5. Information Menu This menu shows you the current operating status of the input signal. FUNCTION Source Resolution DESCRIPTION Shows the current signal source. Lamp Hour System Displays the number of hours the lamp has been used. Preset Mode Shows the selected mode in Picture menu. Shows the Video input system format, NTSC, SECAM or PAL. 30 Operation

User Manual
Page 35
... of the projector except the lamp. page in its original packing or equivalent. Transporting the projector It is dirt or smears, use the provided soft carry case. Maintenance Your projector needs little maintenance. Never remove any parts of compressed air to gently wipe the lens surface. Cleaning the Lens Clean the lens whenever you clean the case, turn the projector off and unplug the power cord. Never rub...
... of the projector except the lamp. page in its original packing or equivalent. Transporting the projector It is dirt or smears, use the provided soft carry case. Maintenance Your projector needs little maintenance. Never remove any parts of compressed air to gently wipe the lens surface. Cleaning the Lens Clean the lens whenever you clean the case, turn the projector off and unplug the power cord. Never rub...
User Manual
Page 36
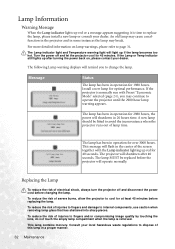
... Lamp indicator light and Temperature warning light will shutdown in 20 hours time. Turn the power off and disconnect the power cord before changing the lamp. The lamp MUST be fitted to fingers and/or compromising image quality by touching the lens, do not touch the empty lamp compartment when the lamp is removed. The lamp has been in operation for 1980 hours. To reduce the risk of severe burns, allow the projector to...
... Lamp indicator light and Temperature warning light will shutdown in 20 hours time. Turn the power off and disconnect the power cord before changing the lamp. The lamp MUST be fitted to fingers and/or compromising image quality by touching the lens, do not touch the empty lamp compartment when the lamp is removed. The lamp has been in operation for 1980 hours. To reduce the risk of severe burns, allow the projector to...
User Manual
Page 37
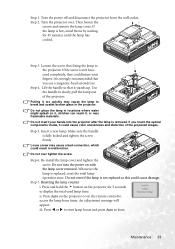
... locations where water might splash on the remote control to display the total used lamp time. iii. Step 6. Step 7. Make sure the handle is hot, avoid burns by waiting for 5 seconds to access the lamp hour timer. Re-install the lamp cover and tighten the screw. Do not turn the power on the projector for 45 minutes until the lamp has cooled. Do not reset if the lamp is removed. An adjustment message...
... locations where water might splash on the remote control to display the total used lamp time. iii. Step 6. Step 7. Make sure the handle is hot, avoid burns by waiting for 5 seconds to access the lamp hour timer. Re-install the lamp cover and tighten the screw. Do not turn the power on the projector for 45 minutes until the lamp has cooled. Do not reset if the lamp is removed. An adjustment message...
User Manual
Page 38
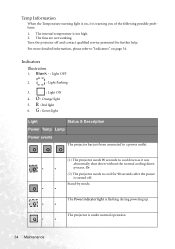
... Power Temp Lamp Power events The projector has just been connected to cool for further help. O OO (1) The projector needs 90 seconds to "Indicators" on , it was abnormally shut down without the normal cooling down as it is warning you of the following possible problems: 1. process. O - - R : Red light 6. G - - O : Orange light 5. Stand-by mode. The projector is flashing during powering up. Blank - : Light OFF 2. : Light flashing 3. : Light ON 4. The internal temperature is turned off and contact qualified service...
... Power Temp Lamp Power events The projector has just been connected to cool for further help. O OO (1) The projector needs 90 seconds to "Indicators" on , it was abnormally shut down without the normal cooling down as it is warning you of the following possible problems: 1. process. O - - R : Red light 6. G - - O : Orange light 5. Stand-by mode. The projector is flashing during powering up. Blank - : Light OFF 2. : Light flashing 3. : Light ON 4. The internal temperature is turned off and contact qualified service...
User Manual
Page 40
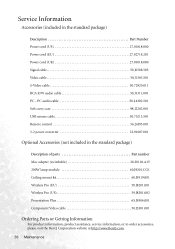
... of parts Part number Mac adapter (switchable 20.20118.A15 200W lamp module 60.J9301.CG1 Ceiling mount kit 60.J9319.001 Wireless Pro (EU 59.J8201.001 Wireless Pro (US 59.J8201.002 Presentation Plus 65.J9306.001 Component Video cable 50.J2401.001 Ordering Parts or Getting Information For product information, product assistance, service information, or to order accessories, please visit the BenQ Corporation website...
... of parts Part number Mac adapter (switchable 20.20118.A15 200W lamp module 60.J9301.CG1 Ceiling mount kit 60.J9319.001 Wireless Pro (EU 59.J8201.001 Wireless Pro (US 59.J8201.002 Presentation Plus 65.J9306.001 Component Video cable 50.J2401.001 Ordering Parts or Getting Information For product information, product assistance, service information, or to order accessories, please visit the BenQ Corporation website...
User Manual
Page 41
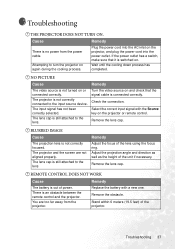
... the lens. Attempting to the input source device. BLURRED IMAGE Cause The projection lens is connected correctly. REMOTE CONTROL DOES NOT WORK Cause The battery is still attached to the lens Remedy Adjust the focus of power. The lens cap is not correctly connected to turn the projector on and check that it is no power from the projector. Plug the power cord into the power outlet. The lens cap is out of the lens using the focus...
... the lens. Attempting to the input source device. BLURRED IMAGE Cause The projection lens is connected correctly. REMOTE CONTROL DOES NOT WORK Cause The battery is still attached to the lens Remedy Adjust the focus of power. The lens cap is not correctly connected to turn the projector on and check that it is no power from the projector. Plug the power cord into the power outlet. The lens cap is out of the lens using the focus...


