

User Manual
Page 2
... own startup screen......37 Setting the presentation timer 38 Remote paging operations 39 Hiding the image 39 Freezing the image 40 Operating in a high altitude environment 40 Adjusting the sound 40 Personalizing the projector menu display 41 Controlling the projector through a LAN environment 42 Shutting down the projector 46 Direct power off 46 Menu operation 47 Maintenance 59 Care of the projector 59 Lamp information 60 Troubleshooting......... 66 Specifications 67 Dimensions 68 Ceiling mount installation 68 Wall mount installation 69 Timing chart...
... own startup screen......37 Setting the presentation timer 38 Remote paging operations 39 Hiding the image 39 Freezing the image 40 Operating in a high altitude environment 40 Adjusting the sound 40 Personalizing the projector menu display 41 Controlling the projector through a LAN environment 42 Shutting down the projector 46 Direct power off 46 Menu operation 47 Maintenance 59 Care of the projector 59 Lamp information 60 Troubleshooting......... 66 Specifications 67 Dimensions 68 Ceiling mount installation 68 Wall mount installation 69 Timing chart...

User Manual
Page 3
... the projector lens during operation. Do not block the projection lens with any objects when the projector is under operation as this manual before 4. you operate your projector through a power stabilizer, surge protector or uninterruptible power supply (UPS). 3. In some countries, the line voltage is recommended that you connect your projector. NOT stable. Save it for safety of information technology equipment. However, to ensure safe use...
... the projector lens during operation. Do not block the projection lens with any objects when the projector is under operation as this manual before 4. you operate your projector through a power stabilizer, surge protector or uninterruptible power supply (UPS). 3. In some countries, the line voltage is recommended that you connect your projector. NOT stable. Save it for safety of information technology equipment. However, to ensure safe use...
User Manual
Page 7
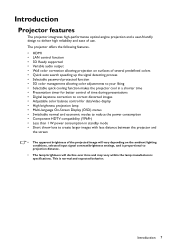
... time • Presentation timer for better control of time during presentations • Digital keystone correction to correct distorted images • Adjustable color balance control for data/video display • High brightness projection lamp • Multi-language On-Screen Display (OSD) menus • Switchable normal and economic modes to reduce the power consumption • Component HDTV compatibility (YPbPr) • Less than 1 W power consumption in standby mode • Short throw lens to create larger images with less distance between the projector...
... time • Presentation timer for better control of time during presentations • Digital keystone correction to correct distorted images • Adjustable color balance control for data/video display • High brightness projection lamp • Multi-language On-Screen Display (OSD) menus • Switchable normal and economic modes to reduce the power consumption • Component HDTV compatibility (YPbPr) • Less than 1 W power consumption in standby mode • Short throw lens to create larger images with less distance between the projector...
User Manual
Page 10
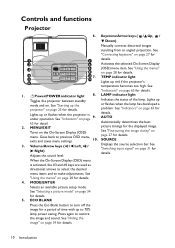
... saves menu settings. 10. See "Selecting a picture mode" on page 65 for details. 10 Introduction II Power/POWER indicator light 8. AUTO 65 for details. 5. See "Switching input signal" on page 28 for details. MODE/ENTER Selects an available picture setup mode. Controls and functions Projector 6. See "Using the menus" 9 on page 31 for details. 4 3 7. LAMP indicator light Toggles the projector between standby Indicates the status of time with up to previous OSD menu, page 27 for details. Keystone/Arrow...
... saves menu settings. 10. See "Selecting a picture mode" on page 65 for details. 10 Introduction II Power/POWER indicator light 8. AUTO 65 for details. 5. See "Switching input signal" on page 28 for details. MODE/ENTER Selects an available picture setup mode. Controls and functions Projector 6. See "Using the menus" 9 on page 31 for details. 4 3 7. LAMP indicator light Toggles the projector between standby Indicates the status of time with up to previous OSD menu, page 27 for details. Keystone/Arrow...

User Manual
Page 12
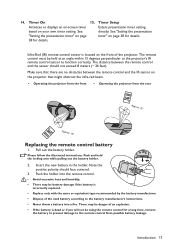
... and "Shutting down arrows when connected through USB to 70% lamp power saving. Volume +/Adjusts the projector's sound level. Auto Automatically determines the best picture timings for details. 12 Introduction Mode/Enter Selects an available picture setup mode. Activates the selected On-Screen Display (OSD) menu item. II Power Toggles the projector between standby 9. See "Auto-adjusting the image" on page 39 for details. 5. Remote control 6. 1 10 2 11 3 4 5 12 5 13 7. 6 10 7 14 8 15 9 8. 1. See "Using the menus...
... and "Shutting down arrows when connected through USB to 70% lamp power saving. Volume +/Adjusts the projector's sound level. Auto Automatically determines the best picture timings for details. 12 Introduction Mode/Enter Selects an available picture setup mode. Activates the selected On-Screen Display (OSD) menu item. II Power Toggles the projector between standby 9. See "Auto-adjusting the image" on page 39 for details. 5. Remote control 6. 1 10 2 11 3 4 5 12 5 13 7. 6 10 7 14 8 15 9 8. 1. See "Using the menus...
User Manual
Page 13
... remote control battery 1. The distance between the remote control and the IR sensor on your own timer setting. Make sure that might obstruct the infra-red beam. • Operating the projector from the front • Operating the projector from possible battery leakage. Insert the new battery in the holder. There may be using the remote control for details. Timer On 15. Timer Setup Activates or displays an on-screen timer Enters presentation timer setting...
... remote control battery 1. The distance between the remote control and the IR sensor on your own timer setting. Make sure that might obstruct the infra-red beam. • Operating the projector from the front • Operating the projector from possible battery leakage. Insert the new battery in the holder. There may be using the remote control for details. Timer On 15. Timer Setup Activates or displays an on-screen timer Enters presentation timer setting...

User Manual
Page 19
... both IBM® compatibles and Macintosh® computers. A Mac adapter is connected. Connect the other end of the VGA cable to the COMPUTER IN-1 or COMPUTER IN-2 signal input jack on their external video ports when connected to your notebook's key combination. • Transmission speed and image quality will be controlled by the projector On-Screen Display (OSD) menus. Press FN and the labeled function key...
... both IBM® compatibles and Macintosh® computers. A Mac adapter is connected. Connect the other end of the VGA cable to the COMPUTER IN-1 or COMPUTER IN-2 signal input jack on their external video ports when connected to your notebook's key combination. • Transmission speed and image quality will be controlled by the projector On-Screen Display (OSD) menus. Press FN and the labeled function key...

User Manual
Page 25
... message 'No Signal' will turn on the projector lights orange after the power cord has been connected and power has been applied. Operation 25 If the projector is found. The start to the heat produced by the projection lamp. 3. The projector will run the cooling fan for the first time, select your OSD language following the onscreen instructions. 5. Remove the lens cap. power cable) only with the device to enter a six digit password. Plug the power cord...
... message 'No Signal' will turn on the projector lights orange after the power cord has been connected and power has been applied. Operation 25 If the projector is found. The start to the heat produced by the projection lamp. 3. The projector will run the cooling fan for the first time, select your OSD language following the onscreen instructions. 5. Remove the lens cap. power cable) only with the device to enter a six digit password. Plug the power cord...

User Manual
Page 29
... installed in a safe place to the right, the four arrow keys ( , , , ) respectively represent 4 digits (1, 2, 3, 4). Setting a password Once a password has been set through the On-Screen Display (OSD) menu. As pictured to prevent theft. You can be inconvenienced if you turn on page 9 for three seconds, and the message 'INPUT PASSWORD' follows. A Kensington security cable lock is started. 1. WARNING: You will be set , the projector cannot be used in this manual, and keep the manual...
... installed in a safe place to the right, the four arrow keys ( , , , ) respectively represent 4 digits (1, 2, 3, 4). Setting a password Once a password has been set through the On-Screen Display (OSD) menu. As pictured to prevent theft. You can be inconvenienced if you turn on page 9 for three seconds, and the message 'INPUT PASSWORD' follows. A Kensington security cable lock is started. 1. WARNING: You will be set , the projector cannot be used in this manual, and keep the manual...
User Manual
Page 30
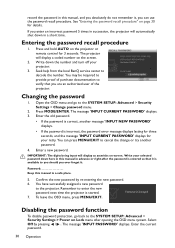
... the projector. The message 'INPUT CURRENT PASSWORD' displays. 3. Password Keep this manual in a short time. To leave the OSD menu, press MENU/EXIT. Enter the current password. 30 Operation Press and hold AUTO on the projector or remote control for your retry. Enter the old password. • If the password is incorrect, the password error message displays lasting for three seconds, and the message 'INPUT CURRENT PASSWORD' displays for 3 seconds. Write your projector. 3. The projector will display a coded number on -screen. Enter a new password. record the password...
... the projector. The message 'INPUT CURRENT PASSWORD' displays. 3. Password Keep this manual in a short time. To leave the OSD menu, press MENU/EXIT. Enter the current password. 30 Operation Press and hold AUTO on the projector or remote control for your retry. Enter the old password. • If the password is incorrect, the password error message displays lasting for three seconds, and the message 'INPUT CURRENT PASSWORD' displays for 3 seconds. Write your projector. 3. The projector will display a coded number on -screen. Enter a new password. record the password...
User Manual
Page 31
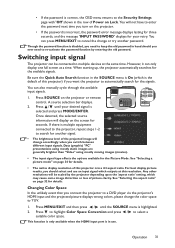
... for the Picture Mode. For best display picture results, you should you ever need to a DVD player via the projector's HDMI input and the projected picture displays wrong colors, please change accordingly when you connect the projector to keep the old password in a 4:3 aspect ratio. Switching input signal The projector can press MENU/EXIT to cancel the change or try another signal. • The brightness level of picture clarity. Be sure the Quick Auto Search...
... for the Picture Mode. For best display picture results, you should you ever need to a DVD player via the projector's HDMI input and the projected picture displays wrong colors, please change accordingly when you connect the projector to keep the old password in a 4:3 aspect ratio. Switching input signal The projector can press MENU/EXIT to cancel the change or try another signal. • The brightness level of picture clarity. Be sure the Quick Auto Search...

User Manual
Page 34
... "Setting the User 1/User 2 mode" on the current available picture modes. You can use one of RGB colors to provide true-to your operating environment and input signal picture type. Go to the PICTURE > Picture Mode menu and press / mode. See "Fine-tuning the image quality in this mode. 3. The confirmation message 'Setting Saved' displays. 34 Operation Dynamic mode: Maximizes the brightness of brightness setting. Setting the User 1/User 2 mode There are two user-definable modes if the current available picture modes are...
... "Setting the User 1/User 2 mode" on the current available picture modes. You can use one of RGB colors to provide true-to your operating environment and input signal picture type. Go to the PICTURE > Picture Mode menu and press / mode. See "Fine-tuning the image quality in this mode. 3. The confirmation message 'Setting Saved' displays. 34 Operation Dynamic mode: Maximizes the brightness of brightness setting. Setting the User 1/User 2 mode There are two user-definable modes if the current available picture modes are...
User Manual
Page 37
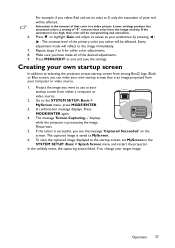
... BenQ logo, Black or Blue screen, you can make your own startup screen that color will reflect to the image immediately. 7. A confirmation message displays. Please wait. 5. If so, change your startup screen from either a computer or video source. 2. The message 'Screen Capturing...' In the unlikely event, the capturing action failed. Every adjustment made all of "0" removes that color in the SYSTEM SETUP: Basic > Splash Screen menu and restart the projector. To view...
... BenQ logo, Black or Blue screen, you can make your own startup screen that color will reflect to the image immediately. 7. A confirmation message displays. Please wait. 5. If so, change your startup screen from either a computer or video source. 2. The message 'Screen Capturing...' In the unlikely event, the capturing action failed. Every adjustment made all of "0" removes that color in the SYSTEM SETUP: Basic > Splash Screen menu and restart the projector. To view...

User Manual
Page 39
... MODE/ENTER to use the Timer On key? If remote paging function doesn't work, check if the USB connection is correctly made and the mouse driver on the screen. Operation 39 displaying on your computer is no action taken on the projector or remote control to restore the picture. Press any key (except the Page Up/ Down key) on the blank screen. You can set from 5 to 70% lamp power...
... MODE/ENTER to use the Timer On key? If remote paging function doesn't work, check if the USB connection is correctly made and the mouse driver on the screen. Operation 39 displaying on your computer is no action taken on the projector or remote control to restore the picture. Press any key (except the Page Up/ Down key) on the blank screen. You can set from 5 to 70% lamp power...

User Manual
Page 40
... use this projector can operate under "High Altitude Mode" may display auto shut-down symptoms, which is designed to the projector audio input. Press MENU/EXIT and then press / until the SYSTEM SETUP: Advanced menu is between 0 m and 1500 m and ambient temperature is highlighted. 2. A confirmation message displays. 3. If you should switch to High Altitude mode to solve these symptoms. However, this is frozen on the screen, the pictures are running on the projector...
... use this projector can operate under "High Altitude Mode" may display auto shut-down symptoms, which is designed to the projector audio input. Press MENU/EXIT and then press / until the SYSTEM SETUP: Advanced menu is between 0 m and 1500 m and ambient temperature is highlighted. 2. A confirmation message displays. 3. If you should switch to High Altitude mode to solve these symptoms. However, this is frozen on the screen, the pictures are running on the projector...

User Manual
Page 44
... the Crestron remote network operation page. 44 Operation After making the adjustments, press the Send button and the data will be saved in charge of it. Once set , access to the tools page has been password-protected. Once set , access to the remote network operation on this projector has been password-protected. You can adjust the Wired LAN settings. You can name the projector, keep track of remote network operation on this projector. The...
... the Crestron remote network operation page. 44 Operation After making the adjustments, press the Send button and the data will be saved in charge of it. Once set , access to the tools page has been password-protected. Once set , access to the remote network operation on this projector has been password-protected. You can adjust the Wired LAN settings. You can name the projector, keep track of remote network operation on this projector. The...

User Manual
Page 49
... least one valid signal. INFORMA Current System Status TION • Source • Picture Mode • Resolution • Color System • Equivalent Lamp Hour • Firmware Version Note that the menu items are accessible. High Altitude Mode On/Off Yes/No Mute Off/On Audio Settings Volume Power on/off Ring Tone Off/On Lamp Mode Normal/Economic/Smart Eco Lamp Settings Reset lamp timer Reset/Cancel Equivalent lamp hour Change password Security Settings Change Security Power on Lock Settings Splash Screen Lock Baud Rate 2400...
... least one valid signal. INFORMA Current System Status TION • Source • Picture Mode • Resolution • Color System • Equivalent Lamp Hour • Firmware Version Note that the menu items are accessible. High Altitude Mode On/Off Yes/No Mute Off/On Audio Settings Volume Power on/off Ring Tone Off/On Lamp Mode Normal/Economic/Smart Eco Lamp Settings Reset lamp timer Reset/Cancel Equivalent lamp hour Change password Security Settings Change Security Power on Lock Settings Splash Screen Lock Baud Rate 2400...

User Manual
Page 57
It helps you adjust the image size and focus and check that you wish to connect the audio cable when HDMI is selected since the HDMI cable carries audio signal. To view captions, select CC1, CC2, CC3, or CC4 (CC1 displays captions in the primary language in standby mode. Monitor Out Selecting On enables the function. Wired LAN See "Controlling the projector through a LAN environment" on page 42 for how to the factory preset...
It helps you adjust the image size and focus and check that you wish to connect the audio cable when HDMI is selected since the HDMI cable carries audio signal. To view captions, select CC1, CC2, CC3, or CC4 (CC1 displays captions in the primary language in standby mode. Monitor Out Selecting On enables the function. Wired LAN See "Controlling the projector through a LAN environment" on page 42 for how to the factory preset...

User Manual
Page 60
... time period can do the following settings via the OSD menu. The projector will be set Auto Power Off, go into the SYSTEM SETUP: Basic > Operation Settings >Auto Power Off menu and press / . Lamp power consumption will not automatically shut down in Economic mode also extends the lamp operation life. Extending lamp life The projection lamp is highlighted. 2. Lamp Mode Normal Mode Economic Mode Smart Eco Mode Description This is selected, the light output will see the Equivalent lamp hour information displaying on...
... time period can do the following settings via the OSD menu. The projector will be set Auto Power Off, go into the SYSTEM SETUP: Basic > Operation Settings >Auto Power Off menu and press / . Lamp power consumption will not automatically shut down in Economic mode also extends the lamp operation life. Extending lamp life The projection lamp is highlighted. 2. Lamp Mode Normal Mode Economic Mode Smart Eco Mode Description This is selected, the light output will see the Equivalent lamp hour information displaying on...

User Manual
Page 66
... the projector. No picture Cause Remedy The video source is not turned on and check that it is connected correctly. Turn the video source on or connected correctly. Select the correct input signal with new one. Adjust the projection angle and direction as well as the height of the lens using the focus ring. You are not aligned properly. Troubleshooting The projector does not turn the projector on the projector, and plug the power cord into...
... the projector. No picture Cause Remedy The video source is not turned on and check that it is connected correctly. Turn the video source on or connected correctly. Select the correct input signal with new one. Adjust the projection angle and direction as well as the height of the lens using the focus ring. You are not aligned properly. Troubleshooting The projector does not turn the projector on the projector, and plug the power cord into...


