
MS513, MX514, MW516 User Manual
Page 1
MS513/MX514/MW516 Digital Projector User Manual
MS513/MX514/MW516 Digital Projector User Manual
MS513, MX514, MW516 User Manual
Page 3
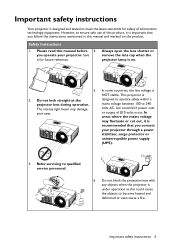
.... In areas where the mains voltage may damage your projector. Important safety instructions Your projector is recommended that you follow the instructions mentioned in this manual and marked on . 5. you operate your eyes. Safety Instructions 1. Do not look straight at the projector lens during operation. Refer servicing to become heated and... could cause the objects to qualified service personnel. 6. Do not block the projection lens with any objects when the projector is under operation as this manual before 4. Important safety instructions 3
.... In areas where the mains voltage may damage your projector. Important safety instructions Your projector is recommended that you follow the instructions mentioned in this manual and marked on . 5. you operate your eyes. Safety Instructions 1. Do not look straight at the projector lens during operation. Refer servicing to become heated and... could cause the objects to qualified service personnel. 6. Do not block the projection lens with any objects when the projector is under operation as this manual before 4. Important safety instructions 3

MS513, MX514, MW516 User Manual
Page 8
... specific regions. Please consult your dealer for your place of the items shown below. Projector QDiugiictkal SPtraortjeGctuoirde Quick start guide Power cord VGA cable User manual CD Warranty card* Remote control with battery Optional accessories 1. Ceiling mount kit 3. RS232 cable 5. Presentation plus 8 Introduction Carry bag 4. Spare lamp kit...
... specific regions. Please consult your dealer for your place of the items shown below. Projector QDiugiictkal SPtraortjeGctuoirde Quick start guide Power cord VGA cable User manual CD Warranty card* Remote control with battery Optional accessories 1. Ceiling mount kit 3. RS232 cable 5. Presentation plus 8 Introduction Carry bag 4. Spare lamp kit...
MS513, MX514, MW516 User Manual
Page 10
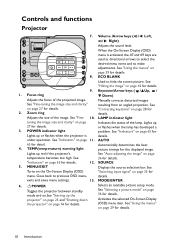
... 36 for details. See "Indicators" on page 65 for details. When the On-Screen Display (OSD) menu is under operation. Keystone/Arrow keys ( / Up, / Down) Manually corrects distorted images resulting from an angled projection. Activates the selected On-Screen Display (OSD) menu item. See "Indicators" on page 11. 65 for details...
... 36 for details. See "Indicators" on page 65 for details. When the On-Screen Display (OSD) menu is under operation. Keystone/Arrow keys ( / Up, / Down) Manually corrects distorted images resulting from an angled projection. Activates the selected On-Screen Display (OSD) menu item. See "Indicators" on page 11. 65 for details...
MS513, MX514, MW516 User Manual
Page 12
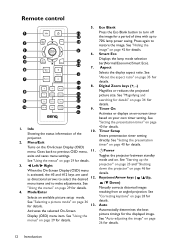
... back to select the desired 12. Mode/Enter Selects an available picture setup mode. Aspect Selects the display aspect ratio. Keystone/Arrow keys ( / Up, / Down) Manually corrects distorted images resulting from an angled projection. Remote control 5. 1 11 12 2 13 3 3 6. 4 5 14 12 7. 6 15 7 16 8. 17 8 18 19 9 20 10 21 9. 22 1. Showing...
... back to select the desired 12. Mode/Enter Selects an available picture setup mode. Aspect Selects the display aspect ratio. Keystone/Arrow keys ( / Up, / Down) Manually corrects distorted images resulting from an angled projection. Remote control 5. 1 11 12 2 13 3 3 6. 4 5 14 12 7. 6 15 7 16 8. 17 8 18 19 9 20 10 21 9. 22 1. Showing...
MS513, MX514, MW516 User Manual
Page 27
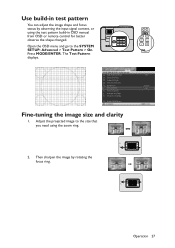
Use build-in OSD manual from OSD or remote control for better observe the shape changed. Fine-tuning the image size and clarity 1. Then sharpen the image by observing the input signal content, or using the zoom ring. 2. Operation 27 Press MODE/ENTER. Adjust the projected image to the SYSTEM SETUP: Advanced > Test Pattern > On. Open the OSD menu and go to the size that you need using the test pattern build-in test pattern You can adjust the image shape and focus status by rotating the focus ring. The Test Pattern displays.
Use build-in OSD manual from OSD or remote control for better observe the shape changed. Fine-tuning the image size and clarity 1. Then sharpen the image by observing the input signal content, or using the zoom ring. 2. Operation 27 Press MODE/ENTER. Adjust the projected image to the SYSTEM SETUP: Advanced > Test Pattern > On. Open the OSD menu and go to the size that you need using the test pattern build-in test pattern You can adjust the image shape and focus status by rotating the focus ring. The Test Pattern displays.
MS513, MX514, MW516 User Manual
Page 28
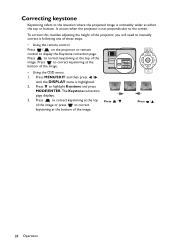
Press to highlight Keystone and press MODE/ENTER. Press MENU/EXIT and then press / until the DISPLAY menu is not perpendicular to manually correct it following one of the image. To correct this, besides adjusting the height of the projector, you will need to the screen. The Keystone ...
Press to highlight Keystone and press MODE/ENTER. Press MENU/EXIT and then press / until the DISPLAY menu is not perpendicular to manually correct it following one of the image. To correct this, besides adjusting the height of the projector, you will need to the screen. The Keystone ...
MS513, MX514, MW516 User Manual
Page 30
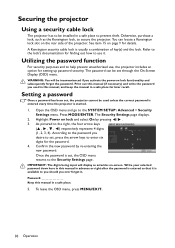
... a password Once a password has been set through the On-Screen Display (OSD) menu. Write your selected password down here in this manual (if necessary) and write the password you ever forget it . Refer to the lock's documentation for finding out how to you should you...Advanced > Security Settings menu. The password can locate a Kensington lock slot on lock functionality and subsequently forget the password. Password Keep this manual, and keep the manual in a safe place. 5. Press MODE/ENTER. You can be set , the projector cannot be inconvenienced if you desire to set ,...
... a password Once a password has been set through the On-Screen Display (OSD) menu. Write your selected password down here in this manual (if necessary) and write the password you ever forget it . Refer to the lock's documentation for finding out how to you should you...Advanced > Security Settings menu. The password can locate a Kensington lock slot on lock functionality and subsequently forget the password. Password Keep this manual, and keep the manual in a safe place. 5. Press MODE/ENTER. You can be set , the projector cannot be inconvenienced if you desire to set ,...

MS513, MX514, MW516 User Manual
Page 31
...the password recall procedure 1. The message 'INPUT CURRENT PASSWORD' displays. 3. You can use the password recall procedure. Seek help from the local BenQ service center to the SYSTEM SETUP: Advanced > Security Settings > Change password menu. 2. Confirm the new password by entering another six-digit password...display a coded number on -screen. Changing the password 1. Open the OSD menu and go to decode the number. Password Keep this manual in this manual, and you absolutely do not remember it, you turn off your projector. 3. Press and hold Auto on page 31 for details....
...the password recall procedure 1. The message 'INPUT CURRENT PASSWORD' displays. 3. You can use the password recall procedure. Seek help from the local BenQ service center to the SYSTEM SETUP: Advanced > Security Settings > Change password menu. 2. Confirm the new password by entering another six-digit password...display a coded number on -screen. Changing the password 1. Open the OSD menu and go to decode the number. Password Keep this manual in this manual, and you absolutely do not remember it, you turn off your projector. 3. Press and hold Auto on page 31 for details....
MS513, MX514, MW516 User Manual
Page 33
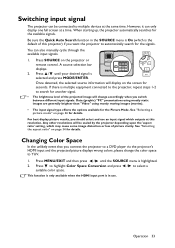
... aspect ratio" on the projector or remote control. When starting up, the projector automatically searches for the signals. Switching input signal The projector can also manually cycle through the available input signals. 1. A source selection bar displays. 2. However, it can only display one full screen at the same time. Press to highlight...
... aspect ratio" on the projector or remote control. When starting up, the projector automatically searches for the signals. Switching input signal The projector can also manually cycle through the available input signals. 1. A source selection bar displays. 2. However, it can only display one full screen at the same time. Press to highlight...
MS513, MX514, MW516 User Manual
Page 50
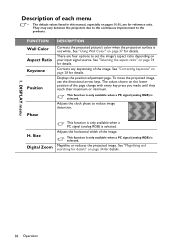
.... There are four options to set the image's aspect ratio depending on the lower position of each menu • The default values listed in this manual, especially on pages 50-58, are for details. Displays the position adjustment page. See "Using Wall Color" on page 34 for details. Adjusts the horizontal...
.... There are four options to set the image's aspect ratio depending on the lower position of each menu • The default values listed in this manual, especially on pages 50-58, are for details. Displays the position adjustment page. See "Using Wall Color" on page 34 for details. Adjusts the horizontal...
MS513, MX514, MW516 User Manual
Page 67
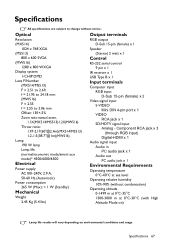
Specifications All specifications are subject to 3.06 mm Offset: 130+-5% Zoom ratio:manual zoom, 1.1X(MX514/MS513)1.2X(MW516) Throw ratio: 1.97-2.17(60"@2.4m)(MX514/MS513) 1.2-1.5(38.7"@1m)(MW516) Lamp 190 W lamp Lamp life (normal/economic mode/smart eco mode)* 4500/6000/6500 Electrical Power supply ...;C at sea level Operating relative humidity 10%-90% (without notice. Optical Output terminals Resolution (MX514) 1024 x 768 XGA (MS513) 800 x 600 SVGA (MW516) 1280 x 800 WXGA Display system 1-CHIP DMD Lens F/Number (MX514/MS513) F = 2.51 to 2.69, f = 21.95 to 24.18 mm (MW516) F = 2.55 f =...
Specifications All specifications are subject to 3.06 mm Offset: 130+-5% Zoom ratio:manual zoom, 1.1X(MX514/MS513)1.2X(MW516) Throw ratio: 1.97-2.17(60"@2.4m)(MX514/MS513) 1.2-1.5(38.7"@1m)(MW516) Lamp 190 W lamp Lamp life (normal/economic mode/smart eco mode)* 4500/6000/6500 Electrical Power supply ...;C at sea level Operating relative humidity 10%-90% (without notice. Optical Output terminals Resolution (MX514) 1024 x 768 XGA (MS513) 800 x 600 SVGA (MW516) 1280 x 800 WXGA Display system 1-CHIP DMD Lens F/Number (MX514/MS513) F = 2.51 to 2.69, f = 21.95 to 24.18 mm (MW516) F = 2.55 f =...
MS513, MX514, MW516 User Manual
Page 72
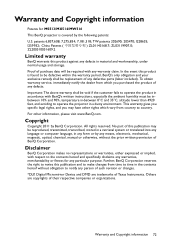
...China Patents ZL01143168.7; Important: The above warranty shall be void if the customer fails to operate the product in accordance with BenQ's written instructions, especially the ambient humidity must be reproduced, transmitted, transcribed, stored in a retrieval system or translated into ... magnetic, optical, chemical, manual or otherwise, without obligation to the contents hereof and specifically disclaims any warranties, merchantability or fitness for MS513/MX514/MW516 This BenQ projector is found to be defective within the warranty period, BenQ's only obligation and your exclusive...
...China Patents ZL01143168.7; Important: The above warranty shall be void if the customer fails to operate the product in accordance with BenQ's written instructions, especially the ambient humidity must be reproduced, transmitted, transcribed, stored in a retrieval system or translated into ... magnetic, optical, chemical, manual or otherwise, without obligation to the contents hereof and specifically disclaims any warranties, merchantability or fitness for MS513/MX514/MW516 This BenQ projector is found to be defective within the warranty period, BenQ's only obligation and your exclusive...
MS513 Data Sheet
Page 1
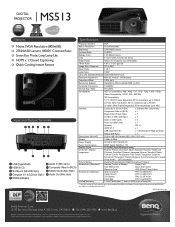
...100 to 240 V, 50 to change without notice. MS513 10-18-11-US BenQ America Corp. 15375 Barranca Parkway. All rights reserved. www.BenQ.us Irvine, CA 92618 Tel: (949) 255-9500 BenQ is a registered trademark of BenQ Corp. Corporate and trademarks are subject to change ...Bulgaria/ Finnish/ Indonesian/ Greek/ Hindi/ Arabic (28 Languages) Dynamic/Presentation/s, RGB/Cinema/User 1/User 2 Remote Control w/ Battery Power Cord User Manual CD Quick Start Guide Warranty Card VGA (D-sub 15pin) Cable Spare Lamp Kit P/N: 5J.J5E05.001 Ceiling Mount P/N: 5J.J2K01.001 3D Glasses...
...100 to 240 V, 50 to change without notice. MS513 10-18-11-US BenQ America Corp. 15375 Barranca Parkway. All rights reserved. www.BenQ.us Irvine, CA 92618 Tel: (949) 255-9500 BenQ is a registered trademark of BenQ Corp. Corporate and trademarks are subject to change ...Bulgaria/ Finnish/ Indonesian/ Greek/ Hindi/ Arabic (28 Languages) Dynamic/Presentation/s, RGB/Cinema/User 1/User 2 Remote Control w/ Battery Power Cord User Manual CD Quick Start Guide Warranty Card VGA (D-sub 15pin) Cable Spare Lamp Kit P/N: 5J.J5E05.001 Ceiling Mount P/N: 5J.J2K01.001 3D Glasses...

