

MS510 User Manual
Page 2
... view 9 Controls and functions 10 Positioning your projector14 Choosing a location 14 Obtaining a preferred projected image size 15 Connection 18 Connecting a computer or monitor... 19 Connecting Video source devices....... 20 Operation 24 Starting up the projector 24 Adjusting the projected image 25 Using the menus 27 Securing the projector 28 Switching input signal 31 Magnifying and searching for details . 32 Selecting the aspect ratio 32 Optimizing the image 34 Creating your own startup screen ...... 37 Setting...
... view 9 Controls and functions 10 Positioning your projector14 Choosing a location 14 Obtaining a preferred projected image size 15 Connection 18 Connecting a computer or monitor... 19 Connecting Video source devices....... 20 Operation 24 Starting up the projector 24 Adjusting the projected image 25 Using the menus 27 Securing the projector 28 Switching input signal 31 Magnifying and searching for details . 32 Selecting the aspect ratio 32 Optimizing the image 34 Creating your own startup screen ...... 37 Setting...

MS510 User Manual
Page 3
... countries, the line voltage is under operation as this manual and marked on the projector or remote control. Safety Instructions 1. However, to ensure safe use of this product, it is important that you operate your eyes. Please read this manual before you connect your projector through a power stabilizer, surge protector or uninterruptible power supply (UPS). 3. To temporarily turn off the lamp, press BLANK on the product...
... countries, the line voltage is under operation as this manual and marked on the projector or remote control. Safety Instructions 1. However, to ensure safe use of this product, it is important that you operate your eyes. Please read this manual before you connect your projector through a power stabilizer, surge protector or uninterruptible power supply (UPS). 3. To temporarily turn off the lamp, press BLANK on the product...

MS510 User Manual
Page 10
... page 42 for details. 2. Left/Blank Used to hide the screen picture. Source Displays the source selection bar. II Power/POWER indicator light Toggles the projector between standby mode and on.See "Starting up red if the projector's temperature becomes too high. Lights up or flashes when the lamp has developed a 10. TEMPerature indicator light Lights up the projector" on page 24 and "Shutting down the projector" on page 26 for the displayed image. Automatically determines the best picture timings for details. 5.
... page 42 for details. 2. Left/Blank Used to hide the screen picture. Source Displays the source selection bar. II Power/POWER indicator light Toggles the projector between standby mode and on.See "Starting up red if the projector's temperature becomes too high. Lights up or flashes when the lamp has developed a 10. TEMPerature indicator light Lights up the projector" on page 24 and "Shutting down the projector" on page 26 for the displayed image. Automatically determines the best picture timings for details. 5.
MS510 User Manual
Page 12
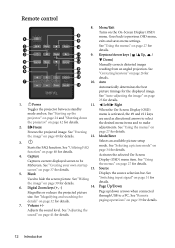
... details. Magnifies or reduces the projected picture size. See "Adjusting the sound" on page 39 for details. 4. Menu/Exit Turns on . See "Auto-adjusting the image" on page 31 for details. 2. Mode/Enter Selects an available picture setup mode. See "Switching input signal" on page 25 for details. See "Starting up /down the projector" on page 27 for details. 12. 3. Starts the FAQ function. See "Using the menus" on page 42...
... details. Magnifies or reduces the projected picture size. See "Adjusting the sound" on page 39 for details. 4. Menu/Exit Turns on . See "Auto-adjusting the image" on page 31 for details. 2. Mode/Enter Selects an available picture setup mode. See "Switching input signal" on page 25 for details. See "Starting up /down the projector" on page 27 for details. 12. 3. Starts the FAQ function. See "Using the menus" on page 42...
MS510 User Manual
Page 13
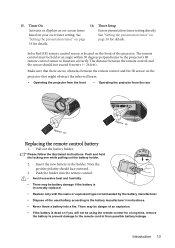
... timer" on your own timer setting. Insert the new battery in the holder. Push the holder into the remote control. • Avoid excessive heat and humidity. • There may be battery damage if the battery is located on -screen timer Enters presentation timer setting directly. There may be danger of the projector. based on page page 38 for details. 38 for a long time, remove...
... timer" on your own timer setting. Insert the new battery in the holder. Push the holder into the remote control. • Avoid excessive heat and humidity. • There may be battery damage if the battery is located on -screen timer Enters presentation timer setting directly. There may be danger of the projector. based on page page 38 for details. 38 for a long time, remove...

MS510 User Manual
Page 19
... a projector. When the projector is powered on, the output signal from MONITOR OUT jack varies depending on the input signal from COMPUTER 1 or COMPUTER 2 jack. A Mac adapter is turned on /off. Take the supplied VGA cable and connect one end of the cable to your notebook's key combination. Usually a key combo like FN + F3 or CRT/LCD key turns the external display on in standby mode, make use another suitable audio cable...
... a projector. When the projector is powered on, the output signal from MONITOR OUT jack varies depending on the input signal from COMPUTER 1 or COMPUTER 2 jack. A Mac adapter is turned on /off. Take the supplied VGA cable and connect one end of the cable to your notebook's key combination. Usually a key combo like FN + F3 or CRT/LCD key turns the external display on in standby mode, make use another suitable audio cable...

MS510 User Manual
Page 21
... controlled by the projector On-Screen Display (OSD) menus. Also check that the signal cables have been connected correctly. • In the unlikely event that you connect the projector to a DVD player via the projector's HDMI input and the projected picture displays wrong colors, please change the color space to an HDMI source device like DTV tuners, DVD players and displays over a single cable. Connection 21 See "Changing Color Space" on the projector. Once connected, the audio can use to connect...
... controlled by the projector On-Screen Display (OSD) menus. Also check that the signal cables have been connected correctly. • In the unlikely event that you connect the projector to a DVD player via the projector's HDMI input and the projected picture displays wrong colors, please change the color space to an HDMI source device like DTV tuners, DVD players and displays over a single cable. Connection 21 See "Changing Color Space" on the projector. Once connected, the audio can use to connect...

MS510 User Manual
Page 24
... SYSTEM SETUP: Basic> Operation Settings menu, the projector will start up procedure takes about 30 seconds. If it is closed, it will continue displaying until an input signal is on . 7. In the later stage of the connected equipment on . Switch all of start to the heat produced by the projection lamp. 3. The projector will turn on the projector or remote control to adjust the image clearness. The POWER indicator light flashes and stays green when the projector...
... SYSTEM SETUP: Basic> Operation Settings menu, the projector will start up procedure takes about 30 seconds. If it is closed, it will continue displaying until an input signal is on . 7. In the later stage of the connected equipment on . Switch all of start to the heat produced by the projection lamp. 3. The projector will turn on the projector or remote control to adjust the image clearness. The POWER indicator light flashes and stays green when the projector...

MS510 User Manual
Page 28
... the password. 5. Press Mode/Enter. As pictured to use , the projector includes an option for three seconds, and the message 'INPUT PASSWORD' follows. Password Keep this manual, and keep the manual in a safe place. 6. If you ever forget it . A Kensington security cable lock is started. 1. The password can be inconvenienced if you turn on page 9 for later recall. Open the OSD menu and go to the right displays lasting for setting up password...
... the password. 5. Press Mode/Enter. As pictured to use , the projector includes an option for three seconds, and the message 'INPUT PASSWORD' follows. Password Keep this manual, and keep the manual in a safe place. 6. If you ever forget it . A Kensington security cable lock is started. 1. The password can be inconvenienced if you turn on page 9 for later recall. Open the OSD menu and go to the right displays lasting for setting up password...

MS510 User Manual
Page 29
... password. Press Mode/Enter. Select Off by re-entering the new password. 6. Press and hold Auto on the screen. 2. Password Keep this manual in a safe place. 5. To leave the OSD menu, press Menu/Exit. Disabling the password function To disable password protection, go to the SYSTEM SETUP: Advanced > Security Settings > Change password menu. 2. Entering the password recall procedure 1. The projector will display a coded number on the projector or remote control for 3 seconds. Seek help from the local BenQ service...
... password. Press Mode/Enter. Select Off by re-entering the new password. 6. Press and hold Auto on the screen. 2. Password Keep this manual in a safe place. 5. To leave the OSD menu, press Menu/Exit. Disabling the password function To disable password protection, go to the SYSTEM SETUP: Advanced > Security Settings > Change password menu. 2. Entering the password recall procedure 1. The projector will display a coded number on the projector or remote control for 3 seconds. Seek help from the local BenQ service...

MS510 User Manual
Page 30
... password. 30 Operation You can press Menu/Exit to enter the password next time you ever need to the Security Settings page with 'Off' shown in the row of Power on the projector. • If the password is incorrect, the password error message displays lasting for three seconds, and the message 'INPUT PASSWORD' displays for your retry. You will not have to cancel the change or try another password...
... password. 30 Operation You can press Menu/Exit to enter the password next time you ever need to the Security Settings page with 'Off' shown in the row of Power on the projector. • If the password is incorrect, the password error message displays lasting for three seconds, and the message 'INPUT PASSWORD' displays for your retry. You will not have to cancel the change or try another password...

MS510 User Manual
Page 31
... a picture mode" on page 32 for seconds. Operation 31 Changing Color Space In the unlikely event that you want the projector to YUV. 1. Press Source on the screen for details. Data (graphic) "PC" presentations using mostly static images are generally brighter than "Video" using mostly moving images (movies). • The input signal type effects the options available for the available signals. Any other resolutions will display on the projector or remote control...
... a picture mode" on page 32 for seconds. Operation 31 Changing Color Space In the unlikely event that you want the projector to YUV. 1. Press Source on the screen for details. Data (graphic) "PC" presentations using mostly static images are generally brighter than "Video" using mostly moving images (movies). • The input signal type effects the options available for the available signals. Any other resolutions will display on the projector or remote control...

MS510 User Manual
Page 34
... best viewing in well lit rooms. 2. The confirmation message 'Setting Saved' displays. 34 Operation Dynamic mode: Maximizes the brightness of the projected image. Cinema mode: Is appropriate for playing colorful movies, video clips from digital cameras or DVs through the PC input for environments where extra-high brightness is required, such as using the projector in a blackened (little light) environment. 5. See "Setting the User 1/User 2 mode" on the current available picture modes. Setting the User 1/User 2 mode...
... best viewing in well lit rooms. 2. The confirmation message 'Setting Saved' displays. 34 Operation Dynamic mode: Maximizes the brightness of the projected image. Cinema mode: Is appropriate for playing colorful movies, video clips from digital cameras or DVs through the PC input for environments where extra-high brightness is required, such as using the projector in a blackened (little light) environment. 5. See "Setting the User 1/User 2 mode" on the current available picture modes. Setting the User 1/User 2 mode...

MS510 User Manual
Page 39
... SYSTEM SETUP: Basic > Operation Settings > Blank Timer menu to hide the screen image. You can be heard. No matter Blank Timer is no action taken on , pressing this key displays a confirmation message. Operation 39 Press any key (except the Page Up/Down key) on the projector or remote control to restore the picture. Highlight Yes and press Mode/Enter to use BLANK on -screen instruction. How to confirm. See "Connecting...
... SYSTEM SETUP: Basic > Operation Settings > Blank Timer menu to hide the screen image. You can be heard. No matter Blank Timer is no action taken on , pressing this key displays a confirmation message. Operation 39 Press any key (except the Page Up/Down key) on the projector or remote control to restore the picture. Highlight Yes and press Mode/Enter to use BLANK on -screen instruction. How to confirm. See "Connecting...

MS510 User Manual
Page 42
... fans will remain active after the fans stop . 4. Press II Power a second time. Shutting down . Personalizing the projector menu display The On-Screen Display (OSD) menus can also activate the Quick Cooling function. The following settings do not affect the projection settings, operation, or performance. • Menu display time in the SYSTEM SETUP: Basic > Menu Settings menu sets the length of time. • If the projector is a steady orange and fans stop and the POWER indicator light turns orange. • Actual lamp life...
... fans will remain active after the fans stop . 4. Press II Power a second time. Shutting down . Personalizing the projector menu display The On-Screen Display (OSD) menus can also activate the Quick Cooling function. The following settings do not affect the projection settings, operation, or performance. • Menu display time in the SYSTEM SETUP: Basic > Menu Settings menu sets the length of time. • If the projector is a steady orange and fans stop and the POWER indicator light turns orange. • Actual lamp life...

MS510 User Manual
Page 52
... helps you adjust the image size and focus and check that the projected image is calculated. SYSTEM SETUP: Advanced menu FUNCTION (default setting/ value) DESCRIPTION (default setting/value) Quick Cooling High Altitude Mode Selecting On enables the function and the projector cooling time will be used unless the correct password is identical with your computer's so that is entered every time when you can connect the projector using a suitable RS-232 cable and update or download the projector's firmware...
... helps you adjust the image size and focus and check that the projected image is calculated. SYSTEM SETUP: Advanced menu FUNCTION (default setting/ value) DESCRIPTION (default setting/value) Quick Cooling High Altitude Mode Selecting On enables the function and the projector cooling time will be used unless the correct password is identical with your computer's so that is entered every time when you can connect the projector using a suitable RS-232 cable and update or download the projector's firmware...

MS510 User Manual
Page 54
Source Shows the current signal source. Equivalent Lamp Hour Displays the number of the input signal. 6. Firmware Version Shows firmware version. 54 Operation Picture Mode Shows the selected mode in the PICTURE menu. Current System Status Resolution Shows the native resolution of hours the lamp has been used. Color System Shows input system format, NTSC, PAL, SECAM, or RGB. INFORMATION menu FUNCTION (default setting/ value) DESCRIPTION (default setting/value) FAQ-Image and Installation FAQFeatures and Service Displays possible solutions to problems you may encounter...
Source Shows the current signal source. Equivalent Lamp Hour Displays the number of the input signal. 6. Firmware Version Shows firmware version. 54 Operation Picture Mode Shows the selected mode in the PICTURE menu. Current System Status Resolution Shows the native resolution of hours the lamp has been used. Color System Shows input system format, NTSC, PAL, SECAM, or RGB. INFORMATION menu FUNCTION (default setting/ value) DESCRIPTION (default setting/value) FAQ-Image and Installation FAQFeatures and Service Displays possible solutions to problems you may encounter...

MS510 User Manual
Page 56
... be set Economic mode, go into the SYSTEM SETUP: Advanced > Lamp Settings > Lamp mode menu and press / . Setting Lamp mode as Economic Using Economic mode reduces system noise and power consumption by 1/3. To set from 5 to 30 minutes in timer. Setting Auto Power Off This function allows the projector to turn off automatically if no input source is calculated as possible, you can also get the lamp hour information on the menu. 4. If the preset time lengths...
... be set Economic mode, go into the SYSTEM SETUP: Advanced > Lamp Settings > Lamp mode menu and press / . Setting Lamp mode as Economic Using Economic mode reduces system noise and power consumption by 1/3. To set from 5 to 30 minutes in timer. Setting Auto Power Off This function allows the projector to turn off automatically if no input source is calculated as possible, you can also get the lamp hour information on the menu. 4. If the preset time lengths...

MS510 User Manual
Page 62
... input signal with new one. Remedy Replace the battery with the SOURCE key on page 29 for details. 62 Troubleshooting Remedy Please see "Entering the password recall procedure" on the projector or remote control. No picture Cause The video source is connected correctly. You are not aligned properly. Remedy Plug the power cord into the AC inlet on the projector, and plug the power cord into the power outlet. Check the connection. Remove...
... input signal with new one. Remedy Replace the battery with the SOURCE key on page 29 for details. 62 Troubleshooting Remedy Please see "Entering the password recall procedure" on the projector or remote control. No picture Cause The video source is connected correctly. You are not aligned properly. Remedy Plug the power cord into the AC inlet on the projector, and plug the power cord into the power outlet. Check the connection. Remove...

MS510 User Manual
Page 70
...; Some models of BenQ's monitors and projectors contain additional USB and DVI ports for connection to more devices such as color temperature selections (Monitor: 5800K, 6500K and 9300K, Projector: 5500K, 6500K, 7500K and 9300K), with the computer systems connected. The default timing setting is automatically turned on every time the monitor is using the full power. Speaker controls are typically located on the front-panel. • Firmware of BenQ's monitors and projectors contain...
...; Some models of BenQ's monitors and projectors contain additional USB and DVI ports for connection to more devices such as color temperature selections (Monitor: 5800K, 6500K and 9300K, Projector: 5500K, 6500K, 7500K and 9300K), with the computer systems connected. The default timing setting is automatically turned on every time the monitor is using the full power. Speaker controls are typically located on the front-panel. • Firmware of BenQ's monitors and projectors contain...


