

User Manual
Page 1
MP772 ST/MP776 ST Digital Projector User Manual Welcome
MP772 ST/MP776 ST Digital Projector User Manual Welcome

User Manual
Page 2
...computer or monitor... 19 Connecting video source devices........ 20 Operation 23 Starting up the projector 23 Adjusting the projected image 24 Using the menus 25 Securing the projector 26 Switching input signal 29 Magnifying and searching for details . 30 Selecting the ... the sound 39 Personalizing the projector menu display 40 Controlling the projector through a Lan environment 40 Shutting down the projector 43 Menu operation 44 Maintenance 53 Care of the projector 53 Lamp information 54 Troubleshooting 60 Specifications 61 Projector specifications 61 Dimensions 62 Ceiling...
...computer or monitor... 19 Connecting video source devices........ 20 Operation 23 Starting up the projector 23 Adjusting the projected image 24 Using the menus 25 Securing the projector 26 Switching input signal 29 Magnifying and searching for details . 30 Selecting the ... the sound 39 Personalizing the projector menu display 40 Controlling the projector through a Lan environment 40 Shutting down the projector 43 Menu operation 44 Maintenance 53 Care of the projector 53 Lamp information 54 Troubleshooting 60 Specifications 61 Projector specifications 61 Dimensions 62 Ceiling...

User Manual
Page 3
...stable. To temporarily turn off the lamp, press BLANK on . Always open the lens shutter or remove the lens cap when the projector lamp is on the projector or remote control. 4. to operate safely within a mains voltage between 100 to qualified service personnel. 6. In some countries, the ... out, it is recommended that you follow the instructions mentioned in this manual before you connect your projector. Do not block the projection lens with any objects when the projector is under operation as this product, it for safety of ±10 volts occur. Important safety ...
...stable. To temporarily turn off the lamp, press BLANK on . Always open the lens shutter or remove the lens cap when the projector lamp is on the projector or remote control. 4. to operate safely within a mains voltage between 100 to qualified service personnel. 6. In some countries, the ... out, it is recommended that you follow the instructions mentioned in this manual before you connect your projector. Do not block the projection lens with any objects when the projector is under operation as this product, it for safety of ±10 volts occur. Important safety ...

User Manual
Page 4
... operation. Do not attempt to break on an unstable cart, stand, or table. projector. Under no circumstances should you ever undo or remove any electronic components unless the projector is under operation, you should come into contact with live parts. Never replace the... user serviceable part is a normal phenomenon and not a product defect. 4 Important safety instructions Safety Instructions (Continued) 7. Allow the projector to cool for approximately 45 minutes prior to suitably qualified professional service personnel. 9. The product may sense some heated air and odor from...
... operation. Do not attempt to break on an unstable cart, stand, or table. projector. Under no circumstances should you ever undo or remove any electronic components unless the projector is under operation, you should come into contact with live parts. Never replace the... user serviceable part is a normal phenomenon and not a product defect. 4 Important safety instructions Safety Instructions (Continued) 7. Allow the projector to cool for approximately 45 minutes prior to suitably qualified professional service personnel. 9. The product may sense some heated air and odor from...

User Manual
Page 5
... rolled up. - Do not block the ventilation holes. - If the ventilation holes are higher than 3000 m (10000 feet). Always place the projector on end vertically. Allow at an angle of more than 10 degrees left to , the lamp. 3000 m (10000 feet) 0 m (0 feet) 16. ... injury or resulting in damage to back. Locations with a cloth or any other item. - Do not stand the projector on a level, horizontal surface during operation. - Do not cover this projector on a blanket, bedding or any other soft surface. - Safety Instructions (Continued) 13. following environments. - Space ...
... rolled up. - Do not block the ventilation holes. - If the ventilation holes are higher than 3000 m (10000 feet). Always place the projector on end vertically. Allow at an angle of more than 10 degrees left to , the lamp. 3000 m (10000 feet) 0 m (0 feet) 16. ... injury or resulting in damage to back. Locations with a cloth or any other item. - Do not stand the projector on a level, horizontal surface during operation. - Do not cover this projector on a blanket, bedding or any other soft surface. - Safety Instructions (Continued) 13. following environments. - Space ...

User Manual
Page 6
... place any objects upon it from the power supply's power outlet and call BenQ to have a pleasant experience using your BenQ projector, so we strongly recommend that you purchased your BenQ projector. Ceiling mounting the projector We want you to the mounting bracket become wet, disconnect it . This will perform the secondary role of the wrong...
... place any objects upon it from the power supply's power outlet and call BenQ to have a pleasant experience using your BenQ projector, so we strongly recommend that you purchased your BenQ projector. Ceiling mounting the projector We want you to the mounting bracket become wet, disconnect it . This will perform the secondary role of the wrong...
User Manual
Page 7
... of the projected image will decline over time and may vary within the lamp manufacturers specifications. Introduction 7 Introduction Projector features The projector integrates high-performance optical engine projection and a user-friendly design to projection distance. • The lamp brightness ...Short throw lens to create larger images with less distance between the projector and the screen • Filter free design to lower maintenance and operating costs • Auto keystone function (for the MP776 ST) to correct image keystoning automatically • Brilliant color / VIDI to...
... of the projected image will decline over time and may vary within the lamp manufacturers specifications. Introduction 7 Introduction Projector features The projector integrates high-performance optical engine projection and a user-friendly design to projection distance. • The lamp brightness ...Short throw lens to create larger images with less distance between the projector and the screen • Filter free design to lower maintenance and operating costs • Auto keystone function (for the MP776 ST) to correct image keystoning automatically • Brilliant color / VIDI to...

User Manual
Page 8
Projector Power cord VGA cable Quick start guide User manual CD Warranty card* Remote control with batteries Optional accessories 1. Ceiling mount kit 3. If any of these ...
Projector Power cord VGA cable Quick start guide User manual CD Warranty card* Remote control with batteries Optional accessories 1. Ceiling mount kit 3. If any of these ...
User Manual
Page 9
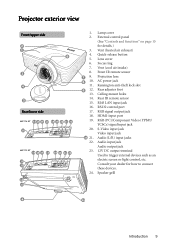
... 10 for how to trigger external devices such as an electric screen or light control, etc. Projector exterior view Front/upper side 2 1 6 3 4 5 Rear/lower side MP776 ST 14 15 16 17 18 19 20 21 22 10 MP772 ST 14 15 16 17 19 20 21 22 10 11 12 13 1. 2. 3. 4. 5. 6. 7. 8. 7 9. 8 10. 11. 9 12...
... 10 for how to trigger external devices such as an electric screen or light control, etc. Projector exterior view Front/upper side 2 1 6 3 4 5 Rear/lower side MP776 ST 14 15 16 17 18 19 20 21 22 10 MP772 ST 14 15 16 17 19 20 21 22 10 11 12 13 1. 2. 3. 4. 5. 6. 7. 8. 7 9. 8 10. 11. 9 12...

User Manual
Page 10
... of the lamp. "Locking control keys" on page 38, "Using the menus" on page 37 Selects an available picture setup mode. Controls and functions Projector 1 2 3 4 5 6 For details, see the info. provided behind the hand sign . 7. "Indicators" on page 29 10 Introduction Left/ 12...and saves menu settings. Mode/Enter Starts the FAQ function. BLANK Used to previous OSD menu, 11. Lights up red if the projector's 8 temperature becomes too high. "Correcting keystone" on page 28 Turns on page 38 6. Automatically determines the best picture timings for ...
... of the lamp. "Locking control keys" on page 38, "Using the menus" on page 37 Selects an available picture setup mode. Controls and functions Projector 1 2 3 4 5 6 For details, see the info. provided behind the hand sign . 7. "Indicators" on page 29 10 Introduction Left/ 12...and saves menu settings. Mode/Enter Starts the FAQ function. BLANK Used to previous OSD menu, 11. Lights up red if the projector's 8 temperature becomes too high. "Correcting keystone" on page 28 Turns on page 38 6. Automatically determines the best picture timings for ...

User Manual
Page 11
... with the MP7 series models) 4. ENTER Activates the selected On-Screen Display (OSD) menu item. 11. "Hiding the image" on page 37 2. POWER Toggles the projector between standby mode and on page 33 For details, see the info. Magnifies or reduces the projected image size. Remote control 1 2 13 3 14 4 5 6 ...OSD menu, exits and saves menu settings. VOLUME+/VOLUME- Adjusts the sound level. "Adjusting the sound" on page 43 14. "Starting up the projector" on page 23, "Shutting down the projector" on page 39 13. "Magnifying and searching for presentation purposes.
... with the MP7 series models) 4. ENTER Activates the selected On-Screen Display (OSD) menu item. 11. "Hiding the image" on page 37 2. POWER Toggles the projector between standby mode and on page 33 For details, see the info. Magnifies or reduces the projected image size. Remote control 1 2 13 3 14 4 5 6 ...OSD menu, exits and saves menu settings. VOLUME+/VOLUME- Adjusts the sound level. "Adjusting the sound" on page 43 14. "Starting up the projector" on page 23, "Shutting down the projector" on page 39 13. "Magnifying and searching for presentation purposes.

User Manual
Page 12
... beam is a presentation aid for professionals. See the warning messages on and Enters presentation timer setting directly. 15. TIMER SET UP Toggles projector audio between on the select the desired menu items and to press and hold LASER for the displayed image. off. AUTO 22. SOURCE ... The Laser Pointer is visible. based on page 32 18. "Selecting a picture mode" on your own timer setting. "Correcting keystone" on the projector. Right/ Locks the buttons on page 28 19. It is activated, the #18, #9 and #19 shine the laser light beam on page ...
... beam is a presentation aid for professionals. See the warning messages on and Enters presentation timer setting directly. 15. TIMER SET UP Toggles projector audio between on the select the desired menu items and to press and hold LASER for the displayed image. off. AUTO 22. SOURCE ... The Laser Pointer is visible. based on page 32 18. "Selecting a picture mode" on your own timer setting. "Correcting keystone" on the projector. Right/ Locks the buttons on page 28 19. It is activated, the #18, #9 and #19 shine the laser light beam on page ...

User Manual
Page 13
...leaving the remote control and batteries in an excessive heat or humid environment like the kitchen, bathroom, sauna, sunroom or in the base of the projector. Introduction 13 There may be danger of an explosion. • If the batteries are dead or if you will slide off. 2. Remote control... on the front and the back of the battery compartment. The cover will not be held at an angle within 30 degrees perpendicular to the projector's IR remote control sensors to negative. 3. Make sure that there are no obstacles between the remote control and the sensors should not exceed 8 ...
...leaving the remote control and batteries in an excessive heat or humid environment like the kitchen, bathroom, sauna, sunroom or in the base of the projector. Introduction 13 There may be danger of an explosion. • If the batteries are dead or if you will slide off. 2. Remote control... on the front and the back of the battery compartment. The cover will not be held at an angle within 30 degrees perpendicular to the projector's IR remote control sensors to negative. 3. Make sure that there are no obstacles between the remote control and the sensors should not exceed 8 ...
User Manual
Page 14
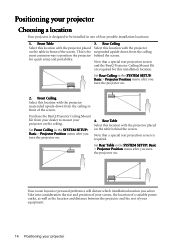
...SETUP: Basic > Projector Position menu after you turn the projector on . 2. Positioning your projector Choosing a location Your projector is designed to be installed in one of your equipment. 14 Positioning your projector Note that a special rear projection screen and the BenQ Projector Ceiling Mount Kit ... required for quick setup and portability. for this location with the projector suspended upside-down from the ceiling most common way to position the projector behind the screen. Purchase the BenQ Projector Ceiling Mount Kit from the ceiling in front of the screen....
...SETUP: Basic > Projector Position menu after you turn the projector on . 2. Positioning your projector Choosing a location Your projector is designed to be installed in one of your equipment. 14 Positioning your projector Note that a special rear projection screen and the BenQ Projector Ceiling Mount Kit ... required for quick setup and portability. for this location with the projector suspended upside-down from the ceiling most common way to position the projector behind the screen. Purchase the BenQ Projector Ceiling Mount Kit from the ceiling in front of the screen....

User Manual
Page 15
...format each factors in the left columns labelled "Screen Size". If the projector is the native aspect ratio of this refers to 75% of the projected image. If the projector is the projection distance. 3. BenQ has provided a table of 4:3-aspect-ratio screen sizes to assist you ...will determine the final vertical offset placement of the screen. This is positioned further away from the horizontal edge of the projector for your screen size...
...format each factors in the left columns labelled "Screen Size". If the projector is the native aspect ratio of this refers to 75% of the projected image. If the projector is the projection distance. 3. BenQ has provided a table of 4:3-aspect-ratio screen sizes to assist you ...will determine the final vertical offset placement of the screen. This is positioned further away from the horizontal edge of the projector for your screen size...

User Manual
Page 16
... 2. In these situations, some image distortion will have purchased this row shows that row to the left to find the closest match to your projector This is the projection distance. 3. Use the Keystone function to position the screen. For example, if you are using an 120-inch screen... your measurement in the average distance from screen column labelled "Distance from Screen in mm" column is required. Refer to the horizontal plane of the projector at that row. On that same row, look across that a 120'' (about 3.0 m) screen is 1481 mm. For example, if your room. 1....
... 2. In these situations, some image distortion will have purchased this row shows that row to the left to find the closest match to your projector This is the projection distance. 3. Use the Keystone function to position the screen. For example, if you are using an 120-inch screen... your measurement in the average distance from screen column labelled "Distance from Screen in mm" column is required. Refer to the horizontal plane of the projector at that row. On that same row, look across that a 120'' (about 3.0 m) screen is 1481 mm. For example, if your room. 1....

User Manual
Page 17
... characteristics. Projection dimensions Refer to "Dimensions" on page 62 for this projector before calculating the appropriate position. Positioning your installation location. BenQ recommends that if you intend to permanently install the projector, you determine the exact mounting position so that it , so as to optical component variations. This will help you should physically...
... characteristics. Projection dimensions Refer to "Dimensions" on page 62 for this projector before calculating the appropriate position. Positioning your installation location. BenQ recommends that if you intend to permanently install the projector, you determine the exact mounting position so that it , so as to optical component variations. This will help you should physically...

User Manual
Page 18
.... • For detailed connection methods, see "Shipping contents" on the projector vary with each source. 3. They are commercially available from electronics stores. • The connection illustrations below are firmly inserted. • In the .... The rear connecting jacks available on page 8). Audio cable adapter cable 8. VGA cable 5. S-Video cable 2. Connection When connecting a signal source to the projector, be included with the projector (see pages 19-22. Turn all equipment off before making any connections. 2. VGA to DVI-A cable 6. Audio L/R cable 4.
.... • For detailed connection methods, see "Shipping contents" on the projector vary with each source. 3. They are commercially available from electronics stores. • The connection illustrations below are firmly inserted. • In the .... The rear connecting jacks available on page 8). Audio cable adapter cable 8. VGA cable 5. S-Video cable 2. Connection When connecting a signal source to the projector, be included with the projector (see pages 19-22. Turn all equipment off before making any connections. 2. VGA to DVI-A cable 6. Audio L/R cable 4.

User Manual
Page 19
...if you wish to both IBM® compatibles and Macintosh® computers. If you wish and the AUDIO OUT jack is available on your projector, you wish to make sure the Standby Monitor Out function is turned on in the SYSTEM SETUP: Advanced menu. Press FN and the ...to the COMPUTER 1 jack. • If you are connecting legacy version Macintosh computers. Or if your external speakers (not supplied). To connect the projector to a projector. Many notebooks do not turn on their external video ports when connected to a notebook or desktop computer: 1. Once connected, the audio can be ...
...if you wish to both IBM® compatibles and Macintosh® computers. If you wish and the AUDIO OUT jack is available on your projector, you wish to make sure the Standby Monitor Out function is turned on in the SYSTEM SETUP: Advanced menu. Press FN and the ...to the COMPUTER 1 jack. • If you are connecting legacy version Macintosh computers. Or if your external speakers (not supplied). To connect the projector to a projector. Many notebooks do not turn on their external video ports when connected to a notebook or desktop computer: 1. Once connected, the audio can be ...

User Manual
Page 20
...source device" on page 21 Better S-Video Video "Connecting an S-Video/ Composite Video source device" on page 22 Good Normal Connecting audio The projector has two built-in home theater or home cinema applications. Connecting video source devices You need not connect audio to the... projector if there is an alternate sound system available, or if audio is mixed into a common mono audio output through the projector speakers. If you have a separate sound system, you choose will most likely ...
...source device" on page 21 Better S-Video Video "Connecting an S-Video/ Composite Video source device" on page 22 Good Normal Connecting audio The projector has two built-in home theater or home cinema applications. Connecting video source devices You need not connect audio to the... projector if there is an alternate sound system available, or if audio is mixed into a common mono audio output through the projector speakers. If you have a separate sound system, you choose will most likely ...


