

Brochure
Page 1
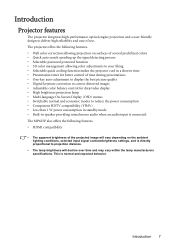
Hot Key for FAQ Auto Adjustment Hot Key Direct Power On VGA(D-sub) cable Power cord Spare Lamp Kit Soft Carry Case MP625P Digital Projector HIGHLIGHTS -Filter Free Design -No Color Decay -2700 ANSI Lumens -XGA Native Resolution -BrilliantColorTM -3D ... Adjustment Hot Key Projection System Native Resolution Brightness Contrast Ratio Keystone Aspect Ratio Color Lens Zoom Ratio Image Size (Diagonal) Throw Ratio Lamp Computer Compatibility HDTV Compatibility Video Compatibility Horizontal Frequency Vertical Scan Rate Input Terminals Output Terminals Control Terminal Dimensions(W x H x D) Weight...
Hot Key for FAQ Auto Adjustment Hot Key Direct Power On VGA(D-sub) cable Power cord Spare Lamp Kit Soft Carry Case MP625P Digital Projector HIGHLIGHTS -Filter Free Design -No Color Decay -2700 ANSI Lumens -XGA Native Resolution -BrilliantColorTM -3D ... Adjustment Hot Key Projection System Native Resolution Brightness Contrast Ratio Keystone Aspect Ratio Color Lens Zoom Ratio Image Size (Diagonal) Throw Ratio Lamp Computer Compatibility HDTV Compatibility Video Compatibility Horizontal Frequency Vertical Scan Rate Input Terminals Output Terminals Control Terminal Dimensions(W x H x D) Weight...

User Manual
Page 2
... the sound level 41 Personalizing the projector menu display 42 Shutting down the projector 42 Menu operation 43 Maintenance 53 Care of the projector 53 Lamp information 54 Troubleshooting 60 Specifications 61 Dimensions 62 Ceiling mount installation 62 Timing chart 63 Warranty and Copyright information 66 Regulation statements ......67
... the sound level 41 Personalizing the projector menu display 42 Shutting down the projector 42 Menu operation 43 Maintenance 53 Care of the projector 53 Lamp information 54 Troubleshooting 60 Specifications 61 Dimensions 62 Ceiling mount installation 62 Timing chart 63 Warranty and Copyright information 66 Regulation statements ......67

User Manual
Page 3
...is recommended that you operate your projector through a power stabilizer, surge protector or uninterruptible power supply (UPS). 3. To temporarily turn off the lamp, press BLANK on . 5. This projector is NOT stable. The intense light beam may fluctuate or cut out, it is important that you...projector. In some countries, the line voltage is designed 2. Always open the lens shutter or remove the lens cap when the projector lamp is on the projector or remote control. Do not look straight at the projector lens during operation. Important safety instructions 3 to operate...
...is recommended that you operate your projector through a power stabilizer, surge protector or uninterruptible power supply (UPS). 3. To temporarily turn off the lamp, press BLANK on . 5. This projector is NOT stable. The intense light beam may fluctuate or cut out, it is important that you...projector. In some countries, the line voltage is designed 2. Always open the lens shutter or remove the lens cap when the projector lamp is on the projector or remote control. Do not look straight at the projector lens during operation. Important safety instructions 3 to operate...

User Manual
Page 4
...not a product defect. 4 Important safety instructions Refer servicing only to removing the lamp assembly for approximately 45 minutes prior to suitably qualified professional service personnel. 9. Do not operate lamps beyond the rated life could voltages inside which has its ventilation grill. Excessive ...the projector to cool for replacement. 10. contact with live parts. The lamp becomes extremely hot during operation. Do not place this rated lamp life. There are dangerous high of lamps beyond the 11. Under no circumstances should come into occasions. Never replace...
...not a product defect. 4 Important safety instructions Refer servicing only to removing the lamp assembly for approximately 45 minutes prior to suitably qualified professional service personnel. 9. Do not operate lamps beyond the rated life could voltages inside which has its ventilation grill. Excessive ...the projector to cool for replacement. 10. contact with live parts. The lamp becomes extremely hot during operation. Do not place this rated lamp life. There are dangerous high of lamps beyond the 11. Under no circumstances should come into occasions. Never replace...

User Manual
Page 5
... temperatures may contaminate optical components, shortening the projector's life span and darkening the image. Allow at angle of more than 10 degrees left to , the lamp. - Do not place inflammables near fire alarms -
... temperatures may contaminate optical components, shortening the projector's life span and darkening the image. Allow at angle of more than 10 degrees left to , the lamp. - Do not place inflammables near fire alarms -
User Manual
Page 7
...than 1 W power consumption in standby mode • Built-in speaker providing mixed mono audio when an audio input is connected The MP625P also offers the following features. • Wall color correction allowing projection on surfaces of several predefined colors • Quick auto search ...8226; Digital keystone correction to correct distorted images • Adjustable color balance control for data/video display • High brightness projection lamp • Multi-language On-Screen Display (OSD) menus • Switchable normal and economic modes to deliver high reliability and ease...
...than 1 W power consumption in standby mode • Built-in speaker providing mixed mono audio when an audio input is connected The MP625P also offers the following features. • Wall color correction allowing projection on surfaces of several predefined colors • Quick auto search ...8226; Digital keystone correction to correct distorted images • Adjustable color balance control for data/video display • High brightness projection lamp • Multi-language On-Screen Display (OSD) menus • Switchable normal and economic modes to deliver high reliability and ease...
User Manual
Page 8
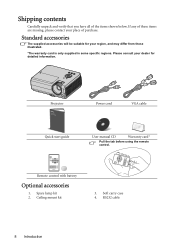
.... Ceiling mount kit 3. Projector Power cord VGA cable Quick start guide User manual CD Warranty card* Pull the tab before using the remote control. Spare lamp kit 2. Soft carry case 4. Standard accessories The supplied accessories will be suitable for detailed information. Remote control with battery Optional accessories 1. RS232 cable 8 Introduction...
.... Ceiling mount kit 3. Projector Power cord VGA cable Quick start guide User manual CD Warranty card* Pull the tab before using the remote control. Spare lamp kit 2. Soft carry case 4. Standard accessories The supplied accessories will be suitable for detailed information. Remote control with battery Optional accessories 1. RS232 cable 8 Introduction...

User Manual
Page 9
...Projector exterior view Front/upper side 1. Lens cover 3 4 6 6. Front IR remote sensor 8. Video input jack 16. HDMI input jack 19. AC power cord inlet 20. Lamp cover 1 3. RGB (PC)/Component video (YPbPr/ YCbCr) signal input jack 14. RS-232 control port (MP615P) 10 11 12 13 14 17. Rear adjuster foot... 2 4. Projection lens 9. S-Video input jack 5 8 12. Vent (heated air exhaust) 7. External control panel (See "Projector" on page 10 for details.) 2. Speaker 15 16 17 (MP625P) 10 18 11 12 13 14 19 15 9 16 20 21 22 23 17 Introduction 9
...Projector exterior view Front/upper side 1. Lens cover 3 4 6 6. Front IR remote sensor 8. Video input jack 16. HDMI input jack 19. AC power cord inlet 20. Lamp cover 1 3. RGB (PC)/Component video (YPbPr/ YCbCr) signal input jack 14. RS-232 control port (MP615P) 10 11 12 13 14 17. Rear adjuster foot... 2 4. Projection lens 9. S-Video input jack 5 8 12. Vent (heated air exhaust) 7. External control panel (See "Projector" on page 10 for details.) 2. Speaker 15 16 17 (MP625P) 10 18 11 12 13 14 19 15 9 16 20 21 22 23 17 Introduction 9

User Manual
Page 10
... "Indicators" on page 25 for details. 11. See "Auto-adjusting the image" on page 59 for details. Focus ring Adjusts the focus of the lamp. Zoom ring Adjusts the size of the image. Keystone/Arrow keys ( / Up, / Down) Manually corrects distorted images resulting from an angled projection. SOURCE... bar. Right/AUTO When the On-Screen Display (OSD) menu is under operation. Menu/Exit Turns on .See "Starting up or flashes when the lamp has developed a 10. See "Hiding the image" on page 27 for detail. See "Using the menus" on page 39 for details. See "Indicators...
... "Indicators" on page 25 for details. 11. See "Auto-adjusting the image" on page 59 for details. Focus ring Adjusts the focus of the lamp. Zoom ring Adjusts the size of the image. Keystone/Arrow keys ( / Up, / Down) Manually corrects distorted images resulting from an angled projection. SOURCE... bar. Right/AUTO When the On-Screen Display (OSD) menu is under operation. Menu/Exit Turns on .See "Starting up or flashes when the lamp has developed a 10. See "Hiding the image" on page 27 for detail. See "Using the menus" on page 39 for details. See "Indicators...

User Manual
Page 24
... takes about 30 seconds. Press II Power on the projector or remote control to start to search for approximately 90 seconds before energizing the lamp. 4. In the later stage of the screen. If you are prompted for the first time, select your OSD language following the onscreen instructions...indicator light flashes green and stays green when the projector is activated for a password, press the arrow keys to the heat produced by the projection lamp. 3. See "Direct power on" on . 7. Remove the lens cap. If the projector is on the power outlet switch (where fitted). Switch...
... takes about 30 seconds. Press II Power on the projector or remote control to start to search for approximately 90 seconds before energizing the lamp. 4. In the later stage of the screen. If you are prompted for the first time, select your OSD language following the onscreen instructions...indicator light flashes green and stays green when the projector is activated for a password, press the arrow keys to the heat produced by the projection lamp. 3. See "Direct power on" on . 7. Remove the lens cap. If the projector is on the power outlet switch (where fitted). Switch...

User Manual
Page 25
... cause damage to your desired input signal. See "Switching input signal" on page 31 for details. • Do not look into the lens while the lamp is on page 63 for 3 seconds. • The screen will re-adjust the values of the projector. Adjusting the projected image Adjusting the projection angle... will see "Magnifying and searching for details" on page 32 for details. You can also press SOURCE on a blank screen. The strong light from the lamp may need to the exhaust vent where hot air comes from. Auto-adjusting the image In some cases, you press the adjuster button as it...
... cause damage to your desired input signal. See "Switching input signal" on page 31 for details. • Do not look into the lens while the lamp is on page 63 for 3 seconds. • The screen will re-adjust the values of the projector. Adjusting the projected image Adjusting the projection angle... will see "Magnifying and searching for details" on page 32 for details. You can also press SOURCE on a blank screen. The strong light from the lamp may need to the exhaust vent where hot air comes from. Auto-adjusting the image In some cases, you press the adjuster button as it...

User Manual
Page 42
...sets the length of time. • If the projector is a steady orange and fans stop and the POWER indicator light turns orange. • Lamp life results will run for details. 3. The following settings do not affect the projection settings, operation, or performance. • Menu display time ...after your preferences. Once the cooling process finishes, the POWER indicator light is not properly shut down the projector. • To protect the lamp, the projector will remain active after the fans stop . 4. Disconnect the power cord from 5 to 30 seconds in an extended period ...
...sets the length of time. • If the projector is a steady orange and fans stop and the POWER indicator light turns orange. • Lamp life results will run for details. 3. The following settings do not affect the projection settings, operation, or performance. • Menu display time ...after your preferences. Once the cooling process finishes, the POWER indicator light is not properly shut down the projector. • To protect the lamp, the projector will remain active after the fans stop . 4. Disconnect the power cord from 5 to 30 seconds in an extended period ...
User Manual
Page 45
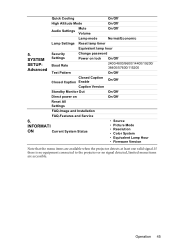
INFORMATI ON Current System Status • Source • Picture Mode • Resolution • Color System • Equivalent Lamp Hour • Firmware Version Note that the menu items are accessible. If there is no equipment connected to the projector or no ...least one valid signal. Operation 45 Quick Cooling On/Off High Altitude Mode On/Off Mute Audio Settings Volume On/Off Lamp mode Normal/Economic Lamp Settings Reset lamp timer Equivalent lamp hour 5. SYSTEM SETUP: Advanced Security Settings Baud Rate Test Pattern Change password Power on lock On/Off 2400/4800/...
INFORMATI ON Current System Status • Source • Picture Mode • Resolution • Color System • Equivalent Lamp Hour • Firmware Version Note that the menu items are accessible. If there is no equipment connected to the projector or no ...least one valid signal. Operation 45 Quick Cooling On/Off High Altitude Mode On/Off Mute Audio Settings Volume On/Off Lamp mode Normal/Economic Lamp Settings Reset lamp timer Equivalent lamp hour 5. SYSTEM SETUP: Advanced Security Settings Baud Rate Test Pattern Change password Power on lock On/Off 2400/4800/...

User Manual
Page 50
...the image size and focus and check that the projected image is free from distortion. 50 Operation Audio Settings Mute Sets the mute function. Equivalent lamp hour See "Getting to restart the projector right after the quick cooling process, it may not be shortened to a new one. This function is... projector's firmware. If you to enter the audio setting menu. Allows you attempt to know the lamp hour" on page 54 for details on successfully and will be turned on how the total lamp hour is intended for operation in a high altitude environment" on page 58 for details. Power on...
...the image size and focus and check that the projected image is free from distortion. 50 Operation Audio Settings Mute Sets the mute function. Equivalent lamp hour See "Getting to restart the projector right after the quick cooling process, it may not be shortened to a new one. This function is... projector's firmware. If you to enter the audio setting menu. Allows you attempt to know the lamp hour" on page 54 for details on successfully and will be turned on how the total lamp hour is intended for operation in a high altitude environment" on page 58 for details. Power on...

User Manual
Page 52
...-Image and Installation FAQFeatures and Service Displays possible solutions to problems you may encounter. 6. Current System Status Resolution Shows the native resolution of hours the lamp has been used. Color System Shows input system format, NTSC, PAL, SECAM, or RGB. Firmware Version Shows firmware version. 52 Operation Picture Mode Shows the...
...-Image and Installation FAQFeatures and Service Displays possible solutions to problems you may encounter. 6. Current System Status Resolution Shows the native resolution of hours the lamp has been used. Color System Shows input system format, NTSC, PAL, SECAM, or RGB. Firmware Version Shows firmware version. 52 Operation Picture Mode Shows the...

User Manual
Page 53
...-cleaning paper or moisten a soft cloth with water and a neutral pH detergent. Maintenance 53 Then wipe the case. Maintenance Care of the projector except the lamp. The only thing you clean the case, turn the projector off using the proper shutdown procedure as alcohol, benzene, thinner or insecticide.
...-cleaning paper or moisten a soft cloth with water and a neutral pH detergent. Maintenance 53 Then wipe the case. Maintenance Care of the projector except the lamp. The only thing you clean the case, turn the projector off using the proper shutdown procedure as alcohol, benzene, thinner or insecticide.

User Manual
Page 54
... Off, go into the SYSTEM SETUP: Basic > Auto Power Off menu and press / . That is highlighted. 2. To keep the lamp life as long as follows: Total (equivalent) lamp hour = 1 (hours used in Economic mode) + 4/3 (hours used in 5-minute increments. You can last up to turn off..., you can be reduced and result in a certain time period. 54 Maintenance You will see the Equivalent lamp hour information displaying on Economic mode. Extending lamp life The projection lamp is selected, the light output will not automatically shut down in darker projected pictures. The method of...
... Off, go into the SYSTEM SETUP: Basic > Auto Power Off menu and press / . That is highlighted. 2. To keep the lamp life as long as follows: Total (equivalent) lamp hour = 1 (hours used in Economic mode) + 4/3 (hours used in 5-minute increments. You can last up to turn off..., you can be reduced and result in a certain time period. 54 Maintenance You will see the Equivalent lamp hour information displaying on Economic mode. Extending lamp life The projection lamp is selected, the light output will not automatically shut down in darker projected pictures. The method of...

User Manual
Page 55
... to avoid the inconvenience when the projector runs out of replacing the lamp When the Lamp indicator lights up if the lamp becomes too hot. It is a consumable item. The lamp brightness diminishes with Economic selected (See "Setting Lamp mode as Economic" on page 54), you to operate the projector ...until the 3950 hour lamp warning appears. You can replace the lamp whenever you notice that you replace the lamp at this age. The following lamp warning displays will light up red or a message appears suggesting it must be replaced...
... to avoid the inconvenience when the projector runs out of replacing the lamp When the Lamp indicator lights up if the lamp becomes too hot. It is a consumable item. The lamp brightness diminishes with Economic selected (See "Setting Lamp mode as Economic" on page 54), you to operate the projector ...until the 3950 hour lamp warning appears. You can replace the lamp whenever you notice that you replace the lamp at this age. The following lamp warning displays will light up red or a message appears suggesting it must be replaced...

User Manual
Page 56
... this lamp in accordance with local disposal laws. Loosen the screw on the lamp cover. 56 Maintenance Consult your local hazardous waste regulations to dispose of injuries to internal components, use caution when removing lamp glass that you purchase a BenQ projector lamp for approximately 45 minutes until the lamp has cooled. 2. Replacing the lamp • Hg - Lamp contains...
... this lamp in accordance with local disposal laws. Loosen the screw on the lamp cover. 56 Maintenance Consult your local hazardous waste regulations to dispose of injuries to internal components, use caution when removing lamp glass that you purchase a BenQ projector lamp for approximately 45 minutes until the lamp has cooled. 2. Replacing the lamp • Hg - Lamp contains...

User Manual
Page 57
... the side of the projector. • Pulling it fits in locations where water might splash on with the lamp cover removed. • Do not insert your fingers between the lamp and the projector. Loosen the screws that it could cause color unevenness and distortion of the projected images. 6.... break and scatter broken glass in the projector. • Do not place the lamp in the projector. 3. The sharp edges inside , it stands up. Insert the new lamp into the projector after the lamp is removed. Maintenance 57 If you touch the optical components inside the projector may ...
... the side of the projector. • Pulling it fits in locations where water might splash on with the lamp cover removed. • Do not insert your fingers between the lamp and the projector. Loosen the screws that it could cause color unevenness and distortion of the projected images. 6.... break and scatter broken glass in the projector. • Do not place the lamp in the projector. 3. The sharp edges inside , it stands up. Insert the new lamp into the projector after the lamp is removed. Maintenance 57 If you touch the optical components inside the projector may ...


