User Manual
Page 2
... screen size for a given distance ..... 18 Connection 20 Connecting a computer or monitor 20 Connecting a computer 20 Connecting a monitor 21 Connecting Video source devices 22 Connecting a Component Video source device 23 Connecting an S-Video source device 24 Connecting a composite Video source device 25 Operation 26 Start up 26 Utilizing the power-on lock function 27 Setting a password 27 If you forget the password 27 Entering the password recall procedure 28 Changing the password 28 Disabling the power-on lock function 28 Switching input signal 29 Adjusting...
... screen size for a given distance ..... 18 Connection 20 Connecting a computer or monitor 20 Connecting a computer 20 Connecting a monitor 21 Connecting Video source devices 22 Connecting a Component Video source device 23 Connecting an S-Video source device 24 Connecting a composite Video source device 25 Operation 26 Start up 26 Utilizing the power-on lock function 27 Setting a password 27 If you forget the password 27 Entering the password recall procedure 28 Changing the password 28 Disabling the power-on lock function 28 Switching input signal 29 Adjusting...
User Manual
Page 3
... the projector menu display 40 Shutting down the projector 40 Menu operation 41 Menu system 41 Using the menus 44 Display menu 45 Picture menu 46 Source menu 47 System setup: Basic menu 47 System setup: Advanced menu 48 Information menu 50 Maintenance 51 Care of the projector 51 Cleaning the lens 51 Cleaning the projector case 51 Storing the projector 51 Transporting the projector 51 Lamp information 52 Calculation of lamp hour 52 Warning message 52 Replacing the lamp 53 Temperature information 55 Indicators ...56 Troubleshooting...
... the projector menu display 40 Shutting down the projector 40 Menu operation 41 Menu system 41 Using the menus 44 Display menu 45 Picture menu 46 Source menu 47 System setup: Basic menu 47 System setup: Advanced menu 48 Information menu 50 Maintenance 51 Care of the projector 51 Cleaning the lens 51 Cleaning the projector case 51 Storing the projector 51 Transporting the projector 51 Lamp information 52 Calculation of lamp hour 52 Warning message 52 Replacing the lamp 53 Temperature information 55 Indicators ...56 Troubleshooting...

User Manual
Page 5
... on the projector or remote control. To temporarily turn off the lamp, press BLANK on the product. Always open the lens shutter or remove the lens cap when the projector lamp is 2. The intense light beam may fluctuate or cut out, it is recommended that you operate your projector through a power stabilizer, surge protector or uninterruptible power supply (UPS). 3. Save it is important that you connect your projector. NOT...
... on the projector or remote control. To temporarily turn off the lamp, press BLANK on the product. Always open the lens shutter or remove the lens cap when the projector lamp is 2. The intense light beam may fluctuate or cut out, it is recommended that you operate your projector through a power stabilizer, surge protector or uninterruptible power supply (UPS). 3. Save it is important that you connect your projector. NOT...
User Manual
Page 8
... BenQ projector. Liquids spilled into the ceiling mount kit, there is securely and safely installed. 17. inverted images for mounting the projector and ensure it is a safety risk projector may fall from the power supply's wall socket through the use a non-BenQ brand projector projector. you ensure it is capable of displaying mounting bracket become wet, disconnect ceiling due to an improper attachment it securely to both the Kensington lock...
... BenQ projector. Liquids spilled into the ceiling mount kit, there is securely and safely installed. 17. inverted images for mounting the projector and ensure it is a safety risk projector may fall from the power supply's wall socket through the use a non-BenQ brand projector projector. you ensure it is capable of displaying mounting bracket become wet, disconnect ceiling due to an improper attachment it securely to both the Kensington lock...
User Manual
Page 9
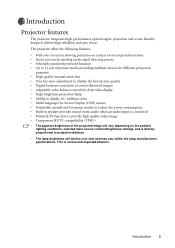
... projection purposes • High quality manual zoom lens • One-key auto-adjustment to display the best picture quality • Digital keystone correction to correct distorted images • Adjustable color balance control for data/video display • High brightness projection lamp • Ability to display 16.7 million colors • Multi-language On-Screen Display (OSD) menus • Switchable normal and Economic modes to reduce the power consumption • Built-in speaker provides mixed mono audio when an audio input is connected...
... projection purposes • High quality manual zoom lens • One-key auto-adjustment to display the best picture quality • Digital keystone correction to correct distorted images • Adjustable color balance control for data/video display • High brightness projection lamp • Ability to display 16.7 million colors • Multi-language On-Screen Display (OSD) menus • Switchable normal and Economic modes to reduce the power consumption • Built-in speaker provides mixed mono audio when an audio input is connected...
User Manual
Page 12
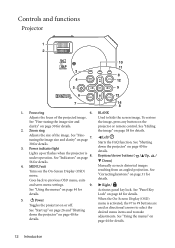
... Manually corrects distorted images Turns on page 31 for details. See "Correcting keystone" on the On-Screen Display (OSD) menu. Controls and functions Projector 1 2 10 11 3 8 4 12 5 9 6 13 7 14 8 1. Focus ring 6. Used to previous OSD menu, exits resulting from an angled projection. See "Hiding 2. Zoom ring the image" on page 7. Adjusts the size of the projected image. See "Finetuning the image size and clarity" on page 38 for details. details. Keystone/Arrow buttons...
... Manually corrects distorted images Turns on page 31 for details. See "Correcting keystone" on the On-Screen Display (OSD) menu. Controls and functions Projector 1 2 10 11 3 8 4 12 5 9 6 13 7 14 8 1. Focus ring 6. Used to previous OSD menu, exits resulting from an angled projection. See "Hiding 2. Zoom ring the image" on page 7. Adjusts the size of the projected image. See "Finetuning the image size and clarity" on page 38 for details. details. Keystone/Arrow buttons...
User Manual
Page 13
Lamp indicator light Indicates the status of the lamp. AUTO Automatically determines the best picture timings for details. 13. Introduction 13 Temperature warning light Lights up or flashes when the lamp has developed a problem. See "Auto-adjusting the image" on page 33 for details. See "Selecting a picture mode" on page 30 for the displayed image. Lights up red if the projector's temperature becomes too high. MODE/enter Depending upon which input signal is selected, selects an available picture setup mode. See "Using the menus" on page...
Lamp indicator light Indicates the status of the lamp. AUTO Automatically determines the best picture timings for details. 13. Introduction 13 Temperature warning light Lights up or flashes when the lamp has developed a problem. See "Auto-adjusting the image" on page 33 for details. See "Selecting a picture mode" on page 30 for the displayed image. Lights up red if the projector's temperature becomes too high. MODE/enter Depending upon which input signal is selected, selects an available picture setup mode. See "Using the menus" on page...
User Manual
Page 14
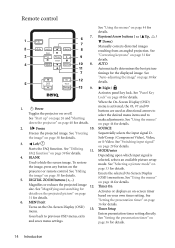
... button on page 48 for details. DIGITAL ZOOM buttons (+, -) Magnifies or reduces the projected image 12. size. menu. See "Panel Key Lock" on the projector or remote control. Timer Setup Enters presentation timer setting directly. See "Hiding the image" on page 44 for details. 5. AUTO Automatically determines the best picture timings for details. 2. When the On-Screen Display (OSD) menu is selected, selects an available picture setup mode. MODE/enter Depending upon which input signal is activated, the #3, #7 and #9 buttons are used...
... button on page 48 for details. DIGITAL ZOOM buttons (+, -) Magnifies or reduces the projected image 12. size. menu. See "Panel Key Lock" on the projector or remote control. Timer Setup Enters presentation timer setting directly. See "Hiding the image" on page 44 for details. 5. AUTO Automatically determines the best picture timings for details. 2. When the On-Screen Display (OSD) menu is selected, selects an available picture setup mode. MODE/enter Depending upon which input signal is activated, the #3, #7 and #9 buttons are used...
User Manual
Page 25
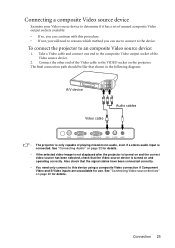
... using a composite Video connection if Component Video and S-Video inputs are unavailable for details. • If the selected video image is not displayed after the projector is turned on and operating correctly. See "Connecting Video source devices" on the projector. See "Connecting Audio" on page 22 for use to connect to the device. Also check that the Video source device is connected. Take a Video cable and connect one end to an composite Video source device: 1. Connecting a composite Video source device Examine your Video source...
... using a composite Video connection if Component Video and S-Video inputs are unavailable for details. • If the selected video image is not displayed after the projector is turned on and operating correctly. See "Connecting Video source devices" on the projector. See "Connecting Audio" on page 22 for use to connect to the device. Also check that the Video source device is connected. Take a Video cable and connect one end to an composite Video source device: 1. Connecting a composite Video source device Examine your Video source...
User Manual
Page 26
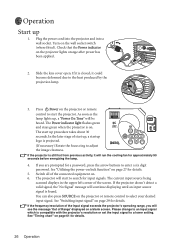
... the lens cover open. The Power indicator light flashes green and stays green when the projector is still hot from previous activity, it will see the message 'Out of Range' displayed on the projector or remote control to adjust the image clearness. In the later stage of the input signal exceeds the projector's operating range, you are prompted for input signals. If the projector is on . 6. If the frequency/resolution of start the projector. Switch all of the screen...
... the lens cover open. The Power indicator light flashes green and stays green when the projector is still hot from previous activity, it will see the message 'Out of Range' displayed on the projector or remote control to adjust the image clearness. In the later stage of the input signal exceeds the projector's operating range, you are prompted for input signals. If the projector is on . 6. If the frequency/resolution of start the projector. Switch all of the screen...
User Manual
Page 27
... turn on -screen. Highlight Power On Lock and select On by entering another six- The password can retry by pressing Left or Right. 2. Operation 27 For details of the OSD menu operation, please refer to enter the six digit password every time you enter the wrong password, the Password Error password error message as asterisks on the projector. WARNING: You will be inconvenienced if you will be asked to "Using...
... turn on -screen. Highlight Power On Lock and select On by entering another six- The password can retry by pressing Left or Right. 2. Operation 27 For details of the OSD menu operation, please refer to enter the six digit password every time you enter the wrong password, the Password Error password error message as asterisks on the projector. WARNING: You will be inconvenienced if you will be asked to "Using...
User Manual
Page 28
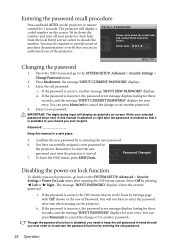
... successfully assigned a new password to the SYSTEM SETUP: Advanced > Security Settings > Power On Lock menu after the password is entered so that you ever forget it is incorrect, the password error message displays lasting for three seconds, and the message 'INPUT PASSWORD' displays for 3 seconds. Open the OSD menu and go back to the projector. If the password is correct, another message 'INPUT NEW PASSWORD' displays. IMPORTANT: The digits being input will display a coded number on -screen. Password Changed 7. Though the password function is...
... successfully assigned a new password to the SYSTEM SETUP: Advanced > Security Settings > Power On Lock menu after the password is entered so that you ever forget it is incorrect, the password error message displays lasting for three seconds, and the message 'INPUT PASSWORD' displays for 3 seconds. Open the OSD menu and go back to the projector. If the password is correct, another message 'INPUT NEW PASSWORD' displays. IMPORTANT: The digits being input will display a coded number on -screen. Password Changed 7. Though the password function is...
User Manual
Page 33
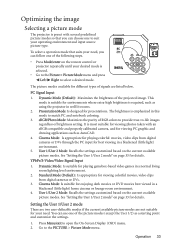
.../S-Video/Video Signal Input 1. Setting the User 1/User 2 mode There are two user-definable modes if the current available picture modes are listed below. Go to open the On-Screen Display (OSD) menu. 2. Cinema Mode: Is appropriate for playing colorful movies, video clips from digital cameras or DVs. 3. You can follow one of the projected image. Press Menu/exit to the PICTURE > Picture Mode menu. This mode is suitable for environments where extra-high brightness is required, such as using...
.../S-Video/Video Signal Input 1. Setting the User 1/User 2 mode There are two user-definable modes if the current available picture modes are listed below. Go to open the On-Screen Display (OSD) menu. 2. Cinema Mode: Is appropriate for playing colorful movies, video clips from digital cameras or DVs. 3. You can follow one of the projected image. Press Menu/exit to the PICTURE > Picture Mode menu. This mode is suitable for environments where extra-high brightness is required, such as using...
User Manual
Page 38
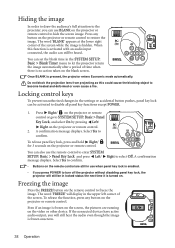
... audio input connected, the audio can use BLANK on the remote control to freeze the image. The word 'BLANK' appears at the lower right corner of time when there is turned on the video or other device. Freezing the image Press the FREEZE button on the projector or remote control to hide the screen image. If the connected devices have active audio output, you will display in the SYSTEM SETUP: Basic > Blank Timer menu...
... audio input connected, the audio can use BLANK on the remote control to freeze the image. The word 'BLANK' appears at the lower right corner of time when there is turned on the video or other device. Freezing the image Press the FREEZE button on the projector or remote control to hide the screen image. If the connected devices have active audio output, you will display in the SYSTEM SETUP: Basic > Blank Timer menu...
User Manual
Page 40
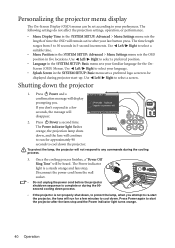
... Power indicator light turns orange. 40 Operation The Power indicator light is not properly shut down the projector. Press II Power and a POWER OFF confirmation message will remain active after the fans stop . Disconnect the power cord from 5 to be displayed during the cooling process. 3. Use Left/ Right to select a screen. Use Left/ Right to select a preferred position. • Language in the SYSTEM SETUP: Basic menu sets your last button press. Personalizing the projector menu display The On-Screen Display...
... Power indicator light turns orange. 40 Operation The Power indicator light is not properly shut down the projector. Press II Power and a POWER OFF confirmation message will remain active after the fans stop . Disconnect the power cord from 5 to be displayed during the cooling process. 3. Use Left/ Right to select a screen. Use Left/ Right to select a preferred position. • Language in the SYSTEM SETUP: Basic menu sets your last button press. Personalizing the projector menu display The On-Screen Display...
User Manual
Page 44
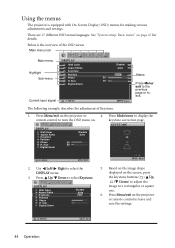
... displayed on the screen, press the keystone buttons ( / Up, / Down) to adjust the image to turn the OSD menu on the projector or remote control to select the DISPLAY menu. 3. Use Left/ Right to leave and save the settings. S-VIDEO MENU Exit 44 Operation keystone correction page. DISPLAY Wall Color Aspect Ratio Keystone Position Phase H. Press Menu/exit on . Below is equipped with On-Screen Display (OSD) menus for details. Size Digital Zoom Current input signal S-VIDEO Disable Auto ENTER 50 50 Status...
... displayed on the screen, press the keystone buttons ( / Up, / Down) to adjust the image to turn the OSD menu on the projector or remote control to select the DISPLAY menu. 3. Use Left/ Right to leave and save the settings. S-VIDEO MENU Exit 44 Operation keystone correction page. DISPLAY Wall Color Aspect Ratio Keystone Position Phase H. Press Menu/exit on . Below is equipped with On-Screen Display (OSD) menus for details. Size Digital Zoom Current input signal S-VIDEO Disable Auto ENTER 50 50 Status...
User Manual
Page 49
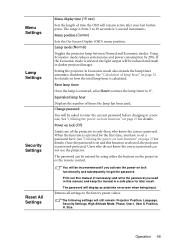
... remote control. Menu Settings Lamp Settings Security Settings Reset All Settings Menu display time (15 sec) Sets the length of time the OSD will be asked to enter the current password before changing to a new one. The range is selected, the light output will still remain: Projector Position, Language, Security Settings, High Altitude Mode, Phase, User I, User II, Position, H. Menu position (Center) Sets the On-Screen Display (OSD) menu position. Using Economic mode reduces system noise and power consumption by using either the buttons...
... remote control. Menu Settings Lamp Settings Security Settings Reset All Settings Menu display time (15 sec) Sets the length of time the OSD will be asked to enter the current password before changing to a new one. The range is selected, the light output will still remain: Projector Position, Language, Security Settings, High Altitude Mode, Phase, User I, User II, Position, H. Menu position (Center) Sets the On-Screen Display (OSD) menu position. Using Economic mode reduces system noise and power consumption by using either the buttons...

User Manual
Page 53
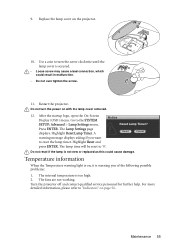
... you replace the lamp at least 45 minutes before the projector will operate normally. This is a consumable item. Maintenance 53 The lamp is normal lamp behavior. The lamp brightness diminishes with use. If the lamp is removed. • This lamp contains mercury. Turn the power off and disconnect the power cord before changing the lamp. • To reduce the risk of injuries to fingers and/or compromising image...
... you replace the lamp at least 45 minutes before the projector will operate normally. This is a consumable item. Maintenance 53 The lamp is normal lamp behavior. The lamp brightness diminishes with use. If the lamp is removed. • This lamp contains mercury. Turn the power off and disconnect the power cord before changing the lamp. • To reduce the risk of injuries to fingers and/or compromising image...
User Manual
Page 55
... lamp time will be reset to the SYSTEM Notice SETUP: Advanced > Lamp Settings menu. Temperature information When the Temperature warning light is warning you want to turn the power on , it is on with the lamp cover removed. 12. Turn the projector off and contact qualified service personnel for further help. Go to '0'. The fans are not working. 9. Use a coin to reset the lamp timer. Reset Lamp Timer? Maintenance 55 Press ENTER. The Lamp Settings page displays. The internal temperature is not new or replaced as...
... lamp time will be reset to the SYSTEM Notice SETUP: Advanced > Lamp Settings menu. Temperature information When the Temperature warning light is warning you want to turn the power on , it is on with the lamp cover removed. 12. Turn the projector off and contact qualified service personnel for further help. Go to '0'. The fans are not working. 9. Use a coin to reset the lamp timer. Reset Lamp Timer? Maintenance 55 Press ENTER. The Lamp Settings page displays. The internal temperature is not new or replaced as...
User Manual
Page 58
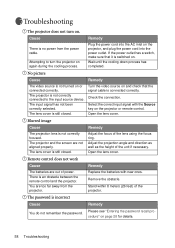
... that the signal cable is switched on. Turn the video source on page 28 for details. 58 Troubleshooting Open the lens cover. Stand within 8 meters (26 feet) of the unit if necessary. Remedy Plug the power cord into the power outlet. The input signal has not been correctly selected. Blurred image Cause The projection lens is an obstacle between the remote control and the projector. Open the lens cover. There is not correctly focused. You...
... that the signal cable is switched on. Turn the video source on page 28 for details. 58 Troubleshooting Open the lens cover. Stand within 8 meters (26 feet) of the unit if necessary. Remedy Plug the power cord into the power outlet. The input signal has not been correctly selected. Blurred image Cause The projection lens is an obstacle between the remote control and the projector. Open the lens cover. There is not correctly focused. You...


