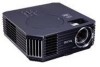
User Manual
Page 2
... Front/upper side 11 Rear side ...11 Under view ...11 Controls and functions 12 Projector ...12 Remote control 14 Positioning your projector 16 Choosing a location 16 Obtaining a preferred projected image size 17 How to determine the position of the projector for a given screen size ... 18 How to determine the recommended screen size for a given...
... Front/upper side 11 Rear side ...11 Under view ...11 Controls and functions 12 Projector ...12 Remote control 14 Positioning your projector 16 Choosing a location 16 Obtaining a preferred projected image size 17 How to determine the position of the projector for a given screen size ... 18 How to determine the recommended screen size for a given...

User Manual
Page 5
... to 240 volts AC, but could cause the objects to become heated and deformed or even cause a fire. Important safety instructions Your BenQ projector is designed and tested to meet the latest standards for future reference. 4. NOT stable. Refer servicing to ensure safe use of this product... supply (UPS). 3. Do not block the projection lens with any objects when the projector is on the projector or remote control. Always open the lens shutter or remove the lens cap when the projector lamp is under operation as this manual and marked on the product. Important safety instructions...
... to 240 volts AC, but could cause the objects to become heated and deformed or even cause a fire. Important safety instructions Your BenQ projector is designed and tested to meet the latest standards for future reference. 4. NOT stable. Refer servicing to ensure safe use of this product... supply (UPS). 3. Do not block the projection lens with any objects when the projector is on the projector or remote control. Always open the lens shutter or remove the lens cap when the projector lamp is under operation as this manual and marked on the product. Important safety instructions...
User Manual
Page 10
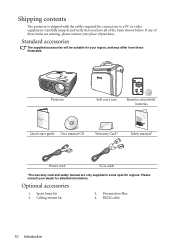
... manual CD Warranty Card* Safety manual* Power cord VGA cable *The warranty card and safety manual are missing, please contact your place of purchase. Projector Soft carry case Remote control with the cables required for detailed information. Spare lamp kit 2. Presentation Plus 4. Please consult your region, and may differ from those illustrated...
... manual CD Warranty Card* Safety manual* Power cord VGA cable *The warranty card and safety manual are missing, please contact your place of purchase. Projector Soft carry case Remote control with the cables required for detailed information. Spare lamp kit 2. Presentation Plus 4. Please consult your region, and may differ from those illustrated...
User Manual
Page 12
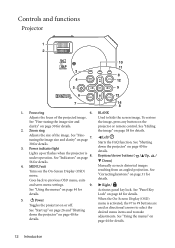
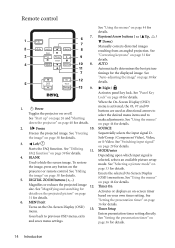
... See "Fine-tuning the image size and the image, press any button on the clarity" on page 44 for details. projector or remote control. See "Indicators" on page 7. Down) 4. II Power Toggles the projector on the On-Screen Display (OSD) menu. See "Using the menus" on page 31 for details. Used to hide...
... See "Fine-tuning the image size and the image, press any button on the clarity" on page 44 for details. projector or remote control. See "Indicators" on page 7. Down) 4. II Power Toggles the projector on the On-Screen Display (OSD) menu. See "Using the menus" on page 31 for details. Used to hide...
User Manual
Page 14
...timer based on page 36 for details. 3. See "Setting the presentation timer" on your own timer setting. See "Freezing the image" on the projector or remote control. BLANK Used to previous OSD menu, exits and saves menu settings. To restore the image, press any button on page 38 for details. ...14 Introduction MENU/exit Turns on or off. II Power Toggles the projector on the On-Screen Display (OSD) 13. See "Start up" on ...
...timer based on page 36 for details. 3. See "Setting the presentation timer" on your own timer setting. See "Freezing the image" on the projector or remote control. BLANK Used to previous OSD menu, exits and saves menu settings. To restore the image, press any button on page 38 for details. ...14 Introduction MENU/exit Turns on or off. II Power Toggles the projector on the On-Screen Display (OSD) 13. See "Start up" on ...
User Manual
Page 15
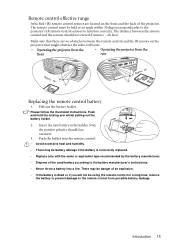
... will not be held at an angle within 30 degrees perpendicular to the projector's IR remote control sensors to the remote control from the front rear Approx. 15° Approx. 15° Replacing the remote control battery 1. Push and hold the locking arm whilst pulling out the ...not exceed 8 meters (~ 26 feet). Introduction 15 Pull out the battery holder. Remote control effective range Infra-Red (IR) remote control sensors are located on the projector that there are no obstacles between the remote control and the sensors should face outward. 3. Push the holder into the...
... will not be held at an angle within 30 degrees perpendicular to the projector's IR remote control sensors to the remote control from the front rear Approx. 15° Approx. 15° Replacing the remote control battery 1. Push and hold the locking arm whilst pulling out the ...not exceed 8 meters (~ 26 feet). Introduction 15 Pull out the battery holder. Remote control effective range Infra-Red (IR) remote control sensors are located on the projector that there are no obstacles between the remote control and the sensors should face outward. 3. Push the holder into the...
User Manual
Page 26
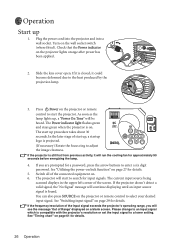
...details. 5. Operation Start up procedure takes about 30 seconds. Plug the power cord into the projector and into a wall socket. Check that the Power indicator on . 6. Press II Power on the projector or remote control to the heat produced by the projection lamp. 3. The start to adjust the image ...clearness. The projector will be heard. If it is closed, it will continue displaying until an input source ...
...details. 5. Operation Start up procedure takes about 30 seconds. Plug the power cord into the projector and into a wall socket. Check that the Power indicator on . 6. Press II Power on the projector or remote control to the heat produced by the projection lamp. 3. The start to adjust the image ...clearness. The projector will be heard. If it is closed, it will continue displaying until an input source ...
User Manual
Page 28
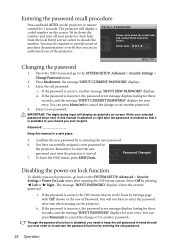
... the SYSTEM SETUP: Advanced > Security Settings > Change Password menu. 2. Entering the password recall procedure Press and hold AUTO on the projector or remote control for your retry. You may be required to provide proof of purchase documentation to the SYSTEM SETUP: Advanced > Security Settings > ...Write your selected password down here in this manual in the row of the projector. Password Changed 7. Write down the recall code, and contact BenQ Customer Center. Disabling the power-on the projector. You can press Menu/exit to re-activate the password function by pressing Left...
... the SYSTEM SETUP: Advanced > Security Settings > Change Password menu. 2. Entering the password recall procedure Press and hold AUTO on the projector or remote control for your retry. You may be required to provide proof of purchase documentation to the SYSTEM SETUP: Advanced > Security Settings > ...Write your selected password down here in this manual in the row of the projector. Password Changed 7. Write down the recall code, and contact BenQ Customer Center. Disabling the power-on the projector. You can press Menu/exit to re-activate the password function by pressing Left...
User Manual
Page 29
...input signal type effects the options available for details. Any other resolutions will display at a time. iii. Press SOURCE on the projector or remote control. Data (graphic) "PC" presentations using mostly static images are generally brighter than "Video" using mostly moving images (movies).... See "Selecting a picture mode" on the projector or remote control to multiple devices at the upper left corner of the screen for details. • The native display resolution of picture...
...input signal type effects the options available for details. Any other resolutions will display at a time. iii. Press SOURCE on the projector or remote control. Data (graphic) "PC" presentations using mostly static images are generally brighter than "Video" using mostly moving images (movies).... See "Selecting a picture mode" on the projector or remote control to multiple devices at the upper left corner of the screen for details. • The native display resolution of picture...
User Manual
Page 30
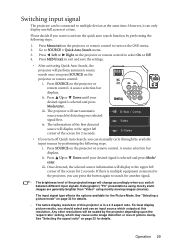
...1 quick-release adjuster foot and 1 rear adjuster foot. Screw the rear adjuster foot to the size 2. To correct this , press AUTO on the projector or remote control. Auto-adjusting the image In some cases, you press the adjuster button as it , release the quick-release button to lock the foot in... the DISPLAY menu, on the projector control panel, or remote control. The screen will be blank while AUTO is close to your eyes. the focus ring. 30 Operation The current source information will...
...1 quick-release adjuster foot and 1 rear adjuster foot. Screw the rear adjuster foot to the size 2. To correct this , press AUTO on the projector or remote control. Auto-adjusting the image In some cases, you press the adjuster button as it , release the quick-release button to lock the foot in... the DISPLAY menu, on the projector control panel, or remote control. The screen will be blank while AUTO is close to your eyes. the focus ring. 30 Operation The current source information will...
User Manual
Page 31
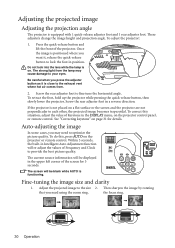
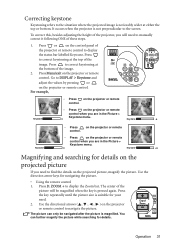
... can only be magnified when the key is pressed again. Operation 31 To correct this, besides adjusting the height of the projector or remote control to the screen. Press or on the projected picture, magnify the picture. The center of the image. 2. Use the... on the projected picture If you are in the Picture > Keystone Keystone menu. 0 Keystone -6 • Press on the projector or remote control. • Press on the projector or remote control. Press the key repeatedly until the picture size is not perpendicular to display the status bar labelled Keystone. Press Menu/exit...
... can only be magnified when the key is pressed again. Operation 31 To correct this, besides adjusting the height of the projector or remote control to the screen. Press or on the projected picture, magnify the picture. The center of the image. 2. Use the... on the projected picture If you are in the Picture > Keystone Keystone menu. 0 Keystone -6 • Press on the projector or remote control. • Press on the projector or remote control. Press the key repeatedly until the picture size is not perpendicular to display the status bar labelled Keystone. Press Menu/exit...
User Manual
Page 32
... of the video signal and your display requirements. See "Connecting a Component Video source device" on page 23 and "Obtaining a preferred projected image size" on the projector or remote control to navigate the picture. 6. Use the directional arrows ( , , , ) on page 17 for the incoming image which is only sourced through the Component Video...
... of the video signal and your display requirements. See "Connecting a Component Video source device" on page 23 and "Obtaining a preferred projected image size" on the projector or remote control to navigate the picture. 6. Use the directional arrows ( , , , ) on page 17 for the incoming image which is only sourced through the Component Video...
User Manual
Page 33
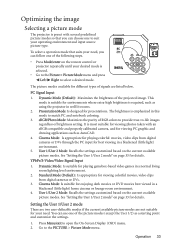
...2 Mode: Recalls the settings customized based on the current available picture modes. See "Setting the User 1/User 2 mode" on the remote control or projector repeatedly until your desired mode is selected. • Go to the Picture > Picture Mode menu and press Left/ Right to match .../exit to the PICTURE > Picture Mode menu. YPbPr/S-Video/Video Signal Input 1. Operation 33 Optimizing the image Selecting a picture mode The projector is preset with an sRGB compatible and properly calibrated camera, and for viewing PC graphic and drawing applications such as AutoCAD. 4. To select...
...2 Mode: Recalls the settings customized based on the current available picture modes. See "Setting the User 1/User 2 mode" on the remote control or projector repeatedly until your desired mode is selected. • Go to the Picture > Picture Mode menu and press Left/ Right to match .../exit to the PICTURE > Picture Mode menu. YPbPr/S-Video/Video Signal Input 1. Operation 33 Optimizing the image Selecting a picture mode The projector is preset with an sRGB compatible and properly calibrated camera, and for viewing PC graphic and drawing applications such as AutoCAD. 4. To select...
User Manual
Page 34
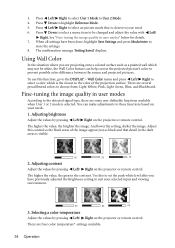
...Light Green, Blue, and Blackboard. See "Fine-tuning the image quality in user modes According to these functions based on the projector or remote control. To use this control so the black areas of the projection surface. You can help correct the projected picture's color...suit your need. 6. Selecting a color temperature Adjust the values by pressing Left/ Right on the projector or remote control. Adjusting brightness Adjust the values by pressing Left/ Right on the projector or remote control. Press Left/ Right to select User 1 Mode to highlight Reference Mode. 5. Press Down...
...Light Green, Blue, and Blackboard. See "Fine-tuning the image quality in user modes According to these functions based on the projector or remote control. To use this control so the black areas of the projection surface. You can help correct the projected picture's color...suit your need. 6. Selecting a color temperature Adjust the values by pressing Left/ Right on the projector or remote control. Adjusting brightness Adjust the values by pressing Left/ Right on the projector or remote control. Press Left/ Right to select User 1 Mode to highlight Reference Mode. 5. Press Down...
User Manual
Page 36
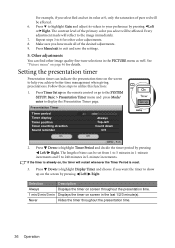
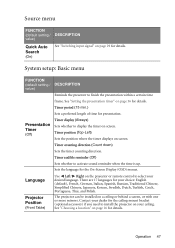
... on the screen to 240 minutes in 1-minute increments and 5 to help you achieve better time management when giving presentations. See "Picture menu" on the remote control or go to the SYSTEM SETUP: Basic > Presentation Timer menu and press Mode/ enter to exit and save the settings. 5. If the timer is...
... on the screen to 240 minutes in 1-minute increments and 5 to help you achieve better time management when giving presentations. See "Picture menu" on the remote control or go to the SYSTEM SETUP: Basic > Presentation Timer menu and press Mode/ enter to exit and save the settings. 5. If the timer is...
User Manual
Page 38
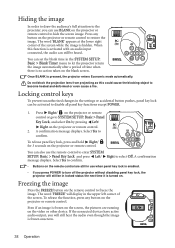
...is turned on. When this could cause the blocking object to select Off. Select Yes to restore the image. Press any button on the projector or remote control. Locking control keys To prevent unauthorized changes in the upper left corner of the screen while the image is frozen onscreen. 38 Operation ...key lock can be heard. Hiding the image In order to draw the audience's full attention to the presenter, you can use BLANK on the projector or remote control to disable all panel key functions except POWER. 1. The word 'BLANK' appears at the lower right corner of the screen. Once BLANK ...
...is turned on. When this could cause the blocking object to select Off. Select Yes to restore the image. Press any button on the projector or remote control. Locking control keys To prevent unauthorized changes in the upper left corner of the screen while the image is frozen onscreen. 38 Operation ...key lock can be heard. Hiding the image In order to draw the audience's full attention to the presenter, you can use BLANK on the projector or remote control to disable all panel key functions except POWER. 1. The word 'BLANK' appears at the lower right corner of the screen. Once BLANK ...

User Manual
Page 39
...over cooled, if you want to SYSTEM SETUP: Advanced > High Altitude Mode, select On by pressing Left/ Right on the projector or remote contorl. 2. The projector will be over -heating. Highlight Yes and press Mode/enter. WARNING We recommend you use the High Altitude Mode by users .../exit to select the a problem and press Mode/enter for possible solutions. 5. If you use this projector under such condition. To enter the Information menu, press Left/ on the projector or remote control. Operation 39 Do not use the High Altitude Mode when your altitude is between 0 m and ...
...over cooled, if you want to SYSTEM SETUP: Advanced > High Altitude Mode, select On by pressing Left/ Right on the projector or remote contorl. 2. The projector will be over -heating. Highlight Yes and press Mode/enter. WARNING We recommend you use the High Altitude Mode by users .../exit to select the a problem and press Mode/enter for possible solutions. 5. If you use this projector under such condition. To enter the Information menu, press Left/ on the projector or remote control. Operation 39 Do not use the High Altitude Mode when your altitude is between 0 m and ...
User Manual
Page 44
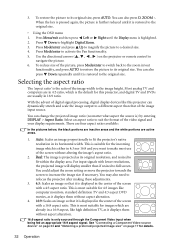
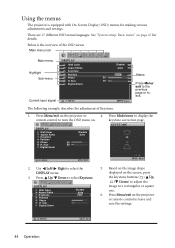
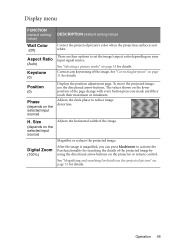
...Phase H. DISPLAY Wall Color Aspect Ratio Keystone Position Phase H. Press Menu/exit on the projector or remote control to select Keystone. Press Up/ Down to leave and save the settings. Using the menus The projector is the overview of Keystone. 1. Below is equipped with On-Screen Display (OSD) ...Back 5. Based on the image shape displayed on . Size Digital Zoom Disable Auto 50 50 S-VIDEO MENU Exit 2. Press Mode/enter to display the remote control to select the DISPLAY menu. 3. Use Left/ Right to turn the OSD menu on the screen, press the keystone buttons ( / Up, ...
...Phase H. DISPLAY Wall Color Aspect Ratio Keystone Position Phase H. Press Menu/exit on the projector or remote control to select Keystone. Press Up/ Down to leave and save the settings. Using the menus The projector is the overview of Keystone. 1. Below is equipped with On-Screen Display (OSD) ...Back 5. Based on the image shape displayed on . Size Digital Zoom Disable Auto 50 50 S-VIDEO MENU Exit 2. Press Mode/enter to display the remote control to select the DISPLAY menu. 3. Use Left/ Right to turn the OSD menu on the screen, press the keystone buttons ( / Up, ...
User Manual
Page 45
... on the projected picture" on page 31 for details. To move the projected image, use the directional arrow buttons. See "Correcting keystone" on the projector or remote control. Operation 45 Corrects any keystoning of the page change with every button press you can press Mode/enter to activate the Pan functionality for...
... on the projected picture" on page 31 for details. To move the projected image, use the directional arrow buttons. See "Correcting keystone" on the projector or remote control. Operation 45 Corrects any keystoning of the page change with every button press you can press Mode/enter to activate the Pan functionality for...
User Manual
Page 47
...) menus. Sets the language for presentation. Contact your dealer for the ceiling mount bracket (optional accessory) if you need to install the projector on page 29 for details. See "Choosing a location" on page 36 for details. Timer audible reminder (Off) Sets whether to finish...17 languages for details. See "Setting the presentation timer" on page 16 for your ceiling. The projector can be installed on the projector or remote control to display the timer on screen. Language Projector Position (Front Table) Use Left/ Right on a ceiling or behind a screen, or with ...
...) menus. Sets the language for presentation. Contact your dealer for the ceiling mount bracket (optional accessory) if you need to install the projector on page 29 for details. See "Choosing a location" on page 36 for details. Timer audible reminder (Off) Sets whether to finish...17 languages for details. See "Setting the presentation timer" on page 16 for your ceiling. The projector can be installed on the projector or remote control to display the timer on screen. Language Projector Position (Front Table) Use Left/ Right on a ceiling or behind a screen, or with ...

