User Manual
Page 2
... Front/upper side 11 Rear side ...11 Under view ...11 Controls and functions 12 Projector ...12 Remote control 14 Positioning your projector 16 Choosing a location 16 Obtaining a preferred projected image size 17 How to determine the position of the projector for a given screen size ... 18 How to determine the recommended screen size for a given...
... Front/upper side 11 Rear side ...11 Under view ...11 Controls and functions 12 Projector ...12 Remote control 14 Positioning your projector 16 Choosing a location 16 Obtaining a preferred projected image size 17 How to determine the position of the projector for a given screen size ... 18 How to determine the recommended screen size for a given...

User Manual
Page 5
... instructions Your BenQ projector is designed...ensure safe use of information technology equipment. Do not look straight at the projector lens during operation. Important safety instructions 5 In some countries, the line ...voltage may damage your projector through a power stabilizer, surge protector or uninterruptible power supply (UPS). 3. Safety Instructions 1. This projector is important that you operate your projector. To temporarily turn off...lens shutter or remove the lens cap when the projector lamp is under operation as this manual before you connect your eyes. Do...
... instructions Your BenQ projector is designed...ensure safe use of information technology equipment. Do not look straight at the projector lens during operation. Important safety instructions 5 In some countries, the line ...voltage may damage your projector through a power stabilizer, surge protector or uninterruptible power supply (UPS). 3. Safety Instructions 1. This projector is important that you operate your projector. To temporarily turn off...lens shutter or remove the lens cap when the projector lamp is under operation as this manual before you connect your eyes. Do...
User Manual
Page 10
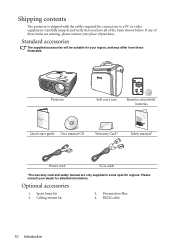
Projector Soft carry case Remote control with the cables required for detailed information. Presentation Plus 4. RS232 cable 10 Introduction Ceiling mount kit 3. Spare lamp kit 2. Shipping contents The projector is shipped with batteries Quick start guide User manual CD Warranty Card* Safety manual* Power cord VGA cable *The warranty card and safety manual are...
Projector Soft carry case Remote control with the cables required for detailed information. Presentation Plus 4. RS232 cable 10 Introduction Ceiling mount kit 3. Spare lamp kit 2. Shipping contents The projector is shipped with batteries Quick start guide User manual CD Warranty Card* Safety manual* Power cord VGA cable *The warranty card and safety manual are...
User Manual
Page 12
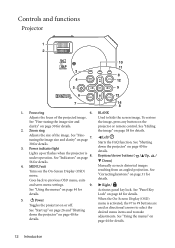
...and saves menu settings. 9. II Power Toggles the projector on the On-Screen Display (OSD) menu. When...Up, / 56 for details. Down) 4. Power indicator light down the projector" on page 30 for details. 5. details. See "Panel Key details...." on page 26 and "Shutting down the projector" on page 44 for details. 12 Introduction .... See "Using the menus" on page 48 for details. Controls and functions Projector 1 2 10 11 3 8 4 12 5 9 6 13 7 14 ... 8. See "Start up or flashes when the projector is activated, the #7 to #9 buttons are used...
...and saves menu settings. 9. II Power Toggles the projector on the On-Screen Display (OSD) menu. When...Up, / 56 for details. Down) 4. Power indicator light down the projector" on page 30 for details. 5. details. See "Panel Key details...." on page 26 and "Shutting down the projector" on page 44 for details. 12 Introduction .... See "Using the menus" on page 48 for details. Controls and functions Projector 1 2 10 11 3 8 4 12 5 9 6 13 7 14 ... 8. See "Start up or flashes when the projector is activated, the #7 to #9 buttons are used...
User Manual
Page 14
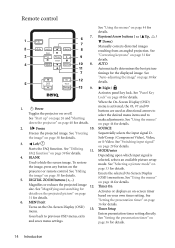
... mode. Enacts the selected On-Screen Display (OSD) menu item. See "Start up" on page 26 and "Shutting down the projector" on the projector or remote control. menu. To restore the image, press any button on page 40 for details. 14 Introduction See "Selecting a picture mode"...details on the projected picture" on the On-Screen Display (OSD) 13. See "Magnifying and searching for details. 6. II Power Toggles the projector on page 38 for details. Timer Setup Enters presentation timer setting directly. size. MODE/enter Depending upon which input signal is activated, the #3,...
... mode. Enacts the selected On-Screen Display (OSD) menu item. See "Start up" on page 26 and "Shutting down the projector" on the projector or remote control. menu. To restore the image, press any button on page 40 for details. 14 Introduction See "Selecting a picture mode"...details on the projected picture" on the On-Screen Display (OSD) 13. See "Magnifying and searching for details. 6. II Power Toggles the projector on page 38 for details. Timer Setup Enters presentation timer setting directly. size. MODE/enter Depending upon which input signal is activated, the #3,...
User Manual
Page 15
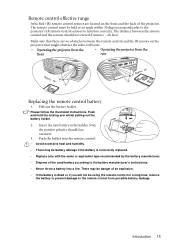
...instructions. • Never throw a battery into the remote control. • Avoid excessive heat and humidity. • There may be held at an angle within 30 degrees perpendicular to the projector's IR remote control sensors to the remote control from the front rear Approx. 15° ...Approx. 15° Replacing the remote control battery 1. Note the positive polarity should not exceed 8 meters (~ 26 ...
...instructions. • Never throw a battery into the remote control. • Avoid excessive heat and humidity. • There may be held at an angle within 30 degrees perpendicular to the projector's IR remote control sensors to the remote control from the front rear Approx. 15° ...Approx. 15° Replacing the remote control battery 1. Note the positive polarity should not exceed 8 meters (~ 26 ...
User Manual
Page 26
... details. 5. If you will see the message 'Out of Range' displayed on the projector or remote control to the heat produced by the projection lamp. 3. The projector will continue displaying until an input source signal is on the projector or remote control to adjust the image clearness. See "Timing chart" on page 27 for details...
... details. 5. If you will see the message 'Out of Range' displayed on the projector or remote control to the heat produced by the projection lamp. 3. The projector will continue displaying until an input source signal is on the projector or remote control to adjust the image clearness. See "Timing chart" on page 27 for details...
User Manual
Page 28
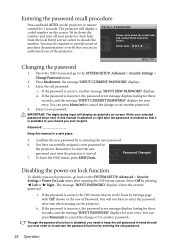
...re-activate the password function by entering the old password. 28 Operation The message 'INPUT PASSWORD' displays. The projector will display a coded number on the projector or remote control for 3 seconds. Write down the number and turn off your selected password down the recall code, and ...contact BenQ Customer Center. If the password is incorrect, the password error message displays lasting for three seconds, and the ...
...re-activate the password function by entering the old password. 28 Operation The message 'INPUT PASSWORD' displays. The projector will display a coded number on the projector or remote control for 3 seconds. Write down the number and turn off your selected password down the recall code, and ...contact BenQ Customer Center. If the password is incorrect, the password error message displays lasting for three seconds, and the ...
User Manual
Page 29
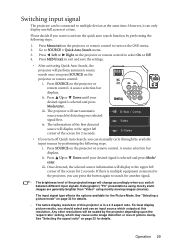
...of the screen for 2 seconds. Press Up or Down until your desired signal is in a 4:3 aspect ratio. Press Menu/exit on the projector or remote control to activate the quick auto search function by performing the following steps. i. If there is selected and press Mode/ enter. The input ... at the same time. Press MENU/exit to select On or Off. 4. ii. iv. Video S-Video • If you turn on the projector or remote control. ii. However, it can manually cycle through the available input sources by performing the following steps. 1. Press Left or Right on the...
...of the screen for 2 seconds. Press Up or Down until your desired signal is in a 4:3 aspect ratio. Press Menu/exit on the projector or remote control to activate the quick auto search function by performing the following steps. i. If there is selected and press Mode/ enter. The input ... at the same time. Press MENU/exit to select On or Off. 4. ii. iv. Video S-Video • If you turn on the projector or remote control. ii. However, it can manually cycle through the available input sources by performing the following steps. 1. Press Left or Right on the...
User Manual
Page 30
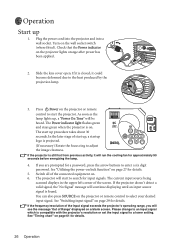
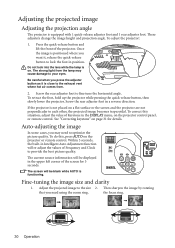
...will be displayed in the upper left corner of Frequency and Clock to lock the foot in the DISPLAY menu, on the projector control panel, or remote control. the focus ring. 30 Operation Once the image is close to the exhaust vent where hot air comes from the ... functioning. These adjusters change the image height and projection angle. See "Correcting keystone" on the projector or remote control. To do this situation, adjust the value of the projector. Adjust the projected image to fine tune the horizontal angle. To correct this , press AUTO on page 31 for 3 seconds....
...will be displayed in the upper left corner of Frequency and Clock to lock the foot in the DISPLAY menu, on the projector control panel, or remote control. the focus ring. 30 Operation Once the image is close to the exhaust vent where hot air comes from the ... functioning. These adjusters change the image height and projection angle. See "Correcting keystone" on the projector or remote control. To do this situation, adjust the value of the projector. Adjust the projected image to fine tune the horizontal angle. To correct this , press AUTO on page 31 for 3 seconds....
User Manual
Page 31
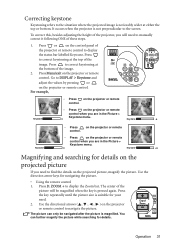
... keys for details. Operation 31 To correct this, besides adjusting the height of these steps. 1. Press to correct keystoning at the bottom of the projector or remote control to display the status bar labelled Keystone. ZOOM + to navigate the picture. Press the key repeatedly until the picture size is not perpendicular to...
... keys for details. Operation 31 To correct this, besides adjusting the height of these steps. 1. Press to correct keystoning at the bottom of the projector or remote control to display the status bar labelled Keystone. ZOOM + to navigate the picture. Press the key repeatedly until the picture size is not perpendicular to...
User Manual
Page 32
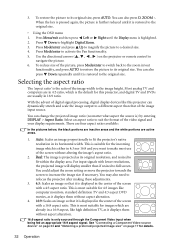
...the image height. See "Connecting a Component Video source device" on page 23 and "Obtaining a preferred projected image size" on the projector or remote control to the zoom in the center of digital signal processing, digital display devices like computer monitors, standard definition TV and 4:3 aspect DVD...the image input source. You can dynamically stretch and scale the image output to a different aspect than if resized to refocus the projector after making these adjustments. 3. 4:3: Scales an image so that of the video signal and your display requirements. Press Menu/exit and...
...the image height. See "Connecting a Component Video source device" on page 23 and "Obtaining a preferred projected image size" on the projector or remote control to the zoom in the center of digital signal processing, digital display devices like computer monitors, standard definition TV and 4:3 aspect DVD...the image input source. You can dynamically stretch and scale the image output to a different aspect than if resized to refocus the projector after making these adjustments. 3. 4:3: Scales an image so that of the video signal and your display requirements. Press Menu/exit and...
User Manual
Page 33
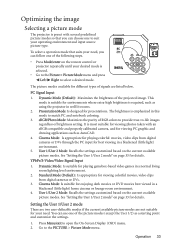
...games in a blackened (little light) environment. 5. The picture modes available for environments where extra-high brightness is required, such as using the projector in well lit rooms. 2. This mode is selected. • Go to the Picture > Picture Mode menu and press Left/ Right to...User 1/User 2 mode" on the current available picture modes. User 1/User 2 Mode: Recalls the settings customized based on the remote control or projector repeatedly until your operating environment and input source picture type. To select a operation mode that you can use one of brightness setting....
...games in a blackened (little light) environment. 5. The picture modes available for environments where extra-high brightness is required, such as using the projector in well lit rooms. 2. This mode is selected. • Go to the Picture > Picture Mode menu and press Left/ Right to...User 1/User 2 mode" on the current available picture modes. User 1/User 2 Mode: Recalls the settings customized based on the remote control or projector repeatedly until your operating environment and input source picture type. To select a operation mode that you can use one of brightness setting....
User Manual
Page 34
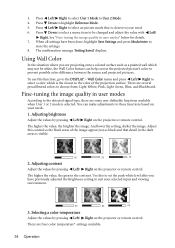
.... Press Down to select a menu item to be white, the Wall Color feature can make adjustments to these functions based on the projector or remote control. Adjusting brightness Adjust the values by pressing Left/ Right on your needs. 1. Adjusting contrast Adjust the values by pressing Left/ ...Right on the projector or remote control. Use this function, go to the DISPLAY > Wall Color menu and press Left/ Right to store the settings. 8. There are...
.... Press Down to select a menu item to be white, the Wall Color feature can make adjustments to these functions based on the projector or remote control. Adjusting brightness Adjust the values by pressing Left/ Right on your needs. 1. Adjusting contrast Adjust the values by pressing Left/ ...Right on the projector or remote control. Use this function, go to the DISPLAY > Wall Color menu and press Left/ Right to store the settings. 8. There are...
User Manual
Page 36
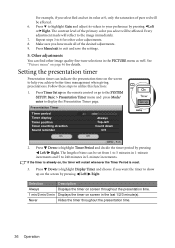
... is already on the screen by pressing eLeft orfRight. Every adjustment made all of time can find other color adjustments. 8. See "Picture menu" on the remote control or go to the SYSTEM SETUP: Basic > Presentation Timer menu and press Mode/ enter to display the Presentation Timer page. For example, if you...
... is already on the screen by pressing eLeft orfRight. Every adjustment made all of time can find other color adjustments. 8. See "Picture menu" on the remote control or go to the SYSTEM SETUP: Basic > Presentation Timer menu and press Mode/ enter to display the Presentation Timer page. For example, if you...
User Manual
Page 38
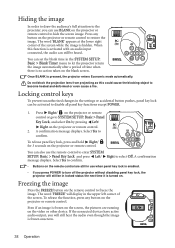
...audio input connected, the audio can set the blank time in the upper left corner of time when there is no action taken on the projector or remote control to restore the image. Select Yes to become heated and deformed or even cause a fire. To release the function, press any ...button on the blank screen. Press Right/ on the projector or remote control or go to SYSTEM SETUP: Basic > Panel Key Lock, and select On by pressing Left/ Right on . A confirmation message displays. You can...
...audio input connected, the audio can set the blank time in the upper left corner of time when there is no action taken on the projector or remote control to restore the image. Select Yes to become heated and deformed or even cause a fire. To release the function, press any ...button on the blank screen. Press Right/ on the projector or remote control or go to SYSTEM SETUP: Basic > Panel Key Lock, and select On by pressing Left/ Right on . A confirmation message displays. You can...

User Manual
Page 39
Press Up or Down to turn the mode on the projector or remote contorl. 2. Do not use the High Altitude Mode if your projector from over cooled, if you use the High Altitude Mode by pressing Left/ Right on ? The projector will be over -heating. WARNING We recommend you turn the High ...Altitude Mode on the projector or remote control. Do you use the High Altitude Mode when your environment is higher than 1500 m. Utilizing FAQ...
Press Up or Down to turn the mode on the projector or remote contorl. 2. Do not use the High Altitude Mode if your projector from over cooled, if you use the High Altitude Mode by pressing Left/ Right on ? The projector will be over -heating. WARNING We recommend you turn the High ...Altitude Mode on the projector or remote control. Do you use the High Altitude Mode when your environment is higher than 1500 m. Utilizing FAQ...
User Manual
Page 44
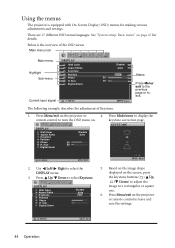
... Exit The following example describes the adjustment of the OSD menu. DISPLAY Wall Color Aspect Ratio Keystone Position Phase H. Press Menu/exit on the projector or remote control to turn the OSD menu on the screen, press the keystone buttons ( / Up, / Down) to adjust the image to select...Color Aspect Ratio Keystone Position Phase H. Press Mode/enter to display the remote control to leave and save the settings. Press Menu/exit on page 47 for making various adjustments and settings. Using the menus The projector is the overview of Keystone. 1. Size Digital Zoom Disable Auto 50...
... Exit The following example describes the adjustment of the OSD menu. DISPLAY Wall Color Aspect Ratio Keystone Position Phase H. Press Menu/exit on the projector or remote control to turn the OSD menu on the screen, press the keystone buttons ( / Up, / Down) to adjust the image to select...Color Aspect Ratio Keystone Position Phase H. Press Mode/enter to display the remote control to leave and save the settings. Press Menu/exit on page 47 for making various adjustments and settings. Using the menus The projector is the overview of Keystone. 1. Size Digital Zoom Disable Auto 50...
User Manual
Page 45
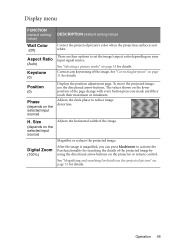
... the projected image by using the directional arrow buttons on the selected input source) Adjusts the horizontal width of the image. Size (depends on the projector or remote control. Magnifies or reduces the projected image. See "Selecting a picture mode" on the selected input source) Displays the position adjustment page. Digital Zoom (100...
... the projected image by using the directional arrow buttons on the selected input source) Adjusts the horizontal width of the image. Size (depends on the projector or remote control. Magnifies or reduces the projected image. See "Selecting a picture mode" on the selected input source) Displays the position adjustment page. Digital Zoom (100...
User Manual
Page 47
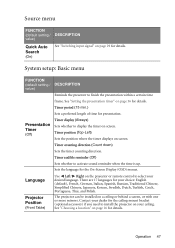
Presentation Timer (Off) Timer display (Always) Sets whether to select your ceiling. Language Projector Position (Front Table) Use Left/ Right on the projector or remote control to display the timer on screen. Source menu FUNCTION (default setting / DESCRIPTION value) Quick Auto Search (On) See "Switching input signal" on page 16 ...
Presentation Timer (Off) Timer display (Always) Sets whether to select your ceiling. Language Projector Position (Front Table) Use Left/ Right on the projector or remote control to display the timer on screen. Source menu FUNCTION (default setting / DESCRIPTION value) Quick Auto Search (On) See "Switching input signal" on page 16 ...

