
User Manual
Page 4
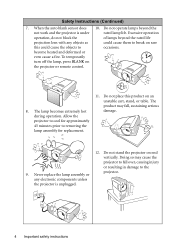
... could cause them to break on rare this product on an unstable cart, stand, or table. Do not stand the projector on the projector or remote control. 11. The product may cause the projector to the 9. Doing so may fall over, causing injury or resulting in damage to fall , sustaining serious 8. Safety Instructions (Continued...
... could cause them to break on rare this product on an unstable cart, stand, or table. Do not stand the projector on the projector or remote control. 11. The product may cause the projector to the 9. Doing so may fall over, causing injury or resulting in damage to fall , sustaining serious 8. Safety Instructions (Continued...
User Manual
Page 8
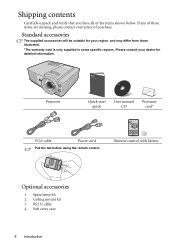
... those illustrated. *The warranty card is only supplied in some specific regions. Standard accessories The supplied accessories will be suitable for detailed information. Remote control with battery Optional accessories 1. Soft carry case 8 Introduction Projector Quick start guide User manual CD Warranty card* VGA cable Power cord Pull the tab before using the...
... those illustrated. *The warranty card is only supplied in some specific regions. Standard accessories The supplied accessories will be suitable for detailed information. Remote control with battery Optional accessories 1. Soft carry case 8 Introduction Projector Quick start guide User manual CD Warranty card* VGA cable Power cord Pull the tab before using the...
User Manual
Page 9
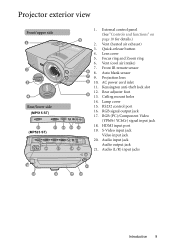
... input jack 20. Focus ring and Zoom ring 6. HDMI input port 19. Projection lens 10. RS232 control port 16. Projector exterior view Front/upper side 1 2 PUSH 3 4 Rear/lower side (MP515 ST) 15 (MP525 ST) 17 18 15 16 17 5 6 7 8 9 19 21 19 20 11 1. External control panel (See "...Controls and functions" on page 10 for details.) 2. Vent (cool air intake) 7. Front IR remote sensor 8. AC power cord inlet 11. RGB signal output jack 17...
... input jack 20. Focus ring and Zoom ring 6. HDMI input port 19. Projection lens 10. RS232 control port 16. Projector exterior view Front/upper side 1 2 PUSH 3 4 Rear/lower side (MP515 ST) 15 (MP525 ST) 17 18 15 16 17 5 6 7 8 9 19 21 19 20 11 1. External control panel (See "...Controls and functions" on page 10 for details.) 2. Vent (cool air intake) 7. Front IR remote sensor 8. AC power cord inlet 11. RGB signal output jack 17...
User Manual
Page 12
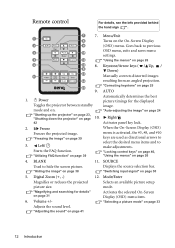
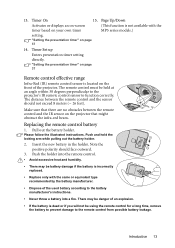
..."Shutting down the projector" on page 39 When the On-Screen Display (OSD) menu is activated, the #3, #8, and #10 keys are used as directional arrows to select the desired menu items and to hide the screen picture. Left/ Starts the FAQ function. Volume +/- Remote control For details, .... "Hiding the image" on page 39 3. Mode/Enter Magnifies or reduces the projected picture size. "Magnifying and searching for the displayed Toggles the projector between standby image. Activates the selected On-Screen Display (OSD) menu item. "Adjusting the sound" on page 31 6. Menu/Exit 1 8 Turns...
..."Shutting down the projector" on page 39 When the On-Screen Display (OSD) menu is activated, the #3, #8, and #10 keys are used as directional arrows to select the desired menu items and to hide the screen picture. Left/ Starts the FAQ function. Volume +/- Remote control For details, .... "Hiding the image" on page 39 3. Mode/Enter Magnifies or reduces the projected picture size. "Magnifying and searching for the displayed Toggles the projector between standby image. Activates the selected On-Screen Display (OSD) menu item. "Adjusting the sound" on page 31 6. Menu/Exit 1 8 Turns...
User Manual
Page 13
... hold the locking arm while pulling out the battery holder. 2. There may be held at an angle within 30 degrees perpendicular to the projector's IR remote control sensor to the remote control from possible battery leakage. Introduction 13 Please follow the illustrated instructions. Timer Set up Enters presentation timer setting directly. 13. Timer...
... hold the locking arm while pulling out the battery holder. 2. There may be held at an angle within 30 degrees perpendicular to the projector's IR remote control sensor to the remote control from possible battery leakage. Introduction 13 Please follow the illustrated instructions. Timer Set up Enters presentation timer setting directly. 13. Timer...
User Manual
Page 23
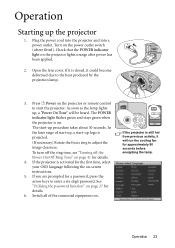
..." on -screen instructions. 5. Press II Power on page 27 for approximately 90 seconds before energizing the lamp. See "Utilizing the password function" on the projector or remote control to the heat produced by the projection lamp. 3. Turn on . As soon as the lamp lights up logo is on the power outlet switch...
..." on -screen instructions. 5. Press II Power on page 27 for approximately 90 seconds before energizing the lamp. See "Utilizing the password function" on the projector or remote control to the heat produced by the projection lamp. 3. Turn on . As soon as the lamp lights up logo is on the power outlet switch...
User Manual
Page 24
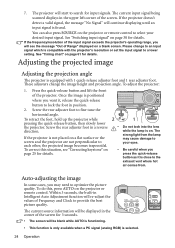
You can also press SOURCE on • Be careful when you want it is on the projector or remote control. Press the quick-release button and lift the front of Frequency and Clock to fine tune the horizontal angle. Once the image is selected. ... change the image height and projection angle. Auto-adjusting the image In some cases, you will see "Correcting keystone" on the projector or remote control to lock the foot in Intelligent Auto Adjustment function will be displayed in the corner of Range" displayed on page 30 for input signals. ...
You can also press SOURCE on • Be careful when you want it is on the projector or remote control. Press the quick-release button and lift the front of Frequency and Clock to fine tune the horizontal angle. Once the image is selected. ... change the image height and projection angle. Auto-adjusting the image In some cases, you will see "Correcting keystone" on the projector or remote control to lock the foot in Intelligent Auto Adjustment function will be displayed in the corner of Range" displayed on page 30 for input signals. ...
User Manual
Page 25
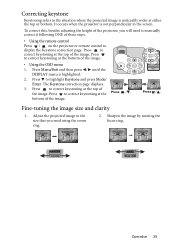
It occurs when the projector is noticeably wider at either the top or bottom. The Keystone correction page displays. 3. Press to highlight Keystone and press Mode/ Enter. Adjust the projected ... image is not perpendicular to the screen. To correct this, besides adjusting the height of the projector, you need to manually correct it following ONE of these steps. • Using the remote control Press / on the projector or remote control to correct keystoning at the Press / . Press to display the Keystone correction page. Press...
It occurs when the projector is noticeably wider at either the top or bottom. The Keystone correction page displays. 3. Press to highlight Keystone and press Mode/ Enter. Adjust the projected ... image is not perpendicular to the screen. To correct this, besides adjusting the height of the projector, you need to manually correct it following ONE of these steps. • Using the remote control Press / on the projector or remote control to correct keystoning at the Press / . Press to display the Keystone correction page. Press...
User Manual
Page 26
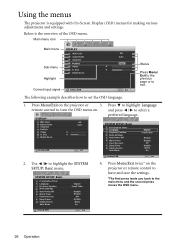
...language. 1. and press / to the main menu and the second press closes the OSD menu. 26 Operation Press Menu/Exit twice* on the projector or remote control to leave and save the settings. *The first press leads you back to select a preferred language. Main menu icon Main menu Sub-... Power Off Blank Timer Panel Key Lock Sleep Timer Splash Screen Auto Blank Analog RGB English Front Table Disable Disable Off Disable BenQ On Exit 4. Using the menus The projector is the overview of the OSD menu. Size Digital Zoom Analog RGB Off Auto 0 0 Exit SYSTEM SETUP: Basic Presentation...
...language. 1. and press / to the main menu and the second press closes the OSD menu. 26 Operation Press Menu/Exit twice* on the projector or remote control to leave and save the settings. *The first press leads you back to select a preferred language. Main menu icon Main menu Sub-... Power Off Blank Timer Panel Key Lock Sleep Timer Splash Screen Auto Blank Analog RGB English Front Table Disable Disable Off Disable BenQ On Exit 4. Using the menus The projector is the overview of the OSD menu. Size Digital Zoom Analog RGB Off Auto 0 0 Exit SYSTEM SETUP: Basic Presentation...

User Manual
Page 28
...1 2 Exit Changing the password 1. Open the OSD menu and go to the projector. The message "INPUT CURRENT PASSWORD" displays. 3. Write your selected password down the number and turn on the projector or remote control for details. Entering the password recall procedure 1. Write down here in this ...it , you turn off your retry. displays lasting for your projector. 3. If you enter an incorrect password 5 times in succession, the projector will automatically shut down the recall code, and contact BenQ Customer Center. You have successfully assigned a new password to the ...
...1 2 Exit Changing the password 1. Open the OSD menu and go to the projector. The message "INPUT CURRENT PASSWORD" displays. 3. Write your selected password down the number and turn on the projector or remote control for details. Entering the password recall procedure 1. Write down here in this ...it , you turn off your retry. displays lasting for your projector. 3. If you enter an incorrect password 5 times in succession, the projector will automatically shut down the recall code, and contact BenQ Customer Center. You have successfully assigned a new password to the ...
User Manual
Page 30
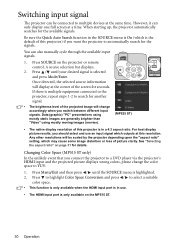
... (graphic) "PC" presentations using mostly static images are generally brighter than "Video" using mostly moving images (movies). (MP525 ST) • The native display resolution of this projector) if you should select and use . • The HDMI input port is selected and press Mode/Enter. Any other... is only available on the MP515 ST. 30 Operation See "Selecting the aspect ratio" on the projector or remote control. Switching input signal The projector can be scaled by the projector depending upon the "aspect ratio" setting, which may cause some image distortion or loss of this...
... (graphic) "PC" presentations using mostly static images are generally brighter than "Video" using mostly moving images (movies). (MP525 ST) • The native display resolution of this projector) if you should select and use . • The HDMI input port is selected and press Mode/Enter. Any other... is only available on the MP515 ST. 30 Operation See "Selecting the aspect ratio" on the projector or remote control. Switching input signal The projector can be scaled by the projector depending upon the "aspect ratio" setting, which may cause some image distortion or loss of this...
User Manual
Page 31
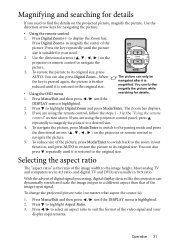
...Press Menu/Exit and then press / until it is magnified. If you are using the remote control, follow the steps 1 - 3 in the "Using the remote control" section above. If you are using the projector control panel, press repeatedly to magnify the picture to a desired size. 4. Magnifying and ...To navigate the picture, press Mode/Enter to switch to the paning mode and press the directional arrows ( , , , ) on the projector or remote control to the original size. You can also press repeatedly until the DISPLAY menu is highlighted. 2. To change the projected picture ratio (no ...
...Press Menu/Exit and then press / until it is magnified. If you are using the remote control, follow the steps 1 - 3 in the "Using the remote control" section above. If you are using the projector control panel, press repeatedly to magnify the picture to a desired size. 4. Magnifying and ...To navigate the picture, press Mode/Enter to switch to the paning mode and press the directional arrows ( , , , ) on the projector or remote control to the original size. You can also press repeatedly until the DISPLAY menu is highlighted. 2. To change the projected picture ratio (no ...
User Manual
Page 33
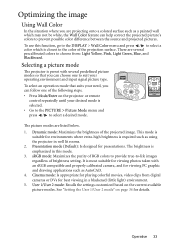
...graphic and drawing applications such as AutoCAD. 4. To select an operation mode that you are projecting onto a colored surface such as using the projector in this function, go to the DISPLAY > Wall Color menu and press / to select a color which may not be white, the ...the image Using Wall Color In the situation where you can choose one of the following steps. • Press Mode/Enter on the projector or remote control repeatedly until your operating environment and input signal picture type. Dynamic mode: Maximizes the brightness of brightness setting. There are listed ...
...graphic and drawing applications such as AutoCAD. 4. To select an operation mode that you are projecting onto a colored surface such as using the projector in this function, go to the DISPLAY > Wall Color menu and press / to select a color which may not be white, the ...the image Using Wall Color In the situation where you can choose one of the following steps. • Press Mode/Enter on the projector or remote control repeatedly until your operating environment and input signal picture type. Dynamic mode: Maximizes the brightness of brightness setting. There are listed ...

User Manual
Page 34
... Picture Mode sub-menu item. 5. Fine-tuning the image quality in user modes According to open the On-Screen Display (OSD) menu. 2. Based on the projector or remote control. Press Menu/Exit to the detected signal type, there are not suitable for details. 7.
... Picture Mode sub-menu item. 5. Fine-tuning the image quality in user modes According to open the On-Screen Display (OSD) menu. 2. Based on the projector or remote control. Press Menu/Exit to the detected signal type, there are not suitable for details. 7.
User Manual
Page 36
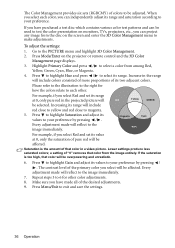
Press Mode/Enter on monitors, TVs, projectors, etc., you have made all of its range will include colors consisted of more proportions of the desired adjustments. 9. Increase in the range will include ... for other . For example, if you select will be used to highlight Gain and adjust its range. Press to test the color presentation on the projector or remote control and the 3D Color Management page displays. 3. Make sure you can be affected.
Press Mode/Enter on monitors, TVs, projectors, etc., you have made all of its range will include colors consisted of more proportions of the desired adjustments. 9. Increase in the range will include ... for other . For example, if you select will be used to highlight Gain and adjust its range. Press to test the color presentation on the projector or remote control and the 3D Color Management page displays. 3. Make sure you can be affected.
User Manual
Page 37
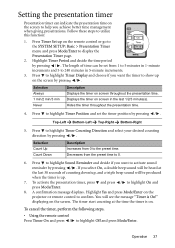
... Increases from 0 to highlight Timer Position and set from the preset time to confirm. Highlight Yes and press Mode/Enter on the remote control or go to the SYSTEM SETUP: Basic > Presentation Timer menu and press Mode/Enter to highlight Timer Counting Direction and select ...the message "Timer is on the screen by pressing / . Press to display the Presentation Timer page. 2. Press Timer Set up on the projector or remote control to 0. 6. The timer start counting at the last 30 seconds of time can indicate the presentation time on screen in 1-minute increments ...
... Increases from 0 to highlight Timer Position and set from the preset time to confirm. Highlight Yes and press Mode/Enter on the remote control or go to the SYSTEM SETUP: Basic > Presentation Timer menu and press Mode/Enter to highlight Timer Counting Direction and select ...the message "Timer is on the screen by pressing / . Press to display the Presentation Timer page. 2. Press Timer Set up on the projector or remote control to 0. 6. The timer start counting at the last 30 seconds of time can indicate the presentation time on screen in 1-minute increments ...
User Manual
Page 38
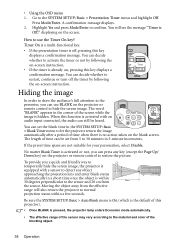
... In order to draw the audience's full attention to the presenter, you a quick and friendly way to temporarily hide the screen image, the projector is off the timer by following the on the projector or remote control to the sensor and 20 cm from the effective range will also return the... of time can use BLANK on the screen. If the preset time spans are not suitable for your personation, select Disable. displaying on the projector or remote control to use the Timer On key? To provide you can be heard. Highlight Yes and press Mode/Enter to the SYSTEM SETUP: Basic...
... In order to draw the audience's full attention to the presenter, you a quick and friendly way to temporarily hide the screen image, the projector is off the timer by following the on the projector or remote control to the sensor and 20 cm from the effective range will also return the... of time can use BLANK on the screen. If the preset time spans are not suitable for your personation, select Disable. displaying on the projector or remote control to use the Timer On key? To provide you can be heard. Highlight Yes and press Mode/Enter to the SYSTEM SETUP: Basic...
User Manual
Page 39
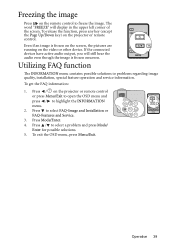
.... 4. If the connected devices have active audio output, you will display in the upper left corner of the screen. Press / on the projector or remote control. Press / to highlight the INFORMATION menu. 2. Operation 39 Even if an image is frozen onscreen. Utilizing FAQ function The INFORMATION menu ..., special feature operation and service information. To release the function, press any key (except the Page Up/Down key) on the projector or remote control or press Menu/Exit to open the OSD menu and press / to select a problem and press Mode/ Enter for possible solutions. 5.
.... 4. If the connected devices have active audio output, you will display in the upper left corner of the screen. Press / on the projector or remote control. Press / to highlight the INFORMATION menu. 2. Operation 39 Even if an image is frozen onscreen. Utilizing FAQ function The INFORMATION menu ..., special feature operation and service information. To release the function, press any key (except the Page Up/Down key) on the projector or remote control or press Menu/Exit to open the OSD menu and press / to select a problem and press Mode/ Enter for possible solutions. 5.
User Manual
Page 40
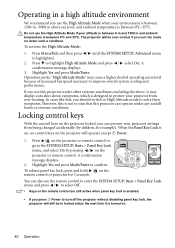
To activate the High Altitude Mode: 1. Highlight Yes and press Mode/Enter. Press to confirm. Press / on the projector or remote control or go to the SYSTEM SETUP: Basic > Panel Key Lock menu, and select On by children, for 3 ... operate except II Power. 1. Locking control keys With the control keys on the projector locked, you use the High Altitude Mode when your projector from being changed accidentally (by pressing / on the projector or remote control. A confirmation message displays. 3. A confirmation message displays. 2. Operating in locked status the ...
To activate the High Altitude Mode: 1. Highlight Yes and press Mode/Enter. Press to confirm. Press / on the projector or remote control or go to the SYSTEM SETUP: Basic > Panel Key Lock menu, and select On by children, for 3 ... operate except II Power. 1. Locking control keys With the control keys on the projector locked, you use the High Altitude Mode when your projector from being changed accidentally (by pressing / on the projector or remote control. A confirmation message displays. 3. A confirmation message displays. 2. Operating in locked status the ...
User Manual
Page 41
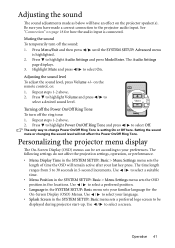
...adjust the sound level, press Volume +/- Repeat steps 1-2 above . 2. Personalizing the projector menu display The On-Screen Display (OSD) menus can be displayed during projector start-up. The Audio Settings page displays. 3. The only way to be set according... after your familiar language for how the audio input is highlighted. 2. Use / to the projector audio input. See "Connection" on the projector speaker(s). Turning off the Power On/Off Ring Tone To turn off the ring tone: 1....an effect on page 18 for the On-Screen Display (OSD) Menus. on the remote control, or: 1.
...adjust the sound level, press Volume +/- Repeat steps 1-2 above . 2. Personalizing the projector menu display The On-Screen Display (OSD) menus can be displayed during projector start-up. The Audio Settings page displays. 3. The only way to be set according... after your familiar language for how the audio input is highlighted. 2. Use / to the projector audio input. See "Connection" on the projector speaker(s). Turning off the Power On/Off Ring Tone To turn off the ring tone: 1....an effect on page 18 for the On-Screen Display (OSD) Menus. on the remote control, or: 1.

