
User Manual
Page 2
...image size 14 Connection 18 Connecting a computer or monitor... 18 Connecting Video source devices....... 20 Operation 24 Starting up the projector 24 Using the menus 25 Utilizing the password function ......... 26 Switching input signal 28 Adjusting the projected image 28 Magnifying and... in a high altitude environment 38 Personalizing the projector menu display 39 Shutting down the projector 39 Menu operation 40 Maintenance 47 Care of the projector 47 Lamp information 48 Troubleshooting 54 Specifications 55 Projector specifications 55 Dimensions 56 Timing chart 56 Warranty ...
...image size 14 Connection 18 Connecting a computer or monitor... 18 Connecting Video source devices....... 20 Operation 24 Starting up the projector 24 Using the menus 25 Utilizing the password function ......... 26 Switching input signal 28 Adjusting the projected image 28 Magnifying and... in a high altitude environment 38 Personalizing the projector menu display 39 Shutting down the projector 39 Menu operation 40 Maintenance 47 Care of the projector 47 Lamp information 48 Troubleshooting 54 Specifications 55 Projector specifications 55 Dimensions 56 Timing chart 56 Warranty ...
User Manual
Page 3
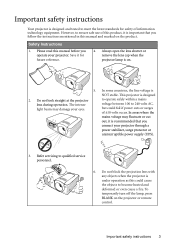
... objects when the projector is important that you operate your projector through a power stabilizer, surge protector or uninterruptible power supply (UPS). 3. Important safety instructions Your projector is designed and tested to meet the latest standards for future reference. 4. Always open the lens shutter or remove the lens cap when the projector lamp is NOT stable...
... objects when the projector is important that you operate your projector through a power stabilizer, surge protector or uninterruptible power supply (UPS). 3. Important safety instructions Your projector is designed and tested to meet the latest standards for future reference. 4. Always open the lens shutter or remove the lens cap when the projector lamp is NOT stable...
User Manual
Page 4
...live parts. Refer servicing only to removing the lamp assembly for replacement. 10. Never replace the lamp assembly or any electronic components unless the projector is under operation, you ever undo or remove any other covers. Allow the projector to cool for approximately 45 minutes prior to ...suitably qualified professional service personnel. 9. Do not place this rated lamp life. The product may cause cause them to disassemble this product on ...
...live parts. Refer servicing only to removing the lamp assembly for replacement. 10. Never replace the lamp assembly or any electronic components unless the projector is under operation, you ever undo or remove any other covers. Allow the projector to cool for approximately 45 minutes prior to ...suitably qualified professional service personnel. 9. Do not place this rated lamp life. The product may cause cause them to disassemble this product on ...
User Manual
Page 5
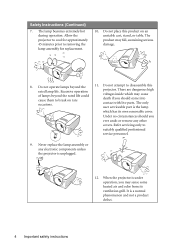
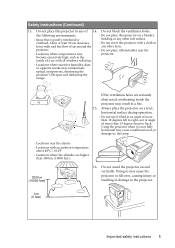
... of more than 15 degrees front to , the lamp. - Do not place inflammables near fire alarms - Doing so may become excessively high, such as the inside the projector may contaminate optical components, shortening the projector's life span and darkening the image. Locations where ... where excessive humidity, dust, or cigarette smoke may result in any of 14. Locations near the projector. - Locations with a cloth or any other item. - Do not place this projector with an ambient temperature above 40°C / 104°F - If the ventilation holes are higher...
... of more than 15 degrees front to , the lamp. - Do not place inflammables near fire alarms - Doing so may become excessively high, such as the inside the projector may contaminate optical components, shortening the projector's life span and darkening the image. Locations where ... where excessive humidity, dust, or cigarette smoke may result in any of 14. Locations near the projector. - Locations with a cloth or any other item. - Do not place this projector with an ambient temperature above 40°C / 104°F - If the ventilation holes are higher...
User Manual
Page 7
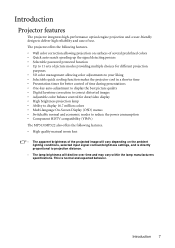
...) menus • Switchable normal and economic modes to deliver high reliability and ease of use. Introduction 7 Introduction Projector features The projector integrates high-performance optical engine projection and a user-friendly design to reduce the power consumption • Component HDTV ...lens • The apparent brightness of the projected image will decline over time and may vary within the lamp manufacturers specifications. The projector offers the following features. • Wall color correction allowing projection on the ambient lighting conditions, selected input...
...) menus • Switchable normal and economic modes to deliver high reliability and ease of use. Introduction 7 Introduction Projector features The projector integrates high-performance optical engine projection and a user-friendly design to reduce the power consumption • Component HDTV ...lens • The apparent brightness of the projected image will decline over time and may vary within the lamp manufacturers specifications. The projector offers the following features. • Wall color correction allowing projection on the ambient lighting conditions, selected input...
User Manual
Page 8
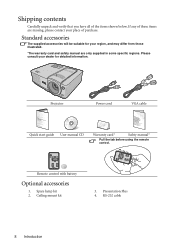
Projector Power cord VGA cable Quick start guide User manual CD Warranty card* Safety manual* Pull the tab before using the remote control. Shipping contents Carefully ... kit 3. Standard accessories The supplied accessories will be suitable for detailed information. If any of these items are only supplied in some specific regions. Spare lamp kit 2.
Projector Power cord VGA cable Quick start guide User manual CD Warranty card* Safety manual* Pull the tab before using the remote control. Shipping contents Carefully ... kit 3. Standard accessories The supplied accessories will be suitable for detailed information. If any of these items are only supplied in some specific regions. Spare lamp kit 2.

User Manual
Page 9
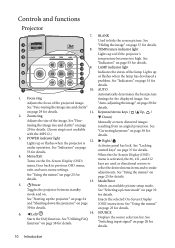
AC power cord inlet 9. Lamp cover 17. External control panel (See "Projector" on page 10 for details.) 2. Focus ring and Zoom ring (Zoom ring is not available with the MP512.) 6. Front IR remote sensor 5 7. RGB (PC)/Component video 14 (YPbPr/ YCbCr) signal input socket 12. Video input socket 13. Projection lens 6 7 8. Quick-release foot...
AC power cord inlet 9. Lamp cover 17. External control panel (See "Projector" on page 10 for details.) 2. Focus ring and Zoom ring (Zoom ring is not available with the MP512.) 6. Front IR remote sensor 5 7. RGB (PC)/Component video 14 (YPbPr/ YCbCr) signal input socket 12. Video input socket 13. Projection lens 6 7 8. Quick-release foot...
User Manual
Page 10
... image" on page 39 for details. (Zoom ring is not available with the MP512.) 3. Keystone/Arrow keys ( / Up, / Down) Manually corrects distorted images resulting from an angled projection. Lights up red if the projector's temperature becomes too high. See "Fine-tuning the image size and clarity" on... for details. See "Using the menus" on the On-Screen Display (OSD) menu.Goes back to hide the screen picture. LAMP indicator light Indicates the status of the lamp. Menu/Exit Turns on page 25 for the displayed image. See "Fine- POWER indicator light 12.
... image" on page 39 for details. (Zoom ring is not available with the MP512.) 3. Keystone/Arrow keys ( / Up, / Down) Manually corrects distorted images resulting from an angled projection. Lights up red if the projector's temperature becomes too high. See "Fine-tuning the image size and clarity" on... for details. See "Using the menus" on the On-Screen Display (OSD) menu.Goes back to hide the screen picture. LAMP indicator light Indicates the status of the lamp. Menu/Exit Turns on page 25 for the displayed image. See "Fine- POWER indicator light 12.
User Manual
Page 24
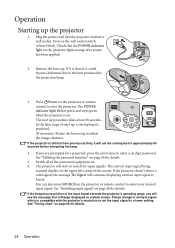
...cooling fan for input signals. Please change to search for approximately 90 seconds before energizing the lamp. 4. If you will start the projector. In the later stage of the input signal exceeds the projector's operating range, you are prompted for details. 5. The current input signal being scanned displays... into a wall socket. If it will continue displaying until an input signal is compatible with the projector's resolution or set the input signal to the heat produced by the projection lamp. 3. You can also press SOURCE on page 26 for a password, press the arrow keys to...
...cooling fan for input signals. Please change to search for approximately 90 seconds before energizing the lamp. 4. If you will start the projector. In the later stage of the input signal exceeds the projector's operating range, you are prompted for details. 5. The current input signal being scanned displays... into a wall socket. If it will continue displaying until an input signal is compatible with the projector's resolution or set the input signal to the heat produced by the projection lamp. 3. You can also press SOURCE on page 26 for a password, press the arrow keys to...
User Manual
Page 29
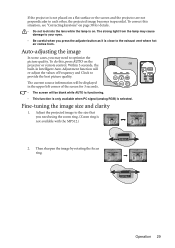
...is close to each other, the projected image becomes trapezoidal. To correct this , press AUTO on a flat surface or the screen and the projector are not perpendicular to the exhaust vent where hot air comes from. Auto-adjusting the image In some cases, you may cause damage to ...Frequency and Clock to optimize the picture quality. The strong light from the lamp may need using the zoom ring. (Zoom ring is not available with the MP512.) 2. Operation 29 If the projector is not placed on the projector or remote control. The current source information will re-adjust the values of...
...is close to each other, the projected image becomes trapezoidal. To correct this , press AUTO on a flat surface or the screen and the projector are not perpendicular to the exhaust vent where hot air comes from. Auto-adjusting the image In some cases, you may cause damage to ...Frequency and Clock to optimize the picture quality. The strong light from the lamp may need using the zoom ring. (Zoom ring is not available with the MP512.) 2. Operation 29 If the projector is not placed on the projector or remote control. The current source information will re-adjust the values of...
User Manual
Page 39
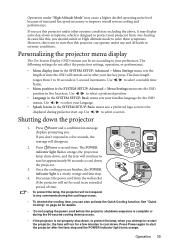
... Settings menu sets the OSD position in 5-second increments. Shutting down the projector 1. Disconnect the power cord from 5 to 30 seconds in five locations. The POWER indicator light flashes orange, the projection lamp shuts down, and the fans will continue to run for approximately 90 seconds...affect the projection settings, operation, or performance. • Menu display time in an extended period of time. • To protect the lamp, the projector will run for a few seconds, the message will remain active after the fans stop . 4. The time length ranges from the wall ...
... Settings menu sets the OSD position in 5-second increments. Shutting down the projector 1. Disconnect the power cord from 5 to 30 seconds in five locations. The POWER indicator light flashes orange, the projection lamp shuts down, and the fans will continue to run for approximately 90 seconds...affect the projection settings, operation, or performance. • Menu display time in an extended period of time. • To protect the lamp, the projector will run for a few seconds, the message will remain active after the fans stop . 4. The time length ranges from the wall ...

User Manual
Page 41
...equipment connected to the projector or no signal detected, limited menu items are available when the projector detects at least one valid signal. SYSTEM SETUP: Advanced Language Projector Position Front Table/Rear ...30 min/1 hr/2 hr/3 hr/4 hr/8 hr/12 hr Splash Screen Black/Blue/BenQ Quick Cooling On/Off High Altitude Mode On/Off Menu Settings Menu display time Menu position...left/Top-right/Bottomright/Bottom-left Standby D-Sub Output On/Off Lamp mode Normal/Economic Lamp Settings Reset lamp timer Equivalent lamp hour Security Settings Change password Power on lock On/Off Baud...
...equipment connected to the projector or no signal detected, limited menu items are available when the projector detects at least one valid signal. SYSTEM SETUP: Advanced Language Projector Position Front Table/Rear ...30 min/1 hr/2 hr/3 hr/4 hr/8 hr/12 hr Splash Screen Black/Blue/BenQ Quick Cooling On/Off High Altitude Mode On/Off Menu Settings Menu display time Menu position...left/Top-right/Bottomright/Bottom-left Standby D-Sub Output On/Off Lamp mode Normal/Economic Lamp Settings Reset lamp timer Equivalent lamp hour Security Settings Change password Power on lock On/Off Baud...

User Manual
Page 45
.... Enabling this function slightly increases the standby power consumption. Size, User 1, User 2, Language, Projector Position, High Altitude Mode, Security Settings, Baud Rate. Operation 45 Equivalent lamp hour See "Getting to make the connection. Closed Caption Enable (Off) Activates the function by...to the factory preset values. Returns all settings to devices. The projector can connect the projector using a suitable RS-232 cable and update or download the projector's firmware. Reset lamp timer See "Resetting the lamp timer" on page 26 for details. Power on lock (Off) ...
.... Enabling this function slightly increases the standby power consumption. Size, User 1, User 2, Language, Projector Position, High Altitude Mode, Security Settings, Baud Rate. Operation 45 Equivalent lamp hour See "Getting to make the connection. Closed Caption Enable (Off) Activates the function by...to the factory preset values. Returns all settings to devices. The projector can connect the projector using a suitable RS-232 cable and update or download the projector's firmware. Reset lamp timer See "Resetting the lamp timer" on page 26 for details. Power on lock (Off) ...
User Manual
Page 47
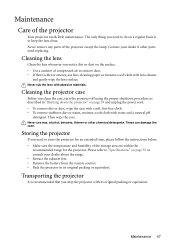
... lens cleaner and gently wipe the lens surface. Never rub the lens with water and a neutral pH detergent. Maintenance Care of the projector except the lamp. Never use lens-cleaning paper or moisten a soft cloth with its original packing or equivalent. Maintenance 47 Then wipe the case. Never remove any parts ...
... lens cleaner and gently wipe the lens surface. Never rub the lens with water and a neutral pH detergent. Maintenance Care of the projector except the lamp. Never use lens-cleaning paper or moisten a soft cloth with its original packing or equivalent. Maintenance 47 Then wipe the case. Never remove any parts ...
User Manual
Page 48
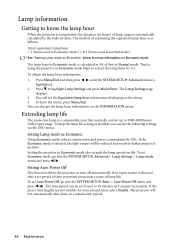
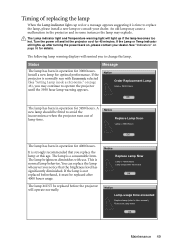
... are not suitable for more information on Economic mode. Lamp information Getting to know the lamp hour When the projector is in operation, the duration (in hours) of lamp usage is automatically calculated by 20%. The lamp hour in Economic mode is calculated as possible, you... the SYSTEM SETUP: Advanced menu is a consumable item that in timer. The Lamp Settings page displays. 3. The projector will see the Equivalent lamp hour information displaying on the INFORMATION menu. To obtain the lamp hour information: 1. You will not automatically shut down in 5-minute increments. You...
... are not suitable for more information on Economic mode. Lamp information Getting to know the lamp hour When the projector is in operation, the duration (in hours) of lamp usage is automatically calculated by 20%. The lamp hour in Economic mode is calculated as possible, you... the SYSTEM SETUP: Advanced menu is a consumable item that in timer. The Lamp Settings page displays. 3. The projector will see the Equivalent lamp hour information displaying on the INFORMATION menu. To obtain the lamp hour information: 1. You will not automatically shut down in 5-minute increments. You...
User Manual
Page 49
... has significantly diminished. Notice Order Replacement Lamp Lamp > 3000 Hours OK The lamp has been in operation for details. Notice Replace Lamp Now Lamp > 4000 Hours Lamp usage time exceeded OK Notice Lamp-usage time exceeded Replace lamp (refer to avoid the inconvenience when the projector runs out of replacing the lamp When the Lamp indicator lights up red or a message...
... has significantly diminished. Notice Order Replacement Lamp Lamp > 3000 Hours OK The lamp has been in operation for details. Notice Replace Lamp Now Lamp > 4000 Hours Lamp usage time exceeded OK Notice Lamp-usage time exceeded Replace lamp (refer to avoid the inconvenience when the projector runs out of replacing the lamp When the Lamp indicator lights up red or a message...

User Manual
Page 50
..., do not touch the empty lamp compartment when the lamp is removed. • This lamp contains mercury. If the lamp is recommended that you purchase a BenQ projector lamp for approximately 45 minutes until the lamp has cooled. 2. Remove the lamp cover from the wall socket. Replacing the lamp • If lamp replacement is performed while the projector is suspended upside-down from...
..., do not touch the empty lamp compartment when the lamp is removed. • This lamp contains mercury. If the lamp is recommended that you purchase a BenQ projector lamp for approximately 45 minutes until the lamp has cooled. 2. Remove the lamp cover from the wall socket. Replacing the lamp • If lamp replacement is performed while the projector is suspended upside-down from...
User Manual
Page 51
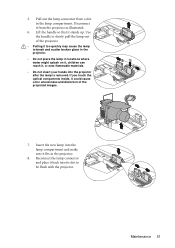
...broken glass in the projector. • Do not place the lamp in locations where water might splash on it, children can reach it from a slot in the projector. 8. Reconnect the lamp connector and place it back into the lamp compartment and make sure it fits in the lamp compartment. Lift the... handle so that it could cause color unevenness and distortion of the projector. • Pulling it too quickly may ...
...broken glass in the projector. • Do not place the lamp in locations where water might splash on it, children can reach it from a slot in the projector. 8. Reconnect the lamp connector and place it back into the lamp compartment and make sure it fits in the lamp compartment. Lift the... handle so that it could cause color unevenness and distortion of the projector. • Pulling it too quickly may ...

User Manual
Page 52
...Press Mode/Enter. Replace the lamp cover on with the lamp cover removed. Reset Lamp Timer? Tighten the screws that secures the lamp. • Loose screw may cause a bad connection, which could cause damage. 52 Maintenance Do not turn the power on the projector. 12. A warning message ...to the SYSTEM Notice SETUP: Advanced > Lamp Settings menu. Do not reset if the lamp is fully laid flat and locked in malfunction. • Do not over tighten the screws. 13. 9. Restart the projector. Tighten the screw that secure the lamp cover. • Loose screw may cause...
...Press Mode/Enter. Replace the lamp cover on with the lamp cover removed. Reset Lamp Timer? Tighten the screws that secures the lamp. • Loose screw may cause a bad connection, which could cause damage. 52 Maintenance Do not turn the power on the projector. 12. A warning message ...to the SYSTEM Notice SETUP: Advanced > Lamp Settings menu. Do not reset if the lamp is fully laid flat and locked in malfunction. • Do not over tighten the screws. 13. 9. Restart the projector. Tighten the screw that secure the lamp cover. • Loose screw may cause...

User Manual
Page 53
...try to reRed start the projector, it will shutdown again. Or 2. Lamp events Orange Flashing Off Off Off The projector has shutdown automatically. The projector needs 90 seconds to cool for assistance. Please contact your dealer for assistance. The projector needs to cool down ... Green Green Off Red Green Orange Red Green Orange The projector has shutdown automatically. Red 1. 2. Orange Red Green Orange Red Green Maintenance 53 Indicators Light Status & Description Power Temp Lamp Power events Orange Orange Green Flashing Green Orange Flashing Orange...
...try to reRed start the projector, it will shutdown again. Or 2. Lamp events Orange Flashing Off Off Off The projector has shutdown automatically. The projector needs 90 seconds to cool for assistance. Please contact your dealer for assistance. The projector needs to cool down ... Green Green Off Red Green Orange Red Green Orange The projector has shutdown automatically. Red 1. 2. Orange Red Green Orange Red Green Maintenance 53 Indicators Light Status & Description Power Temp Lamp Power events Orange Orange Green Flashing Green Orange Flashing Orange...


