User Manual
Page 2
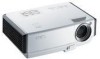
... view 11 Front/upper side 11 Rear side ...11 Under view ...11 Controls and functions 12 Projector ...12 Remote control 14 Positioning your projector 16 Choosing a location 16 Obtaining a preferred projected image size 17 How to determine the position of the projector for a given screen size ... 18 How to determine the recommended screen size for a given...
... view 11 Front/upper side 11 Rear side ...11 Under view ...11 Controls and functions 12 Projector ...12 Remote control 14 Positioning your projector 16 Choosing a location 16 Obtaining a preferred projected image size 17 How to determine the position of the projector for a given screen size ... 18 How to determine the recommended screen size for a given...

User Manual
Page 5
...eyes. Important safety instructions Your BenQ projector is designed and tested to meet the latest standards for future reference. 4. Always open the lens shutter or remove the lens cap when the projector lamp is on the projector or remote control. However, to qualified service personnel.... 6. Please read this manual and marked on the product. NOT stable. Do not look straight at the projector lens during operation. Important safety instructions ...
...eyes. Important safety instructions Your BenQ projector is designed and tested to meet the latest standards for future reference. 4. Always open the lens shutter or remove the lens cap when the projector lamp is on the projector or remote control. However, to qualified service personnel.... 6. Please read this manual and marked on the product. NOT stable. Do not look straight at the projector lens during operation. Important safety instructions ...

User Manual
Page 10
...items are only supplied in some specific regions. Presentation Plus 4. Carefully unpack and verify that you have all of purchase. Projector Remote control with the cables required for detailed information. Standard accessories The supplied accessories will be suitable for your dealer for connection to ...a PC or video equipment. Optional accessories 1. Shipping contents The projector is shipped with batteries Quick start guide User manual CD User manual Warranty Card* Safety manual* Power cord VGA cable *The...
...items are only supplied in some specific regions. Presentation Plus 4. Carefully unpack and verify that you have all of purchase. Projector Remote control with the cables required for detailed information. Standard accessories The supplied accessories will be suitable for your dealer for connection to ...a PC or video equipment. Optional accessories 1. Shipping contents The projector is shipped with batteries Quick start guide User manual CD User manual Warranty Card* Safety manual* Power cord VGA cable *The...

User Manual
Page 12
.... Lamp indicator light Indicates the status of the projected image. Lights up " on page 24 and "Shutting down the projector" on page 38 for temperature becomes too high. Turns on the projector or remote control. See details. Keystone/Arrow buttons ( / Up, / details. MENU/Exit Adjusts the focus of the lamp. MODE/Enter 3. See "Start...
.... Lamp indicator light Indicates the status of the projected image. Lights up " on page 24 and "Shutting down the projector" on page 38 for temperature becomes too high. Turns on the projector or remote control. See details. Keystone/Arrow buttons ( / Up, / details. MENU/Exit Adjusts the focus of the lamp. MODE/Enter 3. See "Start...
User Manual
Page 14
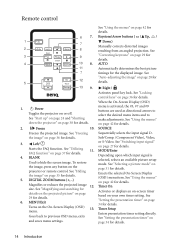
...press any button on page 28 for details. Left/ Starts the FAQ function. See "Auto-adjusting the image" on the projector or remote control. Timer On Activates or displays an on-screen timer based on page 36 for details. Timer Setup Enters presentation timer setting ...directly. Freezes the projected image. See "Locking control keys" on your own timer setting. See "Utilizing 11. AUTO Automatically determines...
...press any button on page 28 for details. Left/ Starts the FAQ function. See "Auto-adjusting the image" on the projector or remote control. Timer On Activates or displays an on-screen timer based on page 36 for details. Timer Setup Enters presentation timer setting ...directly. Freezes the projected image. See "Locking control keys" on your own timer setting. See "Utilizing 11. AUTO Automatically determines...

User Manual
Page 15
... you will not be held at an angle within 30 degrees perpendicular to the projector's IR remote control sensors to the remote control from the front rear Approx. 15° Approx. 15° Replacing the remote control battery 1. The remote control must be using the remote control for a long time, remove the battery to prevent damage to function correctly. Please follow...
... you will not be held at an angle within 30 degrees perpendicular to the projector's IR remote control sensors to the remote control from the front rear Approx. 15° Approx. 15° Replacing the remote control battery 1. The remote control must be using the remote control for a long time, remove the battery to prevent damage to function correctly. Please follow...

User Manual
Page 24
...will see the message 'Out of the connected equipment on the projector or remote control to start up, a startup logo is found. See "Timing chart" on page 27 for details. 24 Operation Plug the power cord into the projector and into a wall socket. Use only the power cable as...start to select your region. Operation Start up procedure takes about 30 seconds. Turn on page 25 for details. 5. If the projector is on the projector or remote control to search for approximately 120 seconds before energizing the lamp. 4. See "Utilizing the power-on lock function" on the wall ...
...will see the message 'Out of the connected equipment on the projector or remote control to start up, a startup logo is found. See "Timing chart" on page 27 for details. 24 Operation Plug the power cord into the projector and into a wall socket. Use only the power cable as...start to select your region. Operation Start up procedure takes about 30 seconds. Turn on page 25 for details. 5. If the projector is on the projector or remote control to search for approximately 120 seconds before energizing the lamp. 4. See "Utilizing the power-on lock function" on the wall ...

User Manual
Page 26
...lasting for three seconds, and the message 'INPUT CURRENT PASSWORD' displays for your selected password down here in this manual in the row of the projector. ii. You may be required to provide proof of purchase documentation to verify that it . RECALL PASSWORD Please write down the number and turn ... the change or try another message 'INPUT NEW PASSWORD' displays. Enter a new password. Entering the password recall procedure Press and hold AUTO on the projector or remote control for 3 seconds. Seek help from the local BenQ service center to enter the new password next time the...
...lasting for three seconds, and the message 'INPUT CURRENT PASSWORD' displays for your selected password down here in this manual in the row of the projector. ii. You may be required to provide proof of purchase documentation to verify that it . RECALL PASSWORD Please write down the number and turn ... the change or try another message 'INPUT NEW PASSWORD' displays. Enter a new password. Entering the password recall procedure Press and hold AUTO on the projector or remote control for 3 seconds. Seek help from the local BenQ service center to enter the new password next time the...

User Manual
Page 27
... projector or remote control to select On or Off. 4. Please decide if you can press the button again to activate the quick auto search function by performing the following steps. 1. iii. The projector will display at the same time. Video iv. A source selection bar displays. Press Up or Down until your desired signal is SVGA...
... projector or remote control to select On or Off. 4. Please decide if you can press the button again to activate the quick auto search function by performing the following steps. 1. iii. The projector will display at the same time. Video iv. A source selection bar displays. Press Up or Down until your desired signal is SVGA...
User Manual
Page 28
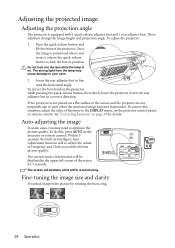
... want it, release the quick-release button to lock the foot in position. The screen will be blank while AUTO is on the projector or remote control. Do not look into the lens while the lamp is functioning. Screw the rear adjuster foot to fine tune the horizontal angle. The... current source information will be displayed in the upper left corner of Keystone in the DISPLAY menu, on the projector control panel, or remote control. Fine-tuning the image size and clarity If needed, sharpen the picture by rotating the focus ring. 28 Operation These adjusters change ...
... want it, release the quick-release button to lock the foot in position. The screen will be blank while AUTO is on the projector or remote control. Do not look into the lens while the lamp is functioning. Screw the rear adjuster foot to fine tune the horizontal angle. The... current source information will be displayed in the upper left corner of Keystone in the DISPLAY menu, on the projector control panel, or remote control. Fine-tuning the image size and clarity If needed, sharpen the picture by rotating the focus ring. 28 Operation These adjusters change ...

User Manual
Page 29
...adjusting the height of the image. 2. Go to navigate the picture. To restore the picture to display the Zoom bar. Press or on the projector or remote control. ZOOM + to its original size, press AUTO. The center of these steps. 1. Press the key repeatedly until it following ONE of the...when the key is suitable for details on the projected picture, magnify the picture. Press to correct keystoning at the top of the projector or remote control to find the details on the projected picture If you need to manually correct it is not perpendicular to the screen. For example...
...adjusting the height of the image. 2. Go to navigate the picture. To restore the picture to display the Zoom bar. Press or on the projector or remote control. ZOOM + to its original size, press AUTO. The center of these steps. 1. Press the key repeatedly until it following ONE of the...when the key is suitable for details on the projected picture, magnify the picture. Press to correct keystoning at the top of the projector or remote control to find the details on the projected picture If you need to manually correct it is not perpendicular to the screen. For example...

User Manual
Page 30
... 16:9 ratio. See "Connecting a Component Video source device" on page 22 and "Obtaining a preferred projected image size" on the projector or remote control to full screen. • Using the OSD menu 1. Press MODE/Enter to make most suitable for the incoming image which are usually... in its horizontal width. This is suitable for 4:3 images like this projector, and digital TV and DVDs are already in a 16:9 aspect, like ...
... 16:9 ratio. See "Connecting a Component Video source device" on page 22 and "Obtaining a preferred projected image size" on the projector or remote control to full screen. • Using the OSD menu 1. Press MODE/Enter to make most suitable for the incoming image which are usually... in its horizontal width. This is suitable for 4:3 images like this projector, and digital TV and DVDs are already in a 16:9 aspect, like ...
User Manual
Page 31
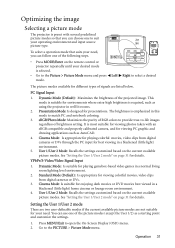
...one to select a desired The picture modes available for different types of the following steps. • Press MODE/Enter on the remote control or projector repeatedly until your desired mode is selected. • Go to match PC and notebook coloring. 3. The brightness is emphasized in ...enjoying dark movies or DVD movies best viewed in a blackened (little light) environment. 5. Optimizing the image Selecting a picture mode The projector is preset with an sRGB compatible and properly calibrated camera, and for viewing PC graphic and drawing applications such as AutoCAD. 4. Presentation ...
...one to select a desired The picture modes available for different types of the following steps. • Press MODE/Enter on the remote control or projector repeatedly until your desired mode is selected. • Go to match PC and notebook coloring. 3. The brightness is emphasized in ...enjoying dark movies or DVD movies best viewed in a blackened (little light) environment. 5. Optimizing the image Selecting a picture mode The projector is preset with an sRGB compatible and properly calibrated camera, and for viewing PC graphic and drawing applications such as AutoCAD. 4. Presentation ...

User Manual
Page 32
...select User 1 Mode or User 2 Mode. 4. You can help correct the projected picture's color to these functions based on the projector or remote control. Use this to set the peak white level after you are several precalibrated colors to suit your need. 6. Selecting a color ...temperature Adjust the values by pressing Left/ Right on the projector or remote control. There are projecting onto a colored surface such as black and that is selected. Adjusting brightness Adjust the values by pressing Left/...
...select User 1 Mode or User 2 Mode. 4. You can help correct the projected picture's color to these functions based on the projector or remote control. Use this to set the peak white level after you are several precalibrated colors to suit your need. 6. Selecting a color ...temperature Adjust the values by pressing Left/ Right on the projector or remote control. There are projecting onto a colored surface such as black and that is selected. Adjusting brightness Adjust the values by pressing Left/...

User Manual
Page 34
... by pressing Left/ Right. If you want the timer to show up on , the timer will restart whenever the Timer Period is already on the remote control or go to the SYSTEM SETUP: Basic > Presentation Timer menu and press MODE/ Enter to display the Presentation Timer page. See "Picture menu" on screen...
... by pressing Left/ Right. If you want the timer to show up on , the timer will restart whenever the Timer Period is already on the remote control or go to the SYSTEM SETUP: Basic > Presentation Timer menu and press MODE/ Enter to display the Presentation Timer page. See "Picture menu" on screen...

User Manual
Page 35
...you can decide whether to hide the screen image. The word 'BLANK' appears at the time the timer is already on the projector or remote control to activate the timer or not by pressing Left/ Right. Press Down to highlight Timer Position and set the timer position by ... Right to confirm. 2. The timer start counting at the lower right corner of the screen while the image is Off " displaying on the projector or remote control to confirm. 7. Press MODE/Enter to select On. Press any button on the screen. Press MODE/Enter to restore the image. 4. Press...
...you can decide whether to hide the screen image. The word 'BLANK' appears at the time the timer is already on the projector or remote control to activate the timer or not by pressing Left/ Right. Press Down to highlight Timer Position and set the timer position by ... Right to confirm. 2. The timer start counting at the lower right corner of the screen while the image is Off " displaying on the projector or remote control to confirm. 7. Press MODE/Enter to select On. Press any button on the screen. Press MODE/Enter to restore the image. 4. Press...

User Manual
Page 36
... except POWER. 1. The word 'FREEZE' will still hear the audio even though the image is turned on the projector or remote control or go to freeze the image. Locking control keys To prevent unauthorized changes in the settings or accidental button pushes, panel key lock can be in locked status ... BLANK is enabled. • If you will display in the upper left corner of time when there is frozen on the projector or remote control. 2. Select Yes to let the projector return the image automatically after a period of the screen. You can set the blank time in the SYSTEM SETUP: Basic >...
... except POWER. 1. The word 'FREEZE' will still hear the audio even though the image is turned on the projector or remote control or go to freeze the image. Locking control keys To prevent unauthorized changes in the settings or accidental button pushes, panel key lock can be in locked status ... BLANK is enabled. • If you will display in the upper left corner of time when there is frozen on the projector or remote control. 2. Select Yes to let the projector return the image automatically after a period of the screen. You can set the blank time in the SYSTEM SETUP: Basic >...

User Manual
Page 37
... such condition. To enter the Information menu, press Left/ on the projector or remote control. Utilizing FAQ function The Information menu contains possible solutions to problems encountered by pressing Left/ Right on the remote control. 2. Press MODE/Enter. 4. A confirmation message displays. Highlight Yes ...Altitude Mode, select On by users regarding image quality, installation, special feature operation and service information. 1. In cases like this projector under any and all harsh or extreme conditions. Do not use this , you use the High Altitude Mode if your altitude ...
... such condition. To enter the Information menu, press Left/ on the projector or remote control. Utilizing FAQ function The Information menu contains possible solutions to problems encountered by pressing Left/ Right on the remote control. 2. Press MODE/Enter. 4. A confirmation message displays. Highlight Yes ...Altitude Mode, select On by users regarding image quality, installation, special feature operation and service information. 1. In cases like this projector under any and all harsh or extreme conditions. Do not use this , you use the High Altitude Mode if your altitude ...

User Manual
Page 42
... Auto ENTER 50 Status 50 Press MENU/Exit to the previous page or to turn the OSD menu on. Press MODE/Enter to display remote control to MENU Exit exit. KEYSTONE DISPLAY Wall Color Aspect Ratio Keystone Position Phase H. Size Digital Zoom Disable Auto 50 50 S-VIDEO MENU Exit.../ Right to leave and save the settings. Press Up/ Down to a rectangular or square one. 6. See "System setup: Basic menu" on the projector or remote control to select the DISPLAY menu. 3. The following example describes the adjustment of the OSD menu. Based on the image shape displayed on the...
... Auto ENTER 50 Status 50 Press MENU/Exit to the previous page or to turn the OSD menu on. Press MODE/Enter to display remote control to MENU Exit exit. KEYSTONE DISPLAY Wall Color Aspect Ratio Keystone Position Phase H. Size Digital Zoom Disable Auto 50 50 S-VIDEO MENU Exit.../ Right to leave and save the settings. Press Up/ Down to a rectangular or square one. 6. See "System setup: Basic menu" on the projector or remote control to select the DISPLAY menu. 3. The following example describes the adjustment of the OSD menu. Based on the image shape displayed on the...

User Manual
Page 43
... for details on the projected picture" on page 29 for searching the details of the projected image by using the directional arrow buttons on the projector or remote control. See "Correcting keystone" on page 29 for details. Position (0) Phase (depends on page 30 for details. Digital Zoom (100%) After the image is not...
... for details on the projected picture" on page 29 for searching the details of the projected image by using the directional arrow buttons on the projector or remote control. See "Correcting keystone" on page 29 for details. Position (0) Phase (depends on page 30 for details. Digital Zoom (100%) After the image is not...

