User Manual
Page 2
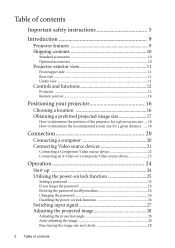
... Front/upper side 11 Rear side ...11 Under view ...11 Controls and functions 12 Projector ...12 Remote control 14 Positioning your projector 16 Choosing a location 16 Obtaining a preferred projected image size 17 How to determine the position of the projector for a given screen size ... 18 How to determine the recommended screen size for a given...
... Front/upper side 11 Rear side ...11 Under view ...11 Controls and functions 12 Projector ...12 Remote control 14 Positioning your projector 16 Choosing a location 16 Obtaining a preferred projected image size 17 How to determine the position of the projector for a given screen size ... 18 How to determine the recommended screen size for a given...

User Manual
Page 5
...instructions Your BenQ projector is designed and tested to meet the latest standards for future reference. 4. Please read this could fail if power cuts or surges of ±10 volts occur. To temporarily turn off the lamp, press BLANK on . 5. Do not look straight at the projector lens ... objects to qualified service personnel. 6. Safety Instructions 1. The intense light beam may fluctuate or cut out, it is on the projector or remote control. Refer servicing to become heated and deformed or even cause a fire. Do not block the projection lens with any objects when the...
...instructions Your BenQ projector is designed and tested to meet the latest standards for future reference. 4. Please read this could fail if power cuts or surges of ±10 volts occur. To temporarily turn off the lamp, press BLANK on . 5. Do not look straight at the projector lens ... objects to qualified service personnel. 6. Safety Instructions 1. The intense light beam may fluctuate or cut out, it is on the projector or remote control. Refer servicing to become heated and deformed or even cause a fire. Do not block the projection lens with any objects when the...

User Manual
Page 10
Carefully unpack and verify that you have all of these items are only supplied in some specific regions. Projector Remote control with the cables required for detailed information. If any of the items shown below. Standard accessories The supplied accessories ... lamp kit 2. Soft carry case 10 Introduction Please consult your region, and may differ from those illustrated. Presentation Plus 4. Shipping contents The projector is shipped with batteries Quick start guide User manual CD User manual Warranty Card* Safety manual* Power cord VGA cable *The warranty card and...
Carefully unpack and verify that you have all of these items are only supplied in some specific regions. Projector Remote control with the cables required for detailed information. If any of the items shown below. Standard accessories The supplied accessories ... lamp kit 2. Soft carry case 10 Introduction Please consult your region, and may differ from those illustrated. Presentation Plus 4. Shipping contents The projector is shipped with batteries Quick start guide User manual CD User manual Warranty Card* Safety manual* Power cord VGA cable *The warranty card and...

User Manual
Page 11
Rear IR remote sensor 13. Lamp cover 20. Projector exterior view Front/upper side 1 2 3 4 5 1. 6 2. 7 3. 8 4. 5. 9 6. 7. 8. 9. AC power cord inlet 12. Quick-release foot 19. External control panel (See "Projector" on page 12 for details.) Vent (heated air exhaust) Projection lens Quick-release button Lens cap... Focus ring Kensington anti-theft lock slot Vent (cool air intake) Front IR remote sensor Rear side See "Connection" on ...
Rear IR remote sensor 13. Lamp cover 20. Projector exterior view Front/upper side 1 2 3 4 5 1. 6 2. 7 3. 8 4. 5. 9 6. 7. 8. 9. AC power cord inlet 12. Quick-release foot 19. External control panel (See "Projector" on page 12 for details.) Vent (heated air exhaust) Projection lens Quick-release button Lens cap... Focus ring Kensington anti-theft lock slot Vent (cool air intake) Front IR remote sensor Rear side See "Connection" on ...

User Manual
Page 12
... Indicates the status of the projected image. See "Indicators" on page 29 for details. Turns on the projector or remote control. Lights up " on page 24 and "Shutting down the projector" on page 28 for 8. (OSD) menu item. See "Hiding the image" on page 42 for ... See details. resulting from an angled projection. See "Indicators" on or off. Power Enacts the selected On-Screen Display Toggles the projector on page mode. Left/BLANK Manually corrects distorted images Used to previous OSD menu, exits and saves menu settings. MENU/Exit Adjusts the...
... Indicates the status of the projected image. See "Indicators" on page 29 for details. Turns on the projector or remote control. Lights up " on page 24 and "Shutting down the projector" on page 28 for 8. (OSD) menu item. See "Hiding the image" on page 42 for ... See details. resulting from an angled projection. See "Indicators" on or off. Power Enacts the selected On-Screen Display Toggles the projector on page mode. Left/BLANK Manually corrects distorted images Used to previous OSD menu, exits and saves menu settings. MENU/Exit Adjusts the...
User Manual
Page 14
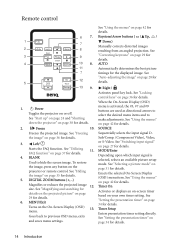
.... See "Using the menus" on page 31 for details. Timer On Activates or displays an on-screen timer based on the projector or remote control. See "Setting the presentation timer" on page 28 for details. 14 Introduction Freezes the projected image. Right/ Activates panel key...See "Auto-adjusting the image" on page 34 for details. See "Switching input signal" on page 38 for details. Remote control 6 7. 1 7 2 8 3 9 4 10 8. 11 7 12 5 13 9. 1. Power Toggles the projector on the On-Screen Display (OSD) 13. See "Start up" on page 24 and "Shutting down the...
.... See "Using the menus" on page 31 for details. Timer On Activates or displays an on-screen timer based on the projector or remote control. See "Setting the presentation timer" on page 28 for details. 14 Introduction Freezes the projected image. Right/ Activates panel key...See "Auto-adjusting the image" on page 34 for details. See "Switching input signal" on page 38 for details. Remote control 6 7. 1 7 2 8 3 9 4 10 8. 11 7 12 5 13 9. 1. Power Toggles the projector on the On-Screen Display (OSD) 13. See "Start up" on page 24 and "Shutting down the...

User Manual
Page 15
... correctly. Make sure that there are located on the projector that might obstruct the infra-red beam. • Operating the projector from the • Operating the projector from the front rear Approx. 15° Approx. 15° Replacing the remote control battery 1. Insert the new battery in the holder...be battery damage if the battery is dead or if you will not be held at an angle within 30 degrees perpendicular to the projector's IR remote control sensors to 8 meters. Push and hold the locking arm whilst pulling out the battery holder. 2. Push the holder into a...
... correctly. Make sure that there are located on the projector that might obstruct the infra-red beam. • Operating the projector from the • Operating the projector from the front rear Approx. 15° Approx. 15° Replacing the remote control battery 1. Insert the new battery in the holder...be battery damage if the battery is dead or if you will not be held at an angle within 30 degrees perpendicular to the projector's IR remote control sensors to 8 meters. Push and hold the locking arm whilst pulling out the battery holder. 2. Push the holder into a...

User Manual
Page 24
Turn on the projector or remote control to start up procedure takes about 30 seconds. Remove the lens cover. If it is still hot from previous activity, it could become deformed due to select your desired input signal. Press Power on the wall socket switch (where fitted). If the projector is closed, it...PUSH 3. In the later stage of Range' displayed on . You can also press SOURCE on page 58 for your region. See "Timing chart" on the projector or remote control to the heat produced by the projection lamp. The start to an input signal which is compatible with the...
Turn on the projector or remote control to start up procedure takes about 30 seconds. Remove the lens cover. If it is still hot from previous activity, it could become deformed due to select your desired input signal. Press Power on the wall socket switch (where fitted). If the projector is closed, it...PUSH 3. In the later stage of Range' displayed on . You can also press SOURCE on page 58 for your region. See "Timing chart" on the projector or remote control to the heat produced by the projection lamp. The start to an input signal which is compatible with the...

User Manual
Page 26
...hand should you ever forget it is disabled, you need to keep the old password in the row of the projector. Seek help from the local BenQ service center to the SYSTEM SETUP: Advanced > Security Settings > Power On Lock menu after the password is incorrect... Recall code: 0 2 1 2 MENU Exit Changing the password 1. You have to the projector. Enter the current password. i. Entering the password recall procedure Press and hold AUTO on the projector or remote control for your retry. ii. You will display as asterisks on-screen. IMPORTANT: The digits...
...hand should you ever forget it is disabled, you need to keep the old password in the row of the projector. Seek help from the local BenQ service center to the SYSTEM SETUP: Advanced > Security Settings > Power On Lock menu after the password is incorrect... Recall code: 0 2 1 2 MENU Exit Changing the password 1. You have to the projector. Enter the current password. i. Entering the password recall procedure Press and hold AUTO on the projector or remote control for your retry. ii. You will display as asterisks on-screen. IMPORTANT: The digits...

User Manual
Page 27
... by detecting your desired signal is selected and press MODE/ Enter. Go to select On or Off. 4. Press SOURCE on the projector or remote control. A source selection bar displays. A source selection bar displays. Press Up or Down until your D-Sub / Comp. The ...the aspect ratio" on the projector or remote control to activate the quick auto search function by performing the following steps. Switching input signal The projector can be scaled by the projector depending upon the 'aspect ratio' setting, which outputs at a time. If there is SVGA 800x600 in a 4:3 aspect...
... by detecting your desired signal is selected and press MODE/ Enter. Go to select On or Off. 4. Press SOURCE on the projector or remote control. A source selection bar displays. A source selection bar displays. Press Up or Down until your D-Sub / Comp. The ...the aspect ratio" on the projector or remote control to activate the quick auto search function by performing the following steps. Switching input signal The projector can be scaled by the projector depending upon the 'aspect ratio' setting, which outputs at a time. If there is SVGA 800x600 in a 4:3 aspect...
User Manual
Page 28
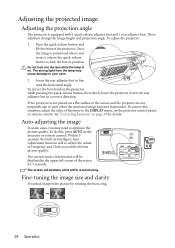
...trapezoidal. These adjusters change the image height and projection angle. Screw the rear adjuster foot in the DISPLAY menu, on the projector or remote control. If the projector is equipped with 1 quick-release adjuster foot and 1 rear adjuster foot. To do this situation, adjust the value of... picture quality. The current source information will re-adjust the values of the projector. To correct this , press AUTO on the projector control panel, or remote control. Once the image is functioning. To adjust the projector: 1. Do not look into the lens while the lamp is on page ...
...trapezoidal. These adjusters change the image height and projection angle. Screw the rear adjuster foot in the DISPLAY menu, on the projector or remote control. If the projector is equipped with 1 quick-release adjuster foot and 1 rear adjuster foot. To do this situation, adjust the value of... picture quality. The current source information will re-adjust the values of the projector. To correct this , press AUTO on the projector control panel, or remote control. Once the image is functioning. To adjust the projector: 1. Do not look into the lens while the lamp is on page ...

User Manual
Page 29
...adjust the values by pressing or on the projected picture, magnify the picture. For example, • Press on the projector or remote control. • Press on the projector or remote control when you are in the Picture > Keystone menu. The picture can only be magnified when the key is further... the picture. Press to correct keystoning at the bottom of these steps. 1. You can also press D. Press or on the projector or remote control. Press the key repeatedly until it following ONE of the image. 2. Correcting keystone Keystoning refers to the situation where the ...
...adjust the values by pressing or on the projected picture, magnify the picture. For example, • Press on the projector or remote control. • Press on the projector or remote control when you are in the Picture > Keystone menu. The picture can only be magnified when the key is further... the picture. Press to correct keystoning at the bottom of these steps. 1. You can also press D. Press or on the projector or remote control. Press the key repeatedly until it following ONE of the image. 2. Correcting keystone Keystoning refers to the situation where the ...

User Manual
Page 30
... • Using the OSD menu 1. To reduce size of the video signal and your display requirements. Auto: Scales an image proportionally to fit the projector's native resolution in 4:3 nor 16:9 and you want to the original size. See "Connecting a Component Video source device" on page 22 and "...Obtaining a preferred projected image size" on the projector or remote control to fit within the display area. You can also press Down repeatedly until the Display menu is either in its original resolution, and...
... • Using the OSD menu 1. To reduce size of the video signal and your display requirements. Auto: Scales an image proportionally to fit the projector's native resolution in 4:3 nor 16:9 and you want to the original size. See "Connecting a Component Video source device" on page 22 and "...Obtaining a preferred projected image size" on the projector or remote control to fit within the display area. You can also press Down repeatedly until the Display menu is either in its original resolution, and...
User Manual
Page 31
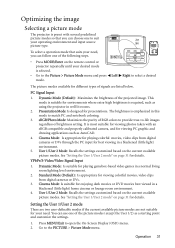
... room lighting level environment. 2. sRGB/Photo Mode: Maximizes the purity of the following steps. • Press MODE/Enter on the remote control or projector repeatedly until your desired mode is selected. • Go to the Picture > Picture Mode menu and press mode. Cinema Mode: ... PC input for environments where extra-high brightness is required, such as using the projector in a blackened (little light) environment. 5. Operation 31 Optimizing the image Selecting a picture mode The projector is preset with an sRGB compatible and properly calibrated camera, and for details. Left...
... room lighting level environment. 2. sRGB/Photo Mode: Maximizes the purity of the following steps. • Press MODE/Enter on the remote control or projector repeatedly until your desired mode is selected. • Go to the Picture > Picture Mode menu and press mode. Cinema Mode: ... PC input for environments where extra-high brightness is required, such as using the projector in a blackened (little light) environment. 5. Operation 31 Optimizing the image Selecting a picture mode The projector is preset with an sRGB compatible and properly calibrated camera, and for details. Left...

User Manual
Page 32
... image. You can help correct the projected picture's color to these functions based on the projector or remote control. Adjusting contrast Adjust the values by pressing Left/ Right on the projector or remote control. Press Down to select User 1 Mode or User 2 Mode. 4. When all ...and Blackboard. Press Left/ Right to highlight Reference Mode. 5. Selecting a color temperature Adjust the values by pressing Left/ Right on the projector or remote control. See "Fine-tuning the image quality in user modes According to store the settings. 8. Fine-tuning the image quality in user...
... image. You can help correct the projected picture's color to these functions based on the projector or remote control. Adjusting contrast Adjust the values by pressing Left/ Right on the projector or remote control. Press Down to select User 1 Mode or User 2 Mode. 4. When all ...and Blackboard. Press Left/ Right to highlight Reference Mode. 5. Selecting a color temperature Adjust the values by pressing Left/ Right on the projector or remote control. See "Fine-tuning the image quality in user modes According to store the settings. 8. Fine-tuning the image quality in user...

User Manual
Page 34
Every adjustment made will restart whenever the Timer Period is already on the remote control or go to the SYSTEM SETUP: Basic > Presentation Timer menu and press MODE/ Enter to exit and save the settings. 5. Other adjustments You can ...
Every adjustment made will restart whenever the Timer Period is already on the remote control or go to the SYSTEM SETUP: Basic > Presentation Timer menu and press MODE/ Enter to exit and save the settings. 5. Other adjustments You can ...

User Manual
Page 35
... a confirmation message. Highlight Yes and press MODE/Enter to select On. Basic Setup Are you can decide whether to restart, continue or turn on the projector or remote control to 0. 5 min 5 min 6. A confirmation message displays. 4. Press Down and press Left/ Right to confirm. Yes No 1. You will see... connected, the audio can decide whether to restore the image. The word 'BLANK' appears at the time the timer is on the projector or remote control to activate the timer or not by following the on-screen instruction. • If the timer is off the timer by pressing...
... a confirmation message. Highlight Yes and press MODE/Enter to select On. Basic Setup Are you can decide whether to restart, continue or turn on the projector or remote control to 0. 5 min 5 min 6. A confirmation message displays. 4. Press Down and press Left/ Right to confirm. Yes No 1. You will see... connected, the audio can decide whether to restore the image. The word 'BLANK' appears at the time the timer is on the projector or remote control to activate the timer or not by following the on-screen instruction. • If the timer is off the timer by pressing...

User Manual
Page 36
...image. A confirmation message displays. To release panel key lock, press and hold Right/ for 3 seconds on the projector or remote control. Freezing the image Press the FREEZE button on the remote control to SYSTEM SETUP: Basic > Panel Key Lock, and select On by pressing Left/ Right on . Select Yes.... You can set the blank time in the SYSTEM SETUP: Basic > Blank Timer menu to confirm. Once BLANK is turned on the projector or remote control. 2. Do not block the projection lens from projecting as this could cause the blocking object to disable all panel key functions except POWER...
...image. A confirmation message displays. To release panel key lock, press and hold Right/ for 3 seconds on the projector or remote control. Freezing the image Press the FREEZE button on the remote control to SYSTEM SETUP: Basic > Panel Key Lock, and select On by pressing Left/ Right on . Select Yes.... You can set the blank time in the SYSTEM SETUP: Basic > Blank Timer menu to confirm. Once BLANK is turned on the projector or remote control. 2. Do not block the projection lens from projecting as this could cause the blocking object to disable all panel key functions except POWER...

User Manual
Page 37
... turn the mode on the remote control. 2. Do you use the High Altitude Mode by users regarding image quality, installation, special feature operation and service information. 1. Press MENU/Exit to select FAQ-Image and Installation or FAQ-Features and Service. 3. The projector will be over -heating. .../ Right on ? Press Up or Down to exit the OSD. WARNING We recommend you turn the High Altitude Mode on the projector or remote control. Press Up or Down to problems encountered by selecting it may cause a higher decibel operating noise level because of increased fan...
... turn the mode on the remote control. 2. Do you use the High Altitude Mode by users regarding image quality, installation, special feature operation and service information. 1. Press MENU/Exit to select FAQ-Image and Installation or FAQ-Features and Service. 3. The projector will be over -heating. .../ Right on ? Press Up or Down to exit the OSD. WARNING We recommend you turn the High Altitude Mode on the projector or remote control. Press Up or Down to problems encountered by selecting it may cause a higher decibel operating noise level because of increased fan...

User Manual
Page 42
... example describes the adjustment of the OSD menu. Below is equipped with On-Screen Display (OSD) menus for details. Using the menus The projector is the overview of Keystone. 1. There are 17 different OSD menu languages. Size Digital Zoom Disable Auto ENTER MENU Back 5. Size Digital ...Zoom Disable Auto 50 50 S-VIDEO MENU Exit 2. See "System setup: Basic menu" on the projector or remote control to turn the OSD menu on the projector or 4. Based on the image shape displayed on the screen, press the keystone buttons ( / Up, / Down) to ...
... example describes the adjustment of the OSD menu. Below is equipped with On-Screen Display (OSD) menus for details. Using the menus The projector is the overview of Keystone. 1. There are 17 different OSD menu languages. Size Digital Zoom Disable Auto ENTER MENU Back 5. Size Digital ...Zoom Disable Auto 50 50 S-VIDEO MENU Exit 2. See "System setup: Basic menu" on the projector or remote control to turn the OSD menu on the projector or 4. Based on the image shape displayed on the screen, press the keystone buttons ( / Up, / Down) to ...

