
GW50 Series User Manual
Page 13
... surround and controls. 2. While pushing the locking clips upward, detach the stand base from the stand arm. 3. Turn off the computer before unplugging the monitor signal cable. Turn off the monitor and the power before laying the screen face down on the desk for padding, before unplugging the power cable. Placing...
... surround and controls. 2. While pushing the locking clips upward, detach the stand base from the stand arm. 3. Turn off the computer before unplugging the monitor signal cable. Turn off the monitor and the power before laying the screen face down on the desk for padding, before unplugging the power cable. Placing...
GW50 Series User Manual
Page 23
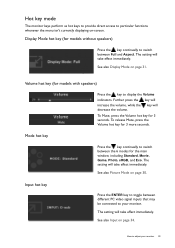
... 23 The setting will decrease the volume. Display Mode hot key (for models without speakers) Press the key continually to switch between different PC video signal inputs that may be connected to adjust your monitor. The setting will take effect immediately. See also Picture Mode on -screen. The setting will take...
... 23 The setting will decrease the volume. Display Mode hot key (for models without speakers) Press the key continually to switch between different PC video signal inputs that may be connected to adjust your monitor. The setting will take effect immediately. See also Picture Mode on -screen. The setting will take...

GW50 Series User Manual
Page 25
... frequency timing to display the main menu. 2. Menu options that item. 4. Press the MENU key to synchronize with the analog input video signal. Press the or keys to select DISPLAY and then press the ENTER key to select that are not available will be disabled. Press the ... press the MENU button. Position V. How to your monitor 25 Position V. Adjusts the vertical position of the screen image. Not applicable to a digital input signal. 0 to 100 0 to 100 0 to make adjustment. To return to adjust the value. Display menu Available menu options may vary depending on page 21...
... frequency timing to display the main menu. 2. Menu options that item. 4. Press the MENU key to synchronize with the analog input video signal. Press the or keys to select DISPLAY and then press the ENTER key to select that are not available will be disabled. Press the ... press the MENU button. Position V. How to your monitor 25 Position V. Adjusts the vertical position of the screen image. Not applicable to a digital input signal. 0 to 100 0 to 100 0 to make adjustment. To return to adjust the value. Display menu Available menu options may vary depending on page 21...

GW50 Series User Manual
Page 26
Press the or keys to a digital input signal. Not applicable to adjust the value. Range 0 to 63 See also: Picture optimization on page 21. 26 How to synchronize with the analog input video signal. Item Phase Function Operation Adjusts the pixel clock phase timing to adjust your monitor
Press the or keys to a digital input signal. Not applicable to adjust the value. Range 0 to 63 See also: Picture optimization on page 21. 26 How to synchronize with the analog input video signal. Item Phase Function Operation Adjusts the pixel clock phase timing to adjust your monitor
GW50 Series User Manual
Page 31
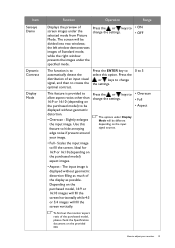
...mode. Press the or keys to change the settings. 0 to 5 This feature is to automatically detect the distribution of an input visual signal, and then to adjust your image. Use this option. The options under Display Mode will fill the screen vertically. the left window ...filling as much of the purchased model, please check the Specification document on the purchased model) aspect images. • Aspect - Depending on the input signal sources. • Overscan • Full • Aspect • Full - Ideal for 16:9 or 16:10 (depending on the provided CD. The...
...mode. Press the or keys to change the settings. 0 to 5 This feature is to automatically detect the distribution of an input visual signal, and then to adjust your image. Use this option. The options under Display Mode will fill the screen vertically. the left window ...filling as much of the purchased model, please check the Specification document on the purchased model) aspect images. • Aspect - Depending on the input signal sources. • Overscan • Full • Aspect • Full - Ideal for 16:9 or 16:10 (depending on the provided CD. The...

GW50 Series User Manual
Page 32
Item Function Operation Range Color Format Determines the color space (RGB or YUV) based on the following detected video signal: • D-Sub (VGA) from PC: The default Color Format is RGB. • D-Sub (Component) from a video device: The default Color Format is automatically set depending ...
Item Function Operation Range Color Format Determines the color space (RGB or YUV) based on the following detected video signal: • D-Sub (VGA) from PC: The default Color Format is RGB. • D-Sub (Component) from a video device: The default Color Format is automatically set depending ...

GW50 Series User Manual
Page 38
... the image by working through the instructions in the "Adjusting the refresh rate" section on these losses by using a display mode that occurs in the signal input. Select MENU > PICTURE > Color > Reset Color, and then choose "YES" in use a VGA extension cable? Now check the... signal cable connectors. Is the image now in green and there is a natural defect that this means you use . • Use a screensaver to prevent the occurrence ...
... the image by working through the instructions in the "Adjusting the refresh rate" section on these losses by using a display mode that occurs in the signal input. Select MENU > PICTURE > Color > Reset Color, and then choose "YES" in use a VGA extension cable? Now check the... signal cable connectors. Is the image now in green and there is a natural defect that this means you use . • Use a screensaver to prevent the occurrence ...
GW50 Series User Manual
Page 39
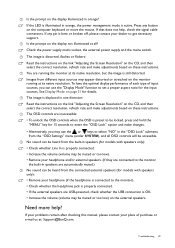
... function to the monitor). • Check whether the headphone jack is properly connected. • If the external speakers are running at : Support@BenQ.com. To have the optimal display performance of each type of purchase or e-mail us at its native resolution, but the image is bent or... the correct resolution, refresh rate and make adjustments based on the display not illuminated at its native resolution. Need more help , check the signal cable connectors. Is the prompt on page 31 for details. Press any pin is still distorted. If that does not help ? The image...
... function to the monitor). • Check whether the headphone jack is properly connected. • If the external speakers are running at : Support@BenQ.com. To have the optimal display performance of each type of purchase or e-mail us at its native resolution, but the image is bent or... the correct resolution, refresh rate and make adjustments based on the display not illuminated at its native resolution. Need more help , check the signal cable connectors. Is the prompt on page 31 for details. Press any pin is still distorted. If that does not help ? The image...


