
User Manual
Page 2
... installed near or over a radiator or heat source, or in a built-in any form or by BenQ Corporation. Please follow these safety instructions for best performance, and long life for servicing. 2 Downloaded from time to time in a retrieval system or translated into this equipment from the AC supply. • The power supply cord serves as opening or removing covers may be used. Care And Cleaning • Cleaning...
... installed near or over a radiator or heat source, or in a built-in any form or by BenQ Corporation. Please follow these safety instructions for best performance, and long life for servicing. 2 Downloaded from time to time in a retrieval system or translated into this equipment from the AC supply. • The power supply cord serves as opening or removing covers may be used. Care And Cleaning • Cleaning...
User Manual
Page 4
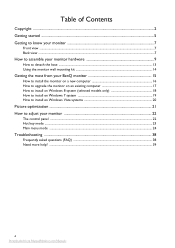
... 16 How to upgrade the monitor on an existing computer 17 How to install on Windows 8 system (selected models only 18 How to install on Windows 7 system 19 How to install on Windows Vista systems 20 Picture optimization ...21 How to adjust your monitor 22 The control panel ...22 Hot key mode ...23 Main menu mode ...24 Troubleshooting ...38 Frequently asked questions (FAQ) ...38 Need more help? ...39 4 Downloaded from ManualMonitor.com...
... 16 How to upgrade the monitor on an existing computer 17 How to install on Windows 8 system (selected models only 18 How to install on Windows 7 system 19 How to install on Windows Vista systems 20 Picture optimization ...21 How to adjust your monitor 22 The control panel ...22 Hot key mode ...23 Main menu mode ...24 Troubleshooting ...38 Frequently asked questions (FAQ) ...38 Need more help? ...39 4 Downloaded from ManualMonitor.com...

User Manual
Page 11
... HDMI ports on the rear of a digital output device. Tighten all finger screws to prevent the plugs from ManualMonitor.com Manuals How to assemble your package and the socket illustrations on the right may vary depending on the same PC. Good quality: D-Sub The video cables included in which both DVI-D cable and D-Sub cable on the product supplied for models with speakers). To Connect the DVI-D Cable Connect...
... HDMI ports on the rear of a digital output device. Tighten all finger screws to prevent the plugs from ManualMonitor.com Manuals How to assemble your package and the socket illustrations on the right may vary depending on the same PC. Good quality: D-Sub The video cables included in which both DVI-D cable and D-Sub cable on the product supplied for models with speakers). To Connect the DVI-D Cable Connect...

User Manual
Page 12
... jacks may vary by pressing the power button on . Check Input and output ports on the rear of the monitor. Do not connect the other end of the power cord into the socket labelled on page 8 for your BenQ monitor on the monitor by model. Turn on page 15 to install the monitor software. Turn on the computer too, and follow the instructions in Getting the most from your...
... jacks may vary by pressing the power button on . Check Input and output ports on the rear of the monitor. Do not connect the other end of the power cord into the socket labelled on page 8 for your BenQ monitor on the monitor by model. Turn on page 15 to install the monitor software. Turn on the computer too, and follow the instructions in Getting the most from your...

User Manual
Page 13
... the monitor surround and controls. 2. If the screen size is 27 inches, follow the illustration on a flat clean padded surface. Please be careful to prevent damage to the hole above the monitor stand arm, and then push the screwdriver against the release button inside the hole. Insert a pointed object such as a screwdriver to the monitor. Turn off the computer before unplugging the power cable...
... the monitor surround and controls. 2. If the screen size is 27 inches, follow the illustration on a flat clean padded surface. Please be careful to prevent damage to the hole above the monitor stand arm, and then push the screwdriver against the release button inside the hole. Insert a pointed object such as a screwdriver to the monitor. Turn off the computer before unplugging the power cable...

User Manual
Page 14
Remove the monitor base. In case you purchased to complete the installation. 1 2 1 2 14 How to support the weight of the monitor. • Turn off the monitor and the power before disconnecting the cables from ManualMonitor.com Manuals Before starting to detach the monitor stand. Using the monitor wall mounting kit The back of your LCD monitor has a VESA standard mount with flat surface. • Ensure that the wall material is 27 inches, follow the illustration on...
Remove the monitor base. In case you purchased to complete the installation. 1 2 1 2 14 How to support the weight of the monitor. • Turn off the monitor and the power before disconnecting the cables from ManualMonitor.com Manuals Before starting to detach the monitor stand. Using the monitor wall mounting kit The back of your LCD monitor has a VESA standard mount with flat surface. • Ensure that the wall material is 27 inches, follow the illustration on...

User Manual
Page 15
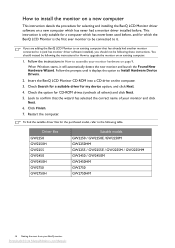
... monitor and installing the software onto a new computer (without existing monitor driver software), or whether you to select a monitor model. At that point, click the Have Disk button, insert the BenQ LCD Monitor CD-ROM and select the appropriate monitor model. Further details and step-by-step instructions for either case however, the very next time you turn on your computer (after connecting the monitor to successfully install the BenQ LCD Monitor driver software...
... monitor and installing the software onto a new computer (without existing monitor driver software), or whether you to select a monitor model. At that point, click the Have Disk button, insert the BenQ LCD Monitor CD-ROM and select the appropriate monitor model. Further details and step-by-step instructions for either case however, the very next time you turn on your computer (after connecting the monitor to successfully install the BenQ LCD Monitor driver software...
User Manual
Page 16
... GW2255 GW2450 GW2450H GW2750 GW2750H Suitable models GW2250 / GW2250E /GW2250M GW2250HM GW2255 / GW2255E / GW2255M / GW2255HM GW2450 / GW2450M GW2450HM GW2750 GW2750HM 16 Getting the most from ManualMonitor.com Manuals This instruction is the first ever monitor to be following these instructions. Check Search for a suitable driver for which has never had another monitor connected to it (and has monitor driver software installed), you are adding the BenQ LCD Monitor...
... GW2255 GW2450 GW2450H GW2750 GW2750H Suitable models GW2250 / GW2250E /GW2250M GW2250HM GW2255 / GW2255E / GW2255M / GW2255HM GW2450 / GW2450M GW2450HM GW2750 GW2750HM 16 Getting the most from ManualMonitor.com Manuals This instruction is the first ever monitor to be following these instructions. Check Search for a suitable driver for which has never had another monitor connected to it (and has monitor driver software installed), you are adding the BenQ LCD Monitor...
User Manual
Page 17
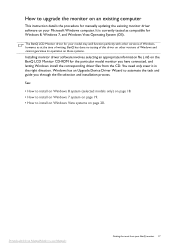
... BenQ LCD Monitor driver for your model may well function perfectly with other versions of Windows, however, as compatible for manually updating the existing monitor driver software on your BenQ monitor 17 See: • How to install on Windows 8 system (selected models only) on page 18. • How to install on Windows 7 system on page 19. • How to upgrade the monitor on an existing computer This instruction details the procedure for Windows 8, Windows...
... BenQ LCD Monitor driver for your model may well function perfectly with other versions of Windows, however, as compatible for manually updating the existing monitor driver software on your BenQ monitor 17 See: • How to install on Windows 8 system (selected models only) on page 18. • How to install on Windows 7 system on page 19. • How to upgrade the monitor on an existing computer This instruction details the procedure for Windows 8, Windows...
User Manual
Page 18
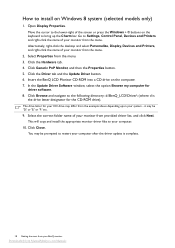
...-click the name of your monitor from the menu. 2. Click the Driver tab and the Update Driver button. 6. Open Display Properties. Insert the BenQ LCD Monitor CD-ROM into a CD drive on Windows 8 system (selected models only) 1. it may be prompted to restart your computer after the driver update is the drive letter designator for the CD-ROM drive). Go to Settings, Control Panel, Devices and Printers and...
...-click the name of your monitor from the menu. 2. Click the Driver tab and the Update Driver button. 6. Open Display Properties. Insert the BenQ LCD Monitor CD-ROM into a CD drive on Windows 8 system (selected models only) 1. it may be prompted to restart your computer after the driver update is the drive letter designator for the CD-ROM drive). Go to Settings, Control Panel, Devices and Printers and...
User Manual
Page 19
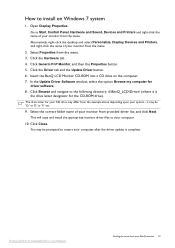
... install on the computer. 7. Select the correct folder name of your monitor from provided driver list, and click Next. How to restart your computer after the driver update is the drive letter designator for the CD-ROM drive). Open Display Properties. Go to Start, Control Panel, Hardware and Sound, Devices and Printers and right-click the name of your monitor from the menu...
... install on the computer. 7. Select the correct folder name of your monitor from provided driver list, and click Next. How to restart your computer after the driver update is the drive letter designator for the CD-ROM drive). Open Display Properties. Go to Start, Control Panel, Hardware and Sound, Devices and Printers and right-click the name of your monitor from the menu...
User Manual
Page 20
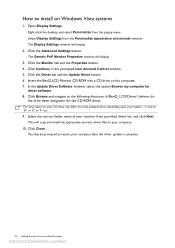
... correct folder name of your system - Open Display Settings. Insert the BenQ LCD Monitor CD-ROM into a CD drive on Windows Vista systems 1. it may be 'D:' or 'E:' or 'F:' etc. 9. Click the Advanced Settings button. Click the Driver tab and the Update Driver button. 6. Select Display Settings from the popup menu. Click the Monitor tab and the Properties button. 4. Click Close. In the Update Driver Software window, select the option Browse my computer...
... correct folder name of your system - Open Display Settings. Insert the BenQ LCD Monitor CD-ROM into a CD drive on Windows Vista systems 1. it may be 'D:' or 'E:' or 'F:' etc. 9. Click the Advanced Settings button. Click the Driver tab and the Update Driver button. 6. Select Display Settings from the popup menu. Click the Monitor tab and the Properties button. 4. Click Close. In the Update Driver Software window, select the option Browse my computer...

User Manual
Page 21
... an analog (D-Sub) input is set to the native resolution of the monitor when you use the AUTO key function. Press the AUTO key to optimize the currently displayed image to enter the menu. 5. When you connect a digital video output using geometry menu items. To assist you in this endeavour, BenQ has provided a screen test image utility which you run auto.exe, a test pattern displays. 2. Run the test program auto.exe from ManualMonitor.com Manuals Picture optimization...
... an analog (D-Sub) input is set to the native resolution of the monitor when you use the AUTO key function. Press the AUTO key to optimize the currently displayed image to enter the menu. 5. When you connect a digital video output using geometry menu items. To assist you in this endeavour, BenQ has provided a screen test image utility which you run auto.exe, a test pattern displays. 2. Run the test program auto.exe from ManualMonitor.com Manuals Picture optimization...

User Manual
Page 22
.... Power: Turns the power on page 23. 22 How to adjust your monitor The control panel For models without speakers): For Up/Increase adjustment. OSD = On Screen Display. The key is the hot key for Display Mode. /Volume key (for models with DVI inputs, this key is the hot key for Volume. 4. /Mode key: For Down/Decrease adjustment. The key is also the hot key for models without speakers 1 2 3 4 5 6 For models with speakers 1 2 3 4 5 6 1. AUTO: Adjusts vertical position, phase, horizontal position and pixel clock...
.... Power: Turns the power on page 23. 22 How to adjust your monitor The control panel For models without speakers): For Up/Increase adjustment. OSD = On Screen Display. The key is the hot key for Display Mode. /Volume key (for models with DVI inputs, this key is the hot key for Volume. 4. /Mode key: For Down/Decrease adjustment. The key is also the hot key for models without speakers 1 2 3 4 5 6 For models with speakers 1 2 3 4 5 6 1. AUTO: Adjusts vertical position, phase, horizontal position and pixel clock...
User Manual
Page 24
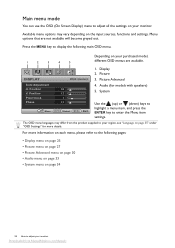
... are available. Position V. Picture Advanced 4. Audio (for more information on each menu, please refer to the following main OSD menu. 1 2 3 4 5 Depending on the input sources, functions and settings. Main menu mode You can use the OSD (On Screen Display) menu to adjust all the settings on page 34 24 How to adjust your monitor Downloaded from the product supplied to enter the Menu item settings. For more details. Position Pixel Clock Phase MODE: Standard 10 12 1 12...
... are available. Position V. Picture Advanced 4. Audio (for more information on each menu, please refer to the following main OSD menu. 1 2 3 4 5 Depending on the input sources, functions and settings. Main menu mode You can use the OSD (On Screen Display) menu to adjust all the settings on page 34 24 How to adjust your monitor Downloaded from the product supplied to enter the Menu item settings. For more details. Position Pixel Clock Phase MODE: Standard 10 12 1 12...

User Manual
Page 25
... you connect a digital video output using a digital (DVI or HDMI) cable to adjust the value. H. Position Pixel Clock When you . Position Pixel Clock Phase Move MODE: Standard 10 12 1 12 ENTER Select MENU Exit 1. Press the or keys to your monitor 25 Downloaded from ManualMonitor.com Manuals How to display the main menu. 2. Press the MENU key to adjust your monitor, the AUTO key and the Auto Adjustment function will become grayed out. Adjusts the vertical position of the screen image...
... you connect a digital video output using a digital (DVI or HDMI) cable to adjust the value. H. Position Pixel Clock When you . Position Pixel Clock Phase Move MODE: Standard 10 12 1 12 ENTER Select MENU Exit 1. Press the or keys to your monitor 25 Downloaded from ManualMonitor.com Manuals How to display the main menu. 2. Press the MENU key to adjust your monitor, the AUTO key and the Auto Adjustment function will become grayed out. Adjusts the vertical position of the screen image...
User Manual
Page 32
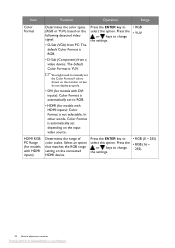
... words, Color Format is automatically set the Color Format if colors shown on the monitor screen do not display properly. • DVI (for models with HDMI inputs): Color Format is not selectable. Press the ENTER key to RGB. • HDMI (for models with HDMI inputs) Determines the range of color scales. Select an option that matches the RGB range setting on the input video source. Press the or keys to change the settings. • RGB (0 ~ 255) • RGB (16...
... words, Color Format is automatically set the Color Format if colors shown on the monitor screen do not display properly. • DVI (for models with HDMI inputs): Color Format is not selectable. Press the ENTER key to RGB. • HDMI (for models with HDMI inputs) Determines the range of color scales. Select an option that matches the RGB range setting on the input video source. Press the or keys to change the settings. • RGB (0 ~ 255) • RGB (16...

User Manual
Page 36
... unlock the OSD controls when the OSD is activated, HDMI port will be locked, press and hold the MENU key for models with the monitor) • Model Name Resets all the monitor settings from being accidentally changed. Item Function Operation Range OSD Lock Prevents all mode, color and geometry settings to the factory default values. Press the or keys to be accessible. Information Reset All Displays the current monitor property settings. • Input • Current Resolution • Optimum Resolution (best with HDMI inputs...
... unlock the OSD controls when the OSD is activated, HDMI port will be locked, press and hold the MENU key for models with the monitor) • Model Name Resets all the monitor settings from being accidentally changed. Item Function Operation Range OSD Lock Prevents all mode, color and geometry settings to the factory default values. Press the or keys to be accessible. Information Reset All Displays the current monitor property settings. • Input • Current Resolution • Optimum Resolution (best with HDMI inputs...
User Manual
Page 38
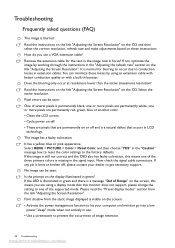
... faulty coloration, this monitor does not support, please change the setting to prevent the occurrence of the supported mode. If not, optimize the image by using a display mode that this means one of several pixels is permanently black, one or more pixels are permanently white, one of image retention. 38 Troubleshooting Downloaded from the link "Adjusting the Screen Resolution". Read the instructions on the link "Adjusting the Screen Resolution" on the link "Adjusting the Screen Resolution". Now check the signal cable connectors. You...
... faulty coloration, this monitor does not support, please change the setting to prevent the occurrence of the supported mode. If not, optimize the image by using a display mode that this means one of several pixels is permanently black, one or more pixels are permanently white, one of image retention. 38 Troubleshooting Downloaded from the link "Adjusting the Screen Resolution". Read the instructions on the link "Adjusting the Screen Resolution" on the link "Adjusting the Screen Resolution". Now check the signal cable connectors. You...
User Manual
Page 39
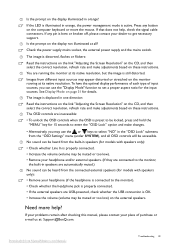
... "MENU" key for 15 seconds to enter the "OSD Lock" option and make adjustments based on the monitor running the monitor at : Support@BenQ.com. See Display Mode on these instructions. Downloaded from different input sources may use the or keys to select "NO" in one direction: Read the instructions on the link "Adjusting the Screen Resolution" on the CD, and then select the correct resolution, refresh rate and make changes. • Alternatively, you can use the "Display Mode...
... "MENU" key for 15 seconds to enter the "OSD Lock" option and make adjustments based on the monitor running the monitor at : Support@BenQ.com. See Display Mode on these instructions. Downloaded from different input sources may use the or keys to select "NO" in one direction: Read the instructions on the link "Adjusting the Screen Resolution" on the CD, and then select the correct resolution, refresh rate and make changes. • Alternatively, you can use the "Display Mode...


